
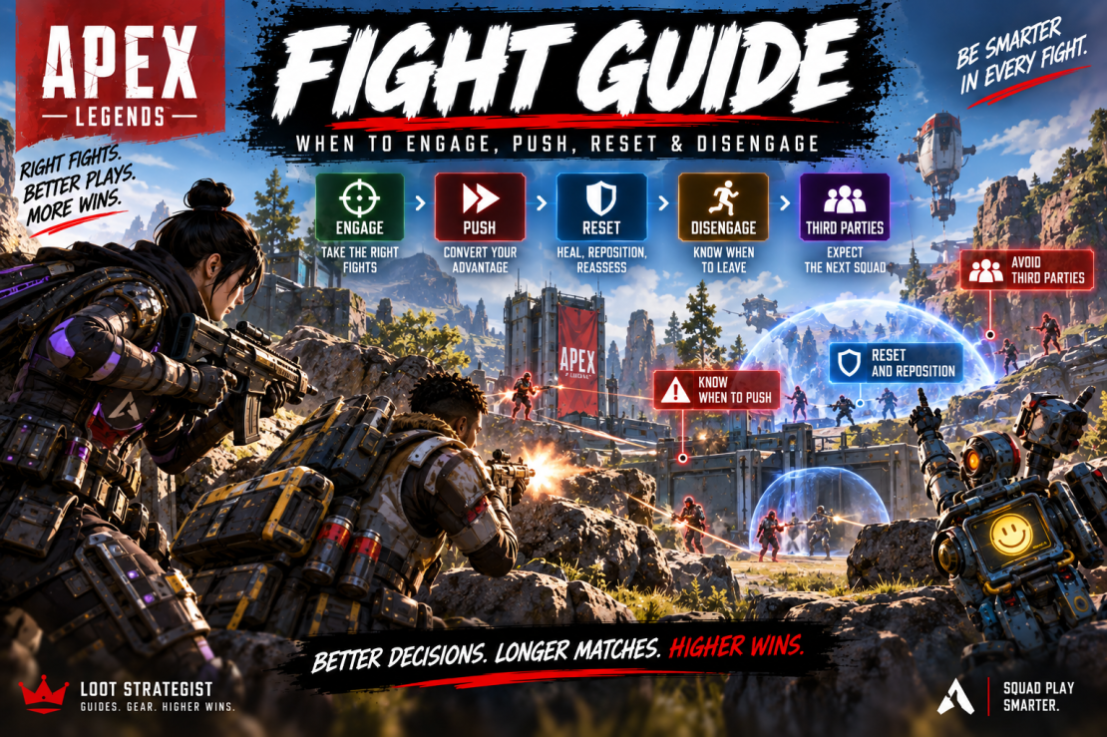
Apex Legends fights are not decided by aim alone.
You can win your gunfights and still lose the match because you started from a bad position, pushed a cracked enemy into their teammates, chased a knock too far, or stayed in a fight long enough for a third squad to arrive.
The harder skill is deciding when a fight is worth taking, when an advantage is real, and when it is time to leave.
That is what this guide is about.
Instead of treating every engagement as a simple question of aim, use this combat loop:
Spot → Assess → Engage → Create an Advantage → Commit or Reset
And remember one distinction throughout the fight:
Damage is not the same thing as an advantage. An advantage is not the same thing as a win.
Your goal is to turn a small opening into something useful without throwing away the position that created it.
The Loot Strategist Fight Framework
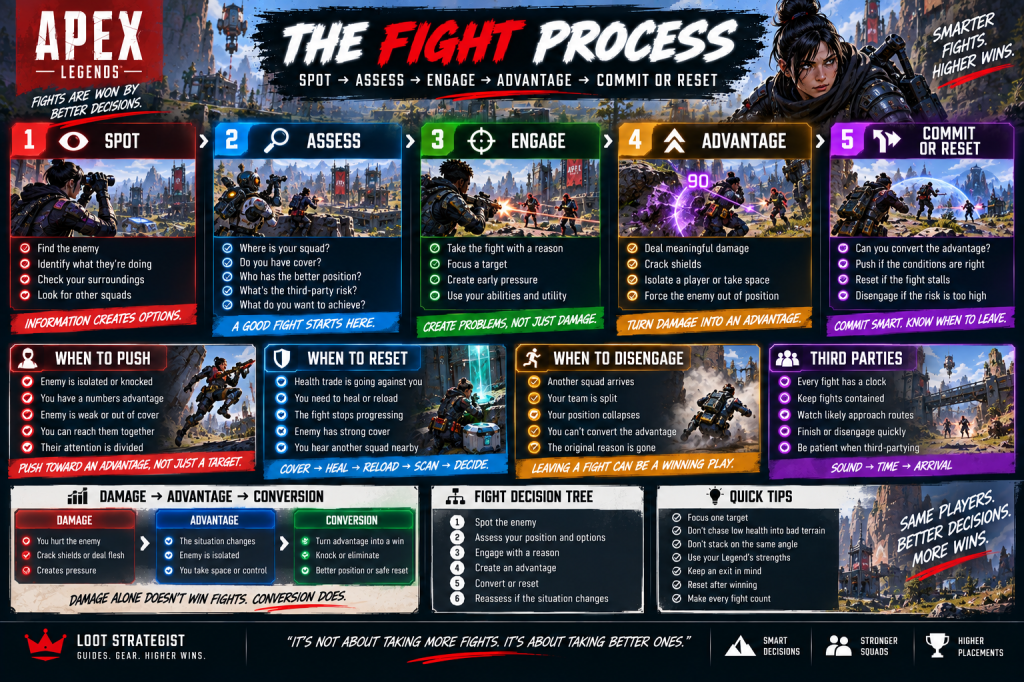
Before you fire, quickly assess five things:
Spot
Where is the enemy, and what are they doing?
Assess
Where is your squad? What cover do you have? Who has the better position?
Engage
Do you have a sensible target and a reason to start shooting?
Create an Advantage
Can you create meaningful damage, isolate someone, take space, or force the enemy out of position?
Commit or Reset
Can you convert that advantage safely, or has the fight changed enough that you should break contact?
This framework is deliberately simple.
You will not have time to think through ten variables during every firefight. With practice, the questions become instinctive.
Damage → Advantage → Conversion
This is the most important idea in the entire guide.
Apex players often treat damage as proof that they are winning.
It isn’t.
Imagine your squad deals 150 damage but gets pushed off high ground, loses half its shields, and ends up exposed.
You dealt more damage.
Your situation may still be worse.
Think of combat in three stages.
Damage
You hurt the enemy.
A crack, flesh damage, or repeated poke can all create pressure.
Advantage
Something about the situation has actually changed.
An enemy is isolated.
Your squad has a numbers advantage.
The opposing team has been forced out of cover.
You have taken a stronger angle.
A teammate has created an opening.
Conversion
You turn that advantage into something meaningful:
a knock, elimination, stronger position, safe reset, or successful disengagement.
That’s the difference between shooting well and fighting well.
1. Know When to Engage
Seeing an enemy does not automatically create a fight.
A good engagement usually begins with some kind of opening:
- an isolated enemy,
- a vulnerable rotation,
- exposed players,
- superior cover,
- a useful angle,
- a numbers advantage,
- or an enemy distracted by another team.
You do not need every advantage.
But before opening fire, know what you’re hoping to achieve.
Are you trying to:
Take a position?
Pressure a weak player?
Force a team away from the Ring?
Create an opening for a push?
Start a fight because you genuinely have the advantage?
If there is no clear reason, shooting may simply announce your location.
2. Choose a Target Your Squad Can Actually Pressure
One of the easiest ways to waste an opening is spreading damage across the entire enemy team.
Three teammates shoot three different players.
Three players take damage.
Nobody gets knocked.
The enemy retreats and heals.
Your squad has spent ammunition and revealed its position without gaining much.
Whenever possible, establish a focus target.
That doesn’t mean every bullet must hit the same player. It means your squad should have a shared understanding of which enemy is closest to becoming vulnerable.
An isolated player in weak cover is usually more valuable than a full-health enemy sitting safely behind strong cover.
Your objective is not to maximize the damage counter.
It is to create a problem the other squad cannot easily solve.
3. A Crack Creates Pressure, Not Permission
Breaking an enemy’s shields is valuable.
It is also an easy moment to make a bad decision.
You crack someone, sprint forward, and suddenly discover that the enemy was only vulnerable because they were standing in front of their entire squad.
Before pushing a cracked player, check:
Where are their teammates?
Can we reach the target together?
What cover is between us?
Where will we end up after the push?
Could another squad hear this fight?
A crack becomes especially powerful when your squad can convert it quickly.
Otherwise, keep the pressure and improve your position.
4. Pressure Is Not the Same as Commitment
You can make an enemy uncomfortable without betting your entire squad on the engagement.
Hold a strong angle.
Force a player away from cover.
Use ordnance to deny space.
Poke from range.
Take a better position.
EA notes that ordnance can be used for damage, forcing enemies from cover, buying time for retreat, and helping secure high ground. (EA Help)
That makes grenades and other utility useful even when you aren’t trying to finish the fight immediately.
Sometimes the best play is to make the enemy’s position progressively worse until a real opening appears.
5. When to Push
A push makes sense when your existing advantage can become something bigger.
Strong push opportunities include:
An enemy is isolated
They are too far from their teammates to receive immediate support.
You have a numbers advantage
A player is knocked, separated, or otherwise unavailable to the enemy squad.
The enemy is forced out of cover
They have fewer safe positions available.
The enemy is already weak
Your squad has created a meaningful health or shield advantage and can reach them safely.
Their attention is divided
Another squad or another problem is pulling their focus.
But don’t push simply because an enemy is nearby.
Push because the conditions have changed in your favor.
6. When Not to Push
The enemy being low does not automatically make the chase good.
Be cautious when:
- your squad is split,
- your health is poor,
- the route is exposed,
- the enemy has strong cover,
- you don’t know where the other players are,
- another squad may be approaching,
- or reaching the target requires abandoning your own strong position.
A common mistake is valuing the enemy’s health bar more than your squad’s position.
Don’t chase 20 HP into a terrible fight.
The number on the enemy’s health bar does not tell you how many teammates are waiting around the corner.
7. Fight Toward an Advantage
The best push is one that moves your squad toward something useful.
That could mean:
Better cover
A stronger angle
A knocked enemy
A separated player
A defensible building
A way to cut off an escape
This is different from simply running toward the enemy.
A push should improve your situation as it progresses.
If every meter forward makes your squad more exposed, you may be converting a good fight into a bad one.
8. Know When to Reset
A reset is a temporary break in combat that lets your squad restore the conditions needed to fight effectively.
Use it when:
- the health trade turns against you,
- your ammunition is running low,
- your position becomes exposed,
- your team loses spacing,
- the enemy gets back into strong cover,
- or the fight simply stops progressing.
The sequence is straightforward:
Cover → Heal → Reload → Scan → Decide
Heal and reload first.
Then look again.
Where is the enemy?
Where are your teammates?
Who has the better position now?
Is another squad nearby?
Has the Ring changed the equation?
A reset is not surrender.
It is a way of changing the terms of the fight.
9. Recognize a Stalled Fight
Some fights are neither winning nor losing.
They’re simply going nowhere.
You peek.
They peek.
You trade damage.
They heal.
You peek again.
They heal again.
Minutes disappear.
This is a stalled fight, and it becomes increasingly dangerous because the original two squads are announcing their location while spending resources.
At that point, you need to change something:
Change the angle.
Change the position.
Force movement.
Create a new opening.
Or leave.
Don’t keep repeating the same exchange because you’ve already invested time in it.
10. A Knock Changes the Numbers — Not the Terrain
A knock is one of the strongest temporary advantages you can create.
But the knock itself doesn’t guarantee the fight is won.
EA distinguishes a knocked player from an eliminated player and uses “thirst” for killing a knocked player to take their items. (EA Help)
The more useful strategic distinction is this:
A knock changes the numbers. It does not automatically change the terrain.
You may now have a 3-vs-2.
But if the remaining enemies have strong cover, a superior position, and a safe route to hold you off, blindly charging them can still throw away the advantage.
Before pushing, ask:
Can we reach them together?
Do we have better cover?
Where are the remaining enemies?
Is the knocked player safe to finish?
Could another squad arrive?
11. When to Finish a Knock
Finishing a knocked enemy can remove them from the fight and potentially give your squad access to their loot.
But the finish should not cost more than it is worth.
A safe finish may make sense when the enemy squad cannot punish you.
A risky finish is often a mistake when it requires:
- leaving cover,
- splitting from your team,
- exposing yourself to the remaining enemies,
- or moving into an area where you have no escape.
The knock is already valuable.
You don’t have to turn every knock into a desperate chase.
12. How to Convert a Knock
After a knock, think about pressure, not just elimination.
Can you use the numbers advantage to:
Take space?
Cut off a retreat?
Force the remaining players into worse cover?
Create a safe angle?
Finish the squad?
If yes, commit.
If not, reset or hold your advantage.
This is where Damage → Advantage → Conversion matters most.
The knock is the advantage.
Your next decision determines whether it becomes a win.
13. Every Fight Has a Clock
EA defines a third party as another squad joining a fight already involving two squads. (EA Help)
That gives every significant fight an invisible timer.
The longer the engagement lasts, the more opportunities nearby teams have to hear it, reposition, and arrive.
Think of the process as:
Sound → Time → Arrival
A fight creates information.
Information attracts attention.
Time gives nearby squads the chance to act on it.
You don’t know exactly when the next team will show up, which is why prolonged fights are dangerous even when neither side is losing badly.
14. How to Avoid Getting Third-Partied
You cannot eliminate third-party risk.
You can reduce it.
Keep the fight contained
Don’t chase an enemy halfway across the map when there is no strategic reason to do so.
Fight from cover
You need somewhere to reset when another squad arrives.
Watch the likely approach
Not everyone needs to stare at the same enemy. One teammate can maintain awareness of the surrounding area.
Finish or disengage
If the fight is no longer progressing, continuing to make noise rarely improves the situation.
Reset immediately after winning
Heal.
Reload.
Scan.
Then loot.
A winning squad that immediately stands around damaged and distracted can become an easy third-party target.
15. How to Third-Party Without Becoming the Third Party
Hearing gunfire does not mean you should sprint directly toward it.
You want to arrive when your presence creates an advantage.
Useful signs include:
- a knock,
- prolonged fighting,
- a squad forced from cover,
- obvious healing or recovery,
- or an enemy team moving through exposed terrain.
The danger is arriving too early.
If both original squads are still healthy and already have strong positions, your team may become the easiest target in the area.
Good third-party timing is less about being first and more about arriving when someone else has already spent their resources.
16. Don’t Chase Damage Into Bad Terrain
This deserves special attention because it is one of the most common combat traps.
An enemy is nearly dead.
They retreat.
You chase.
Suddenly you’re:
- outside your cover,
- separated from your teammates,
- underneath high ground,
- inside another team’s line of sight,
- or surrounded by terrain that makes retreat difficult.
The enemy’s low health has made you ignore everything else.
Don’t.
Ask:
What do we have to give up to finish this player?
If the answer is your position, health, spacing, or escape route, the target may no longer be worth pursuing.
17. Choose Fights You Can Leave
A fight becomes much safer when your squad already has an exit.
Before committing, consider where you go if the exchange turns against you.
Good fighting locations often have:
Hard cover
Multiple routes
Useful elevation
Space to heal
A clear retreat path
That is one reason combat and rotation are closely connected.
Your Apex Legends Rotation Guide covers the macro side of choosing playable terrain. Inside a fight, the same principle applies:
Fight somewhere you can leave.
18. Don’t Stack on the Same Angle
A coordinated push does not mean three players squeezing through the same doorway.
That makes your squad easier to punish and can allow one enemy angle to affect everyone.
A stronger arrangement is usually:
One player creates pressure.
One supports the entry.
One holds a complementary angle or watches the flank.
The exact spacing depends on the terrain and Legend composition.
The principle is more important:
Stay close enough to trade damage, but spread enough to create options.
Your Apex Legends Squad Composition Guide goes deeper into team roles and synergy.
19. Use Your Legend’s Strengths to Create Better Fights
Your Legend’s abilities can change how a fight develops, but they should serve the decision rather than dictate it.
Mobility can help your squad reach an angle.
Recon tools can provide information.
Defensive abilities can make a position easier to hold.
Area-control tools can restrict an enemy’s movement.
The question is always:
Does this ability improve our position, create an opening, or give us a safer way out?
If not, saving it may be the better choice.
Your Apex Legends Movement Guide and Apex Legends Best Legends Guide cover the mechanics and Legend-specific strengths in more detail.
20. When a Fight Is No Longer Worth Its Original Cost
This is an important combat skill that many players overlook.
A fight begins with one reason.
Maybe you wanted better ground.
Maybe an enemy was isolated.
Maybe you wanted to remove a squad before rotating.
Then the situation changes.
You lose shields.
Another squad appears.
The Ring shifts.
Your strong position disappears.
The enemy gets reinforced.
The original reason for fighting may no longer exist.
So ask:
Is the fight still worth what we’re spending to finish it?
That question is more useful than simply asking whether you can keep fighting.
21. The Five Best Reasons to Engage
You should generally feel more comfortable committing when your squad has one or more meaningful advantages.
Better position
You have stronger cover, elevation, or angles.
Better information
You know where the enemies are and can account for the important threats.
Better timing
The enemy is rotating, healing, reviving, split, or otherwise vulnerable.
Better resources
Your squad has enough health, ammunition, and abilities to sustain the engagement.
Better numbers
One enemy is unavailable or isolated.
No single category guarantees a win.
Several together can turn an ordinary encounter into a strong opportunity.
22. Five Warning Signs That You Should Disengage
On the other side, be ready to break contact when:
Your health trade is getting worse
You’re spending more resources than the enemy.
Your position has collapsed
You are now exposed or fighting uphill with nowhere safe to reset.
Your squad is split
The players who need to support one another cannot.
Another squad arrives
The original engagement has become a multi-team fight.
Nothing is progressing
The fight has stalled without producing a meaningful opening.
You don’t need all five.
One severe warning sign can be enough to leave.
23. What to Do After Winning a Fight
Winning the gunfight is not the same as surviving the aftermath.
The moment the enemy falls, your priorities should be:
Cover → Heal → Reload → Scan → Loot → Rotate
This is where your Apex Legends Loot Guide connects naturally with combat.
Don’t open every death box immediately.
First stabilize the squad.
Then determine whether the area is safe enough to loot.
Then check the Ring and decide whether you actually have time to stay.
The loot is valuable.
The position you just won is valuable too.
Don’t trade one for the other without thinking.
24. Don’t Turn a Winning Fight Into a Losing Fight
Some of the worst deaths happen after the squad has already won.
A team gets the knock.
Then another.
Then everyone runs forward.
One player chases a finish.
Another opens a death box.
The third is still healing.
The squad that was winning is suddenly scattered.
The answer is not “never push.”
It is to recognize when the fight has already been won.
Once your advantage is secure, switch from aggression to control.
25. Fighting and Rotation Are Connected
Your Apex Legends Rotation Guide teaches you how to choose routes, terrain, destinations, and playable positions.
That information should influence your fights.
Imagine another squad is blocking your preferred route.
You can:
Fight them.
Go around them.
Change your destination.
A player focused only on combat sees an enemy.
A player thinking strategically sees a decision.
Sometimes the best fight is the one that clears your rotation.
Sometimes the best rotation is the one that avoids a pointless fight.
Knowing which is which is the skill.
26. How to Practice Fight Decisions
After losing a fight, don’t immediately blame your aim.
Ask what happened before the shooting.
Was the target sensible?
Maybe you focused an enemy who was too well protected.
Was the position good?
Maybe you had no cover.
Was the timing good?
Maybe you started the fight while another squad was already nearby.
Did you overcommit?
Maybe the opening disappeared but you kept pushing.
Did you reset?
Maybe the fight was salvageable ten seconds earlier.
Did you convert your advantage?
Maybe you earned a knock but failed to turn it into anything useful.
This gives you something concrete to fix.
Your Apex Legends Tips for Beginners: 25 Mistakes to Avoid also covers several of these recurring errors, including chasing knocks, fighting in the open, splitting from your squad, and treating every fight as mandatory.
The Apex Legends Fight Decision Tree
When you spot a squad, run this sequence mentally:
1. Spot
Where are they?
2. Assess
What position do we have?
Where are my teammates?
What could reach us?
3. Engage
Is there a target or opening worth exploiting?
If not, hold, reposition, or rotate.
4. Create an Advantage
Deal meaningful damage.
Take space.
Isolate someone.
Force movement.
Create a knock.
5. Convert
Can we safely turn that advantage into something useful?
If yes, commit.
If no, reset.
6. Reassess
If another squad arrives or the terrain changes, start the process again.
That’s the point many players miss.
Fight decisions are not one-time choices.
They are continuous decisions based on changing information.
Apex Legends Fight Guide Cheat Sheet
Engage when:
You have a meaningful opening.
Your squad can support the play.
The position is workable.
You have a clear target or objective.
Push when:
The enemy is vulnerable or isolated.
Your advantage can be converted safely.
Your squad can reach the fight together.
Reset when:
The health trade gets worse.
The position deteriorates.
The fight stalls.
You need to restore resources.
Disengage when:
Another squad arrives.
Your team is split.
Your exit disappears.
The original reason for the fight is no longer worth the cost.
After winning:
Cover → Heal → Reload → Scan → Loot → Rotate
Final Thoughts
Good Apex players know how to shoot.
Great decision-making comes from knowing when the shooting is worth doing.
Don’t confuse damage with an advantage.
Don’t confuse a knock with a guaranteed push.
Don’t confuse aggression with commitment.
And don’t confuse disengaging with losing.
A strong fight follows a simple logic:
Spot → Assess → Engage → Create an Advantage → Convert or Reset
Sometimes that ends with a squad wipe.
Sometimes it ends with a better position.
Sometimes it ends with your team walking away before the third party arrives.
All three can be successful outcomes.
The point is to stop letting the fight make the decision for you.
You choose the target. You choose the commitment. You choose when to reset. And, when necessary, you choose when to leave.
That’s how you turn better fights into a repeatable skill instead of a string of lucky gunfights.
Frequently Asked Questions
When should I engage in Apex Legends?
Engage when your squad has a meaningful opening, such as a vulnerable enemy, better position, useful timing, or numbers advantage. You don’t need every advantage, but you should understand why the fight is worth starting.
When should I push after cracking an enemy?
Push when you can reach the vulnerable target safely and maintain support from your teammates. A crack is an opportunity, not automatic permission to sprint into the enemy squad.
When should I disengage from a fight?
Disengage when your health trade becomes unfavorable, your position collapses, your squad becomes split, another team arrives, or the fight stops producing meaningful progress.
What is a reset in Apex Legends?
A reset is a short break in combat used to restore health, shields, ammunition, positioning, and information before deciding whether to re-engage or leave.
What is a third party in Apex Legends?
EA defines a third party as another squad joining a fight already involving two squads. (EA Help)
How do I avoid getting third-partied?
Keep engagements controlled, avoid unnecessarily long fights, maintain cover, watch likely approach routes, and reset quickly after winning. Loot only after you’ve checked whether the area is safe.
Should I always finish a knocked enemy?
No. Finish a knock when doing so is safe and meaningfully improves your position. Don’t abandon cover or split your squad just to secure a finish.
How do I know whether a fight is worth taking?
Look at your position, target, squad health, resources, enemy numbers, available exits, and potential third parties. The more advantages you have, the easier it is to justify a commitment.
How can beginners improve their fight decisions?
After a bad engagement, identify what failed first: target selection, position, timing, overcommitment, reset timing, or conversion of an advantage. Fix one recurring problem rather than trying to overhaul your entire playstyle at once.
Sources & Updates
Last reviewed: September 2026
EA’s official Apex Legends Terms Guide was used to verify terminology including Rotate, Playing Zone, Playing Edge, Third Partied, Thirst, Knock, and related gameplay terms. (EA Help)
EA’s current Apex guidance was used for gameplay references involving health and shields, squad play, movement, and ordnance. (EA Help)
EA’s Marked Patch Notes, published August 3, 2026, confirm the current Season 30 context, including continuing Legend, weapon, loot, map, and Ranked changes. Because Apex is continually updated, this guide deliberately avoids temporary weapon rankings and balance-specific recommendations. (EA)
The strategic frameworks in this article—Spot → Assess → Engage → Create an Advantage → Commit or Reset and Damage → Advantage → Conversion—are Loot Strategist editorial analysis intended to provide a practical decision-making framework rather than reproduce official game documentation.
For related strategy, see the Apex Legends Rotation Guide, Apex Legends Movement Guide, Apex Legends Loot Guide, Apex Legends Squad Composition Guide, Apex Legends Solo Queue Guide, Apex Legends Ranked Guide, and Apex Legends Tips for Beginners: 25 Mistakes to Avoid.

