Tag: APEX LEGENDS

Apex Legends Bangalore Team Comp Guide: Best Squad Synergies

Apex Legends Bangalore Team Comp Guide: Best Squad Synergies

Apex Legends Bangalore Team Composition Guide: Best Squad Synergies & Roles

Bangalore already brings several jobs to an Apex squad.

The Smoke Launcher blocks sightlines and can breach doors, Double Time gives her a temporary speed increase when she takes fire while sprinting, and Rolling Thunder disrupts an area with a creeping artillery strike. She is also an Assault Legend, giving her class-specific combat benefits such as extra ammo capacity, additional grenade slots, faster weapon handling, and other combat advantages in Core modes. (EA Help)

That makes team building around Bangalore less about finding two Legends who simply add more aggression.

The better question is:

What should the other two players add that makes Bangalore’s openings more useful?

A Recon Legend can provide information before Bangalore smokes an angle. A Skirmisher can turn that smoke into a fast entry. A Controller can make the enemy’s remaining routes harder to use. A Support Legend can turn a temporary opening into a safer reset.

This guide focuses on those interactions rather than trying to declare one permanent “best” Bangalore trio.

Mode note: This guide focuses on Core modes such as Ranked and Unranked, where Legend classes apply and each Legend can only be selected once per squad. Wildcard uses different selection rules and allows duplicate Legends. (EA Help)

How we evaluate Bangalore team comps: We look at what Bangalore already provides, what the partner Legend adds, how the abilities interact during an actual fight, and what the squad can do when the first plan fails. These are Loot Strategist editorial recommendations, not official EA rankings.


Bangalore Team Comp at a Glance

CompositionCore SynergyWhat It Covers
Bangalore + Recon + SupportFind → deny → recoverInformation, pressure, recovery
Bangalore + Skirmisher + SupportSmoke → move → resetMobility and sustain
Bangalore + Recon + ControllerScout → deny → controlInformation and positional control
Bangalore + Recon + AssaultFind → pressure → disruptAggressive coordinated fights
Bangalore + Controller + SupportDeny → hold → recoverDefensive and late-game play
Bangalore + Assault + SkirmisherPressure → smoke → collapseHigh-tempo combat

These are composition archetypes, not a ranking. The right setup depends on your team’s strengths, preferred fight distance, map position, and whether you are playing coordinated or solo queue.


What Bangalore Already Gives the Squad
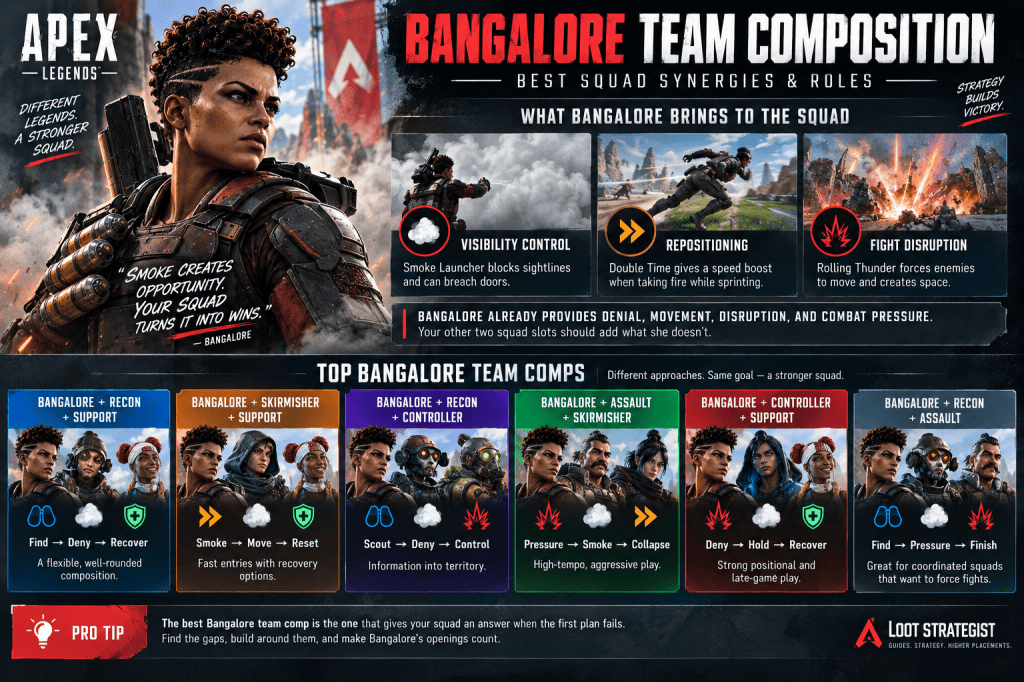
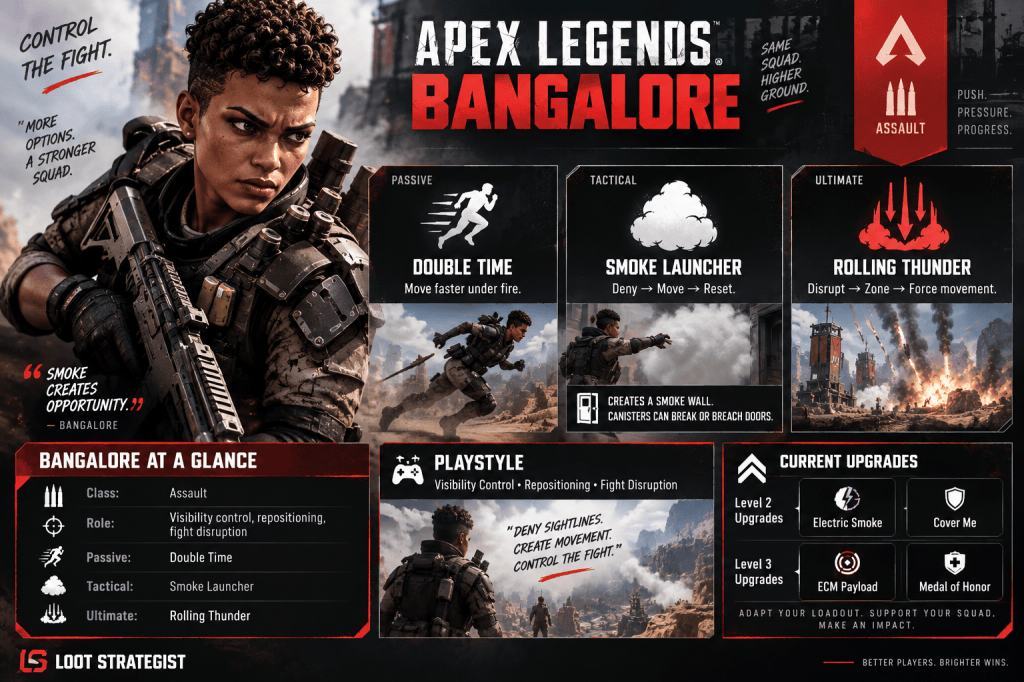
Apex Legends Bangalore team composition infographic showing her visibility control, repositioning, and fight disruption alongside recommended Recon, Skirmisher, Support, Controller, and Assault squad roles

Before choosing teammates, understand the jobs you already have covered.

EA currently classifies Bangalore as Assault. Assault Legends carry more ammunition per stack, have extra grenade slots, use weapons faster, and gain temporary reload and movement-speed benefits when their shield breaks. They can also access weapon attachments from the secret compartment of Supply Bins in Core modes. (EA Help)

Bangalore’s own kit adds three major pieces:

Visibility control

Smoke Launcher creates a smoke wall on impact and can interact with doors. (EA Help)

Repositioning

Double Time gives Bangalore a temporary speed increase when she is taking fire while sprinting. (EA Help)

Fight disruption

Rolling Thunder creates a creeping artillery strike that can force enemies to react to an area. (EA Help)

Put together, Bangalore naturally contributes:

Denial.

Movement.

Disruption.

Combat pressure.

That is why the other two squad slots should usually be chosen for what they add, rather than what they duplicate.


Bangalore’s Team-Building Question

Once Bangalore is selected, ask:

Who finds the enemy?

Who exploits the opening?

Who helps when the first push fails?

Those jobs do not necessarily require three different Legends.

A Recon Legend can provide information and help with shot-calling.

A Skirmisher can provide entry and mobility.

A Support Legend can provide recovery.

Bangalore can connect those pieces by changing the sightlines around the fight.

That is the foundation of a Bangalore-centered composition.

For a broader explanation of Apex classes and squad roles, check this Apex Legends Squad Composition Guide rather than repeating the entire class system here.


Bangalore + Recon: Find First, Smoke Second

Recon is one of the most natural complements to Bangalore because the two Legends approach information from different directions.

EA describes Recon Legends as focused on tracking enemies and gathering intel.

The basic sequence is:

Recon finds → Bangalore denies → squad moves

That is more useful than simply stacking information tools.

The Recon player can help establish:

  • where the enemy is
  • which player is exposed
  • whether another squad is nearby
  • which route is safest
  • where the enemy is likely to rotate

Bangalore then changes the amount of information the opposing team gets in return.

This is the key interaction.

Your squad starts the maneuver with information.

Then Bangalore makes the enemy work with less of it.


Bangalore + Bloodhound: Information Around the Smoke

Bloodhound is an obvious pairing, but the old “Bloodhound sees through Bangalore smoke” strategy should not be presented as current doctrine.

EA’s current Legend documentation describes smoke as capable of blocking threat-vision effects, so the useful interaction is information gathered before or around the smoke rather than assuming Bloodhound has unrestricted vision through it.

A better sequence is:

Scan → identify → Smoke → push

Bloodhound helps the squad understand the engagement.

Bangalore then changes its visual structure.

That makes the pairing useful without relying on an outdated smoke interaction.


Bangalore + Crypto: Information Before the Push

Crypto offers a more deliberate version of the same concept.

His Drone provides scouting and enemy information, while EMP can damage shields, slow affected enemies, and disable traps and certain deployables. (EA Help)

That creates a strong coordinated sequence:

Drone → EMP → Bangalore Smoke → push

Crypto identifies the structure of the fight.

Bangalore removes a key sightline.

The squad acts while the enemy is dealing with both problems.

This composition is better suited to teams that communicate than players who want to sprint into every fight without preparation.


Bangalore + Skirmisher: Turn Smoke Into Movement

A Skirmisher complements Bangalore by making the temporary opening created by Smoke easier to exploit.

EA describes the Skirmisher class around fast-paced combat and mobility.

The interaction is straightforward:

Bangalore creates the opening → Skirmisher takes it

That can mean:

  • crossing dangerous ground
  • closing distance
  • taking high ground
  • chasing a weakened enemy
  • escaping after a failed push
  • changing angles during a fight

The Bangalore player should not think of the smoke as the final destination.

The Skirmisher’s job is often to turn that visual opening into actual positional advantage.


Bangalore + Pathfinder

Pathfinder is a particularly clear example.

His Grappling Hook provides mobility, while Zipline Gun can create a route for the squad. (EA Help)

A simple team sequence looks like:

Smoke the dangerous angle → Pathfinder creates access → squad moves

The important interaction is speed.

Bangalore removes the enemy’s clean view.

Pathfinder turns that temporary window into distance or a new angle.

That makes this pairing especially useful when the safest route is also the most exposed one.


Bangalore + Axle

Axle adds another form of mobility through Nitro Gate, which can launch players into a high-speed slide. EA currently classifies Axle as a Skirmisher and notes that both allies and enemies can use the gate.

The synergy is simple:

Smoke hides the transition.

Nitro Gate accelerates it.

For a coordinated squad, that can make Bangalore’s temporary visual advantage much easier to convert into a fast reposition.

The trade-off is that this is a mobility-heavy composition. You may gain more freedom of movement while giving up some recovery or information.


Bangalore + Support: Turn a Smoke Window Into Recovery

Support solves a different problem.

EA describes Support Legends around helping and healing the squad, with class benefits that include improved healing/revival utility and additional recovery options.

This creates a useful Bangalore sequence:

Smoke → recover → reposition

The Tactical does not have to be used only for an attack.

It can create the few seconds needed to:

  • revive a teammate
  • heal
  • recover from a poor trade
  • move away from a third party
  • stabilize before the next fight

That makes Support particularly attractive for squads that often survive the first exchange but struggle to survive the second.


Bangalore + Newcastle: Layered Protection

Newcastle provides an especially clear example of the Bangalore-plus-Support relationship.

His kit includes Mobile Shield, Retrieve the Wounded, and Castle Wall, giving him several ways to protect a teammate or establish a defensive position. (EA Help)

That lets the squad layer protection:

Smoke → Mobile Shield → revive or reposition

Bangalore disrupts the enemy’s information.

Newcastle adds physical protection and recovery.

Neither ability replaces the other.

That is what makes the pairing useful.


Bangalore + Lifeline: Make the Reset Productive

Lifeline provides another kind of recovery utility.

Her D.O.C. Heal Drone supports healing, while Combat Revive allows a teammate to be revived without Lifeline remaining locked to the interaction. (EA Help)

Bangalore can create the visual window.

Lifeline can turn that window into actual team recovery.

The composition is therefore less about overwhelming the enemy immediately and more about making a temporary advantage last longer.


Bangalore + Controller: Control What Happens After the Smoke

This is one of the more interesting Bangalore combinations.

Controllers specialize in area control and strategy. EA currently lists Legends such as Catalyst, Caustic, Rampart, and Wattson in the class.

Bangalore controls what the enemy can see.

A Controller can influence where the enemy can comfortably go.

That produces a useful two-stage interaction:

Bangalore denies the information.

Controller constrains the response.

That can be especially valuable around buildings, choke points, and late-game positions.


Bangalore + Catalyst: Deny the Angle, Control the Route

Catalyst can reinforce doors, deploy ferrofluid structures, and use her kit to influence movement through an area. (EA Help)

A Bangalore-Catalyst squad can therefore make an enemy solve two different problems.

First:

Where can we see?

Then:

Where can we go?

Bangalore handles the first problem with Smoke.

Catalyst can make the remaining route less comfortable.

This becomes particularly useful when the squad wants to fight around a building rather than immediately leave it.


Bangalore + Caustic: Change the Approach, Punish the Space

Caustic offers another form of area denial through Nox Gas Traps and Nox Gas Grenade. (EA Help)

The combination has a simple purpose:

Smoke makes the approach harder to read.

Gas makes certain positions harder to occupy.

This works best when the squad already knows where it wants the enemy to move.

The danger is over-denial.

Abilities that make an area miserable to enter are not automatically useful if the squad never converts them into a positional or combat advantage.


Bangalore + Assault: More Pressure, Fewer Answers

Bangalore is already Assault, so adding another Assault Legend creates a heavily combat-focused squad.

EA currently includes Bangalore, Fuse, Ash, Mad Maggie, Ballistic, and Revenant among the Assault roster.

The upside is straightforward:

More combat pressure.

The downside is equally important:

Fewer dedicated tools for information, mobility, or recovery.

That makes a double-Assault composition more appealing when your squad is confident it can convert pressure into knocks rather than repeatedly needing to reset.


Bangalore + Fuse: Turn Denial Into Pressure

Fuse is an easy example of how the Assault pairing can work.

His Knuckle Cluster provides repeatable explosive pressure, while The Motherlode influences a larger area. (EA Help)

A coordinated sequence could look like:

Smoke → enemy loses information → movement becomes predictable → Fuse applies explosive pressure

The value is not simply having more damage.

It is making the enemy uncomfortable in the limited space they still have available.


Bangalore + Recon + Support: The Flexible Core

For players who want a balanced three-player structure, this is a natural model:

Information + Denial + Recovery

The Recon player helps the squad understand the situation.

Bangalore controls sightlines and creates movement opportunities.

Support helps the squad survive after the first engagement.

This gives the team answers for:

Find → fight → reset → rotate → fight again

The composition is particularly attractive for players who do not want every match to become an all-in push.


Bangalore + Skirmisher + Support: The Forgiving Composition

This version swaps information for mobility.

Bangalore creates the opening.

Skirmisher exploits it.

Support helps the squad recover.

That gives the team strong answers for:

  • aggressive rotations
  • building entries
  • fast disengagements
  • chasing weak teams
  • recovering from a failed first push

Its weakness is information.

The team may need to rely more heavily on observation, audio, pings, and disciplined movement.


Bangalore + Recon + Controller: Information Into Territory

This is the more methodical composition.

Recon finds.

Bangalore denies.

Controller controls.

The result is a team that can locate an opponent, remove a key sightline, and then make the remaining space less comfortable.

It is especially appealing when your team prefers taking strong positions rather than constantly forcing movement.

The weakness is mobility.

Once the squad has to abandon its position, the composition may have fewer tools for making a rapid transition.


Bangalore + Recon + Assault: Find, Then Finish

This composition is built for pressure.

Recon identifies the opportunity.

Bangalore creates the visual opening.

The second Assault Legend helps turn that opening into damage.

The sequence is:

Find → Smoke → Pressure → Collapse

This is a good fit for coordinated players who are confident about target selection and commit timing.

It is less forgiving when the first engagement goes poorly.


Bangalore + Assault + Skirmisher: The High-Tempo Composition

This is the pure pressure version.

Bangalore creates disruption.

The Assault teammate adds more combat pressure.

The Skirmisher converts the temporary opening into movement or entry.

The team can move quickly from:

Pressure → Smoke → Entry → Collapse

The trade-off is recovery.

There is less room for a slow reset after the first attempt fails.

That means communication matters more.


Bangalore + Controller + Support: Hold, Recover, Punish

This composition plays a slower game.

Bangalore denies vision.

Controller tools help establish a difficult position to challenge.

Support helps the team survive the resulting engagements.

It can be valuable around:

  • strong buildings
  • chokepoints
  • late-game positions
  • defensible terrain

The weakness is rotation.

A squad that is excellent at holding ground still needs a plan for leaving that ground when the Ring changes.


Does a Bangalore Team Need Recon?

No.

Recon adds information, which makes Bangalore’s smoke more deliberate, but Bangalore does not become useless without it.

The better question is:

Does your squad already have enough information to make good decisions?

A disciplined team can gather plenty of information through map awareness, audio, pings, visual checks, and enemy behavior.

Recon is an addition, not a mandatory slot. EA’s class system describes Recon as information-focused, but it does not require every squad to contain one.


Does a Bangalore Team Need Support?

Again, no.

Support becomes more valuable when your squad regularly reaches the reset phase of a fight.

If you often win the first exchange but lose the next one while healing, recovery tools become much more attractive.

If your squad rarely gets the opening knock at all, another offensive or information-focused Legend may provide more immediate value.

Build around the problem your team actually has.


Does a Bangalore Team Need a Skirmisher?

Not necessarily.

Bangalore already has Double Time and can create movement opportunities with Smoke.

A Skirmisher becomes more appealing when the team wants to capitalize on those windows immediately.

That can mean:

take height

close distance

escape

chase

change angles

Mobility is therefore a multiplier for Bangalore rather than a requirement.


Avoid One-Dimensional Bangalore Comps

The easiest mistake is building a squad where every Legend wants to solve the same problem.

Three aggressively minded Legends can be terrifying when the first push works.

But what happens when the enemy survives?

Who provides information?

Who controls the next position?

Who helps recover?

Who gets the team out?

The opposite problem exists too.

Three defensive Legends may hold ground beautifully while struggling to rotate, chase, or convert damage into a finish.

The strongest compositions usually have enough overlap to reinforce one another without becoming copies of the same job.


The Most Important Part Is Ability Timing

A strong team composition on paper can still feel terrible in a match if the players use their abilities independently.

Consider this:

Recon identifies the target.

Bangalore cuts the sightline.

Skirmisher enters.

Support stays ready for the reset.

That is synergy.

Now imagine the same four actions happening at completely different moments.

The composition has not changed.

The timing has.

That is why a team’s communication and decision-making can matter more than the theoretical strength of the three Legends on the banner.


Bangalore Team Comp for Ranked

Ranked currently uses staggered Legend selection, meaning the players choose their Legends one at a time. Duplicate Legends are not allowed in the same squad, and class perks apply in Ranked. (EA Help)

That makes flexible team planning particularly useful.

A Bangalore player can communicate what the squad still lacks:

“We need information.”

“We already have mobility.”

“Let’s add recovery.”

“We need more pressure.”

That’s much more practical than trying to build around a fixed tier-list formula.

Keep a backup plan in mind, especially when teammates choose their Legends before you know the complete squad.


Bangalore Team Comp for Solo Queue

Solo queue changes the calculation because you cannot control what the other two players choose—or how aggressively they play.

That makes Bangalore’s flexibility particularly valuable.

If two teammates pick aggressive Legends, you do not necessarily need to become the third.

You can still provide:

Smoke for the entry

cover for the reset

disruption during the push

a safer rotation

Likewise, if your teammates are playing cautiously, Bangalore can become the player who creates the opening.

The best solo-queue composition is therefore often the one that leaves you with multiple ways to contribute when the original plan disappears.

For a deeper treatment of playing with unpredictable teammates, link this section to your Apex Legends Solo Queue Guide.


The Bangalore Composition Cheat Sheet

Once Bangalore is selected, use this quick check:

Need more information?

→ Consider Recon

Need faster entries or rotations?

→ Consider Skirmisher

Need stronger positional control?

→ Consider Controller

Need better recovery?

→ Consider Support

Already have those covered?

→ Consider Assault for more combat pressure

Then ask one final question:

What does this squad do when the first push fails?

That question catches a lot of bad compositions before the match even begins.


Common Bangalore Team Composition Mistakes

Picking teammates because they are popular

Popularity does not tell you whether the abilities actually fit your squad’s style.

Choosing three Legends with the same job

More aggression is not automatically more complete.

Assuming Bangalore must have a Recon teammate

Information is useful, but it can come from several sources.

Ignoring recovery

A composition should have a plan for the fight that comes after the first fight.

Building a defensive squad with no rotation plan

Eventually, the Ring moves.

Treating class as a permanent role

A class describes broad tools and perks. It does not dictate every action the player takes. EA’s current system separates class identity from the broader possibilities of individual Legend kits.

Throwing abilities without coordination

The same abilities become dramatically more useful when one creates the opening for another.


A Simple Bangalore Team-Building Framework

Start with Bangalore.

Step 1: Identify what she already provides

Denial + disruption + pressure + repositioning

Step 2: Identify the squad’s biggest gap

Choose the job you need most:

Information

Mobility

Control

Recovery

More pressure

Step 3: Plan for failure

Ask:

What happens if we don’t get the knock?

That third step is the one most lineup discussions skip.

A squad should not only have a plan for winning the first exchange.

It should have a plan for continuing after it fails.


Final Thoughts

There is no permanent Bangalore trio that solves every Apex match.

The more reliable approach is to start with what Bangalore already brings and then use the other two slots to fill the gaps.

She provides:

Visibility control.

Repositioning.

Disruption.

Combat pressure.

A Recon teammate can help the squad find the right engagement.

A Skirmisher can turn a smoke-created opening into actual movement.

A Controller can make the enemy’s remaining routes harder to use.

A Support Legend can transform a temporary window into a successful reset.

Another Assault Legend can add more pressure when the squad already has enough information and recovery.

That gives you a much better way to think about Bangalore team composition:

Find → Deny → Exploit → Recover

Not every job needs its own Legend.

The point is to make sure the three players collectively have enough tools to cover what the match demands.

When Bangalore is your anchor, don’t simply ask:

“Who is the best teammate for Bangalore?”

Ask:

“What does Bangalore already solve, and what does the rest of our squad still need?”

That question will survive balance patches much better than any static list of supposedly perfect trios.


Sources & Updates

EA’s current Legends guide documents the five Core-mode classes—Assault, Controller, Recon, Skirmisher, and Support—along with their broad roles and current Legend abilities. Bangalore is currently an Assault Legend. (EA Help)

EA’s current documentation confirms Bangalore’s Smoke Launcher, Double Time, and Rolling Thunder, as well as her current Assault-class benefits. (EA Help)

EA’s current Ranked documentation states that Legend selection is staggered, duplicate Legends are not permitted within the same team, and class perks apply in Ranked. (EA Help)

EA’s current game-mode documentation distinguishes Core modes from Wildcard; Wildcard allows simultaneous Legend selection and duplicate Legends within a squad, while Core modes use the one-Legend-per-squad structure. (EA Help)

EA’s February 2026 roadmap said a Legend Class/team-composition overhaul is planned for Season 32, while also noting that roadmap timing can shift during development. This article should therefore be reviewed when that change arrives. (EA)

Editorial note: The compositions and synergy frameworks in this guide are Loot Strategist recommendations based on documented abilities and squad-role interactions, not official EA rankings.


Recommended internal links

“Apex Legends Squad Composition Guide” → broader squad-building principles

“Bangalore Guide” → overall Bangalore playstyle and abilities

“Bangalore Smoke Guide” → advanced Smoke Launcher placements

“Bangalore Best Loadouts” → weapons that capitalize on Bangalore-created openings

“Team Fighting Guide” → coordinated combat and target focus

“Solo Queue Guide” → playing effectively with unpredictable teammates

“Positioning Guide” → turning team-composition advantages into better positions
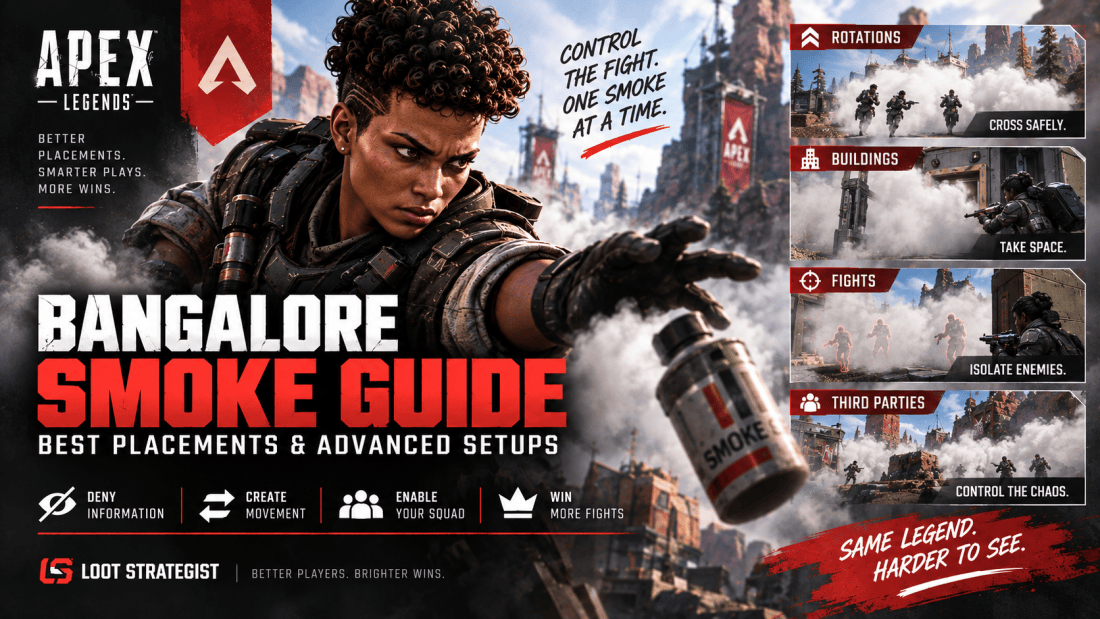
Apex Legends Bangalore Smoke Guide: Best Smoke Placements & Setups

Apex Legends Bangalore Smoke Guide: Best Smoke Placements & Setups

Apex Legends Bangalore Smoke Guide: Best Smoke Placements & Advanced Setups

Bangalore’s Smoke Launcher is easy to use and surprisingly easy to waste.

The difference between an average smoke and a great one is rarely the size of the cloud. It is where the cloud lands, what information it removes, and what your squad does next.

EA’s current Bangalore documentation confirms that Smoke Launcher creates a smoke wall on impact and that its canisters can break or breach doors. The current Showdown tuning also gave the Tactical a 30-second cooldown, 2,900 projectile speed, and a 0.25-second pull-out time. Smoke can also be temporarily disabled by ordnance and abilities used inside or near it. (EA Help)

That makes Bangalore less about throwing smoke whenever a fight gets messy and more about controlling which parts of the fight the enemy is allowed to see.

This guide focuses specifically on that: practical smoke placements, repeatable setups, and the small positioning decisions that turn Bangalore’s Tactical into a real advantage.

Loot Strategist rule: Smoke the enemy’s strongest information before you smoke your own.


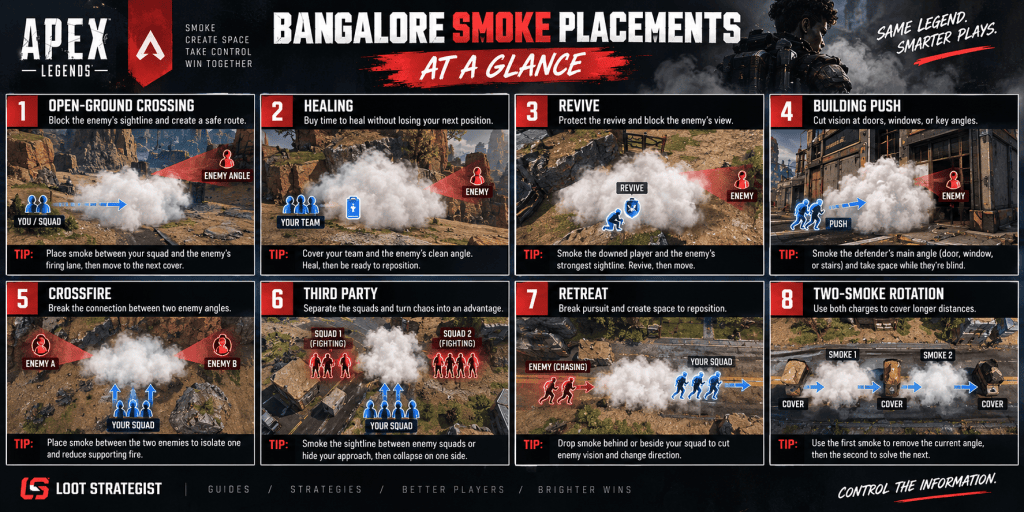
Bangalore Smoke Placements at a Glance

Apex Legends Bangalore smoke placement guide showing open-ground, building, revive, crossfire, third-party, retreat, and two-smoke rotation setups.

SituationWhere to Place SmokeImmediate Follow-Up
Open-ground crossingBetween your squad and the strongest enemy sightlineMove to the next hard cover
HealingBetween your team and the enemy’s firing laneHeal while preparing the next move
ReviveCover the revive and the enemy’s clearest angleRevive, then leave the smoke
Building pushOn the defender’s doorway, window, or supporting angleTake space while vision is disrupted
Enemy crossfireBetween the two enemy positionsPressure the isolated player
Third partyBetween the squads rather than directly on your own teamCollapse on one side
RetreatBehind or beside your movement pathChange direction or reach new cover
Two-smoke rotationFirst smoke on the current angle, second on the nextMove through in stages
False rotationOn the route enemies expect you to useReposition somewhere else

The placement should always answer a simple question:

What becomes harder for the enemy to do after this smoke lands?


1. Smoke the Strongest Enemy Advantage

Start here.

When an enemy squad has you under pressure, find the one sightline that matters most.

It could be:

  • a sniper watching the rotation
  • a player holding a window
  • a head-glitch on a ridge
  • a shotgun player controlling a doorway
  • a teammate providing a crossfire

That is your smoke target.

You do not always need to cover the entire enemy squad.

You need to remove the part of the fight that is currently making your position difficult.

Example

An enemy team is holding a building. One player watches the entrance while another watches your rotation from a window.

Smoking your own squad may hide everyone equally.

Smoking the window angle may be enough to let one teammate cross safely while another keeps pressure on the doorway.

That’s a much better trade.


2. Open-Ground Smoke Placement

Open terrain is where smoke can feel almost magical when it is placed correctly.

The mistake is treating the smoke as a destination.

You need three points:

Current cover → Smoke → Next cover

Your canister should create the bridge between those positions.

Good placement

Put the smoke across the enemy’s primary firing lane, with enough distance that your squad can move toward it and continue into the next safe position.

Bad placement

Drop it directly on your feet, run twenty meters, and discover that the smoke ends before you reach meaningful cover.

You have not solved the rotation.

You have simply delayed being exposed.

The moving-wall idea

On a long crossing, use the first smoke to remove the current threat and the next smoke to solve the next threat.

Do not fire both immediately unless the situation demands it.

A staggered sequence gives your squad more control over the route.


3. Edge Smoke vs. Center Smoke

This is one of the easiest ways to improve your placement without learning a hundred set plays.

Center smoke

A center smoke sits directly on the area your squad occupies.

It gives broad concealment but also removes a lot of your own vision.

Edge smoke

An edge smoke sits between your team and the enemy.

Your squad remains able to see one side of the fight while the opposing team loses the important angle.

For many situations, edge smoke is cleaner.

It creates asymmetry rather than turning the entire area into a visual coin flip.

When you have a strong position already, preserving some of your own information is valuable.


4. Smoke for Healing and Resets

A healing smoke has one job:

buy time without creating a worse position afterward.

That means the best placement usually covers both:

the player who needs to reset

and

the enemy’s clean firing lane.

Do not place the smoke simply because someone is using a Battery.

Look at the route the enemy would take to punish that Battery.

That’s the angle you need to break.

A better reset

Instead of:

Smoke → Heal → Sit there

think:

Smoke → Heal → Reposition

The final step matters because the smoke will eventually become less useful, and Bangalore’s current smoke can also be temporarily disabled by nearby ordnance and abilities. (EA)


5. Best Smoke Placement for a Revive

Revives become much easier to protect when you stop thinking only about the downed player.

Look at the enemy.

Where are they?

What can they see?

Which angle gives them the easiest shot?

Then place the smoke so that the enemy must either:

move,

push through the cloud,

or

give up that angle.

The revive itself should be treated as one part of the maneuver.

The second the teammate is back on their feet, the squad should already know where it is going next.

Smoke is buying that time.


6. Offensive Smoke: Cover the Push, Not the Panic

Bangalore’s smoke becomes much more dangerous when you stop treating it as a defensive ability.

Suppose one enemy is holding a powerful position and the other two are providing support from farther back.

You can smoke your own squad and walk forward.

Or you can smoke the supporting sightline.

Now the isolated defender has less help.

That creates a much better entry.

Offensive smoke works especially well when:

  • one enemy is separated
  • the supporting angle is obvious
  • your squad already knows the target
  • you have a close-range weapon ready
  • the enemy cannot easily change positions

This is where the Bangalore Best Loadouts article can be linked naturally.

A shotgun or SMG becomes more useful when Smoke has already compressed the engagement into the distance where those weapons excel.


7. Building Smoke: Doors, Windows, and Stairs

Buildings reward precise smoke placement.

You rarely need to fill the whole structure.

Instead, identify the defender’s strongest information source.

Doorways

Smoke can disrupt a defender’s ability to read the timing of an entrance. Bangalore’s canisters can also break or breach doors. (EA Help)

That combination creates a useful entry problem for the defender:

Do I hold?

Do I back up?

Do I push through?

Each choice changes the fight.

Windows

Windows are often more important than the main entrance because they allow defenders to create supporting fire.

A single well-placed smoke can remove that second angle without covering the entire building.

Stairs

Stairs compress movement.

If an enemy is relying on a staircase to control when your team can move between floors, smoking that route can remove some of their timing information.

You do not necessarily need to enter through it.

Sometimes the point is simply to make the defender stop trusting the angle.


8. Smoke the Crossfire, Not the Target

This is one of the highest-value advanced placements.

Imagine two enemies are holding separate angles:

Enemy A ← your squad → Enemy B

You are caught between them.

A common reaction is to smoke your own position.

Instead, look for the line connecting A and B.

If you place the smoke between those positions, you can break the relationship between their angles.

Now one enemy has less support.

That can create the opening your team actually needs.

The smoke did not blind the target.

It changed the geometry of the fight.


9. Isolate One Enemy With a Smoke Wall

You can use the same idea more aggressively.

Suppose three enemies are positioned:

A — B — C

B has moved slightly ahead.

A smoke wall between B and the other two can create a temporary separation:

A/C | Smoke | B

That gives your squad a short opportunity to focus B before the supporting players regain a clean line of sight.

The important word is temporary.

Do not stand around admiring the placement.

The smoke created the opening.

Your team has to use it.


10. Third-Party Smoke: Separate the Fight

Third parties become much more manageable when you stop thinking of two enemy squads as one giant problem.

Look at the relationship between them.

Setup A: Cut the squads apart

Smoke the sightline connecting the two teams.

One squad may lose the ability to support the other.

Setup B: Hide your approach

Smoke between your squad and the strongest angle, then move before the enemy can reconstruct your position.

Setup C: Block the escape

If one squad is already weakened, smoke the route they are most likely to use to leave.

Now your Tactical is influencing where the fight goes, not merely whether you can be seen.

That is a much stronger use of smoke.


11. The Reverse Smoke

Most players instinctively throw smoke forward.

Sometimes the better placement is behind you.

Imagine your squad has just won a fight and expects another team to arrive from the rear.

Instead of smoking the area in front, obscure the route behind you while the squad heals and repositions.

The same principle works during a retreat.

Smoke the route the enemy is using to maintain visual contact, then change direction.

The enemy expects the smoke to tell them where you are going.

Instead, use it to hide where you stopped going.


12. The Layered Smoke Setup

Two smoke charges can create a much better route when used as separate stages.

First smoke

Remove the current firing lane.

Move

Take the first piece of safe ground.

Second smoke

Solve the next sightline.

Move again

Reach the final piece of cover.

That is far better than dropping both smokes at once simply because you have them available.

Think of each canister as solving a different moment in the rotation.


13. The False Rotation Setup

Smoke can hide more than movement.

It can hide your intention.

Suppose your team is expected to rotate left.

Throwing smoke on the left can make that route look like your obvious plan.

Instead, use the visual disruption to reposition somewhere else.

This works because enemies often react to incomplete information.

Do not overuse it, though.

A trick stops being a trick once the enemy expects the trick.


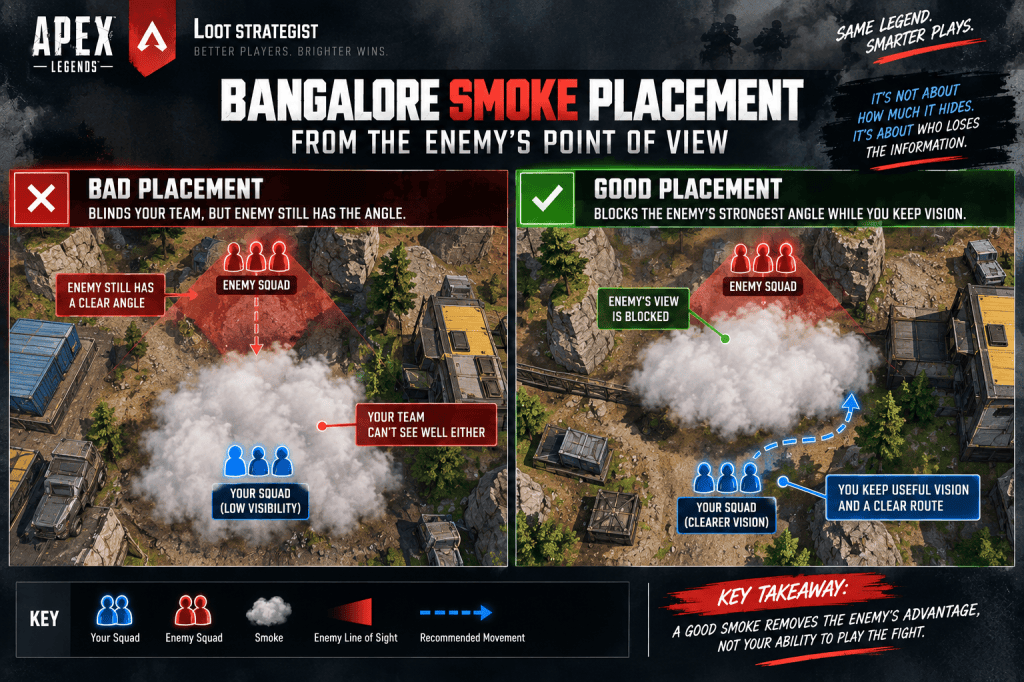
14. Smoke From the Enemy’s Point of View

And for this article specifically, I would consider those two body graphics worth the effort rather than optional decoration.

This is an excellent habit to practice.

After placing a smoke, mentally step into the enemy’s position.

Ask:

What can they still see?

Which teammate can they still shoot?

Which route remains open?

Can they walk around the cloud?

Can they push through it?

Have I actually removed their strongest angle?

That last question is the one that matters.

A smoke cloud can look enormous from your perspective while leaving the enemy’s most important sightline completely intact.


15. Use Smoke to Create an Angle, Not Just Cover One

A more advanced Bangalore play is to use smoke to manufacture a new angle.

For example:

Smoke the original angle → move while hidden → appear from another side

Now the enemy is no longer fighting the position they prepared for.

This pairs naturally with Bangalore’s Double Time.

Her passive temporarily increases her speed when she takes fire while sprinting, so the value of the movement is not simply getting away faster. It can help her change where the next peek comes from. (EA Help)

The smoke hides the transition.

Double Time helps accelerate it.

The new angle creates the payoff.


16. Know When Fighting Inside Smoke Is a Bad Idea

Smoke can encourage a close-range fight, but that does not mean every fight inside the cloud is favorable.

EA changed Smoke Launcher so players inside smoke can see nearby players within 20 meters with a white highlight, while that highlight is not visible from outside the smoke. EA specifically described the change as making close smoke fights more readable while preserving smoke’s sight-blocking and rotational role.

That means you should not assume:

“We are inside Bangalore smoke, so we automatically have the advantage.”

You still need:

  • better weapons
  • better health
  • better positioning
  • a clear target
  • a reason to take the fight

Sometimes the best play is to use the smoke to avoid the fight entirely.


17. Smoke + Weapon Range

This is where your smoke guide and loadout guide should reinforce each other.

If you’re carrying:

AR + Shotgun

you can use Smoke to move the fight from mid-range into the shotgun’s preferred distance.

If you’re carrying:

Marksman + SMG

you can use Smoke to close the gap after creating ranged pressure.

If you’re carrying:

Sniper + SMG

you can smoke your escape or approach once the enemy decides to push.

The weapon pairing changes how valuable a particular smoke placement becomes.

That is why there is no universal “best smoke spot.”

The correct placement depends partly on what you intend to do immediately afterward.


18. Reactive Smoke Changes the Timing

Bangalore’s smoke is no longer something you should treat as untouchable terrain.

EA’s Showdown changes made Smoke Launcher reactive, allowing nearby ordnance and abilities to disable the gas for five seconds.

That has a practical consequence:

Do not spend too much time standing around inside the smoke after you get what you needed from it.

Use the window.

Cross.

Heal.

Split the enemy.

Take the angle.

Reset.

Then move.

The smoke is there to create a favorable moment, not a permanent room.


19. Advanced Setup: Deny → Split → Collapse

This is one of the most useful repeatable setups to practice.

Deny

Smoke the enemy support angle.

Split

Wait for the smoke to separate one player from the rest of the squad’s vision.

Collapse

Your team immediately focuses the isolated player.

The important part is coordination.

If nobody acts on the separation, the smoke has simply delayed the fight.

Call the target before the canister lands.


20. Advanced Setup: Deny → Cross → Re-smoke

This is the open-ground version.

Deny

Remove the strongest firing lane.

Cross

Move to the next piece of cover.

Re-smoke

Use another smoke to solve the new angle.

This creates a controlled rotation instead of one giant panic cloud.

It’s particularly useful when the distance between cover points is too large for one smoke to solve safely.


21. Advanced Setup: Smoke → Fake → Reposition

This one is less about combat and more about creating uncertainty.

Smoke

Block the route enemies expect you to use.

Fake

Give them a reason to believe you’re taking that route.

Reposition

Move somewhere else while their attention is tied to the smoke.

This works best when the enemy has limited time to react.

It also works badly when you try to repeat it every fight.


22. Placement Mistakes to Stop Making

Smoking the entire area automatically

More smoke does not necessarily mean more control.

Smoking your own teammate’s winning angle

If your squad already has a clean firing lane, don’t erase it without a reason.

Placing smoke without a destination

A smoke that leaves you standing in the open when it clears has only postponed the problem.

Using both smokes at once every time

Save the second problem for the second canister.

Smoking the enemy and then waiting

If the smoke creates an opening, use it.

Assuming smoke equals safety

The enemy can still push, interact with the cloud, or challenge the fight from close range. (EA)

Forgetting the enemy’s perspective

Always check what information remains available to them.


23. Three Bangalore Smoke Drills

You can practice the placement logic in the Firing Range without trying to memorize map-specific lineups.

Drill 1: The Angle Cut

Choose a piece of cover.

Imagine an enemy holding a sightline.

Place the smoke so that it removes that angle while leaving part of your own vision intact.

Repeat from several distances.

Drill 2: The Smoke Corridor

Choose two pieces of cover.

Use one smoke to cross toward the first.

Then a second to reach the next.

The goal is to stop moving in the open the instant the first smoke ends.

Drill 3: The Isolation Test

Imagine three enemies positioned with one slightly separated.

Practice placing smoke between the isolated target and the support players.

Then immediately move toward the target.

The point is not to throw the perfect canister every time.

It is to make the placement decision quickly.

For a broader training routine, link this section to your Apex Legends Firing Range Practice Guide.


24. The Five-Question Smoke Check

Before pressing Tactical, quickly ask:

What am I hiding?

Whose angle am I removing?

Where does my squad go next?

What happens if they push through the smoke?

Do I need this smoke again in the next few seconds?

If you can answer those questions quickly, your smoke usage will become far more deliberate.

You don’t need a perfect lineup.

You need a clear purpose.


Final Thoughts

Bangalore’s Smoke Launcher is strongest when it changes the shape of the fight.

The best smoke is not necessarily the biggest one or the one that hides your whole squad.

It is the one that removes the enemy’s strongest option while giving your team a better one.

Smoke the firing lane.

Cut the crossfire.

Separate the support player.

Create the route.

Take the angle.

Then move again.

That is why Bangalore’s strongest smoke placements tend to follow the same underlying logic:

Deny → Create Space → Act → Leave

Once you start viewing Smoke Launcher as a positioning tool rather than a panic button, the Tactical becomes much easier to use well.

And when you are choosing weapons for those smoke-created fights, pair this guide with Apex Legends Bangalore Best Loadouts: Weapons for Every Range. Your smoke determines how the fight changes; your loadout determines what you can do with that opening.


Sources & Updates

EA’s current Bangalore documentation confirms that Smoke Launcher creates a smoke wall on impact and that Bangalore’s canisters can break or breach doors. Bangalore is currently classified as an Assault Legend.

EA’s Showdown patch notes introduced the modern Smoke Launcher tuning, including the 30-second cooldown, 2,900 projectile speed, 0.25-second pull-out time, door interaction, and reactive smoke behavior.

EA also changed smoke combat so nearby players inside the smoke can see one another with a white highlight within 20 meters, while that highlight is not visible from outside the smoke.

Apex Legends Bangalore Best Loadouts: Weapons for Every Range

Apex Legends Bangalore Best Loadouts: Weapons for Every Range

Bangalore can make an average loadout feel much smarter because her kit changes how fights unfold. Smoke Launcher can cut sightlines and create room to move, Double Time gives her another layer of mobility when she comes under fire, and Rolling Thunder can disrupt an area and force enemies to move. She is also an Assault Legend, giving her class-based advantages around ammunition, grenades, weapon handling, and weapon attachments. (EA Help)

That makes Bangalore a particularly flexible Legend when it comes to weapons. Rather than chasing one supposedly perfect combination, it makes more sense to carry a gun for applying pressure and another for converting that pressure into a knock.

This guide is built around that idea: a pressure weapon plus a finisher.

The recommendations below are Loot Strategist editorial picks, not official EA rankings. They are based on weapon range, complementary roles, Bangalore’s ability to control visibility and reposition, Assault-class inventory advantages, and how well a setup continues to work when your ideal loot simply does not appear.

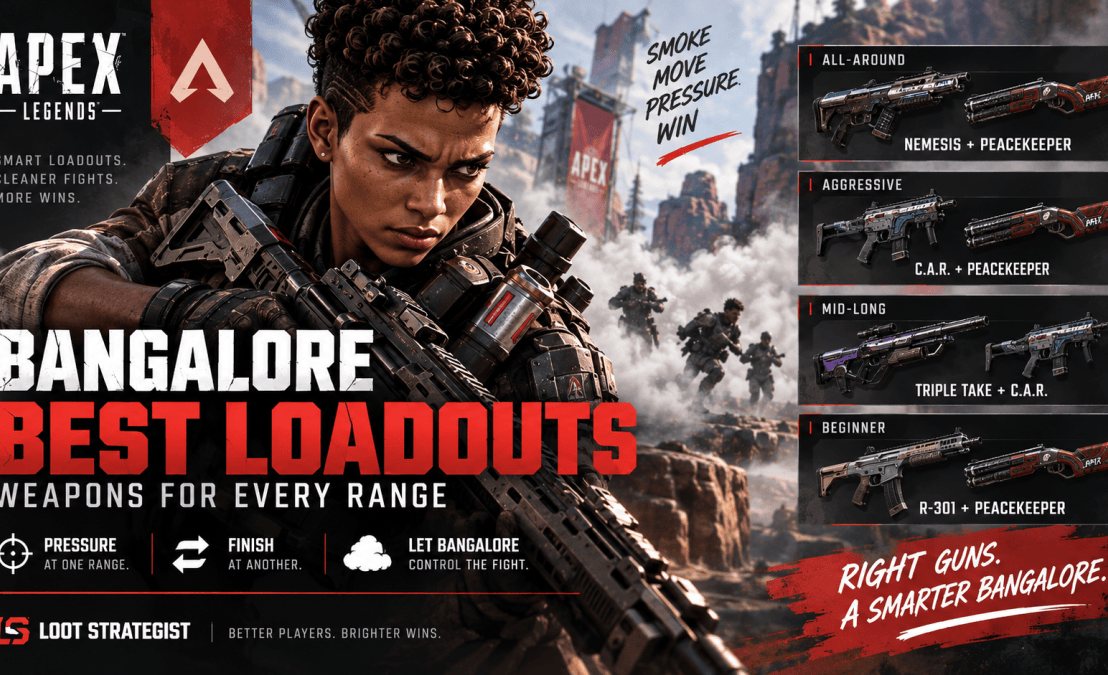
Bangalore Best Loadouts at a Glance

PlaystyleLoadoutWhy It Works
Our All-Around PickNemesis + PeacekeeperStrong mid-range pressure with a reliable close-range finisher
Our Aggressive PickC.A.R. SMG + PeacekeeperFast entry pressure and brutal close-range follow-up
Our Balanced Rifle PickFlatline + PeacekeeperReliable mid-range damage without giving up close-range power
Our Mid-Long PickTriple Take + C.A.R.Chip damage at range with a fast weapon for the collapse
Our Long-Range PickCharge Rifle + C.A.R.Distance control followed by a flexible close-range option
Our Beginner PickR-301 + PeacekeeperSimple rifle handling with a clear close-range answer
Our Care Package Pairing30-30 Repeater + C.A.R. or PeacekeeperLong-range pressure backed by a weapon that handles the closing fight

EA currently classifies assault rifles as all-around weapons for close- and mid-range combat, SMGs as fast-combat weapons, marksman weapons as the space between ARs and snipers, and shotguns as close-range weapons.


Why Bangalore Wants Two Different Ranges

Bangalore does not need two weapons that solve the same problem.

She already has tools for shaping an engagement. Smoke can shut down a sightline, Double Time can help her reposition under fire, and Rolling Thunder can make an enemy team uncomfortable enough to abandon a strong position. (EA Help)

Your weapons should take advantage of that.

A practical Bangalore loadout usually has two jobs:

Pressure weapon: creates damage, forces healing, cracks shields, or makes an enemy move.

Finisher: punishes the enemy once the fight compresses into close range.

That is why combinations such as Nemesis + Peacekeeper or Triple Take + C.A.R. make more sense than simply carrying two guns that excel at the same distance.

The strongest pairing is usually the one that gives Bangalore an answer for the next phase of the fight.


Our All-Around Pick: Nemesis + Peacekeeper

This is the pairing to reach for when you want Bangalore to stay dangerous without committing to one specific type of engagement.

The Nemesis handles the pressure side of the equation. You can use it to work from mid-range, punish exposed enemies, and create the damage that makes a Smoke push worthwhile.

Then the Peacekeeper takes over when the distance collapses.

That combination fits Bangalore’s natural rhythm:

Pressure → Smoke → Close distance → Finish

The shotgun also gives you a genuine threat when an enemy realizes the smoke is not just cover, but an invitation to fight at your preferred distance.

The biggest benefit is flexibility. You can start a fight at range, disappear into smoke, reposition, and emerge with a weapon built for the final exchange.

Best for

Players who want one loadout that can comfortably handle mixed-range fights without constantly changing their game plan.


Our Aggressive Pick: C.A.R. SMG + Peacekeeper

When Bangalore is playing on the front foot, this is the louder option.

The C.A.R. SMG gives you fast close-range pressure, while the Peacekeeper provides a burst-damage finisher once you have forced the fight into a tighter space. Both weapons support the same basic idea: get close, create panic, and finish before the enemy can stabilize.

This pairs especially well with Smoke Launcher.

Smoke can remove long sightlines, allowing Bangalore to cross space without giving the opposing team a clean beam. Once she arrives inside fighting distance, the C.A.R. and Peacekeeper can do the rest.

The trade-off is obvious: you give up some comfortable long-range capability.

That is perfectly acceptable when your plan is to make the fight smaller.

Best for

Aggressive Bangalore players, building fights, close rotations, and teams that prefer taking space rather than waiting for enemies to walk into it.


Our Balanced Rifle Pick: Flatline + Peacekeeper

The Flatline is the more traditional rifle choice here.

Compared with a dedicated long-range weapon, it keeps Bangalore comfortable at closer distances while still giving her a solid mid-range pressure tool. The Peacekeeper covers the gap once the fight gets messy.

This setup also works well when your squad does not want Bangalore playing as a pure entry fragger.

You can hold an angle with the Flatline, use Smoke to break enemy vision, then switch weapons as the fight moves closer.

It is less specialized than some of the other combinations in this guide, which is precisely why it works.

Best for

Players who want a conventional rifle-and-shotgun setup that can adapt to different fight locations.


Our Mid-Long Pick: Triple Take + C.A.R.

This is the loadout for Bangalore players who enjoy starting fights from a little farther out.

The Triple Take gives you a marksman option for applying pressure without committing to a full sniper setup. The C.A.R. then gives you a quick answer when the enemy closes the distance.

That range transition matters.

A common mistake with long-range loadouts is winning the first exchange and then discovering that the second phase of the fight is happening twenty meters away with the wrong weapon in your hands.

Triple Take handles the setup.

C.A.R. handles the collapse.

That makes the pairing especially useful on open terrain where Bangalore can use Smoke to change the geometry of the fight after landing initial damage.

EA classifies the Triple Take alongside the other current marksman weapons, which occupy the gap between assault rifles and dedicated sniper rifles.

Best for

Players who like poking first, closing second, and using Bangalore’s smoke to control the transition.


Our Long-Range Pick: Charge Rifle + C.A.R.

This is the more specialized setup.

The Charge Rifle is useful when the squad wants Bangalore to apply pressure from genuine long range, while the C.A.R. keeps her from becoming helpless once an enemy team pushes into close range.

The pairing is particularly interesting for Bangalore because Smoke gives her a way to disengage after taking a long-range fight.

You can pressure from distance.

You can cut the sightline.

You can reposition.

Then you can take the close fight with the C.A.R. when the enemy tries to force the issue.

EA continues to classify the Charge Rifle as a sniper weapon, while its September 2026 midseason patch increased its maximum-distance damage and adjusted its Selectfire penalty.

Best for

Open areas, long sightlines, and squads that are comfortable turning Bangalore into a long-range pressure player before closing the fight.


Our Beginner Pick: R-301 + Peacekeeper

There is a reason the R-301 remains one of the easiest recommendations for newer players.

EA specifically recommends the R-301 as a beginner-friendly assault rifle, while also describing ARs as versatile weapons for different forms of combat.

That simplicity works beautifully with Bangalore.

Use the R-301 to learn when to take mid-range fights.

Use Smoke when you need to cross dangerous space.

Use the Peacekeeper once the enemy is close enough that precision burst damage matters more than sustained fire.

You are not asking yourself to learn two highly specialized weapons at once. Each gun has a very obvious job.

Best for

Newer Bangalore players who want a loadout that is easy to understand while learning her movement and Smoke usage.


Our Care Package Pairing: 30-30 Repeater + C.A.R. or Peacekeeper

The 30-30 Repeater gives Bangalore a strong long-range pressure option, but the second weapon should reflect how you expect the next fight to develop.

Pair it with the C.A.R. when you want a faster, more flexible close-range weapon.

Choose the Peacekeeper when you expect the fight to end in buildings, tight cover, or point-blank exchanges.

The 30-30’s current Care Package role makes it more of a situational upgrade than a foundation for your entire loadout. The best use is usually to let the rifle handle the opening pressure while your second weapon remains ready for the fight that follows.


Shotguns Make Sense on Bangalore for a Reason

A shotgun is not mandatory on Bangalore, but it complements her kit extremely well.

Smoke naturally creates shorter visual engagements. That means a weapon designed to punish enemies at close range can become disproportionately valuable once Bangalore controls the sightline.

The Peacekeeper is the cleanest example, but the broader principle matters more:

Smoke is not just protection. It can change which weapon has the advantage.

That is why a Bangalore carrying an AR plus shotgun can feel very different from the same player carrying two mid-range weapons.

EA currently lists the Peacekeeper alongside the EVA-8, Mastiff, and Mozambique in the shotgun category. (EA Help)


What About SMGs?

SMGs are the natural alternative when you want more sustained close-range pressure.

EA describes the current SMG category as being built around fast combat, with weapons such as the C.A.R., Volt, R-99, Alternator, and Prowler.

For Bangalore, SMGs work particularly well when the plan is:

Smoke → close distance → force a fast exchange → reset

The major advantage over a shotgun is forgiveness during extended close-range fights.

The major disadvantage is that you lose some of the immediate burst that makes a shotgun so threatening around cover and doorways.

Neither is inherently better. They support different fight patterns.


Bangalore’s Assault Class Changes How You Build the Inventory

Bangalore’s Assault classification matters beyond the weapons themselves.

EA says Assault Legends carry more ammunition per stack, have extra grenade slots, use weapons faster, and receive a temporary reload and movement-speed increase when their shield breaks. Assault Legends can also access the secret compartment of Supply Bins for weapon attachments.

That gives Bangalore a little more room to build an inventory around her weapons.

A rifle-heavy setup can justify carrying more ammunition.

An aggressive SMG-and-shotgun setup can devote more room to healing and grenades.

And Bangalore’s additional grenade capacity pairs naturally with a kit designed around forcing enemies out of cover.

The important part is not to treat the extra inventory space as permission to hoard everything.

Carry what supports the next fight.


The Energy Ammo Rework Changes Some Loadout Decisions

One of the biggest current weapon-system changes in Marked is the energy ammo overhaul.

Energy weapons now come with their own regenerating ammo stockpile, and players no longer need to carry traditional energy-ammo bricks for them. (EA Forums)

That makes weapons such as the Nemesis and C.A.R. more interesting from an inventory-management perspective than they would have been under the older ammo system.

For Bangalore, that can be useful when you want more backpack room for:

  • Shield resources
  • Healing
  • Grenades
  • Utility items

That does not automatically make energy weapons superior. It simply changes one of the costs attached to choosing them.


Long-Range Weapons Worth Considering Right Now

Bangalore does not need to use the same ranged weapon every match.

The current marksman pool includes the G7 Scout, Triple Take, 30-30 Repeater, and Bocek 2.0, while the sniper category includes the Charge Rifle, Longbow DMR, Kraber, and Sentinel. (EA Help)

For this particular playstyle, the important question is not “Which one is strongest?”

Ask instead:

How far away do I want the next fight to begin?

The answer changes your loadout.

G7 Scout

A flexible marksman option that keeps you closer to the AR end of the range spectrum.

Triple Take

Useful when you want stronger mid-to-long-range pressure without committing fully to a sniper-style setup.

30-30 Repeater

A more deliberate ranged weapon that fits players who are comfortable controlling the opening phase of an engagement.

Charge Rifle

The specialist choice for genuinely long-range pressure.

Bocek 2.0

A different rhythm entirely. Its current stockpile changes also make it worth considering when you understand its handling and projectile timing. (EA)


Don’t Build Around a Weapon You Never Practice

This is one of the easiest mistakes to make with “best loadout” guides.

A theoretical loadout is worthless when you cannot hit your shots with it.

That matters even more on Bangalore because Smoke can create chaotic, close-range encounters where weapon familiarity matters more than having the technically ideal combination.

A weapon you can control under pressure is usually more useful than a supposedly stronger weapon that makes you hesitate.

EA itself advises players to experiment with different weapons because guns have different strengths and perform differently across ranges.

That is especially important for the more specialized weapons in this guide.


Pair Your Weapons With Smoke, Not Just With Each Other

Bangalore’s Smoke Launcher should influence your weapon choice.

Think about what happens immediately after you press the Tactical button.

Smoke before a rotation

Use the weapon that lets you exploit the new position.

Smoke before a push

Have the close-range weapon ready.

Smoke after taking damage

Use the time to reset rather than automatically rushing forward.

Smoke during a split fight

Choose the weapon that can pressure an enemy before they reconnect with their squad.

That is where Bangalore starts to feel different from a generic weapons guide.

The question is not simply which gun has the best statistics.

It is which gun becomes more useful because Bangalore changed the fight.


Should Bangalore Run Two Weapons for the Same Range?

Usually, no.

There are situations where a double-close setup or double-ranged setup works, but both options create a very specific game plan.

Two close-range weapons can be brutal in buildings, but they leave you with limited answers when an enemy refuses to enter your space.

Two long-range weapons can dominate open terrain, but they become awkward when another team uses mobility or cover to force a close fight.

For most players, complementary ranges create more options.

That is why Pressure + Finisher works so well as a default rule.


Corrupted Attachments and Bangalore Loadouts

Marked also introduced Corrupted Attachments, which provide stronger weapon benefits at the cost of a drawback. Only one can be attached to a weapon at a time. (EA Forums)

For Bangalore, that creates another reason not to think about attachments in isolation.

A powerful attachment can be worth taking when the weapon’s role already matches your game plan.

For example, a weapon you are deliberately using to pressure from distance can tolerate a drawback that matters mainly in another part of the fight.

The best attachment is therefore not automatically the one with the biggest positive number.

It is the one whose drawback causes you the least trouble.


The Real Best Bangalore Gun Is the One That Matches the Next Fight

This is the part of loadout guides that often gets lost.

You can land on a Nemesis and Peacekeeper setup, decide it is your “perfect” Bangalore loadout, and then spend the rest of the match refusing perfectly usable alternatives because they do not match the guide.

That is backwards.

A good gun on the ground beats a perfect gun that does not exist in your inventory.

A Bangalore player should be willing to adjust.

Open terrain? A marksman weapon starts looking better.

Tight buildings? The shotgun becomes more valuable.

Need to rotate through exposed space? Smoke plus a flexible rifle makes more sense.

Already have a strong long-range weapon from a Care Package? Build the second slot around what happens after the enemy closes.

That adaptability is more important than memorizing one combination.


Common Bangalore Loadout Mistakes

Carrying two weapons that solve the same problem

This can leave you dominant at one distance and useless at another.

Picking a weapon because it is currently popular

A popular weapon is not automatically the right weapon for your mechanical comfort or preferred fight distance.

Ignoring Bangalore’s Smoke

Your weapons should benefit from the sightline changes your Tactical creates.

Overcommitting to long range

Damage from a distance is useful. Damage that never becomes a knock is less useful.

Treating every fight like a push

Bangalore is strong because she can control the tempo. Sometimes the correct play is to create space, heal, and make the enemy chase.


Bangalore Loadout Decision Tree

Use this quick check when you are standing over your next weapon pickup:

Do I want to fight at close range?

→ Shotgun + SMG

Do I want one reliable mid-range weapon?

→ AR + Shotgun

Do I want to start fights from farther away?

→ Marksman + SMG

Do I expect long sightlines?

→ Sniper + SMG

Am I learning Bangalore?

→ R-301 + Peacekeeper

Did I find a weapon I am significantly more comfortable with?

→ Build around it.

That last answer matters more than people think.


Final Thoughts

Bangalore’s strongest loadouts are not really about finding two “best” guns.

They are about building a pair that gives her a clear way to start a fight, change the conditions, and finish it.

That is why Nemesis + Peacekeeper works as our all-around editorial pick, while C.A.R. + Peacekeeper is better suited to a more aggressive approach and Triple Take + C.A.R. makes more sense for players who prefer to apply pressure before closing the distance.

The weapon names may change as Apex evolves. The principle is much more durable:

Pressure weapon + finisher.

Let Bangalore’s Smoke create the opening. Let the first weapon create the problem. Then let the second weapon end the conversation.


Sources & Updates

This Bangalore loadout guide was reviewed against current EA information for Apex Legends: Marked, including the current weapon system, Bangalore’s Legend class, the energy-ammo overhaul, Corrupted Attachments, and the September 2026 midseason weapon changes. Marked launched August 4, 2026, with Split 2 beginning September 15. (EA Help)

Primary sources: EA’s [Apex Legends guns and weapons guide], EA’s [Bangalore and Legend abilities guide], EA’s [Marked information], and EA’s [Marked Midseason Patch Notes]. (EA Help)

Related guides:

Apex Legends Bangalore Guide
Apex Legends Combat Guide → “combat fundamentals”
Apex Legends Positioning Guide → “better positioning”
Apex Legends Aim Guide → “improve your aim”
Apex Legends Firing Range Practice Guide → “practice your weapons”
Apex Legends Loot Guide → “loot more efficiently”
Apex Legends Settings Guide → “optimize your settings”

Apex Legends Bangalore Guide: Smoke, Double Time & More

Apex Legends Bangalore Guide: Smoke, Double Time & More

Apex Legends Bangalore Guide: Smoke Smart, Move Fast & Control the Fight

Bangalore is easy to underestimate.

At first glance, her kit looks straightforward: move faster when you’re under fire, launch smoke, call in an artillery strike. But that description misses what makes her difficult to master.

Bangalore is really a fight-control Legend. She can remove sightlines, create movement windows, disrupt defensive setups, break an enemy push, and give her squad a chance to reset when the fight starts going sideways.

The catch is that Smoke Launcher works both ways.

A good smoke can save your squad.

A bad smoke can blind your own teammates, erase a winning angle, and give the enemy exactly the reset they needed.

That tension is where Bangalore gets interesting.

EA currently lists Bangalore as an Assault Legend with three core abilities: Double Time, Smoke Launcher, and Rolling Thunder. (EA) (EA Help)

This guide covers the current Bangalore kit, her modern Legend Upgrades, smarter smoke placement, Double Time movement, Rolling Thunder usage, common mistakes, and the situations where Bangalore’s abilities are most valuable.

Loot Strategist Bangalore Rule: Smoke should change the fight, not just hide it.


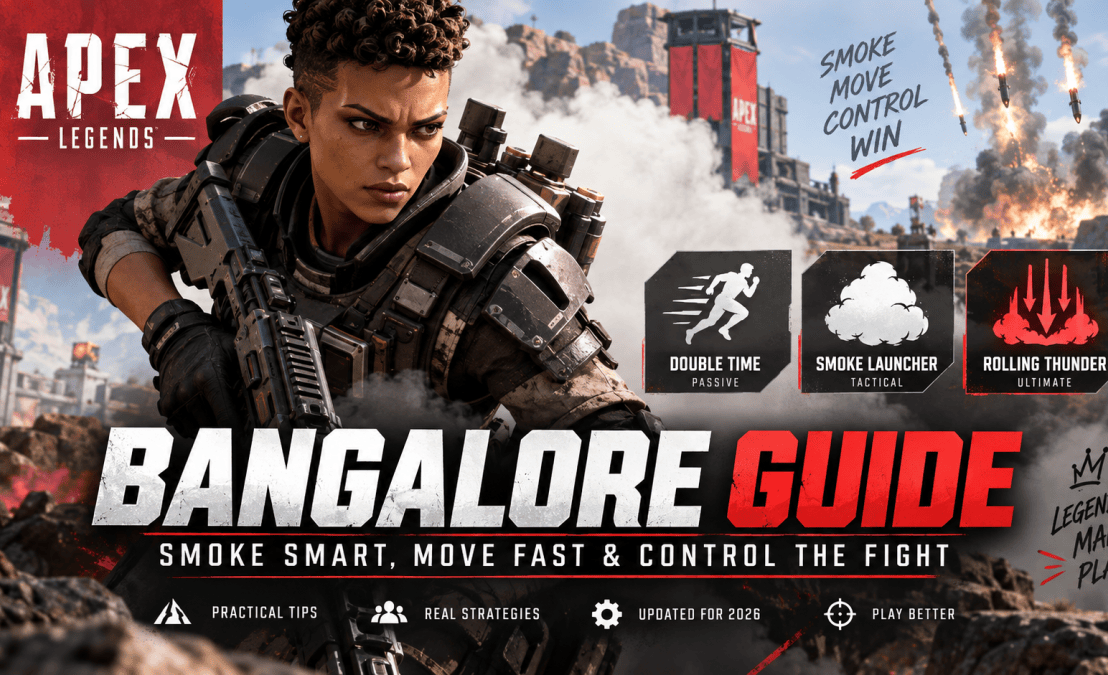
Bangalore’s Current Kit at a Glance

AbilityWhat it does
Passive — Double TimeTaking fire while sprinting temporarily makes Bangalore faster.
Tactical — Smoke LauncherFires a canister that creates a smoke wall on impact. The canister can also break or breach doors.
Ultimate — Rolling ThunderCalls in an artillery strike that slowly creeps across the landscape.
Class — AssaultBangalore benefits from the current Assault class system.

EA’s current Legend guide confirms these core abilities and Bangalore’s Assault classification.

There are also some important differences between today’s Bangalore and the one described in old launch-era guides. In the 2025 Showdown update, EA increased Double Time’s speed bonus by 5%, reduced Smoke Launcher’s cooldown to 30 seconds, increased its projectile speed, shortened its pull-out time, added stronger door interaction, and made the smoke reactive to nearby ordnance and abilities. Rolling Thunder’s cooldown was reduced to 210 seconds and its firing sequence was sped up.

So, yes: your old Bangalore muscle memory may need an update.


Bangalore’s Real Strength: Control the Information

Apex Legends Bangalore guide infographic showing her Assault class, Double Time, Smoke Launcher, Rolling Thunder, playstyle, and current Legend Upgrades

Smoke should change the fight, not just hide it.

Bangalore doesn’t need wallhacks to gain an advantage.

She can decide how much information the enemy gets.

Her abilities can influence:

what the enemy can see

which sightline remains useful

where your squad can move

when an enemy push becomes awkward

how long your team has to reset

That’s the foundation of Bangalore’s playstyle.

A smoke wall doesn’t have to hide your entire squad to be useful.

It only needs to remove the most valuable piece of enemy information for long enough to change the next few seconds.

That’s a much better way to think about Bangalore than simply:

“Throw smoke when you’re in trouble.”


The Bangalore Framework

Think about Bangalore’s kit as four linked actions:

Deny

Remove the enemy’s most useful sightline.

Move

Use the temporary information gap to reach a better position or create a new angle.

Pressure

Attack while the enemy is forced to adjust.

Reset

When the exchange turns bad, use the same tools to regain control.

Deny → Move → Pressure → Reset

The four steps won’t always happen in that order, and you don’t need to force every ability into the sequence.

The important part is that each ability should create a reason for the next action.


Passive: Double Time

Double Time triggers when Bangalore takes fire while sprinting and temporarily increases her movement speed. EA’s current Legend documentation confirms the core behavior, while the 2025 Showdown update increased the passive’s speed by 5%. (EA Help)

It is easy to treat Double Time as an escape button.

That’s only half of it.

A better Bangalore player uses the speed boost to change the geometry of the fight.

You can use Double Time to:

reach cover

cross a dangerous gap

break line of sight

change sides of a building

create a new peek

move toward a knocked teammate

The speed matters because it gives you options.


Don’t Waste Double Time Running in a Straight Line

Getting faster doesn’t automatically make you safer.

You can trigger Double Time and still run straight into another enemy’s line of fire.

Instead, give the speed a destination.

Think:

Cover

Corner

Teammate

New angle

Escape route

The passive is at its best when the extra speed gets you somewhere the enemy can’t easily punish.

Speed without a destination is just faster bad positioning.

That’s particularly important when several squads are fighting.

A route that looks safe from one enemy can run directly into another.


Use Double Time to Create a New Peek

Imagine you’re holding the right side of a rock.

An enemy is watching that exact angle.

You take a hit.

Double Time activates.

Rather than sprinting directly backward, use the speed to swing around the rock.

Now your next peek comes from a different direction.

The enemy didn’t suddenly get worse at aiming.

They simply lost their prediction.

That’s one of the cleanest ways to turn Bangalore’s passive into offensive utility.


Double Time and a Knocked Teammate

Bangalore’s current Level 3 Medal of Honor upgrade makes Double Time trigger when she runs toward knocked allies while also improving revive speed. (EA Showdown patch notes) (EA)

That creates a particularly useful rescue tool.

You can use the passive to:

reach a knocked teammate

cross danger faster

create a safer revive path

break away from an enemy angle before attempting the revive

The mistake is treating the speed itself as the objective.

It isn’t.

The objective is getting the teammate back into the fight without turning yourself into the next knock.


Smoke Launcher Is Bangalore’s Centerpiece

Smoke Launcher is the ability most closely associated with Bangalore, and for good reason.

EA’s current Bangalore documentation says it creates a smoke wall and can break or breach doors.

The current Showdown tuning also matters:

30-second cooldown

2900 projectile speed

0.25-second pull-out time

Canister breaks and travels through doors

Smoke can be disabled for five seconds by ordnance and abilities used inside or nearby

These aren’t just patch-note numbers.

They affect how the tactical should actually be used.

Smoke is now better suited to short, deliberate windows than endless battlefield clutter.


The Three Jobs of Bangalore Smoke

Good Bangalore smoke usually solves one of three problems.

Deny

Remove an enemy’s useful line of sight.

Move

Give your squad a temporary path through danger.

Reset

Create a short window to heal, revive, reload, or reposition.

A smoke can accomplish more than one job.

That’s great.

But before you fire it, know what you want the smoke to accomplish.

Ask:

What sightline am I removing?

Where are we going?

What reset am I buying?

Those three questions give you a much better smoke than simply throwing the canister at your own feet.


Smoke the Enemy’s Advantage

Suppose an enemy team is holding a building and watching the only open route toward them.

You could smoke your own squad.

Or you could smoke the enemy’s sightline.

The second option is often better.

Now the enemy has to decide whether to:

hold blind

move

give up an angle

push through

Your squad has gained something even though you haven’t dealt a single point of damage.

That’s the value of information denial.


Don’t Automatically Smoke Your Own Team

This is the classic Bangalore mistake.

Your squad is holding a strong position with a clean view of the enemy.

You get pressured.

You panic.

Smoke lands across the entire area.

Now:

your team can’t see

the enemy can’t see

your follow-up damage is gone

the enemy gets time to heal

You may have solved the immediate threat while destroying your own advantage.

Self-smoke absolutely has its uses.

It just needs a reason.


When Self-Smoke Is Actually Good

Use your own smoke when visibility is currently hurting your squad more than it helps.

Good examples:

Reviving under enemy sightlines

Healing behind weak cover

Crossing an exposed section

Breaking several enemy sightlines simultaneously

Disengaging from a losing fight

Creating a temporary approach

In those situations, you’re not “hiding.”

You’re buying time.

The destination still matters.


Smoke Should Lead Somewhere

One of the easiest Bangalore habits to develop is:

Smoke → Move → Hard Cover

not:

Smoke → Stand in Smoke

Smoke disappears.

Your new position doesn’t.

If your smoke lets you cross an open area but leaves you standing in the open when it clears, you’ve only delayed the problem.

Use the tactical to reach something better:

rock

building

head-glitch

corner

teammate

new angle

The smoke is the bridge.

It should not be the destination.


Smoke Can Split an Enemy Team

You don’t always need to smoke all three opponents.

Sometimes the best smoke creates a small gap between two enemies.

Imagine:

Two opponents are holding one side of the fight.

A third player is slightly separated.

A smoke wall cuts the support line.

Now your squad may be able to pressure one player without taking immediate fire from all three.

That is a much more valuable use of smoke than simply covering everything.

The goal isn’t maximum visual obstruction.

It is useful asymmetry.


Smoke Before the Push

Don’t save Smoke Launcher exclusively for disaster.

Proactive smoke can make an enemy’s defensive position much harder to hold.

For example:

Smoke their strongest angle.

Move while they lose vision.

Create a second angle.

Attack from there.

Now your smoke has created an advantage instead of merely hiding a disadvantage.

This is where Bangalore begins to feel like a control Legend rather than a panic-button Legend.


Smoke After the Damage

Smoke can also protect the moment immediately after you’ve gained an advantage.

Suppose your teammate cracks an enemy.

The opponent retreats behind cover.

You can use smoke to:

protect your teammate’s reposition

cut off supporting fire

allow a safer swing

create a route toward the isolated target

The important thing is that the smoke should support the advantage you already created.

Don’t erase your own angle immediately just because the fight got exciting.


Smoke Can Break or Breach Doors

EA’s current Legend documentation explicitly says Bangalore’s smoke canisters can break or breach doors.

That gives Smoke Launcher another use in buildings.

A defender sitting safely behind a doorway may suddenly have:

a damaged door

reduced visibility

a less predictable entrance

and

less control over the timing of the push

This is one reason Bangalore’s current tactical is more than a smoke grenade.

It is also utility for disrupting defensive setups.


Bangalore Smoke Is Now Reactive

Showdown added an important interaction: Bangalore’s smoke can be disabled for five seconds when ordnance or abilities are used inside or near it. (EA Showdown patch notes) (EA)

That changes one part of the old Bangalore instinct.

Don’t assume:

“I smoked this area, so nobody can see or interact with it.”

The enemy can challenge the smoke with the right resources.

That means you should be especially careful about sitting still inside your own smoke once opponents have tools available to disrupt it.

The stronger sequence is often:

Smoke → Act → Leave or convert the advantage.

Not:

Smoke → Camp.


Fighting Inside Bangalore’s Smoke

Sometimes you have no choice.

Sometimes the enemy is forced inside with you.

But fighting in smoke isn’t automatically advantageous.

In the 2024 Double Take update, EA changed smoke combat so players inside Bangalore’s smoke within 20 meters receive a white highlight visible to other players inside the smoke. EA also removed Bloodhound’s threat vision through smoke and gas and removed smoke/gas threat vision from the 4x–10x Digital Threat scope. (EA)

That means the old Bangalore rule of:

“Smoke everything and let your team see through it”

isn’t current.

Smoke still denies long-range sightlines, but close-range fights inside the cloud are more readable for everyone who is in there.

Don’t choose that fight automatically.


Bangalore and Bloodhound: Forget the Old Meta

If you’ve watched old Apex guides, you’ve probably seen the classic:

Bangalore smoke + Bloodhound scan/ultimate

combination.

That interaction changed.

EA removed Bloodhound’s threat vision through Bangalore’s smoke and specifically cited the Bangalore/Bloodhound combination as having become too dominant.

Bloodhound has since been reworked again for Season 30, with a new passive, tactical behavior, and ultimate. EA’s current Marked documentation describes the reworked Bloodhound around tracking trails, White Ravens, snapshot scans, and the new Allfather’s Cloak ultimate.

So don’t build your Bangalore guide—or your Bangalore gameplay—around old smoke-vision advice.

The current strength of the combo is coordination and information control, not guaranteed smoke vision.


Don’t Smoke Just Because You’re Being Shot

This might be the most important Bangalore habit to break.

Getting shot does not automatically mean:

Smoke now.

You might actually need:

Cover

Movement

A teammate

A new angle

A reset

Sometimes Double Time already gives you the escape tool you need.

Sometimes smoking only makes the situation harder to read.

Before pressing the tactical, ask:

What gets better after I throw this?

If the answer is “I don’t know,” take another second.


When You Should Save Your Smoke

A Bangalore player can be too aggressive with the tactical.

Having both charges available creates flexibility.

One charge might solve the current problem.

The second might save you sixty seconds later.

Think about saving a charge when:

You’re already safe

Your squad has a strong angle

The current smoke would not change anything

You expect another fight soon

You’re about to rotate into a risky area

You are waiting for a reset opportunity

The best Bangalore players aren’t constantly throwing smoke.

They’re making smoke available when it matters most.


Rolling Thunder Is a Space-Control Tool

Rolling Thunder calls in an artillery strike that slowly creeps across the landscape. EA currently lists it as Bangalore’s Ultimate, and Showdown reduced its cooldown to 210 seconds while shortening the firing sequence. (EA; EA Showdown patch notes) (EA Help)

The common mistake is judging the ultimate by damage alone.

Its best use is often:

Zone

Deny

Disrupt

Buy time

Think about where you want the enemy to stand after the explosions begin.


Use Rolling Thunder to Move Enemies

Suppose another squad is holding a strong defensive position.

You don’t necessarily need to kill them with Rolling Thunder.

You need to make their preferred location unpleasant enough that they have to move.

That can force them:

out of cover

away from an angle

toward your squad

away from their teammate

into a less defensible area

Now your team has something to work with.

The ultimate created movement.

Your guns create the punishment.


Don’t Throw Rolling Thunder Directly on the Enemy Every Time

If the enemy has plenty of room to run, the ultimate can become little more than a loud warning.

Instead, think about:

Where do I want them to go?

Then place the ultimate to make other areas unattractive.

A good Bangalore ultimate can make the enemy choose between:

staying and taking the pressure

or

moving into the position your squad wants

That’s more powerful than simply hoping someone stands on a missile.


Rolling Thunder and Smoke Work Together

These abilities solve different parts of the same problem.

Rolling Thunder makes an area dangerous.

Smoke can hide the route your team uses while the enemy loses comfortable positions.

That gives you:

denied space

plus

denied information

plus

a movement window

The combination is particularly strong when your team already knows where it wants to go.

Don’t use both simply because both are ready.


Bangalore’s Current Legend Upgrades

This is another area where old guides are especially unreliable.

EA rebuilt Bangalore’s Legend Upgrade tree in Showdown. The old Ultimate Cooldown+ and Tactical Cooldown choices were removed; Cover Me moved to Level 2; Electric Smoke was added at Level 2; Refuge was integrated into Cover Me; and Level 3 gained ECM Payload and Medal of Honor. (EA Showdown patch notes)

Level 2: Electric Smoke

Electric Smoke electrifies Smoke Launcher and gives the tactical additional utility against enemy deployables. EA’s patch notes specify damage to enemy Ultimates and destruction of Tactical deployables.

This is the upgrade to think about when your Bangalore game revolves around breaking defensive setups.

Level 2: Cover Me

Cover Me moved to Level 2 in Showdown, with the former Refuge functionality integrated into it. EA’s earlier Bangalore upgrade documentation describes Cover Me as an upgrade that auto-pings enemies who trigger Double Time, while Refuge provided health regeneration inside Bangalore’s smoke. (EA Breakout patch notes; EA Showdown patch notes) (EA)

In practical terms, it leans harder into information and sustain around Bangalore’s own smoke.

Level 3: ECM Payload

ECM Payload electrifies Rolling Thunder, adds damage, and destroys enemy deployables.

This is the upgrade that pushes Bangalore further toward breaking entrenched defensive setups.

Level 3: Medal of Honor

Medal of Honor makes revives faster and causes Double Time to trigger while running toward knocked allies.

This is particularly useful when your matches regularly come down to recovering teammates under pressure.

The important part for an evergreen article is not declaring one universal winner.

Your upgrade should match the problem your squad is trying to solve.


Bangalore’s Upgrade Tree Is About How You Want to Fight

The choices are easier to understand when you stop thinking of them as “good versus bad.”

Think instead:

Electric Smoke → more tactical pressure against defensive utility.

Cover Me → more support and information around smoke/Double Time.

ECM Payload → stronger ultimate utility against enemy setups.

Medal of Honor → stronger teammate recovery and movement toward knocks.

EA’s 2026 Marked midseason patch notes, published September 14, do not list a Bangalore balance change, so the Showdown Bangalore tuning remains the latest Bangalore-specific change in EA’s published patch history as of this review.


Who Should Play the “Aggressive” Bangalore?

Don’t get trapped by the idea that Bangalore needs to be your entry fragger.

Her kit can support several jobs:

First contact

Angle creation

Rotations

Resets

Teammate recovery

Defensive disruption

That makes her flexible.

A Bangalore who takes every fight first can waste a lot of what makes the Legend valuable.

Often, the better move is to create the opportunity and let a teammate capitalize.


Bangalore in a 3v3

In a standard three-versus-three fight, Bangalore can contribute without being the first player through every doorway.

She can:

deny an enemy angle

open a new entry

cover a reposition

create a temporary split

protect a reset

force movement with Rolling Thunder

The strongest Bangalore play often makes the fight easier for the other two players.

That’s one reason smoke placement is such an important skill.


Bangalore in a Third Party

Third parties create exactly the sort of messy battlefield Bangalore can exploit.

But don’t automatically smoke everything.

Choose the problem.

Need to hide a wounded teammate?

Smoke the line of fire.

Need to stop another squad from seeing the first team?

Smoke the connecting sightline.

Need to escape?

Smoke the route, then move.

Need to isolate one squad from another?

Use the smoke wall to cut visibility between them.

Bangalore is at her best when the chaos becomes more useful to your team than the enemy.


Bangalore in Open Terrain

Open ground is where Smoke Launcher can create huge value.

Long sightlines are dangerous.

Smoke temporarily removes them.

But smoke isn’t hard cover.

It doesn’t stop bullets forever.

Use:

Smoke → movement → hard cover

not:

Smoke → stand still

The second approach simply creates a delayed problem.


Bangalore in Buildings

Buildings create a different set of problems.

Smoke can interact with:

doors

windows

stairs

hallways

entries

Because Smoke Launcher can breach doors under the current Bangalore kit, it can help disrupt defensive setups as well as deny vision. (EA Help)

But indoor smoke can become dangerous quickly.

You have less space.

Enemy movement is harder to predict.

Your own squad can block itself.

And opponents can challenge the smoke at close range.

Don’t treat a tiny room filled with smoke as automatically favorable.


The “Smoke and Run” Habit

This is the beginner Bangalore sequence:

Get shot → Smoke → Run

Sometimes that’s exactly what you need.

But Bangalore offers more.

Try:

Get shot → Smoke → reposition → new angle → re-engage

or:

Get shot → Smoke → cover teammate → reset

or:

Get shot → Smoke enemy sightline → pressure while they can’t respond cleanly

The smoke should be the start of your next decision, not the end of the previous one.


Common Bangalore Mistakes

Smoking Your Own Winning Angle

You had the better sightline.

Then you erased it.

Don’t.

Using Both Smoke Charges Automatically

Two charges provide flexibility. Spending both without changing the fight can leave you with nothing when the next problem appears.

Smoking Without a Destination

Temporary visibility denial is only useful if it helps you reach or protect something.

Staying in Your Own Smoke Too Long

Smoke is a window, not a permanent base.

Treating Double Time Like Invulnerability

The passive gives you speed, not immunity.

Throwing Rolling Thunder Because It’s Ready

An ultimate should create a tactical problem for the enemy.

Fighting in Smoke Without Knowing Why

Reduced visibility affects everybody.

Following Old Bloodhound Advice

Bloodhound no longer has the old threat vision through smoke. (EA)

Ignoring the Current Upgrade Tree

Tactical Cooldown, Ultimate Cooldown+, and Refuge are not the current Bangalore upgrade choices.

Using Every Ability at Once

Smoke + Double Time + Rolling Thunder can create a huge window.

It can also become three wasted resources if there is no clear follow-up.


The Bangalore Five-Second Check

Before using an ability, ask:

What am I denying?

Where am I going?

Who benefits from this?

What happens after the smoke disappears?

What will the enemy be forced to do?

That’s enough.

You don’t need an enormous flowchart in your head while bullets are flying.

You need a few questions that become automatic.


A Practical Bangalore Fight

Imagine an enemy team is holding a building while your squad sits behind weak cover.

A panic Bangalore smokes the entire area and runs forward.

A better sequence looks like this:

1. Identify the defender’s strongest sightline.

2. Smoke that sightline instead of the entire battlefield.

3. Move into better cover while the vision is blocked.

4. Keep one useful angle open for your teammate.

5. Use Double Time if incoming fire triggers it and the speed helps you reach the new position.

6. Fight once you’ve reached real cover.

7. Save the remaining smoke charge for the next reset, reposition, or push.

The ability didn’t win the fight.

It changed where the fight could happen.

Your team still had to finish it.


How to Practice Bangalore

Bangalore is a good example of why ability practice shouldn’t be reduced to mechanical repetition.

Take one weakness into the Firing Range.

Smoke placement

Pick an imaginary enemy sightline.

Ask:

What am I denying?

Then place the smoke and move to the position you wanted.

Double Time

When the passive triggers, don’t simply sprint.

Pick a destination:

Cover

New angle

Teammate

Exit

Rolling Thunder

Choose an imaginary enemy position.

Instead of asking where you might hit someone, decide:

Where do I want them to go?

Then place the ultimate around that objective.

EA’s current Legend and gameplay documentation supports using Bangalore’s kit as a combination of movement, smoke control, and artillery pressure; the real skill is learning to turn those tools into decisions rather than firing them on cooldown.


The Bangalore Checklist

Before Smoke Launcher

What sightline am I removing?

Where are we moving?

Who benefits?

Do I still need visibility from this position?

Before using Double Time aggressively

Where am I going?

Is that destination actually safer?

Can I reach another useful angle?

Before Rolling Thunder

Where do I want the enemy to move?

What space am I denying?

Can my squad capitalize?

After the ability

Did the fight actually change?

If the answer is no, you may have spent the resource without creating an advantage.


Frequently Asked Questions

Is Bangalore good for beginners?

Yes. Her abilities are easy to understand, but mastering Smoke Launcher takes practice because poor smoke placement can hurt your own team as easily as it can disrupt the enemy.

What does Bangalore’s Smoke Launcher do?

It fires a canister that creates a smoke wall on impact. EA also says the canisters can break or breach doors.

How many Smoke Launcher charges does Bangalore have?

Bangalore currently has two Smoke Launcher charges. EA’s Showdown update retained two charges while reducing the tactical cooldown to 30 seconds.

How long is Bangalore’s Smoke Launcher cooldown?

The current documented cooldown is 30 seconds. Showdown reduced it from 35 seconds to 30 seconds.

Does Bangalore’s smoke deal direct damage?

No. EA removed Smoke Launcher’s direct damage in the Shadow Society update.

Can Bangalore’s smoke break doors?

Yes. EA’s current Legend guide says the smoke canisters can break or breach doors.

Can Bloodhound see through Bangalore’s smoke?

Not with the old threat-vision mechanic. EA removed Bloodhound’s threat vision through smoke and gas in the Double Take update.

Does Digital Threat still see through Bangalore’s smoke?

No. EA removed threat vision through smoke or gas from the 4x–10x Digital Threat scope in the same update.

What does Bangalore’s Double Time do?

Taking fire while sprinting temporarily makes Bangalore faster. EA later increased its speed by 5% in Showdown.

What does Rolling Thunder do?

It calls in an artillery strike that slowly creeps across the landscape. Its current documented cooldown is 210 seconds following the Showdown update.

What are Bangalore’s current Legend Upgrades?

At Level 2, the current options are Electric Smoke and Cover Me. At Level 3, they are ECM Payload and Medal of Honor. EA removed the older Ultimate Cooldown+ and Tactical Cooldown options and integrated Refuge into Cover Me during the Showdown rework.

Which Bangalore upgrade is best?

There isn’t one universal answer. Electric Smoke and ECM Payload add more utility against enemy deployables, while Cover Me and Medal of Honor lean more toward support, information, sustain, and teammate recovery. Choose according to the problems your squad is actually facing.

Should Bangalore smoke her own team?

Sometimes. Self-smoke can protect a revive, heal, retreat, or exposed crossing. The problem is using it without a clear purpose and deleting your own team’s most valuable sightline.

What is Bangalore’s biggest mistake?

Using Smoke Launcher as a panic button instead of a way to create a specific advantage.


Final Thoughts

Bangalore isn’t powerful because she makes the battlefield difficult to see.

She’s powerful because she can decide when visibility matters.

Double Time helps her escape and reposition when enemies apply pressure.

Smoke Launcher can deny sightlines, create movement windows, disrupt doors and defensive setups, and buy time for a reset. Its current tuning also makes it faster to deploy and more useful for breaching, while nearby ordnance and abilities can temporarily disable the smoke.

Rolling Thunder can reshape where an enemy team is willing to stand.

Her current Legend Upgrade tree then gives her additional ways to specialize those strengths, including stronger smoke/anti-deployable utility, better support around smoke, stronger ultimate utility, and faster teammate recovery.

Put it together and the pattern becomes simple:

Deny → Move → Pressure → Reset.

Take away the enemy’s best sightline.

Move while their information is limited.

Pressure them from the better position.

Then disappear before they regain control.

And keep the most important Bangalore rule in your head:

Smoke should change the fight, not just hide it.

Don’t smoke because you’re scared.

Don’t waste Double Time simply because it activated.

Don’t throw Rolling Thunder because the icon is glowing.

Use each ability to make the next few seconds better for your squad.

That’s what turns Bangalore from a smoke machine into a genuine fight-control Legend.


Related Apex Legends Guides

Apex Legends Combat Guide — Execute gunfights with better peeks, trades, pressure, angle changes, and resets.

Apex Legends Positioning Guide — Improve cover usage, angles, high ground, and playable space.

Apex Legends Team Fighting Guide — Learn focus fire, crossfires, target isolation, synchronized pushes, and team resets.

Apex Legends Fight Guide — Learn when to engage, push, reset, or disengage.

Apex Legends Movement Guide — Improve sliding, strafing, repositioning, and movement during fights.

Apex Legends Aim Guide — Improve crosshair placement, tracking, recoil control, flicking, and target switching.

Apex Legends Firing Range Practice Guide — Turn specific weaknesses into structured combat practice.

Apex Legends Armor & EVO Guide — Understand Shield Cores, EVO, armor progression, overcharge, and armor management.


Sources & Updates

EA’s current Legend Guide was checked for Bangalore’s current class, Double Time, Smoke Launcher, and Rolling Thunder descriptions. It also confirms that Bangalore’s Smoke Launcher can break or breach doors.

EA’s Showdown Patch Notes were checked for Bangalore’s most recent published ability tuning, including the 5% Double Time speed increase, 30-second Smoke Launcher cooldown, faster projectile and pull-out speed, door interaction, reactive smoke behavior, 210-second Rolling Thunder cooldown, and the current Legend Upgrade tree.

EA’s Double Take update was checked for the removal of Bloodhound threat vision through smoke/gas, removal of Digital Threat smoke/gas vision, and the addition of white highlights for players fighting inside Bangalore smoke.

EA’s current Marked documentation and September 14, 2026 Midseason Patch Notes were checked for later Bangalore changes. The September midseason notes list other Legend balance changes but no Bangalore adjustment, so the Showdown tuning remains the relevant Bangalore-specific baseline for this review.

Editorial note: Current mechanical information in this guide is based on EA documentation. The Deny → Move → Pressure → Reset framework, smoke-placement rules, examples, and tactical recommendations are Loot Strategist editorial analysis intended to help players apply Bangalore’s kit in actual matches.

Update policy: Apex Legends is a live-service game. Recheck Bangalore’s ability values and Legend Upgrade choices after future Legend-system, Smoke Launcher, or Rolling Thunder changes. Avoid carrying old Bloodhound/Digital Threat smoke-vision advice into future revisions unless EA restores those mechanics.

Apex Legends Combat Guide: Peeking & Winning Gunfights

Apex Legends Combat Guide: Peeking & Winning Gunfights

Apex Legends Combat Guide: Peeking, Trading & Winning Gunfights

Winning gunfights in Apex Legends isn’t simply about who lands the most bullets.

The player who wins is often the one who exposes less of their body, takes the cleaner peek, recognizes when the exchange has changed, and knows when to disappear before the enemy gets the chance to answer.

That’s what makes Apex combat difficult.

You need to deal damage, but dealing damage requires exposure. You need to stay aggressive, but aggression creates risk. You need to pressure a weakened enemy without turning a good position into a bad chase.

EA’s current guidance recommends keeping your crosshair where enemies are likely to appear, predicting their movement, practicing hip-fire for fast close-range combat, and using the Firing Range to work on weaker shots. EA also recommends keeping grenades available because they can force enemies out of cover or buy time to reposition. (EA Help)

This guide focuses on what happens once the gunfight is already underway.

Your broader Fight Guide covers whether an engagement is worth taking. Your Positioning Guide covers how to choose and use a position. Your Aim Guide covers the mechanics of improving your aim.

This guide connects those pieces.

It is about how to execute the gunfight.

Loot Strategist combat rule: Show less. Deal more. Reset before the enemy does.


What Actually Wins a Gunfight in Apex Legends?

A gunfight is a series of exposure windows.

You expose yourself to deal damage.

You disappear to avoid damage.

You change your angle to make the next exposure more favorable.

You repeat that process until somebody loses the fight.

That means good combat is built around:

Information

Cover

Exposure

Damage

Timing

Reset

You won’t always control all six.

You can, however, improve the quality of the decisions you make with them.

Excellent aim doesn’t save you when you’re standing in the open.

Perfect cover doesn’t save you if you keep showing the same angle to an enemy who is waiting for you.

The goal is to make every time you become vulnerable worth the risk.


The Gunfight Framework

Apex Legends combat guide infographic showing the five-step gunfight framework, peeking patterns, common combat mistakes, and a five-second combat check

When contact begins, think through five steps:

1. Cover

Know what will stop the enemy’s next burst.

2. Peek

Expose yourself with a specific purpose.

3. Pressure

Use damage, angles, or timing to make the opponent uncomfortable.

4. Convert

Turn a meaningful advantage into damage, space, a knock, or a forced retreat.

5. Reset

Get out of the enemy’s firing window before the exchange turns against you.

This isn’t a checklist you need to recite during every firefight.

With practice, it becomes a rhythm.


Cover Is Part of Your Weapon

Your gun isn’t the only tool that wins gunfights.

Good cover lets you:

Break line of sight

Protect yourself while reloading

Create repeatable peeks

Buy time to heal

Move to another angle

Allow teammates to trade

EA’s beginner guidance also emphasizes staying close to your squad and using movement intelligently, which reinforces a basic combat rule: don’t create a fight you can’t support or escape. (EA Help)

But “I’m behind cover” isn’t enough.

A piece of cover can protect you from one angle while leaving you exposed to another.

It can also trap you.

The better question is:

Can I fight from this cover and still get out?

That question matters far more than whether the object technically blocks bullets.


Fight Close to Your Reset Point

One of the simplest improvements you can make is staying close to the part of your cover that actually protects you.

If you are several steps away from safety, every bad exchange takes longer to recover from.

Working close to cover gives you a much shorter path between:

firing

and

disappearing

That doesn’t mean standing motionless beside a rock.

You still need enough room to move.

The point is to reduce unnecessary exposure.


What Is a Good Peek?

A peek is a controlled exposure from cover to gather information, deal damage, or force a response.

The best peeks have a job.

You might peek to:

Check where an enemy is

Deal a burst of damage

Force someone off an angle

See whether another squad has arrived

Create an opening for your teammate

A bad peek usually happens because you feel obligated to keep shooting.

There is no tactical purpose.

You’re simply visible.

And every second you’re visible is another second the enemy gets to shoot back.


Three Useful Peeking Patterns

There is no universal “best peek.”

The right one depends on the enemy’s position and how much risk you’re willing to take.

Short Peek

Expose only what you need.

Fire or gather information, then return to cover.

This is useful when:

The enemy is holding your angle

You want information

You only need a short burst

You don’t want to commit

Wide Swing

Move farther beyond your original cover edge and attack from a larger angle.

A wide swing can work when the enemy is heavily pre-aiming the position you’ve already shown.

It is riskier because you’re exposing more of yourself.

Use it when the change in angle is worth the additional exposure.

Reposition Peek

Disappear, move around your cover, and reappear from somewhere the enemy wasn’t expecting.

This is particularly effective after you’ve shown the same angle several times.

The point isn’t movement for its own sake.

It’s breaking the opponent’s prediction.


Never Give the Enemy the Same Peek for Free

This is one of the easiest habits to fix.

Peek left.

Shoot.

Hide.

Peek left.

Shoot.

Hide.

The opponent now knows:

where you’ll appear

when you’ll appear

roughly how far you’ll swing

You’ve made their job easier.

Change the pattern.

Delay the next peek.

Change sides.

Take a different angle.

Let your teammate show themselves.

Wide swing after several short peeks.

Or don’t peek at all.

A good opponent should have to keep guessing.

Don’t solve the puzzle for them.


Don’t Peek Because You Want to Shoot

Sometimes the correct combat decision is doing nothing.

You have line of sight.

The enemy is visible.

You could shoot.

That doesn’t mean you should.

Maybe your teammate is moving into a stronger position.

Maybe the opponent has a better angle.

Maybe they’re waiting for you to repeek.

Maybe another squad just entered the area.

Information and timing can be worth more than another 20 damage.

Every exposure should accomplish something.


Crosshair Placement Happens Before the Peek

Your Aim Guide already covers crosshair placement in detail, so this is the combat version.

Don’t step into the open and then begin searching for the enemy.

Have your crosshair roughly where the target is likely to appear.

EA’s current guidance specifically recommends keeping your crosshair where enemies might appear and predicting their movement before they move. (EA Help)

That changes:

Peek → Find target → Aim → Shoot

into:

Peek → Shoot

The second sequence is faster because less of your exposure window is spent searching.


Pre-Aim the Most Likely Threat

Before moving around cover, ask:

Where is the enemy most likely to be?

Then prepare for that angle.

If they’re holding the left side of a doorway, don’t expose your whole body while looking somewhere else.

If they’re likely to swing around a rock, have your crosshair ready for that swing.

Players sometimes appear to have unbelievably fast aim when the real difference is simpler:

They were already looking where the enemy appeared.


Damage Is Not the Same as Advantage

Landing damage is useful.

But damage only matters because of what it changes.

Suppose you deal 80 damage and take 100.

You didn’t win that exchange.

Now suppose you deal 60 damage and force the enemy behind cover while your teammate gains an angle.

That’s different.

The useful question after a burst is:

What changed?

Did the enemy:

stop shooting?

give up an angle?

move away from a teammate?

lose access to strong cover?

give your teammate a better opening?

become vulnerable to a second angle?

If nothing meaningful changed, more damage isn’t necessarily the answer.


What to Do After You Gain the Advantage

The fight state changed.

Your next decision should change with it.

Before the advantage, you may be:

trading

gathering information

protecting your cover

waiting for a mistake

After the advantage, you can look for:

a second angle

controlled pressure

a teammate swing

space

an isolated target

You don’t need to sprint forward.

You need to convert the advantage into something useful.


A Crack Is an Opportunity, Not an Order

Cracking an enemy feels like a green light.

It isn’t always one.

Before exposing yourself again, consider:

Where is the target?

Where are their teammates?

Where are you?

Can your teammate follow?

What happens if the target reaches cover?

What happens if another squad arrives?

A damaged enemy is easier to finish.

They’re also often more defensive.

That’s why your next move can be a reposition rather than an immediate push.

Your Fight Guide covers the larger question of whether to continue an engagement. Here, the combat lesson is narrower:

Once you deal meaningful damage, change the way you fight the next exchange.


The Peek-and-Reset Cycle

Strong gunfighters don’t remain exposed throughout the entire exchange.

They cycle:

Peek

→

Damage

→

Cover

→

Reload

→

Reposition

→

Peek again

That rhythm keeps the enemy from enjoying a clean, uninterrupted window.

It also gives you a chance to reassess the fight instead of automatically repeating the last action.

A useful rule:

If being exposed is no longer producing value, stop being exposed.


Reload Behind Cover

This should become automatic.

When a magazine ends, and safe cover is one step away, use it.

Break line of sight.

Reload.

Come back.

The enemy doesn’t need to know when you’re reloading.

There are exceptions, of course. A target may be one bullet from death, or your pressure may be preventing a push.

But even then, know where you can disappear.

A reload is a small moment of vulnerability.

Treat it that way.


Healing Is Part of Combat

Healing isn’t something that only happens after the fight.

It’s part of the fight whenever you’ve created enough time to do it.

A strong reset looks like:

Break line of sight

Create space

Heal

Reload

Reassess

A weak reset is:

Hide behind a tiny object

Start a Battery

Get pushed

Cancel the heal

Die

The healing item wasn’t the problem.

You didn’t create enough time to use it.


The “One More Peek” Trap

This is one of the most common ways players throw a fight.

You’ve already:

lost the health trade

shown the same angle

failed to create a new advantage

Then you peek again because the enemy feels close to dying.

That final peek is often the one that gets you killed.

You don’t need to win every exchange immediately.

Sometimes the enemy survives.

That’s fine.

Disappear.

Recover.

Find another angle.

Fight them again when the circumstances are better.


Use Angles to Make Cover Worse

You don’t always need better aim.

Sometimes you need a better line of sight.

Imagine an enemy hiding behind a rock.

From your current angle, only their head is visible.

Move sideways.

Now more of their body is exposed.

The enemy didn’t become easier to kill.

Your angle improved.

When you’re struggling to damage someone behind cover, ask:

“Am I fighting the player, or am I fighting their cover?”

If you’re fighting the cover, change the angle.


Don’t Stand in Your Teammate’s Firing Lane

Two players can be close without standing on top of each other.

If both teammates use exactly the same angle, the enemy gets one simple target.

A better setup lets each player threaten from a different line while remaining close enough to trade.

You don’t need a giant flank.

Sometimes moving two meters to the side completely changes the fight.

This is one of the simplest ways to make your teammate’s damage more valuable without requiring better aim.


The Trade Is More Important Than the Highlight

You don’t have to win every duel yourself.

Suppose your teammate gets cracked.

You take the enemy’s angle.

They turn toward you.

Your teammate gets behind cover and heals.

You’ve accomplished something important without getting a knock.

You bought time.

Team fighting is about more than individual damage totals.

Sometimes the most valuable combat action is forcing the enemy to look somewhere else.

Your dedicated Team Fighting Guide goes deeper into focus fire, crossfires, isolation, and synchronized pushes. Here, remember the practical rule:

Be close enough to help, but don’t make yourself the easiest shared target.


Fight Around an Exit

Aggression is much safer when you know where you’re going next.

Before committing to an exposed angle, know:

Where is my next piece of cover?

Where can I heal?

Where is my teammate?

What happens if another squad appears?

This doesn’t mean playing passively.

It means keeping an escape option available.

A strong aggressive position has a way out.

A weak aggressive position only has a way forward.


Close-Range Gunfights

Close-range combat compresses every decision.

You have less time to:

Aim

Reload

Move

React

EA specifically recommends practicing hip-fire for fast close-range combat. (EA Help)

Don’t turn every close-range exchange into a stationary ADS duel.

Use:

Cover edges

Short movement bursts

Hip-fire when appropriate

Weapon switching when necessary

Immediate access to your next piece of cover

The closer the enemy gets, the more important the decision made before the fight becomes.


Mid-Range Gunfights

Mid-range fights reward disciplined peeking.

You’re close enough to apply sustained pressure, but far enough away that cover and angles can dominate the exchange.

Avoid predictable repeeks.

A useful sequence is:

Peek

Damage

Hide

Change the angle

Reappear

Now the enemy has to solve a new problem instead of waiting for the same target to return.


Long-Range Gunfights

Long-range combat is often more about information and pressure than immediate elimination.

Ask:

Can this damage accomplish something?

Can I maintain my position?

Will I reveal my squad?

Do I have enough ammunition?

Can the enemy simply retreat?

A long-range exchange can be successful even without a knock.

You might force an enemy away from:

high ground

cover

a rotation path

a healing position

That’s pressure.

Use it when it helps the larger fight.


Doorways and Corners: The Execution Rule

Doorways are useful because they give you a narrow exposure point.

They’re also dangerous because opponents know exactly where you’re likely to appear.

Instead of thinking about doorway combat as a positioning problem, think about exposure timing.

Don’t:

Stand in the center of the doorway

Repeatedly expose the same angle

Reload in the opening

Do:

Peek the edge

Fire

Return to cover

Change your timing or angle

Make the defender guess

The same principle applies to rocks, windows, walls, and other predictable geometry.


Grenades Can Change the Gunfight

A grenade isn’t useful merely because it deals damage.

It can change the enemy’s available options.

EA specifically notes that grenades can force enemies out of cover, deal damage from range, or buy time when retreating or gaining high ground. (EA Help)

Use them to:

Break a defensive hold

Force movement

Prevent a retreat

Buy time

Create an opening

Then follow up on the change.

A grenade that forces someone into the open is valuable because of what you do afterward.


Use Damage to Shrink the Enemy’s Options

This is one of the best ways to understand pressure.

A damaged enemy often has fewer good choices.

Maybe they have to:

heal

leave the angle

move behind a different piece of cover

stay with their teammate

give up high ground

That means your goal isn’t always “deal maximum damage.”

Sometimes it’s:

Make every available choice worse for the enemy.

That is how small advantages turn into winning fights.


When You’ve Been Cracked

Getting cracked doesn’t mean the fight is over.

The first priority is to stop the incoming damage.

Break line of sight.

Get behind meaningful cover.

Don’t immediately peek again because you think the opponent might be weak too.

Once you’ve created space:

Heal

Reload

Check your teammate

Locate the enemy

Decide what changed

A fight can swing because one player survives the two seconds that looked hopeless.


When Your Teammate Gets Cracked

Your teammate taking heavy damage often changes the enemy’s focus.

Use that.

You can:

Take a supporting angle

Apply enough pressure to stop the push

Force the enemy into cover

Buy your teammate time to heal

Don’t automatically launch a counter-push.

Sometimes the winning move is simply making the enemy stop shooting long enough for your teammate to recover.


What to Do After You Crack an Enemy

The response depends on what else changed.

Crack + isolated target

Increase pressure.

Crack + strong cover

Hold the angle or create a new one.

Crack + nearby teammates

Coordinate before exposing yourself again.

Crack + weak squad

Protect your position.

Crack + third party approaching

Convert quickly only when the fight remains safe; otherwise prepare for the new threat.

The crack gives you information.

Your next action should use that information.


You Can Win a Gunfight Without a Knock

This is particularly important for newer players.

Suppose you force an enemy away from:

high ground

a doorway

a healing position

a strong head-glitch-like angle

or

the route your squad needs

and your team takes that space.

You achieved something meaningful without eliminating the opponent.

Kills are valuable.

But space is also a combat resource.

A good exchange can leave the enemy alive but in a much worse position.

That’s still a win.


The 5-Second Combat Check

When the fight gets chaotic, ask:

Where is my cover?

Where is the enemy’s cover?

Who has the health advantage?

Who has the angle advantage?

What changes if I move?

That’s enough.

You don’t need twenty rules running through your head while bullets are flying.

Five useful questions are better than twenty half-remembered tips.


A Practical Gunfight Example

Imagine you’re fighting an enemy behind a rock.

Your first peek deals significant damage.

You immediately return to cover.

Instead of repeeking the same side, your teammate shifts slightly.

The enemy expects your original angle.

You appear from somewhere else.

They take more damage and retreat.

Your squad now controls more space.

Notice what happened.

You didn’t suddenly become more accurate.

The fight improved because you changed the exposure pattern.

That’s the skill this guide is really trying to teach.


How to Practice Combat

Don’t go into the Firing Range and mindlessly shoot targets for twenty minutes.

Give yourself one combat problem.

For example:

I lose every peek.

Practice exposing yourself, firing, returning to cover, and changing sides.

I die after cracking enemies.

Practice damage → cover → reposition instead of immediately chasing.

I get killed while reloading.

Practice ending every magazine near cover.

I keep standing in my teammate’s angle.

Practice creating two useful lines of fire while remaining close enough to trade.

EA’s current guidance recommends the Firing Range for weak areas and specifically mentions tracking, flicking, recoil, movement, hip-fire, and other aim practice. (EA Help)

The important part is to practice the decision around the shot, not only the shot itself.


Build a Combat Improvement Loop

After a match, don’t ask:

“Why did I lose?”

That question is too broad.

Ask:

“What was the last combat decision that put me somewhere I couldn’t recover?”

Maybe it was:

Repeating a known peek

Staying exposed during a reload

Chasing damage without a safe angle

Ignoring your exit

Taking the same angle repeatedly

Refusing to reset

Standing directly behind your teammate

Now you have something specific to fix.

Take that problem into your next session.

That is how combat practice becomes measurable rather than random.


The Combat Checklist

Before exposing yourself:

Do I have cover?

Where is the enemy?

What am I trying to accomplish?

Where do I go if the exchange turns bad?

During the exchange:

Am I gaining anything from being exposed?

Did the fight state change?

Should I change my angle?

Can my teammate capitalize?

After taking damage:

Can I break line of sight?

Can I reset?

Am I about to repeat the same mistake?

That’s enough to build good habits.


Final Thoughts

Winning Apex gunfights isn’t about staying exposed longer than the enemy.

It’s about making your exposure more valuable.

Use cover.

Peek with a purpose.

Keep your crosshair ready.

Don’t give the enemy the same angle repeatedly.

Turn damage into pressure.

Turn pressure into space.

Then reset before the enemy gets the chance to reverse the exchange.

The biggest change is mental.

Stop asking:

“Can I hit this player?”

Start asking:

“What does this peek accomplish?”

That question changes the way you fight.

You stop chasing every crack.

You stop taking the same repeek.

You stop standing in the open because you have a good shot.

And you start treating each gunfight as a sequence of exposure windows and decisions.

Show less. Deal more. Reset before the enemy does.

That’s the combat habit worth taking into your next match.


Related Apex Legends Guides

Apex Legends Fight Guide — Learn when to engage, push, reset, or disengage.

Apex Legends Positioning Guide — Learn how cover, angles, high ground, and playable space shape your options.

Apex Legends Aim Guide — Improve crosshair placement, tracking, recoil control, flicking, and target switching.

Apex Legends Team Fighting Guide — Learn focus fire, crossfires, target isolation, synchronized pushes, and team resets.

Apex Legends Movement Guide — Improve sliding, strafing, repositioning, and movement during fights.

Apex Legends Firing Range Practice Guide — Turn specific combat weaknesses into structured practice.

Apex Legends Loot Guide — Build efficient inventories without sacrificing time or position.


Sources & Updates

Last reviewed: September 15, 2026

EA’s current Best Settings for Apex Legends on PC guide was checked for crosshair placement, predicting enemy movement, hip-fire practice, Firing Range training, and current performance/aim guidance. (EA Help)

EA’s current How to Play Apex Legends guide was checked for beginner combat fundamentals, squad proximity, movement, and grenade use. (EA Help)

EA’s current Apex Legends Terms Guide was checked for official gameplay terminology. (EA Help)

EA continues to update Apex Legends throughout 2026, including changes to maps, loot, weapons, and other gameplay systems. Because this guide deliberately avoids temporary weapon-meta recommendations, its core combat framework is designed to remain useful through those changes. (EA)

Editorial note: Mechanical and terminology references are based on EA’s official documentation. The Cover → Peek → Pressure → Convert → Reset framework, exposure-window concept, combat examples, diagnostic questions, and tactical recommendations are Loot Strategist editorial analysis intended to help players apply those mechanics in actual matches.

Update policy: Review this guide after major changes to movement, weapons, abilities, shields, or combat systems. Avoid adding temporary weapon-meta advice unless the page is deliberately being converted from an evergreen guide into a seasonal article.

Apex Legends Mythic Armor Upgrade Helmet Guide

Apex Legends Mythic Armor Upgrade Helmet Guide

Apex Legends Mythic Armor Upgrade Helmet Guide: How Red Armor Works

The Mythic Armor Upgrade Helmet is one of Apex Legends’ highest-tier armor-related loot items—and one of the easiest mechanics to misunderstand.

Its defining effect is simple: the Mythic Armor Upgrade Helmet sets your armor to 125 regardless of your Legend Level. Your Legend Level still matters for unlocking Legend upgrades, but while the Mythic Helmet is equipped, leveling no longer changes your armor value.

That creates an important split between three systems that are easy to lump together:

EVO controls progression.

Legend Level determines your normal armor tier and progression toward Legend upgrades.

Shield Core determines how much shield charge you actually have available.

The Mythic Armor Upgrade Helmet changes the armor value without replacing those systems.

This matters because the old Apex advice of “farm enough EVO and eventually reach Red Armor” is no longer correct. Normal EVO progression now stops at Level 3, or Purple armor. Red armor comes from the Mythic Armor Upgrade Helmet instead. (EA)

This guide explains what the Mythic Helmet does, how it interacts with EVO and Shield Cores, what Red Armor actually gives you, where the item came from in EA’s original loot design, how the current loot changes affect those locations, who should carry it, and when chasing it is actually worth the risk.

Loot Strategist rule: Red armor is a resource, not a permission slip.


What Is the Mythic Armor Upgrade Helmet?

The Mythic Armor Upgrade Helmet was introduced in the Takeover update as the new way to obtain Red-tier armor after EA removed Red armor from normal EVO progression. It sets the player’s armor to 125 regardless of Legend Level.

The important part is what the item doesn’t do.

It does not:

  • Increase your Legend Level
  • Automatically unlock Legend upgrades
  • Replace EVO progression
  • Replace the Shield Core system
  • Provide headshot damage reduction

EA explicitly states that leveling is still required to unlock Legend upgrades while the Mythic Armor Upgrade Helmet is equipped, and that Red helmets provide no headshot damage reduction.

So if a Level 2 player equips the Mythic Helmet, that player can have 125 armor while remaining Level 2.

Armor value and progression are separate.


Mythic Armor Upgrade Helmet at a Glance

PropertyMythic Armor Upgrade Helmet
TierMythic
Armor value125
Requires a specific Legend LevelNo
Changes Legend LevelNo
Unlocks Legend upgradesNo
Normal EVO progressionContinues separately
Headshot damage reductionNone
PurposeProvides Red-tier armor through loot

EA introduced the item specifically to move Red armor out of normal EVO progression and into the loot system. (EA)


How Red Armor Works Now

Older Apex guides often describe armor progression like this:

White → Blue → Purple → Red

That is outdated for normal EVO progression.

EA changed the system so the maximum armor level earned through EVO is now Level 3, or Purple armor. Level 4 Red armor is no longer earned by accumulating enough EVO.

The current system is better understood as:

Normal EVO: White → Blue → Purple

Special loot: Mythic Armor Upgrade Helmet → 125 armor

EA said the change was designed in part to reduce the incentive to farm damage for Red armor and instead keep players focused on combat and the actual match.

That changes how you should think about EVO.

You’re no longer grinding toward Red armor.

Once you have the Mythic Helmet, your EVO progression is mainly about the Legend upgrades associated with leveling, not chasing a higher normal armor tier.


Does the Mythic Helmet Increase Your Legend Level?

No.

This is probably the most important misconception to clear up.

Imagine you’re Legend Level 2 and find the Mythic Armor Upgrade Helmet.

Your armor becomes:

125

Your Legend Level remains:

Level 2

You don’t suddenly receive the Legend upgrades associated with Level 3.

EA explicitly says leveling remains necessary to unlock Legend upgrades, even while the special armor-upgrade helmet is equipped.

So there are two separate advantages:

Mythic Helmet: immediate armor advantage

EVO progression: Legend upgrade progression

One does not replace the other.


What Does 125 Armor Actually Give You?

Red armor gives you 125 shield capacity.

Normal Purple armor provides 100.

That’s an additional 25 shield health over the normal maximum.

Twenty-five shields doesn’t sound enormous on paper.

In an Apex gunfight, it can be.

That extra durability can be the difference between:

losing the exchange

and

surviving long enough to get behind cover.

It can buy time for a reload, allow a teammate to swing, give you room to finish a weakened enemy, or simply let you survive an otherwise fatal burst.

But don’t confuse additional durability with immunity to bad decisions.

You can still lose instantly from:

poor positioning

missed shots

being isolated

getting third-partied

being caught in the open

That’s why the most useful way to think about the item is:

Red armor gives you more room for error. It doesn’t remove the consequences of making the error.


Mythic Helmet vs. Purple Armor

The basic numbers are straightforward:

ArmorShield Capacity
Purple100
Red via Mythic Helmet125

The Mythic Helmet therefore represents a real increase in armor capacity.

But the practical decision isn’t always:

“Red is higher, so equip it immediately.”

Your current Shield Core charge still matters.

A player with 125 maximum armor but a nearly depleted Core is not walking into the next fight with 125 shields.

That is why armor value and current shield charge need to be considered separately.


Mythic Helmet vs. Shield Core

These systems work together, but they do different jobs.

EA’s current Ranked documentation explains that armor is fueled by a Shield Core, which contains the remaining charge of your shields. Players can drop and swap Shield Cores independently.

The Mythic Helmet doesn’t replace that.

Think of it as:

Mythic Helmet = armor ceiling

Shield Core = current shield charge

That distinction becomes especially important after a fight.

You might have the Mythic Helmet and therefore a 125-armor capacity, but your immediate choice could still be between a nearly empty Core and a healthier Core in a nearby death box.

The helmet gives you the larger ceiling.

The Core determines what’s actually available right now.


How Shield Core Charge Fits Into Red Armor

The current Shield Core system creates another easy-to-miss detail.

EA says the color of a dropped Shield Core reflects its current charge value, not the original Legend Level of the player who dropped it. A damaged Core from a higher-level player can therefore display as a lower color tier. (EA Help)

So don’t look at a death box and assume:

Red-looking armor = full Red shields

or:

Blue-looking Core = Blue-level player

Instead, check the actual charge.

This matters even more when you’re wearing the Mythic Helmet because you’re working with a 125-armor ceiling while still making normal Core-management decisions.


Can You Swap Shield Cores While Wearing the Mythic Helmet?

Yes.

The Mythic Helmet changes your armor value; the Shield Core continues to determine the charge available to you. EA’s current Ranked guide describes dropping and swapping Shield Cores as a separate part of the system.

That means all the normal armor-swap decisions still matter:

Check the Core’s charge.

Check your own shield state.

Check your cover.

Check nearby enemies.

Then decide whether the swap is worth making.

The Mythic Helmet doesn’t remove the need to manage your shields carefully.

It makes having a healthy Core even more valuable.


Does the Mythic Helmet Grant Overcharge?

The Mythic Helmet and Shield Core overcharge are separate mechanics.

EA’s current Ranked documentation says overcharge occurs when you swap to a Shield Core associated with a tier above your current Legend Level. You receive the extra shield health, but that additional charge cannot be restored and lasts for 30 seconds before any remaining overcharge drains and the Core returns to your normal armor capacity.

The Mythic Helmet itself is different.

It sets your armor to 125 regardless of Legend Level.

So don’t think of the Mythic Helmet as an “overcharged Red shield.”

It’s an armor-value upgrade that continues to use the normal Shield Core system.


What Is the Mythic Helmet’s Relationship With EVO?

The helmet doesn’t make EVO irrelevant.

It changes why you’re earning EVO.

Without the Mythic Helmet, normal EVO progression takes you through:

Level 1 → Level 2 → Level 3

and unlocks Legend upgrades along the way.

With the Mythic Helmet, you already have the 125-armor value regardless of your Legend Level.

That means further EVO progress is primarily about:

Legend upgrades

rather than:

chasing Red armor

This is one reason the item changes the way a player should approach the rest of the match.


Where Did the Mythic Armor Upgrade Helmet Come From?

When EA introduced the item during Takeover, it said the Mythic Armor Upgrade Helmet could appear in:

Mythic Bins

and

late-game Care Packages.

There is an important current-game qualification, though.

Season 30’s Marked update removed Mythic and Gold Bins from the loot system. EA’s current Seasons and Updates documentation explicitly lists both bin types as removed.

That means older guides telling players to hunt specifically for a Mythic Bin are outdated.

EA’s original Takeover notes documented late-game Care Packages as another source, but current public documentation does not give us enough information to treat the present Care Package loot pool as permanently fixed. Because Care Package contents can change with later updates, this article deliberately does not promise a specific live spawn rate or permanent loot location.

The practical takeaway

Don’t hunt Mythic Bins. They are gone.

And before planning an entire rotation around finding the Mythic Helmet, check the latest EA loot documentation or current patch notes.

That’s a much safer approach for an evergreen guide than locking the article to a loot source that may change next season.


Why Red Armor Was Moved Out of EVO

This change wasn’t arbitrary.

EA explained that Red Armor created a significant health disparity and encouraged behavior such as farming damage from the outskirts of the fight while avoiding encounters to accumulate resources. The solution was to cap EVO progression at Level 3 and move Red armor into rare loot instead.

That tells you something important about how the Mythic Helmet is supposed to affect gameplay.

It is not a reward for passively grinding a number.

It is a loot advantage that can create a reason to contest valuable areas and Care Packages.

And because the item is not tied to Legend Level, a lower-level player can potentially have the strongest armor value without having completed normal EVO progression.

That is what makes the helmet interesting.


Who Should Wear the Mythic Armor Upgrade Helmet?

There is no official “best Legend” or universal teammate for the item.

EA’s own developer note says the Gold and Red Armor Upgrade Helmets were designed to create strategic decisions about which squadmate should equip these powerful items.

For a real squad, I’d use this rule:

Give the extra survivability to the player most likely to convert it into value during the next important fight.

That might be the player who:

takes first contact

anchors a dangerous angle

holds a key position

is likely to absorb the first wave of pressure

or

needs the extra margin to survive while creating space for the team

It doesn’t automatically belong to the player with the highest kill count.

Think about the next fight, not the scoreboard.


Should You Give It to the Aggressive Player?

Sometimes.

A player who consistently takes favorable first engagements can make excellent use of 125 armor.

But aggression by itself isn’t enough.

The player also needs to:

take fights intelligently

know when to reset

use cover

stay connected to the squad

convert extra durability into pressure

Giving Red armor to someone who simply pushes every team they see can make the problem worse.

The item should support good decision-making.

It shouldn’t encourage reckless decision-making.


Should Your Whole Squad Chase the Mythic Helmet?

No.

This is where high-value loot becomes a trap.

Imagine a late-game Care Package appears across open ground while your squad is already holding a strong position.

The package contains something your team desperately wants.

The temptation is obvious.

But ask what you’re giving up:

cover

high ground

information

time

rotation control

a safe fighting position

If reaching the package exposes three players to an enemy team holding better terrain, the helmet’s theoretical value becomes much lower.

A rare item doesn’t become mandatory simply because it is rare.


When Is the Mythic Helmet Worth Chasing?

Use a simple test.

Consider going for it when:

Your squad already controls the area.

The package or loot source fits naturally into your rotation.

You have information on nearby teams.

There is enough cover to approach safely.

Your team can leave the area without getting trapped.

The additional armor is likely to matter during the next major engagement.

Leave it when:

You would have to cross exposed terrain.

Another team already controls the area.

The Ring is forcing immediate movement.

Your existing position is significantly stronger.

The package is likely to turn into a predictable fight with poor escape options.

This is the same principle that should govern every high-value loot decision:

An item is only as valuable as the position you keep after taking it.


Mythic Helmet in the Early Game

A 125-armor player can have a substantial defensive advantage over players following the normal early-game armor curve.

The unusual part isn’t merely the extra shield capacity.

It’s the fact that the player can have that capacity without having reached the corresponding Legend Level through EVO.

That makes the Mythic Helmet exceptionally valuable if it appears early enough to influence several subsequent engagements.

But don’t confuse the armor advantage with complete progression.

A player wearing the Mythic Helmet can still be behind another player in Legend upgrades.

That’s another reason not to treat Red armor as the entire progression system.


Mythic Helmet in the Mid Game

Mid game is where the item’s strategic value becomes easier to appreciate.

Teams are beginning to consolidate around:

strong positions

rotation paths

third-party opportunities

resource management

fight timing

At this stage, 125 armor can make the opening exchange more forgiving.

That is particularly valuable for the teammate holding an important angle or taking the first trade.

The best use of the helmet is usually not charging blindly into combat.

It is using the extra durability to hold or create an advantage without losing your exit.


Mythic Helmet in the Endgame

Endgame is where small health differences can become enormous.

A player surviving with a handful of shields can heal.

A player who loses that final trade is eliminated.

The additional 25 armor can provide the extra margin needed to:

survive an opening burst

finish a weakened enemy

reach cover

buy time for a teammate

reset before the next squad arrives

That’s powerful.

But late-game terrain is usually dangerous, and death boxes or high-value loot can become bait.

Don’t throw away your endgame position simply because Red armor is sitting somewhere you can see.


Mythic Helmet vs. Gold Armor Upgrade Helmet

These two special helmets solve different problems.

FeatureGold Armor Upgrade HelmetMythic Armor Upgrade Helmet
Armor100125
Changes armor regardless of LevelYesYes
Legend upgrades still require levelingYesYes
Special perkImproved Minor HealingRed-tier armor
Headshot damage reductionNoneNone

EA reworked the Gold Helmet into the Gold Armor Upgrade Helmet, which sets armor to 100 regardless of Level and provides an Improved Minor Healing perk that doubles the output of Cells and Syringes. The Mythic Helmet instead sets armor to 125. Neither provides headshot damage reduction.

So the decision isn’t simply:

Red beats Gold.

The real question is what your squad needs.

The Mythic helmet gives you more raw armor.

The Gold helmet gives you a powerful healing benefit while maintaining 100 armor.


Does the Mythic Helmet Protect Against Headshots?

No.

The “helmet” name can create exactly the wrong expectation.

The Mythic Armor Upgrade Helmet does not reduce headshot damage. EA removed the old helmet-based headshot-damage-reduction system as part of the Takeover armor and helmet overhaul.

So remember:

Mythic Helmet = 125 armor.

Not:

Mythic Helmet = extra head protection.

That distinction is worth remembering every time you equip one.


Armor Value vs. Current Shield Charge

This is perhaps the most useful practical concept in the entire article.

Suppose you have the Mythic Helmet.

Your armor value is:

125

But your Shield Core currently contains:

30 shield HP

You don’t have 125 usable shields right now.

You have a 125-armor ceiling with 30 points currently charged.

That means a nearby healthy Core can still be extremely valuable.

EA’s current Ranked documentation reinforces this distinction by separating Legend Level, armor capacity, and Shield Core charge.

So after every major engagement, ask two different questions:

How much armor can I have?

How much shield do I have right now?

That’s much more useful than simply looking for the highest color.


Common Mythic Armor Upgrade Helmet Mistakes

Chasing the Helmet Through Open Ground

A powerful item isn’t worth losing your entire squad’s position.

Assuming the Helmet Gives You a Higher Legend Level

It changes your armor value.

It does not give you the associated Legend upgrades.

Ignoring Shield Core Charge

125 armor doesn’t mean you’re currently carrying 125 shields.

Treating Red Armor Like a Permanent EVO Milestone

Normal EVO progression now caps at Level 3/Purple. Red armor comes from the Mythic Armor Upgrade Helmet.

Forgetting About the Gold Armor Upgrade Helmet

Gold sets armor to 100 regardless of Level and offers a healing perk. It can be the more useful choice for a particular player or situation.

Expecting Headshot Protection

The Mythic Helmet does not reduce headshot damage.

Hunting Mythic Bins

Mythic Bins were removed in Season 30. Older guides that tell you to search for them are outdated.

Giving It Automatically to the Player With the Most Kills

The person who benefits most isn’t necessarily the person doing the most damage.

Playing More Recklessly Because You Have Red Armor

This is the biggest trap.

The extra durability should make you more confident in good decisions, not less disciplined.


The Loot Strategist Mythic Helmet Rule

Here’s the rule I’d keep:

Red armor is a resource, not a permission slip.

The Mythic Helmet gives you additional survivability.

Your job is to turn that survivability into something meaningful.

That might mean:

winning the opening trade

holding a crucial angle

surviving a third-party push

buying time for your teammate

escaping a bad exchange

or surviving long enough to reset

The armor creates opportunities.

Your positioning, aim, timing, and decision-making determine whether you use them.


A Simple Mythic Helmet Decision Tree

When your squad gets access to a Mythic Armor Upgrade Helmet, ask:

Is the area safe?

If not, secure the area first.

Who benefits most from 125 armor?

Choose the player whose next job exposes them to the most meaningful risk.

Is your current position strong?

If yes, don’t abandon it casually.

Do you have a healthy Shield Core?

Check the actual charge.

Is another squad nearby?

A third party can make a fast shield swap more valuable than extended looting.

Does chasing the item cost more than the item gives?

If yes, leave it.

That is the decision process.


Mythic Armor Upgrade Helmet Quick Reference

QuestionAnswer
What does it do?Sets armor to 125
Does it require a high Legend Level?No
Does it increase Legend Level?No
Does it unlock Legend upgrades?No
Does normal EVO still progress?Yes
Does normal EVO reach Red?No
Does it reduce headshot damage?No
Does it replace the Shield Core?No
Did EA originally list Mythic Bins as a source?Yes
Are Mythic Bins still in the game?No; Season 30 removed them
Is the Mythic Helmet’s exact current Care Package availability permanently guaranteed?No; loot pools can change

EA currently documents Level 3/Purple as the highest normal EVO armor level and confirms that Mythic Bins were removed in Season 30.


Frequently Asked Questions

What does the Mythic Armor Upgrade Helmet do in Apex Legends?

It sets your armor to 125 regardless of your Legend Level, giving you Red-tier armor without requiring normal EVO progression to reach that armor value.

Can a Level 1 player use the Mythic Armor Upgrade Helmet?

Yes. The helmet sets armor to 125 regardless of Level.

Does the Mythic Helmet increase your EVO Level?

No. It changes your armor value, while Legend upgrades still require normal progression.

Can you still get Red Armor through EVO?

No. Normal EVO progression currently caps at Level 3/Purple. Red armor is provided by the Mythic Armor Upgrade Helmet instead.

Does the Mythic Armor Upgrade Helmet reduce headshot damage?

No. EA states that Red helmets provide no headshot damage reduction.

Where does the Mythic Armor Upgrade Helmet come from?

EA’s original Takeover documentation listed Mythic Bins and late-game Care Packages. Mythic Bins were subsequently removed in Season 30, so older guides telling players to search for them are outdated. Current Care Package contents can change, so check the latest EA loot information before relying on a specific spawn source.

Is the Mythic Helmet better than the Gold Armor Upgrade Helmet?

It depends on what your squad needs. The Mythic Helmet provides 125 armor. The Gold Armor Upgrade Helmet provides 100 armor and an Improved Minor Healing perk that doubles the output of Cells and Syringes.

Does the Mythic Helmet give you the Legend upgrades of a higher level?

No. Your armor value changes, but Legend upgrades still require normal leveling.

Does the Mythic Helmet fully charge your shields?

No. It establishes the 125-armor value; your Shield Core still contains the actual shield charge available to you.

Should I chase the Mythic Helmet every match?

No. It is a high-value item, but it isn’t worth sacrificing a strong position, safe rotation, or squad survival to obtain it.


Final Thoughts

The Mythic Armor Upgrade Helmet makes sense once you stop thinking of Red armor as the final step of EVO.

Normal EVO progression currently stops at Level 3/Purple. The Mythic Helmet provides the 125-armor value as a separate loot-based advantage, while your Legend Level continues to control progression toward Legend upgrades.

Your Shield Core is still responsible for your actual available shield charge.

That means the best armor decisions aren’t based on color alone.

Check the armor value.

Check the Core charge.

Check the position.

Check the next fight.

Then decide whether the upgrade is worth taking.

The line worth remembering is:

Red armor is a resource, not a permission slip.

Use the extra 25 shields to survive a better trade, hold a stronger position, create time for your team, or escape an exchange that would otherwise kill you.

Don’t use them as an excuse to sprint into every fight on the map.

Apex still rewards the same things it always has:

good positioning, smart timing, accurate shooting, coordinated teammates, and knowing when to walk away.

The Mythic Helmet simply gives you a little more room to execute those decisions.


Related Apex Legends Guides

Apex Legends Armor & EVO Guide — Learn how EVO, Legend Levels, Shield Cores, overcharge, and Armor Upgrade Helmets work together.

Apex Legends Loot Guide — Learn how to prioritize high-value loot without wasting time or sacrificing position.

Apex Legends Positioning Guide — Improve your use of cover, angles, high ground, and playable space.

Apex Legends Fight Guide — Learn when to engage, push, reset, or disengage.

Apex Legends Rotation Guide — Read the Ring and choose safer routes into stronger positions.

Apex Legends Team Fighting Guide — Improve focus fire, crossfires, synchronized pushes, and team resets.

Apex Legends Armor & EVO Guide: Shield Cores, Levels & Upgrades

Apex Legends Armor & EVO Guide: Shield Cores, Levels & Upgrades

Apex Legends Armor & EVO Guide: Shield Cores, Levels & Upgrades

Armor can be the difference between surviving a bad peek and winning the fight that follows. In Apex Legends, though, armor is no longer as simple as finding the best-colored shield in a death box.

In the current Core Battle Royale and Ranked systems, your armor progresses through EVO and Legend Levels, while a Shield Core provides the charge that fills your shields. EA’s current Ranked documentation lists three normal EVO armor levels—White, Blue, and Purple—and explains that EVO also unlocks Legend upgrades. (EA Help)

That creates an important distinction: your armor level and your current shield charge are not the same thing.

A Purple-level player with a nearly depleted Shield Core is in a very different position from a Purple-level player with a full Core. Likewise, a lower-tier Core with more remaining charge can sometimes be the better immediate choice.

This Apex Legends Armor & EVO Guide explains how the current system works, how Shield Cores differ from your Legend Level, how EVO is earned, when to swap Cores, how overcharge works, and how to make better armor decisions during an actual match.

Current-system note: This guide focuses on the current Core Battle Royale/Ranked-style armor system. Apex has multiple modes, and some systems can differ by mode. EA’s current Ranked documentation specifically describes EVO and Shield Core behavior in Ranked. (EA Help)


How Armor Works in Apex Legends

The easiest way to understand the current system is to separate four things:

EVO is the progression resource.

Legend Level is the progression state you reach through EVO and determines your normal armor tier and access to Legend upgrades.

Shield Core provides your current shield charge.

Armor Upgrade Helmets can change your armor value independently of normal EVO progression.

That separation matters.

When you level up through EVO, you unlock the next normal armor tier and a Legend perk. EA notes that the new armor does not simply appear at full health; it begins regenerating, and incoming damage or an armor change interrupts that regeneration. (EA Help)

So there are really two questions to ask during a match:

What is my armor level?

and:

How much shield charge do I actually have right now?

Learn to separate those two, and the rest of the system becomes much easier to understand.


Normal EVO Armor Levels

EA’s current Ranked documentation lists three levels of normal EVO progression:

Legend LevelArmor TierShield Capacity
Level 1White50
Level 2Blue75
Level 3Purple100

EA confirms that Ranked EVO progression currently goes through Level 3, with White, Blue, and Purple armor. (EA Help)

That does not mean Purple is the only possible armor value in the game, however. Special Armor Upgrade Helmets can override the normal armor value, which we’ll cover below.

What happened to Red armor?

Older Apex guides often show the progression as:

White → Blue → Purple → Red

That is outdated.

EA changed normal EVO progression so that Level 3/Purple is the maximum armor level earned through EVO. Red armor is no longer something you reach simply by earning enough EVO. (EA)


What About Gold and Red Armor?

This is where the modern system gets more interesting.

EA introduced special Armor Upgrade Helmets that can set your armor above or differently from what your current Legend Level normally provides.

The Gold Armor Upgrade Helmet sets armor to 100 regardless of Legend Level.

The Mythic Armor Upgrade Helmet sets armor to 125 regardless of Legend Level, providing the current Red armor value.

Your Legend Level still matters for unlocking Legend upgrades, but while one of these helmets is equipped, leveling no longer determines your armor value in the same way. (EA)

So the cleanest way to remember the current system is:

Normal EVO progression: Level 1 White → Level 2 Blue → Level 3 Purple

Special Armor Upgrade Helmets: can override your normal armor value.

That distinction will save you from a lot of outdated Apex advice.


Apex Legends Armor at a Glance

SystemWhat it controls
EVOProgression toward higher Legend Levels
Legend LevelNormal armor tier and Legend upgrade access
Shield CoreCurrent shield charge
Core SwapReplaces your current Shield Core
OverchargeTemporary shield above your normal capacity
Gold Armor Upgrade HelmetSets armor to 100 regardless of level
Mythic Armor Upgrade HelmetSets armor to 125 regardless of level

This is the entire system in one table.

The important part is knowing which number you are actually looking at.


What Is EVO in Apex Legends?

EVO is the progression system that advances your Legend through the normal armor levels during a match.

EA’s current Ranked guide says players can earn EVO by dealing damage, collecting EVO Caches, and finding EVO Harvesters. (EA Help)

The exact sources and values can change with future updates, so this is one part of the game that should be checked against current patch notes whenever the system changes.

For practical purposes, though, the principle is simple:

EVO helps you progress.

That doesn’t mean it should become your only objective.


How to Gain EVO Efficiently

The best EVO usually comes from actions that already help your squad.

Fight when the fight makes sense

Dealing damage naturally contributes to EVO, so a worthwhile fight can advance your progression while also removing an enemy squad and giving you access to their loot.

That’s efficient.

Taking unnecessary damage trades simply because your EVO bar is nearly full is not.

Use EVO opportunities that fit your route

EVO Caches and EVO Harvesters can be valuable, but the route matters.

An EVO objective sitting along your next rotation is far more attractive than one that drags your squad into open ground or away from safety.

Don’t let EVO become the objective

Armor exists to help you survive fights and reach stronger positions.

You are not playing a damage-counter simulator.

A player with more EVO but a terrible position can still be eliminated before the extra progression matters.


Shield Cores Explained

The Shield Core is what separates the current armor system from the old “swap to a better body shield” model.

EA explains that armor is fueled by a Shield Core, which holds the remaining charge of your current shields. You can drop or swap Cores, and enemy death boxes contain the Cores of defeated players. (EA Help)

This means your Legend Level tells you what your normal armor tier is, while your Shield Core tells you how much shield charge is actually available.

And that brings us to one of the easiest mechanics to misunderstand.


Shield Core Color Does Not Always Mean Armor Level

EA specifically states that the color of a dropped Shield Core reflects its current charge value, not the original Legend Level of the player who dropped it. For example, a Core with only 45 HP remaining can appear white even if it came from a higher-level player. (EA Help)

That means:

Core color ≠ automatically the enemy’s armor level.

Check the actual charge.

Imagine you’re Level 3 with Purple armor, but your current Core has only 20 shield HP left.

A death box contains a Core with 75 shield HP.

The second Core may display as Blue.

That does not mean you have become a Blue-level player.

Your Legend Level is still Level 3.

You’ve simply replaced your current shield charge with a healthier Core.

That small distinction makes shield swapping much easier to understand.


When Should You Swap Shield Cores?

The simplest rule is:

Swap when the new Core gives you a meaningful survivability advantage without creating a worse tactical problem.

That usually means a healthier Core is especially valuable immediately after a knock or squad wipe.

But there is another question that matters just as much:

Is the swap safe?

A full Core isn’t worth much if you stand in the middle of a death box and get eliminated while taking it.

Before swapping, check:

How much charge does the new Core have?

How much shield do I have now?

Do I have cover?

Is another squad nearby?

Am I about to rotate?

A good shield swap is a combat reset.

A bad shield swap is just dangerous looting.


Armor Swapping After a Fight

Armor swapping is one of the most useful habits in Apex.

Suppose you win a close-range fight and your shields are nearly gone.

You can use a Shield Battery.

Or you can replace your current Core with a healthier one.

The swap can put you back into the fight much faster than completing a normal shield heal, which is particularly valuable when a third party is already approaching.

Still, don’t make the mistake of grabbing the nearest Core automatically.

A swap is useful when it improves your immediate fighting state.

It is not useful because a death box happens to contain something with a higher color.


What Is Armor Overcharge?

Overcharge is another major part of the current Shield Core system.

EA explains that when you swap to a Core corresponding to a tier above your current Legend Level, you gain the additional shield health as overcharge. That extra health cannot be restored normally and lasts for 30 seconds. After that, any remaining overcharge drains and the Core returns to your normal armor capacity. (EA Help)

Think of it as temporary combat insurance.

You have extra durability.

You don’t own a permanent higher armor tier.


When Is Overcharge Useful?

Overcharge is strongest when you can immediately convert it into something valuable.

For example:

You’re about to commit to a close-range fight.

You’re holding a position during an enemy push.

You need extra durability while finishing a fight.

You’re crossing a dangerous area and every extra shield point matters.

The 30-second window is short enough that the value comes from timing.

If the extra shield disappears without helping you survive or win anything, you didn’t really gain much from it.


Don’t Waste Overcharge

The worst use of overcharge is taking the extra shield and then spending the entire window doing nothing.

If it gives you the durability to take a fight, use it.

If it helps you survive a dangerous rotation, make the move.

If it gives you an advantage while holding a key position, take advantage of it.

Think of overcharge as:

a temporary opportunity

not:

a new armor tier.


Do You Always Want the Highest Armor?

No.

Armor level matters.

But in a real fight, usable shield charge, positioning, timing, and healing resources matter too.

A full Blue Core in strong cover can be more useful in the next ten seconds than a nearly empty Purple Core.

Likewise, having higher armor doesn’t compensate for standing in the open, getting isolated from your squad, or taking a fight you cannot exit.

Armor gives you more room for error.

It doesn’t remove the need to make good decisions.


Armor, Shield Healing and Resource Management

A damaged Core does not automatically mean “heal now.”

Sometimes you should heal.

Sometimes you should swap.

Sometimes you should simply keep moving.

The right answer depends on what is happening around you.

Heal when:

You have safe cover.

You have enough time.

You expect another fight soon.

No better Core is available.

Swap when:

A meaningfully healthier Core is nearby.

You just won a fight.

A third party is closing in.

You need shields immediately.

Leave it alone when:

You’re about to rotate.

The available Core isn’t significantly better.

Taking it would expose you.

Survival matters more than the loot.

That’s why armor management is really a form of time and risk management.


Why You Shouldn’t Farm EVO at Any Cost

Apex rewards combat, but that doesn’t mean every possible damage opportunity is worth pursuing.

Imagine you’re outside the safe area and an enemy team is sitting across an open valley.

You can probably squeeze another 200 damage out of them.

Your EVO bar would love it.

Your position might not.

You are exposed.

The Ring is moving.

Another squad could arrive from behind.

The extra EVO isn’t worth turning a safe rotation into a bad fight.

EA’s Takeover patch notes explicitly explained that removing Red armor from normal EVO progression was intended in part to reduce incentives to farm damage and avoid encounters simply to build resources. (EA)

The broader lesson is still useful:

EVO should support your game plan, not replace it.


Efficient EVO vs. Forced EVO

The difference is easy to spot.

Efficient EVO

You fight an enemy because the engagement is favorable.

You collect an EVO Cache on your route.

You find an EVO Harvester while rotating.

You earn EVO while gaining useful map control.

You progress naturally through actions that already benefit your squad.

Forced EVO

You cross an open area because an EVO objective is nearby.

You keep shooting a distant squad that has already escaped.

You stay outside your safe position to farm damage.

You take a bad fight because you’re almost at the next armor level.

You separate from your squad to chase progression.

The rule is simple:

Efficient EVO supports the match.

Forced EVO dictates the match.


Armor Decisions in the Early Game

Early-game armor management is mostly about getting yourself into a playable state.

Your priorities should be:

Usable weapons.

Usable shields.

Enough resources to survive the next engagement.

Proximity to your squad.

A sensible position.

You don’t need to obsess over reaching Purple as quickly as possible.

Early fights can naturally push your EVO forward while giving you loot, information, and control.

That is a much better return than wandering around looking for a perfect armor state.


Armor Decisions in the Mid Game

Mid-game armor management becomes more strategic.

By now, you should know:

Your current Legend Level

Your Core’s actual charge

Your healing inventory

Your squad’s position

Your next rotation

This is also where unnecessary EVO farming becomes increasingly expensive.

The match is progressing.

Enemy teams are moving.

Good positions are becoming more valuable.

An EVO objective that was worth taking five minutes ago may now be completely irrelevant.

Don’t let the bar on your HUD make your decisions for you.


Armor Decisions in the Endgame

In the endgame, armor management is less about progression and more about preserving effective health.

Every shield point matters.

Every reset matters.

Every safe Core swap can keep your squad alive through another engagement.

Death-box Cores become especially valuable because you may not have time for a full shield heal between fights.

But the same rule applies:

Don’t die for the shield.

If the Core is sitting in the open while multiple teams have line of sight, leave it.

No armor upgrade is worth donating your squad’s position.


The Armor Swap Decision

When you see a Shield Core, use this quick check:

1. How much charge does it actually contain?

Don’t judge by color alone.

2. How much shield do I have?

Compare the actual values.

3. Is the swap safe?

Check cover and enemy positions.

4. Do I need shields immediately?

A quick swap can be more valuable than a longer heal.

5. Am I about to rotate?

Don’t spend too long looting when the Ring or another squad is forcing movement.

6. Does the swap improve my next decision?

That’s the question that matters.


The Armor Rule

Here’s the framework I’d use:

Charge First. Level Second. Safety Always.

Charge tells you how ready you are for the next fight.

Level tells you your normal armor progression and Legend upgrade access.

Safety tells you whether taking advantage of either is actually worth the risk.

This is a better mental model than simply chasing armor colors.


Common Apex Legends Armor Mistakes

Chasing Purple just because it’s Purple

Higher-tier armor is useful, but the color alone doesn’t tell you whether it is the best immediate resource.

Ignoring Shield Core charge

A dropped Core’s color can reflect its remaining charge rather than the previous player’s Legend Level. (EA Help)

Check the actual value.

Healing when an instant swap is available

A healthy nearby Core can sometimes put you back into fighting shape faster.

Swapping in the open

Getting eliminated while looting isn’t an armor upgrade.

Farming EVO instead of rotating

Progression won’t help if the Ring or another team forces you out of position.

Assuming normal EVO still reaches Red

It doesn’t. Normal EVO progression currently stops at Level 3/Purple. (EA)

Forgetting about Armor Upgrade Helmets

Gold and Mythic Armor Upgrade Helmets can change your armor value independently of normal EVO progression. (EA)

Wasting overcharge

Temporary extra shield is valuable only when you turn that temporary advantage into something useful within its window. (EA Help)

Separating from your squad for armor

A slightly better Core is rarely worth becoming an isolated target.


A Practical Armor Routine for Every Match

You don’t need to stare at your EVO bar all game.

Build armor checks into the decisions you’re already making.

After landing

Ask:

What is my Legend Level?

How healthy is my Core?

Can I take an early fight safely?

After a fight

Ask:

Is there a healthier Core nearby?

Do I need to heal instead?

Is another team coming?

Before rotating

Ask:

Is my current shield state good enough?

Is an EVO objective already on our route?

Is it worth stopping for?

Before a major fight

Ask:

Do I have enough shield charge?

Are my teammates ready?

Do I have cover?

Would a Core swap or heal improve my next engagement?

That is enough to make armor management much more deliberate without turning it into a second HUD to monitor.


Armor Doesn’t Win the Fight by Itself

A stronger armor state gives you more room for error.

It doesn’t give you permission to make bad decisions.

A player with Purple armor can still lose instantly after overextending into the open.

A player with Blue armor can win by taking a better angle, focusing the right target, and forcing the enemy into worse cover.

That’s why armor works best alongside the rest of your fundamentals:

Positioning keeps you alive.

Aim lets you convert the extra durability.

Team fighting helps your squad trade damage.

Rotations put you in stronger positions.

EVO helps your progression keep pace with the match.

Armor is one part of the fight, not the entire fight.


Frequently Asked Questions

Is EVO armor still in Apex Legends?

Yes. In current Ranked play, EVO progresses your Legend through Level 1 White, Level 2 Blue, and Level 3 Purple armor. (EA Help)

What is a Shield Core in Apex Legends?

A Shield Core fuels your armor and holds your current shield charge. You can drop or swap Cores, and defeated enemies leave their Cores in death boxes. (EA Help)

What does EVO do in Apex Legends?

EVO advances your Legend Level. In current Ranked play, leveling unlocks higher normal armor tiers as well as Legend upgrade choices. (EA Help)

Can you still get Red Armor in Apex Legends?

Yes, but not through normal EVO leveling. Normal EVO progression currently caps at Level 3/Purple. Red armor is available through the Mythic Armor Upgrade Helmet, which sets armor to 125 regardless of Legend Level. (EA)

Can you get Gold Armor?

Yes. The Gold Armor Upgrade Helmet sets your armor to 100 regardless of Legend Level, while also providing its associated perk. (EA)

How does armor overcharge work?

Swapping to a Core above your current Legend Level can give you temporary additional shield health. EA says the extra charge cannot be restored normally and lasts for 30 seconds before the remaining overcharge drains away. (EA Help)

Does Shield Core color show the enemy’s armor level?

Not necessarily. EA says a dropped Core’s color reflects its current charge, not the original Legend Level of the player who dropped it. (EA Help)

Should I always farm EVO as quickly as possible?

No. EVO is useful, but not at the expense of your rotation, position, squad cohesion, or fight selection.

Is Purple armor always better than Blue?

Purple is the higher normal armor tier, but immediate shield charge and tactical position matter more than color alone. A healthier Core in a safer position can be the better choice for the next engagement.


Final Thoughts

The current Apex Legends armor system makes more sense once you stop treating armor color, EVO progression, and Shield Core charge as the same thing.

Your Legend Level determines your normal armor progression and helps unlock Legend upgrades.

Your Shield Core determines how much shield charge you can actually bring into the next fight.

EVO moves that progression forward.

Armor Upgrade Helmets can override the normal armor value.

And your decision-making determines whether any of those advantages survive long enough to matter.

The habits worth remembering are simple:

Don’t chase armor at the expense of position.

Don’t judge a Core by color alone.

Use healthier swaps when they’re safe.

Treat overcharge as a temporary advantage.

Let useful fights and efficient rotations generate EVO rather than turning EVO into the reason you take bad fights.

The Loot Strategist rule is worth keeping in your head:

Charge First. Level Second. Safety Always.

Once that becomes automatic, armor stops being something you simply pick up and becomes another resource you actively manage.

And in Apex, good resource management often buys you the extra few seconds you need to win the fight that decides the match.


Related Apex Legends Guides

Apex Legends Loot Guide — Learn how to prioritize weapons, ammo, healing, attachments, and other loot without wasting time.

Apex Legends Positioning Guide — Improve your use of cover, angles, high ground, and playable space.

Apex Legends Fight Guide — Learn when to engage, push, reset, or disengage.

Apex Legends Team Fighting Guide — Improve focus fire, crossfires, target isolation, synchronized pushes, and team resets.

Apex Legends Rotation Guide — Learn how to read the Ring, choose safer routes, and arrive at stronger positions.

Apex Legends Firing Range Practice Guide — Build better aim and combat habits with structured drills.


Sources & Updates

Last reviewed: September 14, 2026

EA’s current How Apex Legends Ranked Works documentation was checked for EVO progression, normal armor levels, Shield Core mechanics, armor regeneration, and overcharge behavior. EA currently lists Level 1 White, Level 2 Blue, and Level 3 Purple as the normal EVO progression in Ranked. (EA Help)

EA’s Takeover Patch Notes were checked for the change that capped normal EVO progression at Level 3/Purple and removed Red Armor from normal leveling. The same update introduced the Gold Armor Upgrade Helmet, which sets armor to 100, and the Mythic Armor Upgrade Helmet, which sets armor to 125. (EA)

EA’s official Apex Legends update archive remains the appropriate place to check for future gameplay changes. Apex continues to receive seasonal updates and balance patches in 2026. (EA)

Editorial note: Current mechanics in this guide are based on EA’s official documentation. The decision-making advice, examples, prioritization rules, and the “Charge First. Level Second. Safety Always.” framework are Loot Strategist editorial analysis intended to help players apply those mechanics in real matches.

Update policy: Apex Legends is a live-service game. Armor, EVO, Shield Core, and loot mechanics can change between seasons and patches, so this guide should be checked against EA’s latest documentation whenever a major gameplay update affects the system.

Apex Legends PC System Requirements: Minimum & Recommended Specs

Apex Legends PC System Requirements: Minimum & Recommended Specs

Wondering whether your PC can run Apex Legends? EA’s current system requirements are relatively modest by 2026 standards, but there is a big difference between being able to launch the game and getting the stable performance you actually want from a competitive shooter.

EA currently lists 6GB of RAM, a GTX 950 or Radeon HD 7790-class graphics card, and an Intel Core i3-6300 or AMD FX-4350-class processor as the minimum specification. Its recommended configuration moves to 8GB of RAM, a GTX 970 or Radeon R9 290, and an Intel Core i5-3570K or Ryzen 5-class CPU. Both configurations call for a DirectX 12-compatible graphics card and at least 75GB of free storage. EA associates its recommended specification with smooth 60 FPS gameplay. (EA)

Those numbers tell you where the official hardware requirements stand. They don’t, however, answer the question most players actually care about:

Will Apex Legends run well on my PC?

This guide answers that question.


Apex Legends PC System Requirements at a Glance

Here are EA’s currently published minimum and recommended specifications. (EA)

ComponentMinimumRecommended
Operating System64-bit Windows 1064-bit Windows 10
CPUIntel Core i3-6300 / AMD FX-4350Intel Core i5-3570K / Ryzen 5 equivalent
RAM6GB DDR38GB DDR3
GPUNVIDIA GTX 950 / AMD Radeon HD 7790 2GBNVIDIA GTX 970 / AMD Radeon R9 290
DirectXDirectX 12-compatible video cardDirectX 12-compatible video card
Storage75GB free space75GB free space
Internet512 Kbps or fasterBroadband connection

Important: these are EA’s published requirements, not a recommendation to buy these exact older components today.

A GTX 970 appearing on an official requirements page doesn’t mean a GTX 970 is the graphics card you should shop for in 2026. Modern hardware should be judged by its actual performance rather than by matching an old model number.


Can Your PC Run Apex Legends? Minimum vs. Recommended

The simplest way to interpret the requirements is to think of them as two different thresholds.

Minimum requirements

The minimum specification is the official floor for running Apex Legends:

  • 64-bit Windows 10
  • Intel Core i3-6300 or AMD FX-4350
  • 6GB RAM
  • GTX 950 or Radeon HD 7790 2GB
  • DirectX 12-compatible graphics card
  • 75GB of free storage
  • 512 Kbps or faster internet connection (EA)

Recommended requirements

The recommended specification raises those targets to:

  • 64-bit Windows 10
  • Intel Core i5-3570K or Ryzen 5 equivalent
  • 8GB RAM
  • GTX 970 or Radeon R9 290
  • DirectX 12-compatible graphics card
  • 75GB of free storage
  • Broadband connection (EA)

The key distinction is straightforward:

Minimum tells you whether your PC clears the published floor. Recommended gives you a more useful reference point for a smoother experience.

And neither one tells you exactly what FPS you will see on your particular system.


“Can Run” vs. “Runs Well”

This is the distinction that matters most.

A PC can technically meet a game’s minimum requirements while still producing an experience that feels poor.

A system hovering around the minimum may need aggressive graphics reductions and can have less performance headroom when several things are happening at once. A machine comfortably above the recommended specification has more room to maintain the performance target you actually care about.

Think of the requirements as a starting point, not a performance guarantee.

For Apex Legends, your real target might be:

Stable 60 FPS

120 FPS

144 FPS

Or simply the highest consistent frame rate your monitor can use.

Those are different goals, and they can require very different levels of hardware.


What Do the Recommended Specs Mean for 60 FPS?

EA describes its recommended configuration as suitable for smooth 60 FPS gameplay. (EA)

That’s a useful benchmark, but it shouldn’t be interpreted as a promise that every PC with a GTX 970, R9 290, or equivalent processor will sit at a locked 60 FPS in every circumstance.

Actual performance varies according to resolution, graphics settings, drivers, thermals, background software, and other system factors.

It is also worth separating average FPS from consistent FPS.

A PC that reports 90 FPS on average but frequently drops much lower can feel worse than a system delivering a steadier frame rate.

For competitive games, consistency matters.

What about 120 FPS or 144 FPS?

That’s a different performance target.

EA’s recommended specification is a 60 FPS reference, not a guarantee for high-refresh competitive play. If you’re building or upgrading specifically for 120Hz, 144Hz, or higher, don’t treat the official recommended hardware as the finish line.

Your monitor matters, too. A 144Hz display can show substantially more than 60 frames per second, but only when your PC can consistently produce them.


Apex Legends Storage Requirements

EA currently requires at least 75GB of free storage for Apex Legends. (EA)

That is free space, not simply the total capacity of your drive.

A 75GB SSD with almost no room left after installing the game is a poor long-term setup. Windows, other games, applications, updates, and temporary files also need space.

There is another distinction worth remembering:

Storage is not RAM.

Your SSD or hard drive stores data. RAM provides working memory for the operating system and running applications.

Adding a larger SSD won’t compensate for a shortage of RAM, just as installing more RAM won’t give a nearly full drive more capacity.


What Windows Version Does Apex Legends Require?

EA’s current system-requirements page lists 64-bit Windows 10. (EA)

There is an important 2026 caveat, though.

Microsoft ended standard Windows 10 support on October 14, 2025, meaning Windows 10 no longer receives normal free software and security updates through Windows Update. Microsoft recommends moving to Windows 11 where the hardware supports it. (Microsoft Support)

So the distinction is:

EA’s published Apex requirement is still 64-bit Windows 10. For a new PC in 2026, Windows 11 is the more sensible supported operating system to target.

That doesn’t mean an existing Windows 10 PC suddenly stops running Apex. It means the operating system itself is no longer Microsoft’s standard supported desktop platform.


CPU, GPU and RAM Explained in Plain English

PC specifications become much easier to understand once you know which job each component handles.

CPU: The Processor

The CPU handles the general computational work behind the game.

In practical terms, it contributes to game logic, simulation, processing tasks, and feeding information to the rest of the system.

A weak CPU can become a performance bottleneck even when the graphics card is capable of rendering more frames.

That matters particularly when you’re chasing high frame rates.

GPU: The Graphics Card

The GPU handles the visual workload.

It renders the game world, characters, effects, lighting, textures, and other graphical elements.

When your graphics card is the limitation, lowering graphical settings can often reduce the workload and improve frame rates.

That’s one reason the GPU is frequently the first component people investigate when graphics performance is poor.

RAM: System Memory

RAM is the computer’s active working space.

It holds data that Windows and your running applications need right now.

EA lists 6GB as the minimum and 8GB as the recommended RAM requirement for Apex Legends. (EA)

That shouldn’t be interpreted as a recommendation to build a brand-new gaming PC around only 8GB of RAM in 2026. A modern Windows gaming system may also have a browser, launcher, voice chat, recording software, and other applications running alongside Apex.

More RAM isn’t automatically more FPS, but insufficient RAM can become a system-wide limitation.


How to Check Your PC Specifications

You don’t need specialist software to find your basic hardware information.

Check your CPU and RAM

Press:

Ctrl + Shift + Esc

Then open the Performance tab in Task Manager.

Select CPU to see your processor.

Select Memory to see your installed RAM.

Check your GPU

In Task Manager, select:

Performance → GPU

Windows will display the graphics processor currently available to the system.

When comparing your GPU with EA’s requirements, pay attention to the actual model rather than simply assuming that a newer-looking name is automatically faster.

Check Windows

Open:

Settings → System → About

Look for your Windows edition and system type.

You want to verify that you’re using a 64-bit installation.

Check free storage

Open:

File Explorer → This PC

You’ll see how much space is available on your drives.

For Apex Legends, EA currently lists 75GB of free space as the requirement. (EA)


What Should You Upgrade First?

Don’t upgrade components in alphabetical order—or simply buy whichever part has the biggest number.

Find the bottleneck first.

That gives you a much better chance of spending money where it actually helps.

GPU-limited

If lowering graphical settings produces a significant FPS improvement, the graphics card may be doing most of the struggling.

A stronger GPU can make sense in that situation.

CPU-limited

If lowering graphics settings barely changes your frame rate, particularly at lower resolutions, the CPU may be limiting overall performance.

This becomes increasingly important when targeting high refresh rates.

RAM-limited

If your system is close to exhausting its available memory while Apex and your normal applications are running, additional RAM may give the system more breathing room.

Don’t assume every FPS problem is a RAM problem simply because more memory sounds better.

Thermal-limited

A PC can have perfectly capable hardware and still perform poorly if it is running too hot.

If performance starts strong and deteriorates after the system has been under load for a while, check temperatures before purchasing new components.

System or software-limited

Background applications, outdated drivers, excessive startup programs, and broader Windows issues can also affect performance.

That is why diagnosis should come before shopping.


Should You Upgrade Your GPU, CPU or RAM?

Once you’ve identified the bottleneck, the upgrade decision becomes much easier.

Upgrade the GPU when:

Your graphics card is the main performance limitation and you want higher FPS or better visual settings.

Upgrade the CPU when:

Your processor is limiting frame rates, particularly at high-refresh targets where the GPU has additional headroom.

Upgrade RAM when:

Your system doesn’t have enough memory for Apex plus the applications you normally keep open.

Replace the PC when:

Multiple major components are outdated, the platform has little meaningful upgrade room, or replacing several parts would cost nearly as much as moving to a newer system.

There is no universal “best first upgrade.”

The right answer depends on the bottleneck.


What If Your PC Is Below the Recommended Specs?

Being below the recommended specifications doesn’t automatically mean Apex Legends is off the table.

Look at how far below the specification your system is and which component falls short.

For example, a PC with a modern GPU but 8GB of RAM isn’t in the same position as a PC that’s below EA’s minimum graphics, CPU, and memory requirements at the same time.

The best next step is to identify the weak point rather than treating the entire machine as one number.

A system that falls slightly short in one area may benefit from an upgrade or sensible settings changes.

A system that falls well below the minimum across several areas may be better served by a broader hardware upgrade.


Can Graphics Settings Improve Apex Legends Performance?

Yes.

EA’s current PC settings guidance recommends reducing graphics settings when the priority is maximizing performance and FPS. It also recommends changing settings incrementally so you can see which adjustments actually help your system. (EA Help)

EA’s current guidance also recommends a 90–110 FOV range as a starting point, with 110 being common among competitive players. (EA Help)

But don’t turn this system-requirements article into another settings guide.

The important relationship is:

Hardware → graphics workload → FPS target → settings

Our Apex Legends Settings Guide covers the configuration side in much greater detail, including FOV, graphics, FPS, mouse, controller, and audio settings.


How to Improve Apex Legends Performance Without Buying a New PC

Before spending money, make sure the problem is actually hardware.

Start by applying sensible performance-oriented settings and checking whether FPS improves. EA recommends lowering graphics settings when maximizing performance is the priority. (EA Help)

Then check the basics:

Close unnecessary background applications.

Check GPU and CPU temperatures while playing.

Make sure your graphics drivers are reasonably current.

Check whether the system is running out of RAM.

Make sure the game drive has adequate free space.

Monitor performance while actually playing rather than judging the PC from specifications alone.

Changing one thing at a time also makes troubleshooting much easier. Otherwise, you won’t know which adjustment produced the result.


A Simple “Can I Run Apex?” Test

Use this five-step check before spending money.

QuestionWhat it tells you
Does the PC meet EA’s minimum requirements?Whether the system clears the official baseline
Which component falls short?Where the bottleneck may be
What FPS are you getting now?Your real-world performance
What happens when graphics settings are lowered?Whether the GPU may be limiting you
What FPS do you actually want?Whether you need optimization or new hardware

That final question is easy to overlook.

A player who wants a stable 60 FPS has a very different hardware target from someone building specifically around a 144Hz monitor.


A Simple Apex Legends Upgrade Checklist

Before buying anything, check these in order:

1. Identify the bottleneck.
Don’t assume the GPU is automatically the problem.

2. Check your actual FPS.
Use in-game performance data rather than guessing.

3. Test lower graphics settings.
A noticeable improvement can point toward a GPU limitation.

4. Check system memory and temperatures.
RAM and thermals can create problems that a new GPU won’t fix.

5. Decide on your target.
60 FPS, 120 FPS, and 144 FPS are different performance goals.

6. Compare modern replacement hardware.
Don’t buy an old component merely because it appears on EA’s requirements page.


Do You Need a High-End PC to Play Apex Legends?

No.

EA’s published minimum and recommended specifications are built around relatively old PC hardware by 2026 standards. (EA)

That is good news for players with older systems.

The bigger question is whether your hardware delivers the performance you want.

A modern budget gaming PC can exceed EA’s recommended specification by a considerable margin. At that point, the focus shifts from basic compatibility to frame-rate consistency, resolution, graphics quality, and your monitor’s refresh rate.

You don’t need an extravagant PC simply to play Apex Legends.

You do need hardware appropriate for the experience you’re trying to achieve.


Frequently Asked Questions

Can I play Apex Legends with 6GB of RAM?

EA lists 6GB of RAM as the minimum requirement. (EA)

That is enough to meet the published minimum, but a modern gaming PC with additional memory can provide more headroom for Windows and other applications.

Is 8GB RAM enough for Apex Legends?

EA currently lists 8GB as the recommended amount. (EA)

For a new gaming PC in 2026, however, I wouldn’t treat 8GB as a generous amount of system memory. It is better viewed as EA’s published recommendation for Apex rather than a modern whole-system memory target.

Can Apex Legends run on integrated graphics?

EA’s published requirements specify dedicated GPU models such as the GTX 950 or Radeon HD 7790 at minimum. (EA)

Because integrated graphics performance varies considerably between processors and generations, there isn’t a useful universal “integrated graphics” answer. Check the exact hardware and compare its real-world gaming performance.

Is 75GB enough for Apex Legends?

EA currently lists 75GB of free hard-drive space as the requirement. (EA)

Leave additional room on the drive for Windows, updates, applications, and other games rather than running the storage device at its limit.

Can Apex Legends run at 144 FPS?

Potentially, but EA’s recommended specification is associated with 60 FPS, not a guaranteed 120 or 144 FPS target. (EA)

If 144 FPS is the goal, assess the specific CPU, GPU, resolution, settings, and monitor rather than relying on the official recommended specification alone.

Should I buy a GTX 970 because EA recommends it?

No.

The GTX 970 is part of EA’s published recommended specification, but that doesn’t make it a sensible new purchase in 2026.

Use the requirement as a performance reference and compare modern hardware instead.


Apex Legends PC Requirements: The Practical Verdict

EA’s current requirements are useful, but they only tell part of the story.

The official minimum is:

6GB RAM + GTX 950/Radeon HD 7790-class GPU + Core i3-6300/FX-4350-class CPU

The recommended level is:

8GB RAM + GTX 970/R9 290-class GPU + Core i5-3570K/Ryzen 5-class CPU

EA also lists 64-bit Windows 10, a DirectX 12-compatible graphics card, and 75GB of free storage, with the recommended configuration associated with smooth 60 FPS gameplay. (EA)

For someone building or upgrading a PC today, though, the smarter approach is not to chase those exact old components.

Use them as reference points.

Then ask:

What hardware do I have?

What is limiting performance?

What FPS do I want?

What resolution am I playing at?

What is the cheapest upgrade that actually solves the problem?

That’s the difference between checking whether your PC can run Apex Legends and understanding whether it can run Apex Legends well.


Final Thoughts

Apex Legends doesn’t require an extravagant gaming PC to get started.

EA’s minimum requirements remain accessible, while its recommended specification gives players a useful 60 FPS reference point. (EA)

The mistake is treating those numbers as a complete performance prediction.

Your hardware, resolution, settings, thermals, background applications, and desired frame rate all matter.

So check the machine you already own before reaching for your wallet.

Diagnose the bottleneck. Set your FPS target. Optimize the settings. Upgrade only what needs upgrading.

That approach can save money—and give you a much better Apex Legends experience.

Once your PC is sorted, the next step is configuration and practice.


Related Apex Legends Guides

Apex Legends Settings Guide — Optimize FOV, graphics, FPS, mouse, controller, audio, and other settings.

Apex Legends Aim Guide — Improve recoil control, tracking, flicking, crosshair placement, and target switching.

Apex Legends Firing Range Practice Guide — Use structured drills to improve aim, recoil, tracking, target switching, and movement.

Apex Legends Movement Guide — Learn how movement, sliding, strafing, and positioning work together.

Apex Legends Beginner Guide — Build a foundation before moving into more advanced strategies.


Sources & Updates

Last reviewed: September 14, 2026

EA’s official Apex Legends PC System Requirements page was checked for the currently published minimum and recommended specifications, including CPU, GPU, RAM, operating system, DirectX, internet connection, and storage requirements. (EA)

EA currently associates its recommended configuration with smooth 60 FPS gameplay. (EA)

EA’s current Best Settings for Apex Legends on PC guidance was also checked for graphics-performance recommendations and FOV guidance. (EA Help)

Microsoft’s current support documentation confirms that Windows 10 reached end of support on October 14, 2025. (Microsoft Support)

Editorial note: The hardware specifications in this article are reported from EA’s official documentation. The explanations of bottlenecks, FPS targets, upgrade priorities, and modern PC-buying considerations are Loot Strategist editorial guidance and should not be interpreted as official EA recommendations.

Update policy: Apex Legends system requirements and PC compatibility information can change. Recheck EA’s official requirements whenever there is a major change to Apex Legends’ PC platform, graphics technology, operating-system support, or minimum hardware requirements.

Apex Legends Firing Range Guide: Practice Drills

Apex Legends Firing Range Guide: Practice Drills

Apex Legends Firing Range Practice Guide: Structured Drills to Improve Faster

The Apex Legends Firing Range becomes much more useful when you stop treating it as a place to empty magazines and start treating it as a training lab.

You can spend 20 minutes shooting targets and leave without knowing whether you improved anything. Or you can spend those same 20 minutes working on one specific weakness, increasing the difficulty in controlled steps, and then testing that skill in a real match.

EA currently recommends the Firing Range for practicing weaker shots, tracking, flicking, recoil, movement, hip-fire, and sensitivity testing. The Range itself was redesigned as an evolving training platform for shooting, movement, weapon experimentation, squad tactics, and combat practice. (EA Help)

That makes it ideal for deliberate practice.

The important part is having a reason for every drill.

Diagnose → Isolate → Drill → Add Pressure → Transfer

This guide shows you how to use that process without turning practice into a second job.


The Training Method

A productive session follows five stages.

Diagnose

Identify the specific problem appearing in your matches.

Isolate

Practice that skill under simple conditions so you can see what is actually going wrong.

Drill

Repeat it with a clear objective instead of shooting randomly.

Add Pressure

Introduce movement, recoil, target switching, distance, or other complications.

Transfer

Take the skill into a real match and see whether it still works when another player is shooting back.

That final step is critical.

The Firing Range gives you a controlled environment. A live match does not.


1. Enter the Range With One Question

Don’t begin with:

“What should I practice?”

Begin with:

“What went wrong in my last few matches?”

Maybe your crosshair repeatedly starts too low.

Maybe you lose moving targets as soon as they change direction.

Maybe your recoil looks controlled until you start strafing.

Maybe your target switches are slow.

Maybe your aim is fine in the Range but falls apart in close combat.

Each problem calls for a different drill.

EA itself recommends using the Range to practice shots you feel weaker at. (EA Help)

That is a better starting point than following the same routine every day regardless of what is actually holding you back.


2. Start With Your Normal Setup

Practice with the settings you normally use in matches.

That includes your:

  • sensitivity,
  • FOV,
  • controller settings,
  • keybinds,
  • and other relevant controls.

The point is to train the skill you will use in the game—not a temporary configuration that disappears when you queue.

EA’s current settings guidance recommends using the Firing Range to test sensitivity and find a setup that feels comfortable, while noting that there isn’t one setting combination that works for everyone. (EA Help)

So use the Range to test settings when needed.

Once you’ve chosen a configuration to evaluate, stop changing it every few minutes.

Train first. Tweak only when you have a reason.

For the full settings discussion, use your Apex Legends Settings Guide.


3. Drill 1: Crosshair Placement

Crosshair placement is one of the highest-value skills to practice because it reduces how much correction you need when an enemy actually appears.

EA recommends keeping the crosshair where enemies might appear and using the Firing Range to practice those shots. (EA Help)

How to practice

Move around the Range without immediately shooting.

Approach a target or piece of terrain.

Before you reveal the target, place your crosshair where an enemy is most likely to appear.

Then check how much correction is required.

Repeat from different directions.

What you’re measuring

How far did the crosshair have to move?

The less correction needed, the better your starting position.

Increase the difficulty

Start with stationary targets.

Then practice approaching corners.

Then combine the drill with movement.

The objective isn’t speed.

It’s learning to arrive at the fight with your crosshair already close to the right place.


4. Drill 2: Smooth Tracking

Tracking is the ability to keep your aim on a moving target.

EA specifically recommends practicing smooth mouse movement while following moving targets and also practicing while standing or moving. (EA Help)

How to practice

Start by tracking without firing.

Once the movement feels controlled, add shooting.

Then add your own movement.

Watch for three problems

Overshooting — your crosshair passes the target.

Under-correcting — your crosshair repeatedly trails behind.

Jerky movement — you make several large corrections instead of one smooth adjustment.

If you’re constantly overshooting, don’t increase the speed.

Reduce it.

Smooth control comes first.


5. Drill 3: Recoil + Tracking

Stationary recoil practice teaches you how a weapon behaves.

It doesn’t fully prepare you for a moving fight.

This drill combines:

Weapon recoil

Target movement

Your own movement

EA recommends using the Range to become familiar with weapon recoil and to practice shooting while moving. (EA Help)

How to practice

Choose a weapon you regularly use.

Begin against a moving target.

Track while firing.

Then add your own strafing.

Your goal

Keep the target centered while making recoil corrections.

If the aim falls apart, remove one difficulty.

For example:

Moving target + stationary player

before:

Moving target + moving player

That’s what isolation is for.


6. Drill 4: Flicking + Target Switching

Flicking is rapid target acquisition.

Target switching adds another requirement: once you reach the new target, you have to stabilize and fire.

EA recommends flicking between widely separated targets and changing the target order rather than memorizing one sequence. (EA Help)

How to practice

Choose two targets.

Shoot the first.

Move quickly to the second.

Stop accurately.

Shoot.

Then reverse the order.

After that, add a third target.

The useful sequence

Acquire → Stabilize → Fire → Switch

Do not sacrifice the stabilization step simply to make the drill faster.

A fast miss is still a miss.


7. Drill 5: Hip-Fire, ADS and Movement Transfer

Close-range Apex fights can require a different aiming approach from a longer-range engagement.

EA specifically recommends practicing hip-fire for fast, close-range combat. (EA Help)

Instead of practicing hip-fire and ADS as completely separate skills, combine them.

Start close

Track with hip-fire while moving.

Create distance

Transition to ADS when additional precision becomes useful.

Repeat

Move between the two ranges without stopping.

The purpose isn’t to memorize a fixed distance where you “must” switch.

It’s to make your aiming choice deliberate.

For broader movement mechanics, your Apex Legends Movement Guide is the better resource.


8. Increase Difficulty in Layers

A good drill becomes harder gradually.

Use this progression:

Level 1 — Control

Perform the skill without unnecessary movement.

Level 2 — Consistency

Repeat it without big mistakes.

Level 3 — Movement

Add your own movement or target movement.

Level 4 — Pressure

Introduce recoil, multiple targets, target switching, or changing distances.

Level 5 — Transfer

Use the skill in a real match.

If you skip directly from Level 1 to Level 5, you may not know what broke.

Layered progression tells you exactly where the problem starts.


9. Don’t Chase Range Scores

A number can be useful if the test is consistent.

A random target count isn’t.

Instead of asking:

“Did I hit more targets today?”

ask:

Did I overshoot less?

Did I lose the moving target less often?

Did the recoil stay controlled while moving?

Did I stabilize faster after switching targets?

Did the skill survive my next matches?

Those are more meaningful measurements because they connect directly to the problem you’re trying to solve.


10. Build a Problem → Drill → Progression Routine

This is where structured practice becomes much more useful than random warm-ups.

ProblemStart withAdd difficulty
Crosshair starts too lowPre-aim targetsAdd corners and movement
Overshooting targetsSlow flicksIncrease speed and distance
Losing moving targetsSmooth trackingAdd your own movement
Recoil breaks while movingStationary recoilAdd tracking and strafing
Slow target switchesTwo targetsAdd three targets and movement
Close-range missesHip-fire trackingAdd direction changes
Good Range aim, poor match aimMovement + target switchingAdd terrain and live combat

This should be one of the most useful parts of the article because it gives you a direct answer to:

“What should I practice today?”


11. The Firing Range Should Be a Laboratory

Use the Range to answer questions.

Not just to shoot things.

For example:

Does my recoil remain controlled while strafing?

Can I track a target after changing direction?

How accurate are my flicks when the targets are farther apart?

Can I maintain hip-fire while moving?

How quickly can I acquire a second target?

That mindset changes the entire session.

Instead of practicing for a vague goal like “better aim,” you’re testing a specific skill.

EA’s current guidance supports using the Firing Range for this kind of targeted practice, including tracking, flicking, recoil, and sensitivity testing. (EA Help)


12. Use the Range to Learn Your Weapons

You don’t need to practice every weapon in the game during every session.

Choose one you actually use regularly.

Study:

Recoil

Firing behavior

Practical range

Tracking feel

Target-switching behavior

EA notes that weapons have different characteristics, including firing speed, bullet drop, and recoil. (EA Help)

The useful outcome is familiarity.

When you already understand how a weapon behaves, you have more attention available for the rest of the fight.

You can then add a second weapon and practice switching between them.


13. Keep Settings Testing Separate From Skill Training

The Firing Range is a perfectly good place to test sensitivity.

But changing sensitivity during a tracking drill makes the result harder to interpret.

Do this instead:

Test setting → choose value → run drill → evaluate

rather than:

Miss → change sensitivity → miss → change sensitivity again

The Apex Legends Settings Guide covers sensitivity, FOV, controller settings, and other configuration decisions in greater detail.

This page should remain about practice methodology.


14. The 10-Minute Warm-Up

When you simply want to prepare before playing, don’t overcomplicate it.

Minutes 1–2

Crosshair placement.

Minutes 3–4

Smooth tracking.

Minutes 5–6

Recoil with a familiar weapon.

Minutes 7–8

Flicks and target switching.

Minutes 9–10

Movement shooting or hip-fire.

Then play.

The warm-up is not supposed to exhaust you.

It’s there to get your hands and eyes working before a match.

EA recommends regular aim practice and specifically points players toward the Firing Range for weaker shots and core aiming skills. (EA Help)


15. The 20-Minute Focus Session

When you’re actually trying to improve a weakness, use a more deliberate structure.

Five minutes — Isolate

Work on the core mechanic without unnecessary complexity.

Five minutes — Repeat

Do the same task until the movement becomes more consistent.

Five minutes — Add pressure

Introduce movement, recoil, target switching, or distance.

Five minutes — Transfer

Build a more realistic sequence using movement and terrain, then take the skill into matches.

If you know your specific weakness already, this is more valuable than simply repeating a generic warm-up for twice as long.


16. Practice the Skill You Actually Need

This is where many training sessions go wrong.

You are already good at tracking.

You enjoy tracking.

So you spend another 20 minutes tracking targets.

Meanwhile, you keep overshooting every target switch.

Your practice feels productive.

Your weakness doesn’t change.

Instead:

Spend most of your deliberate practice on the skill that keeps costing you fights.

Maintain strengths.

Prioritize weaknesses.


17. The Range Cannot Reproduce a Real Match

This is one of the most important limitations to understand.

The Firing Range can isolate mechanics.

A real match adds:

Pressure

Unpredictable movement

Multiple targets

Sound

Limited resources

Positioning

Decision-making

Consequences for failure

That means Range performance is useful evidence, but it isn’t the final test.

The final test is whether you perform the skill when someone is trying to kill you.


18. Use the Transfer Ladder

Move from simple to realistic conditions:

Range → More Complex Range Drill → Live Match

For example:

Tracking

Stationary tracking
→ moving target
→ your own movement
→ movement + recoil
→ live fight

Target switching

Two targets
→ three targets
→ movement
→ movement + cover
→ live fight

Recoil

Wall pattern
→ stationary target
→ moving target
→ movement + tracking
→ live fight

That progression is more useful than assuming one successful Range drill means the skill is finished.


19. Review the Result After a Match

After your first few matches, ask:

Did the skill appear naturally?

If yes, increase the drill difficulty next time.

If no, identify where it broke.

For example:

“Tracking was fine in the Range but fell apart when the enemy changed direction.”

That’s useful.

So is:

“Recoil was controlled until I started strafing.”

Or:

“I could switch targets quickly, but I needed too many corrections afterward.”

Those observations tell you what to train next.

That’s the Transfer stage of the framework.


20. Use Firing Range Features Without Building Your Routine Around Them

EA has continued adding and adjusting Firing Range tools over time. For example, the 2026 Overclocked update added Range settings including Infinite Healing, Self-Revive, and a Hardlight rebuild button. (EA)

Those features can reduce downtime during certain exercises.

But they should remain optional.

The exact Range interface and available tools can change with future updates.

Your core routine should continue to work without relying on one temporary button or menu option.


Common Firing Range Practice Mistakes

Practicing without a goal

You spend time shooting without knowing what you’re trying to improve.

Changing sensitivity constantly

You can’t tell whether your mechanics or settings caused the difference.

Training only stationary aim

Your match opponents move.

Increasing difficulty too quickly

You introduce several problems before mastering the original one.

Practicing only what feels comfortable

The weakness remains untouched.

Chasing scores instead of consistency

A bigger number doesn’t necessarily mean better transfer.

Staying in the Range forever

Practice should eventually return to real matches.

Blaming aim for every death

Sometimes positioning, timing, or fight selection is the actual problem.


A Simple Firing Range Practice Checklist

Before the session:

What specific weakness am I training?

During the drill:

Can I perform the basic skill consistently?

When it becomes comfortable:

What is the next difficulty layer?

After the session:

What improved?

What still breaks?

In your next match:

Did the skill transfer?

If you can’t answer those questions, the session probably needs a clearer objective.


Final Thoughts

The Firing Range is valuable because it lets you isolate problems that are difficult to see in the middle of a match.

Use that advantage.

Don’t enter simply because you feel like your aim is “off.”

Identify what is actually failing.

Isolate it.

Practice it.

Add movement or pressure.

Then take it back into a match.

The most useful practice cycle is:

Diagnose → Isolate → Drill → Add Pressure → Transfer

That gives every session a purpose.

You don’t need twelve complicated drills.

You don’t need a two-hour warm-up.

And you don’t need to chase a perfect Range score.

You need to know what you’re fixing.

Then make the exercise just difficult enough to expose whether the problem is actually improving.

The Firing Range is where you isolate the skill.

The match is where you prove it.


Apex Legends Firing Range Cheat Sheet

Need a quick warm-up?

10 minutes:

Crosshair → Tracking → Recoil → Target Switching → Movement

Need deliberate practice?

20 minutes:

Isolate → Repeat → Add Pressure → Transfer

Not sure what to train?

Review your last matches.

Keep overshooting?

Flick control.

Lose moving targets?

Tracking.

Lose control while strafing?

Recoil + movement.

Slow target switches?

Two- and three-target drills.

Good Range aim, poor match aim?

Add pressure and focus on transfer.


Frequently Asked Questions

What should I practice first in the Apex Legends Firing Range?

Start with the skill that is causing the most obvious problem in your matches. Crosshair placement, tracking, recoil, and target switching are good starting points. EA specifically recommends using the Range for weaker shots and aim practice. (EA Help)

How long should I practice in the Firing Range?

A 10-minute routine works well as a warm-up. For deliberate skill improvement, a focused 20-minute session is often enough when you’re working on one specific weakness.

What is the best Firing Range drill?

There isn’t one universal best drill. Different exercises train different skills. The best drill is the one that directly addresses the mistake you’re making in real matches.

How do I practice recoil?

Choose a weapon you regularly use, observe its recoil at the wall or against targets, then repeat while making controlled corrections. Once that feels consistent, add tracking and movement. EA recommends using the Firing Range to become familiar with weapon recoil. (EA Help)

How do I practice tracking?

Begin by following moving targets without firing, then add shooting and your own movement. EA specifically recommends smooth tracking practice against moving targets. (EA Help)

How do I practice flicking?

Use targets at different positions, move between them, and focus on stopping accurately before trying to increase speed. Change the target order so the drill requires genuine acquisition rather than memorization. EA recommends varying the target pattern during flick practice. (EA Help)

Should I practice with one weapon or many?

Start with one or two weapons you actually use often. Familiarity with their recoil and firing behavior makes practice easier to evaluate. Add variety after the fundamentals are consistent.

Should I change my sensitivity in the Firing Range?

The Range is an appropriate place to test sensitivity, but make deliberate changes rather than changing it after every missed shot. EA specifically recommends the Firing Range for sensitivity testing. (EA Help)

Can I practice movement in the Firing Range?

Yes. EA describes the Range as a training environment for shooting and movement, and its current aim guidance recommends tracking targets while moving. (EA Help)

Can I practice with friends?

Yes. EA designed the Firing Range to support squad practice and combat training with friends, including duels and combat dummies. (EA)

Why is my aim good in the Firing Range but bad in matches?

The Range isolates mechanics. Matches add pressure, unpredictable movement, multiple enemies, positioning, audio, and consequences. Increase drill difficulty gradually, then test the skill in real matches.

Should I practice every day?

You don’t need to. Consistent, purposeful sessions are more useful than long sessions without a goal. A short warm-up before matches and occasional focused training can be enough.

How do I know whether my training is working?

Measure the mistakes rather than just the number of targets hit. Look for fewer overshoots, better target retention, tighter recoil control, cleaner target switches, or better transfer into actual fights.


Sources & Updates

Last reviewed: September 14, 2026

EA’s current Best Settings for Apex Legends on PC guide was used to verify documented recommendations involving Firing Range practice, crosshair placement, tracking, recoil, flicking, hip-fire, movement, weapon characteristics, and sensitivity testing. (EA Help)

EA’s Arsenal update introduced the redesigned Firing Range as an evolving training platform for warming up, shooting and movement practice, weapon experimentation, squad tactics, combat dummies, duels, and simulated combat. (EA)

EA’s Overclocked Patch Notes document additional Firing Range settings introduced in 2026, including Infinite Healing, Self-Revive, and a Hardlight rebuild button. These features are treated as optional conveniences rather than requirements because the Range continues to evolve. (EA)

EA’s current Apex news feed confirms that the game continues to receive frequent updates, with Marked Midseason Designer’s Notes published September 10, 2026 and other recent game updates. This guide therefore focuses on durable practice methodology instead of temporary Range features or weapon-meta recommendations. (EA)

The training methodology in this guide—Diagnose → Isolate → Drill → Add Pressure → Transfer—is Loot Strategist editorial analysis designed to turn Firing Range time into measurable practice rather than random warm-up shooting.

For related guides, see the Apex Legends Aim Guide, Apex Legends Settings Guide, Apex Legends Movement Guide, Apex Legends Positioning Guide, and Apex Legends Fight Guide.

Apex Legends Aim Guide: Recoil Control, Tracking, Flicking & Aim Drills

Apex Legends Aim Guide: Recoil Control, Tracking, Flicking & Aim Drills

Good aim in Apex Legends is not just about moving your crosshair onto an enemy quickly.

You have to acquire targets, track players who are moving, control recoil, switch between enemies, choose between hip-fire and ADS, and keep your aim functional while your own character is moving. A player can have excellent raw mechanics and still miss because their crosshair started in the wrong place, their corrections were too large, or they were taking a shot that their position made unnecessarily difficult.

That is why aim is better understood as a group of skills rather than one talent.

This Apex Legends aim guide focuses on the parts you can actually train: crosshair placement, tracking, recoil control, flicking, hip-fire, ADS, target switching, movement shooting, and Firing Range drills.

The most useful approach is not to practice everything at once.

Find the miss. Identify the cause. Train that skill.


The Aim Framework

Think of aiming as four stages:

Acquire

Get your crosshair onto the target efficiently.

Track

Keep the crosshair with the target as they move.

Control

Manage recoil, corrections, and your own movement.

Convert

Turn accurate aim into meaningful damage and useful combat pressure.

Acquire → Track → Control → Convert

This framework matters because good aim is not measured by how fast you can move your crosshair.

It is measured by how consistently you can put the crosshair where it needs to be and keep it there long enough to matter.


1. Crosshair Placement Comes First

The easiest way to make aiming easier is to reduce how much aiming you have to do.

Keep your crosshair near the height and location where an enemy is likely to appear.

That means avoiding habits such as:

  • looking at the floor while approaching a doorway,
  • staring at the sky while moving toward a ridge,
  • or entering a room with your crosshair nowhere near a likely enemy position.

EA’s current aim guidance specifically recommends keeping the crosshair where enemies might appear and centering the enemy on screen before shooting. (EA Help)

Good crosshair placement turns some of the reaction into preparation.

Instead of:

Enemy appears → huge crosshair movement → fire

you get:

Enemy appears → small correction → fire

That difference adds up over an entire match.


2. Pre-Aim Common Enemy Positions

Pre-aiming means placing your crosshair where you expect the opponent to appear before they arrive.

This is particularly useful around:

Doorways

Windows

Corners

Stairs

Ledges

Common peek points

You don’t need to know the exact position of the enemy.

You are simply reducing the amount of work required once they appear.

The more familiar you become with common angles and terrain, the more useful this becomes.

That is one reason aim and positioning are closely connected. Your Apex Legends Positioning Guide covers the terrain and angle side of the equation.


3. Don’t Stare at the Crosshair

Where you place your visual attention can change with distance.

EA’s current guidance suggests thinking more about the enemy at close range and the crosshair at longer ranges. (EA Help)

The practical lesson is more useful than treating that as a strict rule.

At close range, you have very little time to react to sudden movement, so maintaining awareness of the character model can help.

At longer ranges, tiny crosshair adjustments matter much more.

Your attention should adapt to the shot rather than following one rigid aiming habit.


4. Tracking: Follow the Target, Don’t Chase It

Tracking means keeping your crosshair on a moving opponent.

It is one of the most important skills in Apex because players constantly strafe, slide, change direction, climb, and reposition.

The common mistake is overreacting to every movement.

A smoother approach is to follow the target’s general path and make smaller corrections.

Think:

Smooth movement first. Correction second.

EA recommends practicing smooth mouse movement while following moving targets in the Firing Range. (EA Help)

The same principle applies to controller players. Constantly slamming the stick from one direction to the other makes it harder to keep the target centered.


5. Track the Enemy’s Movement Pattern

Not every movement change is random.

Players often:

  • strafe left and right,
  • repeat a direction,
  • change direction after taking damage,
  • move toward cover,
  • or commit to a predictable escape.

You don’t need to predict every input.

You only need enough awareness to avoid making your crosshair chase every twitch.

Watch the target’s overall movement, then keep your aim flowing with it.

This becomes particularly useful when fighting around cover, where the enemy’s available movement is already limited by the terrain.


6. Recoil Control Starts With Familiarity

There is no universal recoil movement that works perfectly for every weapon.

EA notes that Apex weapons can differ in recoil, firing behavior, bullet drop, and projectile travel characteristics. (EA Help)

You therefore don’t need to memorize every weapon in the game.

Learn the recoil behavior of the weapons you use often.

Take one into the Firing Range.

Fire at a wall.

Watch how the weapon moves.

Then make controlled corrections while shooting.

Once the basic pattern feels familiar, add movement and target tracking.

The goal is not perfect memorization.

It is making recoil control sufficiently familiar that it doesn’t consume your attention in the middle of a fight.


7. Recoil Control Isn’t Just Pulling Down

Pulling down can be part of recoil control, but it isn’t the whole technique.

Weapons can have horizontal movement as well, and EA’s current guidance specifically discusses moving your aim horizontally while firing as part of managing recoil. (EA Help)

Watch the actual weapon behavior.

Then counter it.

The correction should respond to what the gun is doing rather than follow a memorized “pull down harder” routine.


8. Practice Recoil Before Adding Speed

When learning a weapon, begin slowly.

Your first question should be:

Can I keep the shots grouped?

Then:

Can I maintain that control while tracking?

Then:

Can I maintain it while moving?

That progression matters.

If your recoil control is poor while standing still, adding rapid movement usually hides the problem instead of fixing it.


9. Don’t Fight Recoil With Tension

Overcorrecting is one of the easiest ways to make recoil worse.

You pull too far.

Then correct back.

Then overcorrect again.

The result is:

Overshoot → correction → overshoot → correction

Make the size of your input smaller.

Try:

Smooth → controlled → repeatable

rather than constantly trying to “save” a spray after you’ve already lost control.


10. Flicking Is Fast Target Acquisition

A flick is a rapid movement from one target or point to another.

It is useful when:

  • another enemy appears unexpectedly,
  • a target changes position,
  • you need to switch between opponents,
  • or your initial aim point is far away from the target.

The goal isn’t maximum speed.

A useful flick is:

The fastest movement you can consistently stop on target.

EA recommends practicing flicking between widely spaced targets in the Firing Range and varying the order in which you shoot them. (EA Help)

Start under control.

Increase speed only when accuracy survives.


11. Practice Flicks in Different Directions

Don’t train only left-to-right flicks.

Vary:

Left → Right

Right → Left

Up → Down

Down → Up

Near → Far

Far → Near

Change the sequence so your brain isn’t simply memorizing the route.

The goal is target acquisition.

Not choreography.


12. Hip-Fire vs. ADS: Choose the Tool for the Fight

A common mistake is treating ADS as the “proper” way to aim.

It isn’t.

EA specifically recommends hip-fire for fast, close-range combat. (EA Help)

Hip-fire makes more sense when:

The enemy is very close.

You need maximum freedom of movement.

The fight is happening around tight terrain.

You need to react quickly to a changing target.

ADS makes more sense when:

The target is farther away.

You need more precision.

The situation gives you time to stabilize.

The extra accuracy outweighs the mobility trade-off.

There is no universal distance where you must switch.

Learn to recognize the situation.


13. Don’t ADS Because You’re Panicking

This is an underrated aiming mistake.

An enemy suddenly appears.

You panic.

You immediately ADS.

The enemy is already moving across your screen.

Now you’re trying to combine precise aiming with a fight that demands rapid movement.

The result can be worse than controlled hip-fire.

The better habit is to choose the aiming method deliberately.

More precision isn’t always better precision.


14. Practice Hip-Fire on Purpose

Don’t wait for close-range fights to teach you how to hip-fire.

Practice it.

Start near a target.

Move laterally.

Keep the target centered.

Then add:

Direction changes

Target switching

Slides

Different distances

The objective is to make hip-fire feel like a controlled technique rather than something you panic into when an enemy gets too close.


15. Aim While Moving

Apex doesn’t ask you to aim from a shooting range booth.

You are moving.

Your opponent is moving.

Both sides are trying to survive while dealing damage.

EA’s current aim guidance recommends practicing tracking while moving as well as standing still. (EA Help)

That means your aim training should eventually combine:

Movement + tracking

Movement + recoil

Movement + target switching

The objective is not flashy movement.

It’s keeping your aim functional while making yourself harder to hit.

Your Apex Legends Movement Guide covers the actual movement mechanics separately.


16. Don’t Separate Aiming From Positioning

Not every missed shot is an aim problem.

You may have missed because:

  • you started with poor crosshair placement,
  • you were fighting from an exposed position,
  • the enemy had a better angle,
  • you were trying to shoot at an uncomfortable range,
  • or you were forced to make a difficult correction because your positioning was poor.

Your Apex Legends Positioning Guide covers how to make those shots easier before you take them.

That distinction is important:

Sometimes the best way to improve your aim is to improve the situation you’re aiming from.


17. Target Switching Is Its Own Skill

Staying on one target is only part of combat.

An Apex fight can change in an instant.

You are tracking one player.

Another enemy swings from the side.

Now you must:

Acquire → stabilize → shoot → switch

That is a different skill from pure tracking.

Practice switching between targets at different angles and distances.

Don’t make speed the only objective.

A fast target switch that lands nowhere is just a fast miss.


18. Don’t Overcorrect

Aiming errors are often caused by too much input rather than too little.

You see the target.

You move past them.

You correct.

You pass them again.

This happens when you’re reacting to the crosshair instead of controlling it.

Reduce the size of your corrections.

A useful cue is:

Get close, then refine.

The final few pixels of adjustment should feel much smaller than the original movement.


19. Diagnose the Miss Before You Train

This is where aim practice becomes far more useful.

Instead of saying:

“My aim was bad.”

Ask what actually happened.

Crosshair-placement miss

Your starting position was wrong.

Practice: pre-aim and corner-entry drills.

Overflick

You moved too far.

Practice: slower flicks with deliberate stops.

Underflick

You stopped short.

Practice: gradually increase movement distance.

Tracking miss

You couldn’t keep up with the target.

Practice: smooth tracking.

Recoil miss

Your shots drifted away during sustained fire.

Practice: recoil drills.

Target-switch miss

You couldn’t acquire the second target cleanly.

Practice: two- and three-target switching.

Decision miss

Your mechanics were fine, but the shot selection was poor.

Practice: hip-fire/ADS decisions and realistic fight scenarios.

This is more useful than simply logging more hours.


20. Don’t Blame Aim for a Positioning Mistake

Suppose you miss several shots while fighting from bad cover.

You might conclude:

“I need better aim.”

But the actual problem may be that the enemy had a clean angle while you were exposed.

Likewise, a difficult long-range shot isn’t necessarily proof that your tracking is poor.

Diagnosis matters because you want to train the skill responsible for the failure.

That is the difference between practicing aim and improving aim.


21. Your Settings Should Support Your Aim

Sensitivity matters, but changing settings constantly can become its own bad habit.

EA currently says the best mouse or controller settings depend on personal preference and recommends experimenting to find a comfortable setup. Its current competitive starting points include 3.0–5.0 mouse sensitivity with a 1.0 ADS multiplier, while some competitive controller players use 4-3 sensitivity; EA also recommends Classic response curve as a starting point for newer players. (EA Help)

Treat those numbers as starting points, not universal answers.

Your Apex Legends Settings Guide already covers the broader settings question. This article only needs the practical rule:

Make deliberate changes, test them, then give yourself time to adapt.


22. Stop Changing Sensitivity After Every Bad Game

A bad match doesn’t prove your sensitivity is wrong.

Your performance changes because of:

  • fatigue,
  • target distance,
  • different weapons,
  • positioning,
  • movement,
  • pressure,
  • and simple match-to-match variance.

Constant settings changes prevent consistency from developing.

Make a change because you identified a specific problem.

Then test that change long enough to judge it properly.


23. FOV Changes How Aim Feels

FOV affects the size and visibility of targets on screen.

EA currently recommends experimenting within 90–110 FOV and notes that 110 is common among competitive players. Higher FOV shows more of the surroundings but makes distant targets appear smaller. (EA Help)

That’s another reason not to copy another player’s settings without testing them.

A setting can be excellent for one player and uncomfortable for another.

For the full FOV and sensitivity discussion, use the Apex Legends Settings Guide.


24. Controller Players: Understand Aim Assist Without Overthinking It

EA says aim assist is automatically enabled for console players and PC players using controllers, while mouse-and-keyboard players do not receive it. EA also notes that console aim assist is stronger. (EA Help)

EA currently does not recommend turning aim assist off, although the option exists for players who want to experiment without it in the Firing Range. (EA Help)

For most players, the useful takeaway is simple:

Consistency matters more than constantly changing the assistance settings.

Build your mechanics around the input system you actually use in matches.


25. The Firing Range Should Be a Laboratory

The Firing Range is most useful when you have a question you want to answer.

Not:

“I’ll shoot targets for twenty minutes.”

Instead:

Can I track smoothly?

Can I control this weapon?

Can I switch targets without overshooting?

Can I hip-fire while moving?

Does this sensitivity feel controllable?

EA’s current guidance specifically recommends the Firing Range for testing sensitivity, tracking, flicking, recoil, movement, and related aiming skills. (EA Help)

The more specific the question, the more useful the session.


26. Five Aim Drills Worth Repeating

You don’t need ten different routines.

Five focused drills cover most of the important mechanics.

Drill 1: Crosshair Placement

Move through the Firing Range and pre-aim where targets are likely to appear.

Don’t shoot immediately.

First place the crosshair.

Then acquire the target.

Goal: reduce unnecessary crosshair movement.


Drill 2: Smooth Tracking

Follow moving targets without firing.

Then repeat while firing.

Finally, add your own movement.

Goal: maintain smooth target control without large corrections.

EA specifically recommends moving with your crosshair on moving targets as part of aim practice. (EA Help)


Drill 3: Recoil + Tracking

Choose a familiar weapon.

Track a moving target while controlling recoil.

Start at a comfortable range.

Then increase the difficulty.

Goal: manage weapon movement without losing the target.


Drill 4: Flick + Target Switch

Shoot one target.

Move quickly to a second.

Stabilize.

Shoot.

Then repeat with different target orders.

Goal: acquire new targets quickly without sacrificing accuracy.

EA recommends varying target patterns during flick practice. (EA Help)


Drill 5: Hip-Fire + ADS Transition

Start close enough for hip-fire.

Move while tracking.

Then create distance and switch to ADS when the situation calls for more precision.

Goal: choose the appropriate aiming technique rather than defaulting to one.


27. A Simple 10-Minute Aim Routine

You don’t need an hour-long warm-up before every match.

Try:

Minutes 1–2: Crosshair placement

Minutes 3–4: Tracking

Minutes 5–6: Recoil control

Minutes 7–8: Flicks and target switching

Minutes 9–10: Movement + shooting

Then spend a few extra repetitions on the weakness you identified from your previous session.

That last part matters.

A routine should adapt to your problem rather than become another activity you complete on autopilot.


28. Practice the Miss, Not Just the Mechanic

Suppose you keep missing because you stop your flick too late.

Don’t spend the next hour doing faster flicks.

Slow them down.

Suppose tracking breaks when the target changes direction.

Don’t immediately increase speed.

Practice smoother directional changes.

Suppose recoil is fine until you start moving.

Add movement.

Suppose your Firing Range aim looks good, but your matches don’t.

Practice target switching, movement, and realistic decision-making.

Your training should reproduce the conditions causing the mistake.

That’s how practice becomes specific.


29. Don’t Only Practice What Feels Good

It is easy to spend a session doing the drill you’re already comfortable with.

Tracking feels good.

So you track for 20 minutes.

Meanwhile, you still overshoot every target switch.

Train the weakness.

A useful split is:

Strong skill: maintain

Average skill: improve

Weak skill: prioritize

Your aim gets better when the training session is slightly uncomfortable.


30. Mechanical Aim vs. Combat Aim

There is a difference between being accurate in a controlled drill and being accurate in a live match.

Combat adds:

  • movement,
  • cover,
  • multiple targets,
  • sound,
  • pressure,
  • target prioritization,
  • positioning,
  • and decisions about whether to shoot at all.

That’s why your final practice stage should eventually combine the skills.

Track while moving.

Control recoil while tracking.

Switch targets.

Use the appropriate aiming mode.

Work around terrain.

The closer the drill becomes to a real situation, the more useful the transfer becomes.


31. Aim Is Easier When the Shot Is Easier

This is an important connection between your combat guides.

Good positioning can reduce the mechanical difficulty of a shot.

A strong angle gives you more time.

Cover reduces exposure.

High ground can improve visibility.

A predictable doorway simplifies target acquisition.

Your Apex Legends Positioning Guide explains those concepts in detail.

The lesson here is:

Don’t try to mechanically solve a problem that better positioning could prevent.


32. Common Apex Legends Aim Mistakes

Changing sensitivity constantly

You never give yourself enough time to adapt.

Starting with poor crosshair placement

Your first correction is larger than it needs to be.

Practicing only stationary targets

Real opponents move.

Practicing only flicks

Flicking is only one part of aiming.

ADSing every close-range fight

You may be sacrificing the movement freedom the situation requires.

Overcorrecting

Large inputs create a cycle of misses and corrections.

Ignoring target switching

Real fights rarely involve one perfectly isolated opponent.

Blaming recoil for every miss

The starting crosshair position may be the actual problem.

Training without a goal

Random shooting is harder to measure.

Practicing only strengths

Improvement slows when you never train the weaknesses.


Aim Problems → Fixes at a Glance

ProblemLikely causeBest practice
Crosshair starts too lowPoor placementPre-aim drill
Crosshair flies past targetOverflickSlower flicks
Stop short of targetUnderflickGradually increase movement
Lose moving playersTrackingSmooth tracking
Spray leaves targetRecoil controlRecoil + tracking
Miss after switching targetsAcquisitionTarget-switch drill
Struggle at point-blank rangePoor aiming-mode choiceHip-fire practice
Aim is good in Range but poor in matchesPoor transferMovement + target switching
Miss while peekingPositioning problemReassess cover and angle
Aim feels inconsistent after settings changesConstant tweakingSettle on one setup and test it

This is the part of the guide I’d bookmark.

The most useful question after a bad fight isn’t “How do I aim better?”

It’s:

“What kind of miss was that?”


Final Thoughts

Better aim in Apex Legends isn’t about making your crosshair move as quickly as possible.

It’s about making the correct movement repeatable.

Start with crosshair placement.

Learn to track smoothly.

Understand the recoil of the weapons you actually use.

Practice controlled flicks.

Know when hip-fire makes more sense than ADS.

Switch targets without losing control.

Keep your aim functional while moving.

Then diagnose your misses instead of blindly practicing more.

The most useful progression is:

Acquire → Track → Control → Convert

And the most useful training rule is even simpler:

Don’t practice aim. Practice the miss.

If your crosshair starts in the wrong place, work on placement.

If you overshoot, work on stopping.

If you lose moving targets, work on tracking.

If your spray breaks down, work on recoil.

If your Range performance doesn’t transfer to matches, add movement, pressure, and target switching.

You don’t need perfect aim.

You need reliable aim that holds up when the fight gets messy.

That’s what turns practice into better games.


Apex Legends Aim Cheat Sheet

Before the fight:
Pre-aim → correct crosshair height → choose hip-fire or ADS.

During the fight:
Track smoothly → control recoil → stay aware of movement → switch targets when needed.

After a miss:
Identify the type of error before changing your settings.

In the Firing Range:
Train one specific skill at a time.

For improvement:
Acquire → Track → Control → Convert.

For diagnosis:
Practice the miss, not just the mechanic.


Frequently Asked Questions

How do I improve my aim in Apex Legends?

Identify the type of mistake you’re making, then practice that specific skill. Crosshair placement, tracking, recoil control, flicking, target switching, and movement shooting all require slightly different training. EA currently recommends using the Firing Range for tracking, flicking, recoil practice, sensitivity testing, and related aim work. (EA Help)

What is the best way to control recoil?

Learn the recoil behavior of the weapons you use most often, then make smooth corrections while firing. Don’t rely on a single universal movement because Apex weapons can behave differently. (EA Help)

Should I hip-fire or ADS?

Use the technique that fits the engagement. Hip-fire is particularly useful for fast, close-range fights, while ADS is generally more useful when you have enough space and time to benefit from additional precision. EA specifically recommends practicing hip-fire for fast close-range combat. (EA Help)

How do I improve tracking?

Practice smooth tracking against moving targets before adding your own movement. Once you can stay on target consistently, introduce strafing, direction changes, recoil, and target switching. EA recommends practicing tracking against moving targets in the Firing Range. (EA Help)

How do I get better at flicking?

Start slowly enough that you can stop accurately on the target. Then gradually increase speed and vary the target order so you aren’t memorizing one fixed movement pattern. EA recommends practicing flicks between widely spaced targets and changing the target sequence. (EA Help)

What sensitivity should I use in Apex Legends?

There is no universally correct sensitivity. EA currently lists 3.0–5.0 mouse sensitivity with a 1.0 ADS multiplier as competitive starting points, while noting that personal preference matters. For controller, EA notes that some competitive players use 4-3 sensitivity and recommends Classic response curve as a starting point for newer players. (EA Help)

Is 110 FOV best for Apex Legends?

110 is common among competitive players, but it isn’t automatically best for everyone. EA currently recommends experimenting between 90 and 110 FOV and notes that higher FOV shows more of the environment while making distant targets appear smaller. (EA Help)

Should I turn off aim assist to improve?

EA currently says aim assist is automatically enabled for console players and PC players using controllers and does not recommend turning it off generally, although players can disable it to experiment in the Firing Range. (EA Help)

Why do I aim well in the Firing Range but miss in matches?

Live matches add movement, pressure, multiple targets, positioning, cover, target switching, and decision-making. Add those elements progressively rather than assuming your basic mechanics are broken.

Why do I keep missing even though I practice?

You may be practicing the wrong skill. Review your misses and determine whether the problem is crosshair placement, tracking, recoil, flicking, target switching, aiming-mode choice, or positioning.

How long should I practice aim?

A short, focused session can be enough. A structured 10-minute routine is often more useful than a long session of random shooting, especially when you spend the final minutes working on the weakness you identified.


Sources & Updates

Last reviewed: September 2026

EA’s current Best Settings for Apex Legends on PC guide was used to verify guidance around mouse sensitivity, ADS sensitivity, controller settings, FOV, crosshair placement, tracking, flicking, recoil, hip-fire, weapon behavior, and Firing Range practice. (EA Help)

EA’s current Aim Assist documentation was used to verify controller aim-assist behavior and EA’s current recommendation regarding enabling or disabling aim assist. (EA Help)

EA’s current PC and controller controls documentation was checked for current input terminology. (EA Help)

The training framework in this guide—Acquire → Track → Control → Convert, together with the “practice the miss” diagnostic approach—is Loot Strategist editorial analysis rather than official EA instruction.

This article deliberately avoids temporary weapon rankings, recoil tables, and Legend-specific meta advice so its core aim-training guidance remains useful as Apex Legends changes.

For related guides, see the Apex Legends Settings Guide, Apex Legends Movement Guide, Apex Legends Positioning Guide, Apex Legends Fight Guide, and Apex Legends Team Fighting Guide.