
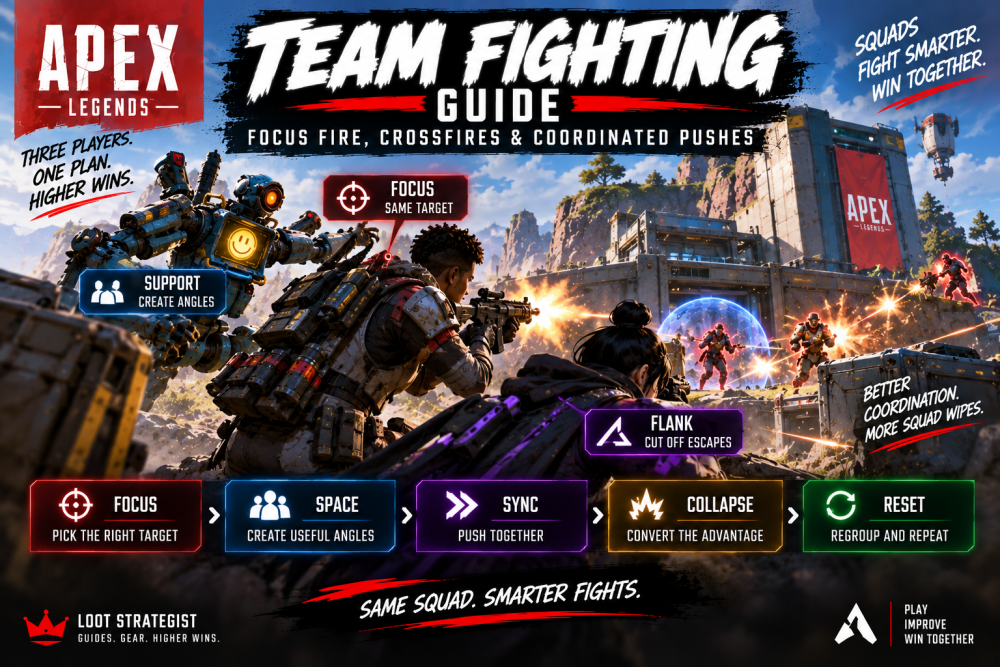
Apex Legends Team Fighting Guide: Focus Fire, Crossfires & Coordinated Pushes
Apex Legends is a team game, but three players fighting in the same area are not automatically fighting as a team.
Coordinated fighting is about making three sets of actions serve one objective. One player creates pressure. Another takes a useful angle. A third controls an escape route or prepares the next move. When the timing is right, the squad collapses on the advantage before the enemy can recover.
That is very different from three players independently taking aim at whichever enemy happens to be in front of them.
Our existing Apex Legends Fight Guide covers the bigger question of whether to engage, push, reset, or disengage. This guide starts one step later:
Once your squad has decided to fight, how do you make all three players more effective together?
The simplest framework is:
Focus → Space → Sync → Collapse → Reset
That is the foundation for everything that follows.
The Team-Fight Framework
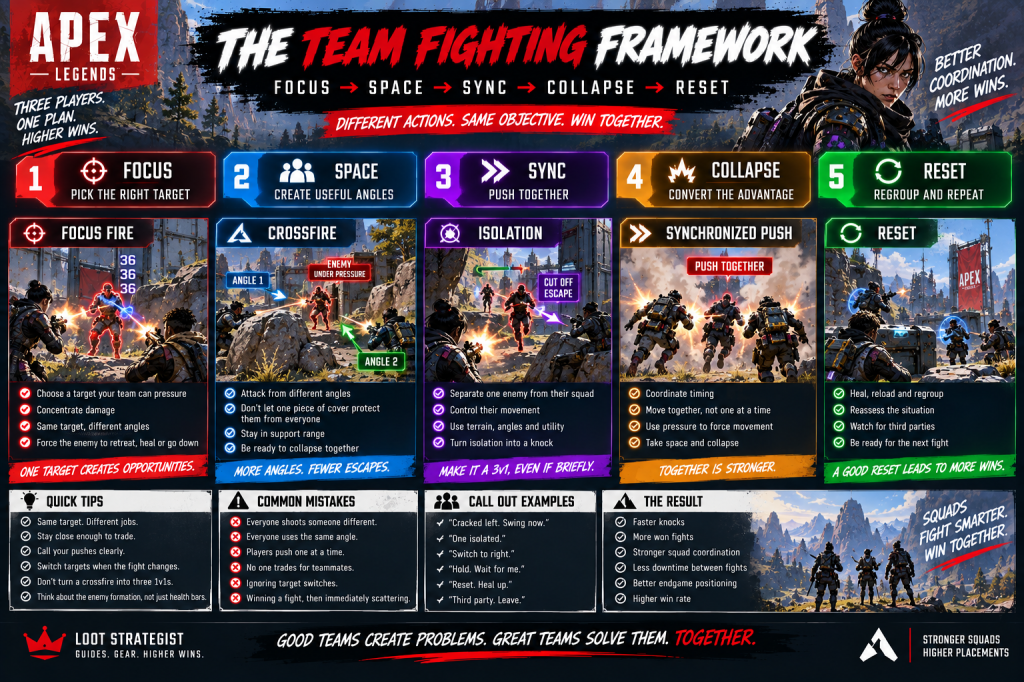
Focus
Choose the enemy who gives your squad the best opportunity.
Space
Create useful angles without separating so far that teammates become isolated.
Sync
Make sure your pressure and movement happen close enough together to matter.
Collapse
When the enemy formation breaks, take space together and convert the opening.
Reset
After the fight changes, rebuild your formation before the next engagement.
This is not a rigid sequence. Fights move too quickly for that.
Think of it as a checklist for keeping three players pointed toward the same problem.
1. Focus Fire: Same Target, Different Jobs
Focus fire is the easiest team-fighting concept to understand and one of the easiest to execute badly.
Three teammates can all shoot the same enemy and still fail to create a meaningful advantage if the target has strong cover and the squad is standing in poor positions.
The better version is:
Same target. Different jobs.
One player keeps the target occupied.
Another takes an angle that punishes movement.
The third supports the pressure, watches for the target’s teammates, or prepares to cut off the retreat.
EA’s official terminology describes “focus” as concentrating attacks on one enemy. (EA Help)
The practical goal is not simply to produce a lot of damage. It is to make one enemy’s survival increasingly difficult.
2. Pick the Target Your Team Can Actually Pressure
Don’t choose a target just because their health bar looks attractive.
Look at the enemy formation first.
A 100-health player standing between two teammates may be a worse target than a full-health player who has drifted 15 meters away from support.
Look for:
Isolation — Can the target receive immediate help?
Cover — How safely can they hide?
Escape — Where can they move?
Support — Who can punish your push?
Access — Can your whole squad reach the fight?
This leads to an important team-fighting rule:
Choose the target that three players can pressure, not necessarily the target with the lowest health.
That single adjustment can make focus fire far more effective.
3. Create Space Without Creating Three Solo Fights
A team needs enough spacing to produce different angles.
Too little space, and your squad becomes one large target.
Too much space, and you’ve created three separate fights.
The best spacing is practical rather than numerical.
Ask:
If this teammate gets pushed right now, can I help before they are knocked?
If the answer is yes, the spacing is probably workable.
If the answer is no, the angle may be clever but the formation is too spread out.
EA’s current beginner guidance similarly recommends staying close enough to support your squad while avoiding landing directly on top of one another. (EA Help)
That principle continues into combat.
4. Build Crossfires That Actually Work
A crossfire is useful when an enemy cannot use one piece of cover to protect themselves from every attacker.
Imagine an enemy behind a rock.
Player A holds the front.
Player B moves far enough left to create a second line of sight.
The enemy can no longer comfortably fight Player A without exposing themselves to Player B.
That’s the value of a crossfire.
But distance alone doesn’t make a crossfire.
A good crossfire needs three things:
Threat — both angles must matter.
Support — teammates must be able to help one another.
Collapse potential — once the enemy moves, the squad can follow up together.
A bad crossfire looks like three teammates scattered across the map.
A good one looks like one enemy trying to solve several connected problems.
5. Same Objective, Different Jobs
This is the central idea behind coordinated team fighting.
Your squad does not need three players doing the same thing.
It needs three players working toward the same result.
For example:
Player 1 — Pressure
Keeps the enemy occupied.
Player 2 — Support Angle
Punishes movement and creates the second threat.
Player 3 — Cutoff
Covers the retreat, watches the flank, or prepares to collapse.
Those jobs can rotate constantly.
The player holding the cutoff may become the aggressor.
The player creating pressure may need to fall back.
The point is not permanent roles.
It is shared intent.
6. Isolate the Enemy by Controlling Their Options
“Look for isolated enemies” is useful advice.
Making an enemy isolated is better.
A squad can create isolation by controlling the space between one player and their teammates.
For example:
An enemy backs away from your pressure.
One teammate moves to cut off the shortest route back.
Another keeps their attention from the front.
The third player closes the remaining space.
Suddenly, the target is alone even though the enemy team started together.
This is the key:
Isolation is often created by positioning, not discovered by accident.
Grenades and other ordnance can help force players away from cover or deny parts of a position; EA specifically lists those as strategic uses for grenades. (EA Help)
Use the tools your squad has to make the enemy formation worse.
7. Attack the Formation, Not Just the Health Bar
An enemy team is a shape.
Sometimes all three players are stacked tightly.
Sometimes two are together and one is ahead.
Sometimes one is healing while another holds the angle.
Sometimes a player has rotated to a completely different building.
That arrangement tells you more than the health bars alone.
Ask:
Who can support whom?
Which player is hardest to reach?
Which player is closest to becoming isolated?
Where is the escape route?
You are looking for a weakness in the formation.
Once the formation breaks, your squad has something to exploit.
8. Sync the Push
A coordinated push is mostly a timing problem.
One player pushing first and hoping the others follow is not synchronization.
It creates a staggered fight.
The first player gets focused.
They retreat.
The second player arrives late.
The third is still moving.
Now the enemy gets three manageable engagements instead of one difficult team fight.
A better sequence is:
Pressure → position → call → collapse
The call does not need to be elaborate.
“Cracked left. Swing.”
Or:
“One isolated. Now.”
Or:
“Hold. Wait for me.”
The objective is to make sure the squad’s movement reaches the enemy at roughly the same moment.
9. A Team Push Should Improve the Fight
Don’t push simply because the enemy is nearby.
A good push should improve at least one part of the situation.
You should be gaining:
Space
A stronger angle
Closer access to an isolated target
Control of an escape route
A numbers advantage
A better position for the next exchange
If every step forward exposes another teammate without giving anything back, the push is probably getting worse.
That is where coordinated teams stop thinking about momentum and start thinking about conversion.
10. Change Targets When the Fight Changes
Focus fire is not a commandment.
Your initial target can stop being the correct target.
Imagine:
You begin pressuring Player A.
Player A reaches excellent cover.
At the same time, Player B swings wide and becomes isolated.
Continuing to shoot Player A because “that’s who we called” makes no sense.
Switch.
All three players should understand the reason for the change.
That is why short callouts matter:
“Switch.”
“Right side.”
“Isolated.”
“New target.”
Good teams don’t simply share targets.
They share changes in priority.
11. Trade for Your Teammates
You don’t need to win your own duel every time.
Sometimes your most useful action is punishing the enemy for attacking someone else.
Suppose an enemy swings at your teammate.
Your teammate takes heavy damage.
Instead of watching the duel, you take the angle and punish the attacker.
Now the enemy has a problem:
If they keep attacking your teammate, another player will damage them.
That is a trade.
Trading makes aggressive enemy plays expensive.
It also gives your teammate confidence to take space because they know the squad can respond when the fight turns.
12. Communication Should Be Short Enough to Use
A team callout has three useful pieces:
State — What happened?
Action — What should we do?
Timing — When?
For example:
“Cracked left. Swing now.”
That’s more useful than narrating the entire fight.
Apex’s ping system is also designed to communicate enemies, locations, and movement without voice chat. EA explicitly recommends using pings to communicate with teammates and alert them to nearby enemies. (EA Help)
Good communication doesn’t mean talking constantly.
It means providing the information that changes what your teammates should do.
13. Buildings and Open Ground Require Different Coordination
In buildings
Avoid turning every push into three players entering through the same doorway.
One player can create pressure.
Another can hold an adjacent angle.
A third can cover the route the enemy is most likely to use.
You want the enemy to deal with more than one threat without giving them three isolated targets.
In open terrain
Spacing becomes more dangerous because there may be less cover between teammates.
Don’t spread out simply to create a theoretical crossfire.
Move from one usable piece of terrain to another.
Rocks, walls, slopes, buildings, and elevation changes can become temporary anchors for your formation.
The question is not:
“How far apart can we get?”
It is:
“How much useful space can we control while remaining able to trade?”
14. When the First Knock Happens
A knock creates a numbers advantage.
It does not automatically solve the fight.
This is where coordinated teams should become calmer, not more frantic.
Immediately identify:
Where are the remaining enemies?
Can they support one another?
Can we take space safely?
Is the knocked player worth finishing now?
Is another squad approaching?
Then choose the next action.
You might collapse.
You might hold the better position.
You might finish the knock.
You might prepare for the remaining two players.
The key is that everyone understands what happens next.
15. Reset as a Team
A coordinated squad should know how to stop fighting together as well as start fighting together.
Once the exchange turns bad—or once the immediate fight is won—rebuild the formation.
Use:
Cover → Heal → Reload → Regroup → Scan → Decide
Regroup is especially important.
One teammate shouldn’t be behind a rock healing while another is already pushing the next building and the third is looting.
Get the squad back into a state where everyone can contribute.
Our existing Apex Legends Fight Guide covers the broader engage/reset/disengage decision. This article’s focus is narrower: make the reset happen as a squad rather than three separate players reacting individually.
16. Don’t Let a Won Fight Become Three Solo Plays
This is where many teams throw away an advantage.
They get a knock.
One player chases.
Another opens a death box.
The third watches a completely different angle.
The enemy team is no longer fighting the squad.
They are fighting three distracted players.
After an advantage, switch from damage mode to control mode.
Secure the area.
Watch the approaches.
Rebuild health and ammunition.
Then decide whether another push is worthwhile.
The same principle applies after a squad wipes: the next danger often comes from somewhere else.
17. Third Parties Change Your Formation
When another squad enters the fight, don’t continue your original plan by habit.
EA defines a third party as another squad joining an existing fight. (help.ea.com)
The squad that was previously your opponent may suddenly become temporary cover, an obstacle, or a source of pressure.
Your priorities can change from:
“Finish this team.”
to:
“Keep our squad alive and preserve our position.”
That may mean:
- pulling back,
- taking cover,
- changing angles,
- finishing a vulnerable enemy quickly,
- or leaving the area.
Coordination matters most when the plan changes.
18. Use Legend Abilities to Support the Team Fight
Your Legend choice matters, but this article doesn’t need to become another class guide.
EA currently divides Legends into Assault, Controller, Recon, Skirmisher, and Support, with different class benefits and roles. (EA Help)
For team fighting, think more simply:
Information helps the squad choose an angle.
Mobility helps the squad take or abandon space.
Control helps restrict enemy movement.
Offensive utility helps create pressure.
Recovery helps the team survive mistakes.
The best ability is usually the one that makes the whole squad’s next decision easier, not the one that produces the flashiest individual play.
For the broader team-building question, see the Apex Legends Squad Composition Guide.
19. Solo Queue: Coordinate With the Team You Actually Have
Perfect synchronization is difficult with random teammates.
You can still create basic structure.
Ping the target.
Stay close enough to trade.
Mirror a teammate’s reasonable commitment.
Don’t build your entire plan around an assumption that nobody else has heard.
A teammate pushing alone does not always mean you should blindly follow. But if you can safely support their play, doing so may turn a reckless push into a successful team fight.
For more on adapting to random teammates, see the Apex Legends Solo Queue Guide.
20. The Most Common Team-Fighting Mistakes
Everyone shoots someone different
The enemy takes manageable damage instead of facing a decisive threat.
Everyone stands at the same angle
One piece of cover protects the entire squad.
Everyone creates their own flank
Your crossfire becomes three isolated 1v1s.
One player pushes before the others are ready
The enemy gets an easy isolated target.
The squad never switches targets
Players keep following an old plan after the fight has changed.
A knock causes panic
Everyone rushes forward without checking terrain or the remaining enemies.
Nobody trades for the teammate taking damage
The squad behaves like three separate players.
Everyone talks, but nobody calls the decision
Communication becomes noise instead of information.
The squad wins the fight and immediately scatters
The next enemy gets three separate targets.
These mistakes are often more serious than raw aim because they determine whether your mechanical skill gets the support it needs.
The Team-Fight Checklist
Before committing, ask:
Who are we focusing?
Where is everyone standing?
Can we trade for each other?
Which angle creates the most pressure?
How do we isolate the target?
When the opening appears:
Are we ready to move together?
After the knock:
Where are the remaining enemies?
After the fight:
Cover → Heal → Reload → Regroup → Scan → Decide
That is enough.
You don’t need a complicated tactical system to start fighting better as a team.
A Simple Team-Fight Scenario
Imagine an enemy squad is holding a building.
One player is watching the front door.
The second is on a side angle.
The third is deeper inside.
Instead of sending three players through the front:
Player 1 pressures the entrance.
Player 2 moves toward the side.
Player 3 watches the likely escape route.
The defender at the entrance backs away.
That movement exposes the side.
Player 2 gets damage.
The enemy tries to retreat farther inside.
Player 3 closes the exit.
Now the enemy squad has a choice:
Stay and fight from a worse position.
Or move into another player’s line of fire.
That is the entire point of coordinated team fighting.
You are not simply adding three sources of damage.
You are taking away the enemy’s good choices.
How to Practice Team Fighting
Don’t try to fix everything at once.
After a bad engagement, identify one coordination failure.
If your squad constantly spreads too far apart, work on support distance.
If you deal damage without getting meaningful advantages, work on focus fire.
If your pushes fail, work on synchronization.
If enemies keep escaping, work on cutoffs.
If your squad wins the first fight and loses the second, work on resets and awareness after the engagement.
The goal is not to make every match perfect.
It’s to make the same mistake less often.
Final Thoughts
Strong team fighting isn’t about making three players act like one person.
It’s about making three different players work toward the same outcome.
Focus the right target.
Create space without breaking support range.
Build crossfires that actually threaten the enemy.
Use pressure to isolate players.
Sync the push instead of trickling in.
Switch targets when the fight changes.
Trade for teammates when they take pressure.
And after the fight, regroup before the next problem finds you.
The most useful mental model is:
Focus → Space → Sync → Collapse → Reset
One player can create the opening.
Another can make the opening larger.
The third can make the escape route disappear.
Then the squad moves together.
That’s coordinated Apex.
Not three players standing beside one another.
Three players creating one advantage.
Frequently Asked Questions
What is focus fire in Apex Legends?
Focus fire means concentrating your squad’s attacks on one enemy rather than spreading damage across several targets. The goal is to create a decisive problem for one player instead of manageable pressure across the whole squad. EA’s terminology also uses “focus” for concentrating attacks on one enemy. (EA Help)
How do I create a crossfire in Apex Legends?
Use two or more useful angles that the enemy cannot comfortably defend with one piece of cover. Keep the angles close enough for teammates to support one another, and be ready to collapse when the enemy moves.
How do I isolate an enemy?
Use pressure, positioning, and utility to separate a player from their teammates. Cut off the easiest route back to their squad while another teammate maintains pressure.
Should all three teammates shoot the same enemy?
Concentrated pressure is usually useful, but the squad should not stand in the exact same position. The strongest setup is generally the same target, different jobs.
When should we push together?
Push when your squad has created a meaningful opening and everyone is close enough to contribute. A synchronized push is much stronger than three players arriving seconds apart.
What should we do after getting a knock?
Find the remaining enemies, assess the terrain, and decide whether the knock can be converted into space, another knock, an elimination, or a stronger position. Don’t assume the knock automatically means “rush.”
How important are crossfires?
Very. A good crossfire can force an enemy to choose between exposing themselves to one teammate or another. But a crossfire that leaves teammates too far apart can create more problems than it solves.
What should I say in voice chat?
Keep calls short and actionable. Examples include “Cracked left,” “Swing now,” “Hold,” “Switch,” “Isolated,” and “Reset.” The exact vocabulary matters less than making sure teammates understand the state of the fight and the intended action.
Can team fighting work in solo queue?
Yes, although perfect coordination is unlikely. Use pings, maintain support distance, mirror reasonable teammate decisions, and communicate simple priorities rather than expecting random teammates to follow a detailed plan. EA specifically supports ping-based squad communication. (EA Help)
How can I practice coordinated team fighting?
Pick one coordination problem per session—focus fire, spacing, crossfires, synchronized pushes, target switching, or resets—and work on that one habit deliberately.
Sources & Updates
Last reviewed: September 2026
EA’s current How to Play Apex Legends guidance was used for durable gameplay references involving squad communication, pinging enemies and locations, staying close enough to support teammates, movement, and strategic use of grenades. (EA Help)
EA’s current Legends Guide was used to verify the five current Legend classes—Assault, Controller, Recon, Skirmisher, and Support—and their broad team functions. (EA Help)
EA’s current terminology documentation was used for established gameplay terminology such as third party and related combat language. (EA Help)
The practical frameworks in this article—Focus → Space → Sync → Collapse → Reset, target switching, formation-based isolation, synchronized pushes, and the distinction between stacking and genuine teamwork—are Loot Strategist editorial analysis rather than official EA rules.
This guide deliberately avoids temporary weapon rankings and Legend tier-list recommendations so that the core team-fighting advice remains useful as Apex balance changes.
For related guides, see the Apex Legends Squad Composition Guide, Apex Legends Solo Queue Guide, and Apex Legends Rotation Guide. The existing Apex Legends Fight Guide covers the broader engage/push/reset/disengage decision, while this article focuses specifically on coordinating the squad once combat begins.
 Gaming Guides, Builds, Loot & Strategies
One thought on “Apex Legends Team Fighting Guide: Focus Fire & Crossfires”