
Apex Legends Combat Guide: Peeking, Trading & Winning Gunfights
Winning gunfights in Apex Legends isn’t simply about who lands the most bullets.
The player who wins is often the one who exposes less of their body, takes the cleaner peek, recognizes when the exchange has changed, and knows when to disappear before the enemy gets the chance to answer.
That’s what makes Apex combat difficult.
You need to deal damage, but dealing damage requires exposure. You need to stay aggressive, but aggression creates risk. You need to pressure a weakened enemy without turning a good position into a bad chase.
EA’s current guidance recommends keeping your crosshair where enemies are likely to appear, predicting their movement, practicing hip-fire for fast close-range combat, and using the Firing Range to work on weaker shots. EA also recommends keeping grenades available because they can force enemies out of cover or buy time to reposition. (EA Help)
This guide focuses on what happens once the gunfight is already underway.
Your broader Fight Guide covers whether an engagement is worth taking. Your Positioning Guide covers how to choose and use a position. Your Aim Guide covers the mechanics of improving your aim.
This guide connects those pieces.
It is about how to execute the gunfight.
Loot Strategist combat rule: Show less. Deal more. Reset before the enemy does.
What Actually Wins a Gunfight in Apex Legends?
A gunfight is a series of exposure windows.
You expose yourself to deal damage.
You disappear to avoid damage.
You change your angle to make the next exposure more favorable.
You repeat that process until somebody loses the fight.
That means good combat is built around:
Information
Cover
Exposure
Damage
Timing
Reset
You won’t always control all six.
You can, however, improve the quality of the decisions you make with them.
Excellent aim doesn’t save you when you’re standing in the open.
Perfect cover doesn’t save you if you keep showing the same angle to an enemy who is waiting for you.
The goal is to make every time you become vulnerable worth the risk.
The Gunfight Framework
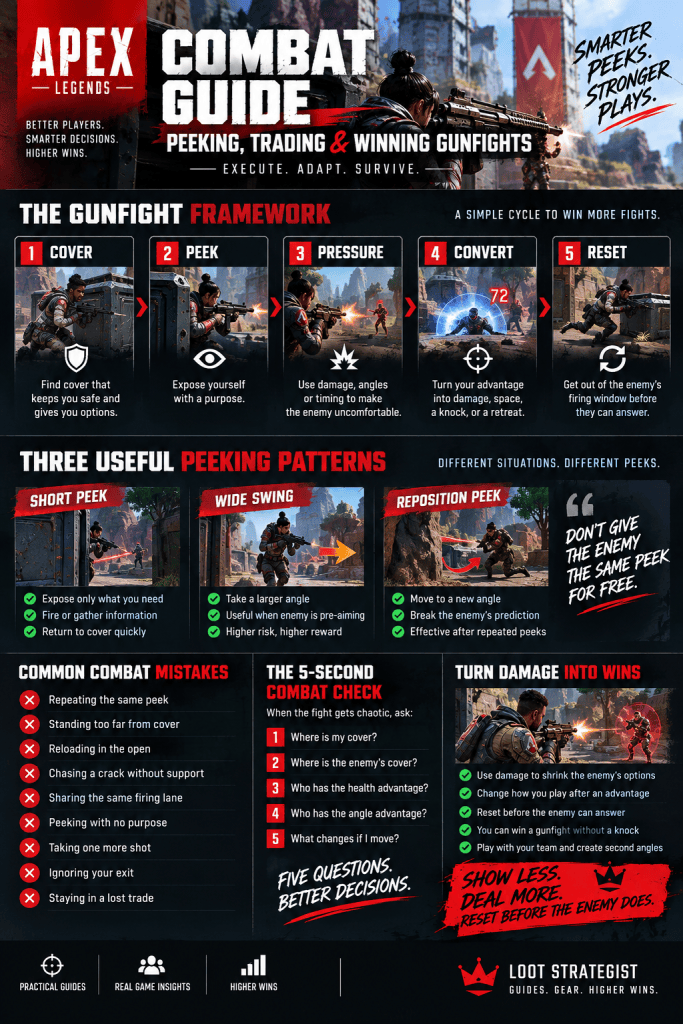
When contact begins, think through five steps:
1. Cover
Know what will stop the enemy’s next burst.
2. Peek
Expose yourself with a specific purpose.
3. Pressure
Use damage, angles, or timing to make the opponent uncomfortable.
4. Convert
Turn a meaningful advantage into damage, space, a knock, or a forced retreat.
5. Reset
Get out of the enemy’s firing window before the exchange turns against you.
This isn’t a checklist you need to recite during every firefight.
With practice, it becomes a rhythm.
Cover Is Part of Your Weapon
Your gun isn’t the only tool that wins gunfights.
Good cover lets you:
Break line of sight
Protect yourself while reloading
Create repeatable peeks
Buy time to heal
Move to another angle
Allow teammates to trade
EA’s beginner guidance also emphasizes staying close to your squad and using movement intelligently, which reinforces a basic combat rule: don’t create a fight you can’t support or escape. (EA Help)
But “I’m behind cover” isn’t enough.
A piece of cover can protect you from one angle while leaving you exposed to another.
It can also trap you.
The better question is:
Can I fight from this cover and still get out?
That question matters far more than whether the object technically blocks bullets.
Fight Close to Your Reset Point
One of the simplest improvements you can make is staying close to the part of your cover that actually protects you.
If you are several steps away from safety, every bad exchange takes longer to recover from.
Working close to cover gives you a much shorter path between:
firing
and
disappearing
That doesn’t mean standing motionless beside a rock.
You still need enough room to move.
The point is to reduce unnecessary exposure.
What Is a Good Peek?
A peek is a controlled exposure from cover to gather information, deal damage, or force a response.
The best peeks have a job.
You might peek to:
Check where an enemy is
Deal a burst of damage
Force someone off an angle
See whether another squad has arrived
Create an opening for your teammate
A bad peek usually happens because you feel obligated to keep shooting.
There is no tactical purpose.
You’re simply visible.
And every second you’re visible is another second the enemy gets to shoot back.
Three Useful Peeking Patterns
There is no universal “best peek.”
The right one depends on the enemy’s position and how much risk you’re willing to take.
Short Peek
Expose only what you need.
Fire or gather information, then return to cover.
This is useful when:
The enemy is holding your angle
You want information
You only need a short burst
You don’t want to commit
Wide Swing
Move farther beyond your original cover edge and attack from a larger angle.
A wide swing can work when the enemy is heavily pre-aiming the position you’ve already shown.
It is riskier because you’re exposing more of yourself.
Use it when the change in angle is worth the additional exposure.
Reposition Peek
Disappear, move around your cover, and reappear from somewhere the enemy wasn’t expecting.
This is particularly effective after you’ve shown the same angle several times.
The point isn’t movement for its own sake.
It’s breaking the opponent’s prediction.
Never Give the Enemy the Same Peek for Free
This is one of the easiest habits to fix.
Peek left.
Shoot.
Hide.
Peek left.
Shoot.
Hide.
The opponent now knows:
where you’ll appear
when you’ll appear
roughly how far you’ll swing
You’ve made their job easier.
Change the pattern.
Delay the next peek.
Change sides.
Take a different angle.
Let your teammate show themselves.
Wide swing after several short peeks.
Or don’t peek at all.
A good opponent should have to keep guessing.
Don’t solve the puzzle for them.
Don’t Peek Because You Want to Shoot
Sometimes the correct combat decision is doing nothing.
You have line of sight.
The enemy is visible.
You could shoot.
That doesn’t mean you should.
Maybe your teammate is moving into a stronger position.
Maybe the opponent has a better angle.
Maybe they’re waiting for you to repeek.
Maybe another squad just entered the area.
Information and timing can be worth more than another 20 damage.
Every exposure should accomplish something.
Crosshair Placement Happens Before the Peek
Your Aim Guide already covers crosshair placement in detail, so this is the combat version.
Don’t step into the open and then begin searching for the enemy.
Have your crosshair roughly where the target is likely to appear.
EA’s current guidance specifically recommends keeping your crosshair where enemies might appear and predicting their movement before they move. (EA Help)
That changes:
Peek → Find target → Aim → Shoot
into:
Peek → Shoot
The second sequence is faster because less of your exposure window is spent searching.
Pre-Aim the Most Likely Threat
Before moving around cover, ask:
Where is the enemy most likely to be?
Then prepare for that angle.
If they’re holding the left side of a doorway, don’t expose your whole body while looking somewhere else.
If they’re likely to swing around a rock, have your crosshair ready for that swing.
Players sometimes appear to have unbelievably fast aim when the real difference is simpler:
They were already looking where the enemy appeared.
Damage Is Not the Same as Advantage
Landing damage is useful.
But damage only matters because of what it changes.
Suppose you deal 80 damage and take 100.
You didn’t win that exchange.
Now suppose you deal 60 damage and force the enemy behind cover while your teammate gains an angle.
That’s different.
The useful question after a burst is:
What changed?
Did the enemy:
stop shooting?
give up an angle?
move away from a teammate?
lose access to strong cover?
give your teammate a better opening?
become vulnerable to a second angle?
If nothing meaningful changed, more damage isn’t necessarily the answer.
What to Do After You Gain the Advantage
The fight state changed.
Your next decision should change with it.
Before the advantage, you may be:
trading
gathering information
protecting your cover
waiting for a mistake
After the advantage, you can look for:
a second angle
controlled pressure
a teammate swing
space
an isolated target
You don’t need to sprint forward.
You need to convert the advantage into something useful.
A Crack Is an Opportunity, Not an Order
Cracking an enemy feels like a green light.
It isn’t always one.
Before exposing yourself again, consider:
Where is the target?
Where are their teammates?
Where are you?
Can your teammate follow?
What happens if the target reaches cover?
What happens if another squad arrives?
A damaged enemy is easier to finish.
They’re also often more defensive.
That’s why your next move can be a reposition rather than an immediate push.
Your Fight Guide covers the larger question of whether to continue an engagement. Here, the combat lesson is narrower:
Once you deal meaningful damage, change the way you fight the next exchange.
The Peek-and-Reset Cycle
Strong gunfighters don’t remain exposed throughout the entire exchange.
They cycle:
Peek
→
Damage
→
Cover
→
Reload
→
Reposition
→
Peek again
That rhythm keeps the enemy from enjoying a clean, uninterrupted window.
It also gives you a chance to reassess the fight instead of automatically repeating the last action.
A useful rule:
If being exposed is no longer producing value, stop being exposed.
Reload Behind Cover
This should become automatic.
When a magazine ends, and safe cover is one step away, use it.
Break line of sight.
Reload.
Come back.
The enemy doesn’t need to know when you’re reloading.
There are exceptions, of course. A target may be one bullet from death, or your pressure may be preventing a push.
But even then, know where you can disappear.
A reload is a small moment of vulnerability.
Treat it that way.
Healing Is Part of Combat
Healing isn’t something that only happens after the fight.
It’s part of the fight whenever you’ve created enough time to do it.
A strong reset looks like:
Break line of sight
Create space
Heal
Reload
Reassess
A weak reset is:
Hide behind a tiny object
Start a Battery
Get pushed
Cancel the heal
Die
The healing item wasn’t the problem.
You didn’t create enough time to use it.
The “One More Peek” Trap
This is one of the most common ways players throw a fight.
You’ve already:
lost the health trade
shown the same angle
failed to create a new advantage
Then you peek again because the enemy feels close to dying.
That final peek is often the one that gets you killed.
You don’t need to win every exchange immediately.
Sometimes the enemy survives.
That’s fine.
Disappear.
Recover.
Find another angle.
Fight them again when the circumstances are better.
Use Angles to Make Cover Worse
You don’t always need better aim.
Sometimes you need a better line of sight.
Imagine an enemy hiding behind a rock.
From your current angle, only their head is visible.
Move sideways.
Now more of their body is exposed.
The enemy didn’t become easier to kill.
Your angle improved.
When you’re struggling to damage someone behind cover, ask:
“Am I fighting the player, or am I fighting their cover?”
If you’re fighting the cover, change the angle.
Don’t Stand in Your Teammate’s Firing Lane
Two players can be close without standing on top of each other.
If both teammates use exactly the same angle, the enemy gets one simple target.
A better setup lets each player threaten from a different line while remaining close enough to trade.
You don’t need a giant flank.
Sometimes moving two meters to the side completely changes the fight.
This is one of the simplest ways to make your teammate’s damage more valuable without requiring better aim.
The Trade Is More Important Than the Highlight
You don’t have to win every duel yourself.
Suppose your teammate gets cracked.
You take the enemy’s angle.
They turn toward you.
Your teammate gets behind cover and heals.
You’ve accomplished something important without getting a knock.
You bought time.
Team fighting is about more than individual damage totals.
Sometimes the most valuable combat action is forcing the enemy to look somewhere else.
Your dedicated Team Fighting Guide goes deeper into focus fire, crossfires, isolation, and synchronized pushes. Here, remember the practical rule:
Be close enough to help, but don’t make yourself the easiest shared target.
Fight Around an Exit
Aggression is much safer when you know where you’re going next.
Before committing to an exposed angle, know:
Where is my next piece of cover?
Where can I heal?
Where is my teammate?
What happens if another squad appears?
This doesn’t mean playing passively.
It means keeping an escape option available.
A strong aggressive position has a way out.
A weak aggressive position only has a way forward.
Close-Range Gunfights
Close-range combat compresses every decision.
You have less time to:
Aim
Reload
Move
React
EA specifically recommends practicing hip-fire for fast close-range combat. (EA Help)
Don’t turn every close-range exchange into a stationary ADS duel.
Use:
Cover edges
Short movement bursts
Hip-fire when appropriate
Weapon switching when necessary
Immediate access to your next piece of cover
The closer the enemy gets, the more important the decision made before the fight becomes.
Mid-Range Gunfights
Mid-range fights reward disciplined peeking.
You’re close enough to apply sustained pressure, but far enough away that cover and angles can dominate the exchange.
Avoid predictable repeeks.
A useful sequence is:
Peek
Damage
Hide
Change the angle
Reappear
Now the enemy has to solve a new problem instead of waiting for the same target to return.
Long-Range Gunfights
Long-range combat is often more about information and pressure than immediate elimination.
Ask:
Can this damage accomplish something?
Can I maintain my position?
Will I reveal my squad?
Do I have enough ammunition?
Can the enemy simply retreat?
A long-range exchange can be successful even without a knock.
You might force an enemy away from:
high ground
cover
a rotation path
a healing position
That’s pressure.
Use it when it helps the larger fight.
Doorways and Corners: The Execution Rule
Doorways are useful because they give you a narrow exposure point.
They’re also dangerous because opponents know exactly where you’re likely to appear.
Instead of thinking about doorway combat as a positioning problem, think about exposure timing.
Don’t:
Stand in the center of the doorway
Repeatedly expose the same angle
Reload in the opening
Do:
Peek the edge
Fire
Return to cover
Change your timing or angle
Make the defender guess
The same principle applies to rocks, windows, walls, and other predictable geometry.
Grenades Can Change the Gunfight
A grenade isn’t useful merely because it deals damage.
It can change the enemy’s available options.
EA specifically notes that grenades can force enemies out of cover, deal damage from range, or buy time when retreating or gaining high ground. (EA Help)
Use them to:
Break a defensive hold
Force movement
Prevent a retreat
Buy time
Create an opening
Then follow up on the change.
A grenade that forces someone into the open is valuable because of what you do afterward.
Use Damage to Shrink the Enemy’s Options
This is one of the best ways to understand pressure.
A damaged enemy often has fewer good choices.
Maybe they have to:
heal
leave the angle
move behind a different piece of cover
stay with their teammate
give up high ground
That means your goal isn’t always “deal maximum damage.”
Sometimes it’s:
Make every available choice worse for the enemy.
That is how small advantages turn into winning fights.
When You’ve Been Cracked
Getting cracked doesn’t mean the fight is over.
The first priority is to stop the incoming damage.
Break line of sight.
Get behind meaningful cover.
Don’t immediately peek again because you think the opponent might be weak too.
Once you’ve created space:
Heal
Reload
Check your teammate
Locate the enemy
Decide what changed
A fight can swing because one player survives the two seconds that looked hopeless.
When Your Teammate Gets Cracked
Your teammate taking heavy damage often changes the enemy’s focus.
Use that.
You can:
Take a supporting angle
Apply enough pressure to stop the push
Force the enemy into cover
Buy your teammate time to heal
Don’t automatically launch a counter-push.
Sometimes the winning move is simply making the enemy stop shooting long enough for your teammate to recover.
What to Do After You Crack an Enemy
The response depends on what else changed.
Crack + isolated target
Increase pressure.
Crack + strong cover
Hold the angle or create a new one.
Crack + nearby teammates
Coordinate before exposing yourself again.
Crack + weak squad
Protect your position.
Crack + third party approaching
Convert quickly only when the fight remains safe; otherwise prepare for the new threat.
The crack gives you information.
Your next action should use that information.
You Can Win a Gunfight Without a Knock
This is particularly important for newer players.
Suppose you force an enemy away from:
high ground
a doorway
a healing position
a strong head-glitch-like angle
or
the route your squad needs
and your team takes that space.
You achieved something meaningful without eliminating the opponent.
Kills are valuable.
But space is also a combat resource.
A good exchange can leave the enemy alive but in a much worse position.
That’s still a win.
The 5-Second Combat Check
When the fight gets chaotic, ask:
Where is my cover?
Where is the enemy’s cover?
Who has the health advantage?
Who has the angle advantage?
What changes if I move?
That’s enough.
You don’t need twenty rules running through your head while bullets are flying.
Five useful questions are better than twenty half-remembered tips.
A Practical Gunfight Example
Imagine you’re fighting an enemy behind a rock.
Your first peek deals significant damage.
You immediately return to cover.
Instead of repeeking the same side, your teammate shifts slightly.
The enemy expects your original angle.
You appear from somewhere else.
They take more damage and retreat.
Your squad now controls more space.
Notice what happened.
You didn’t suddenly become more accurate.
The fight improved because you changed the exposure pattern.
That’s the skill this guide is really trying to teach.
How to Practice Combat
Don’t go into the Firing Range and mindlessly shoot targets for twenty minutes.
Give yourself one combat problem.
For example:
I lose every peek.
Practice exposing yourself, firing, returning to cover, and changing sides.
I die after cracking enemies.
Practice damage → cover → reposition instead of immediately chasing.
I get killed while reloading.
Practice ending every magazine near cover.
I keep standing in my teammate’s angle.
Practice creating two useful lines of fire while remaining close enough to trade.
EA’s current guidance recommends the Firing Range for weak areas and specifically mentions tracking, flicking, recoil, movement, hip-fire, and other aim practice. (EA Help)
The important part is to practice the decision around the shot, not only the shot itself.
Build a Combat Improvement Loop
After a match, don’t ask:
“Why did I lose?”
That question is too broad.
Ask:
“What was the last combat decision that put me somewhere I couldn’t recover?”
Maybe it was:
Repeating a known peek
Staying exposed during a reload
Chasing damage without a safe angle
Ignoring your exit
Taking the same angle repeatedly
Refusing to reset
Standing directly behind your teammate
Now you have something specific to fix.
Take that problem into your next session.
That is how combat practice becomes measurable rather than random.
The Combat Checklist
Before exposing yourself:
Do I have cover?
Where is the enemy?
What am I trying to accomplish?
Where do I go if the exchange turns bad?
During the exchange:
Am I gaining anything from being exposed?
Did the fight state change?
Should I change my angle?
Can my teammate capitalize?
After taking damage:
Can I break line of sight?
Can I reset?
Am I about to repeat the same mistake?
That’s enough to build good habits.
Final Thoughts
Winning Apex gunfights isn’t about staying exposed longer than the enemy.
It’s about making your exposure more valuable.
Use cover.
Peek with a purpose.
Keep your crosshair ready.
Don’t give the enemy the same angle repeatedly.
Turn damage into pressure.
Turn pressure into space.
Then reset before the enemy gets the chance to reverse the exchange.
The biggest change is mental.
Stop asking:
“Can I hit this player?”
Start asking:
“What does this peek accomplish?”
That question changes the way you fight.
You stop chasing every crack.
You stop taking the same repeek.
You stop standing in the open because you have a good shot.
And you start treating each gunfight as a sequence of exposure windows and decisions.
Show less. Deal more. Reset before the enemy does.
That’s the combat habit worth taking into your next match.
Related Apex Legends Guides
Apex Legends Fight Guide — Learn when to engage, push, reset, or disengage.
Apex Legends Positioning Guide — Learn how cover, angles, high ground, and playable space shape your options.
Apex Legends Aim Guide — Improve crosshair placement, tracking, recoil control, flicking, and target switching.
Apex Legends Team Fighting Guide — Learn focus fire, crossfires, target isolation, synchronized pushes, and team resets.
Apex Legends Movement Guide — Improve sliding, strafing, repositioning, and movement during fights.
Apex Legends Firing Range Practice Guide — Turn specific combat weaknesses into structured practice.
Apex Legends Loot Guide — Build efficient inventories without sacrificing time or position.
Sources & Updates
Last reviewed: September 15, 2026
EA’s current Best Settings for Apex Legends on PC guide was checked for crosshair placement, predicting enemy movement, hip-fire practice, Firing Range training, and current performance/aim guidance. (EA Help)
EA’s current How to Play Apex Legends guide was checked for beginner combat fundamentals, squad proximity, movement, and grenade use. (EA Help)
EA’s current Apex Legends Terms Guide was checked for official gameplay terminology. (EA Help)
EA continues to update Apex Legends throughout 2026, including changes to maps, loot, weapons, and other gameplay systems. Because this guide deliberately avoids temporary weapon-meta recommendations, its core combat framework is designed to remain useful through those changes. (EA)
Editorial note: Mechanical and terminology references are based on EA’s official documentation. The Cover → Peek → Pressure → Convert → Reset framework, exposure-window concept, combat examples, diagnostic questions, and tactical recommendations are Loot Strategist editorial analysis intended to help players apply those mechanics in actual matches.
Update policy: Review this guide after major changes to movement, weapons, abilities, shields, or combat systems. Avoid adding temporary weapon-meta advice unless the page is deliberately being converted from an evergreen guide into a seasonal article.
 Gaming Guides, Builds, Loot & Strategies