Path of Exile 2 launches its full Version 1.0 release on December 11, 2026 (PST). This update marks the end of Grinding Gear Games’ paid Early Access period, making the action RPG completely free-to-play across PC, PlayStation 5, and Xbox Series X|S.
Version 1.0 completes the six-act campaign, brings the total roster to 12 character classes, and expands the endgame system. Below is a complete breakdown of everything you need to know about the launch, including release platforms, crossplay rules, system requirements, and preloading details.
Quick Reference: Key Launch Details
Feature / Question
Confirmed Answer
Full Release Date
December 11, 2026 (PST)
Platforms
PC (Steam, Epic Games Store, Standalone), PS5, Xbox Series X
Launch Price
Free-to-Play
Current Status
Paid Early Access (Supporter Packs)
Crossplay & Cross-Progression
Supported across all platforms (store-bound cosmetic limits apply)
PC Storage Required
100 GB available space (SSD strongly recommended)
Preload Availability
Not yet announced for the free 1.0 client
Frequently Asked Questions
When does Path of Exile 2 officially release?
Path of Exile 2 officially leaves Early Access on December 11, 2026 (PST). While the game first entered paid Early Access back on December 6, 2024, the December 2026 date marks the full 1.0 launch and the transition to a free-to-play model. An exact worldwide unlock hour has not yet been announced.
Which platforms can I play on?
Path of Exile 2 is available on PC, PlayStation 5, and Xbox Series X|S. On PC, you can play via Steam, the Epic Games Store, or the official standalone Grinding Gear Games client.
Note: No releases have been announced for last-gen consoles (PS4, Xbox One) or Nintendo platforms.
Is Path of Exile 2 free-to-play?
Yes. Once Version 1.0 launches on December 11, 2026, the game will be 100% free-to-play.
Buying an Early Access Supporter Pack grants immediate entry to the current test phase alongside digital extras. However, buying a pack is completely optional—new players can wait until launch day to download the game without spending anything.
Do Early Access players need to buy the game again?
No. Current Early Access players do not need to buy anything new. Your current game client will simply receive the Version 1.0 patch on launch day.
Is Path of Exile 2 replacing the original Path of Exile?
No.Path of Exile 2 is an entirely separate game. Grinding Gear Games will continue to support and release new expansion content for both titles simultaneously.
Does Path of Exile 2 feature crossplay and cross-progression?
Yes. Full crossplay lets players form parties together regardless of platform. Cross-progression is also supported, allowing you to carry your character progress between PC, PS5, and Xbox Series X|S by linking your accounts. Keep in mind that certain platform-specific store purchases may not transfer across platforms due to console publisher restrictions.
Can I preload the Version 1.0 update?
Preloading instructions for the official free-to-play release have not been detailed yet. While existing Early Access players can update their current client on launch day, new players should wait for platform-specific download announcements closer to December 11.
Path of Exile 2 PC System Requirements
Below are the official minimum and recommended PC hardware requirements as listed on Steam:
As you gear up for Version 1.0, organizing your endgame item drops will be crucial—be sure to check out our Path of Exile loot filters guide to optimize your inventory management.
For more action RPG news, builds, and strategies, check out our full archive of ARPG guides and coverage.
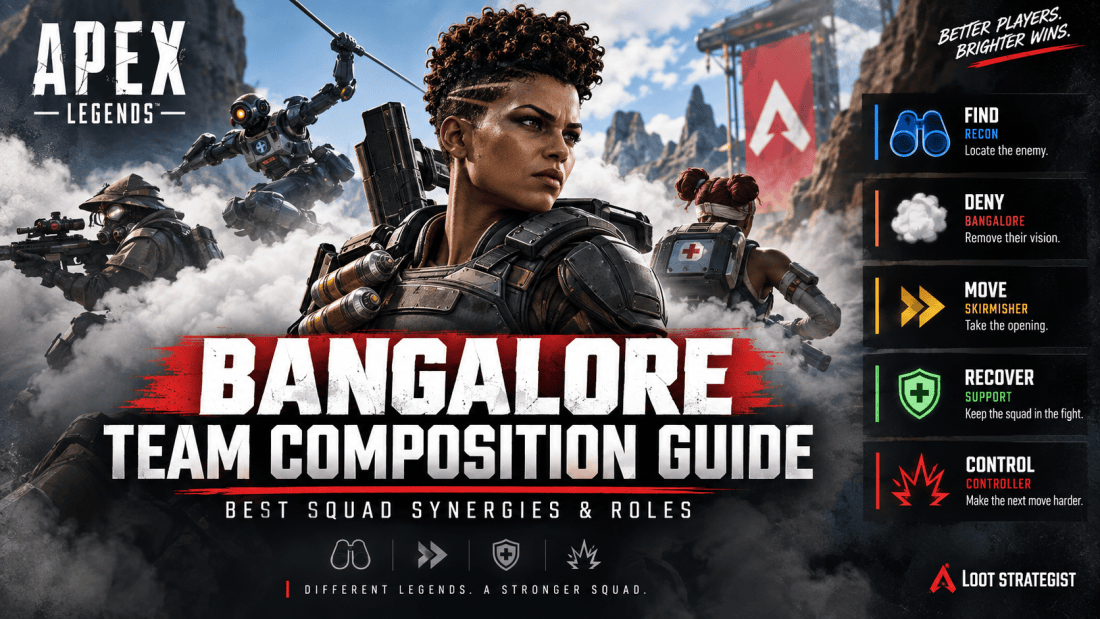
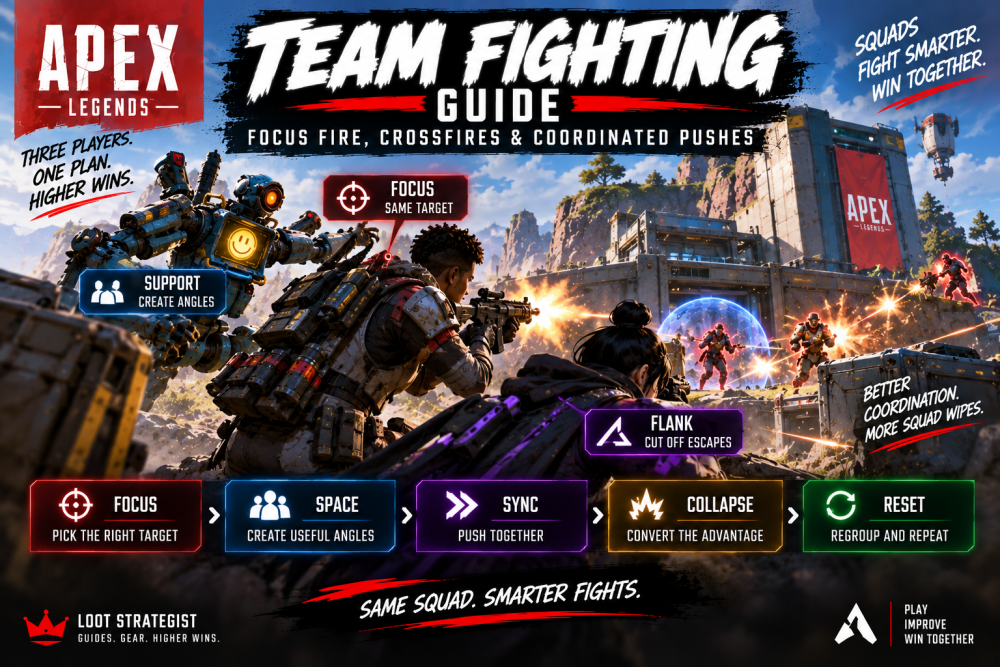
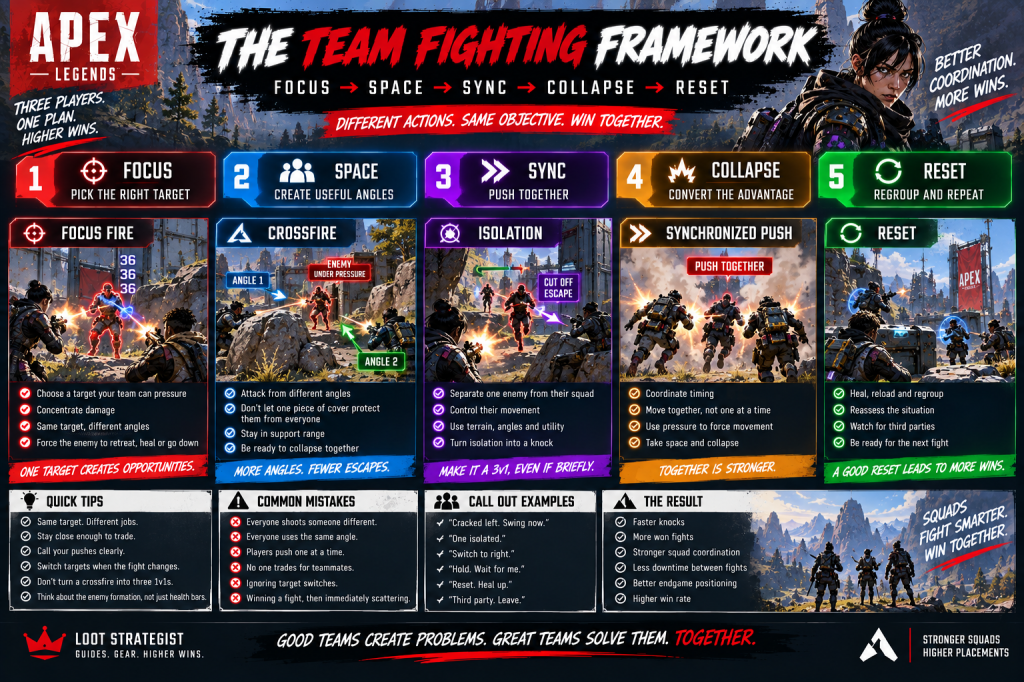
Apex Legends Bangalore Team Composition Guide: Best Squad Synergies & Roles
Bangalore already brings several jobs to an Apex squad.
The Smoke Launcher blocks sightlines and can breach doors, Double Time gives her a temporary speed increase when she takes fire while sprinting, and Rolling Thunder disrupts an area with a creeping artillery strike. She is also an Assault Legend, giving her class-specific combat benefits such as extra ammo capacity, additional grenade slots, faster weapon handling, and other combat advantages in Core modes. (EA Help)
That makes team building around Bangalore less about finding two Legends who simply add more aggression.
The better question is:
What should the other two players add that makes Bangalore’s openings more useful?
A Recon Legend can provide information before Bangalore smokes an angle. A Skirmisher can turn that smoke into a fast entry. A Controller can make the enemy’s remaining routes harder to use. A Support Legend can turn a temporary opening into a safer reset.
This guide focuses on those interactions rather than trying to declare one permanent “best” Bangalore trio.
Mode note: This guide focuses on Core modes such as Ranked and Unranked, where Legend classes apply and each Legend can only be selected once per squad. Wildcard uses different selection rules and allows duplicate Legends. (EA Help)
How we evaluate Bangalore team comps: We look at what Bangalore already provides, what the partner Legend adds, how the abilities interact during an actual fight, and what the squad can do when the first plan fails. These are Loot Strategist editorial recommendations, not official EA rankings.
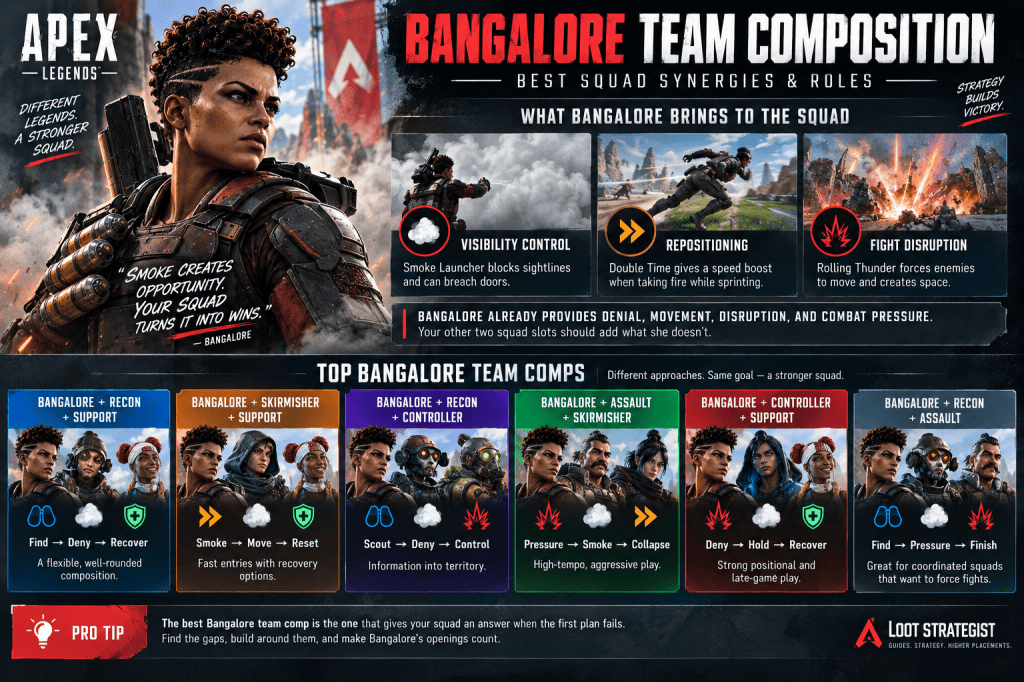
Bangalore Team Comp at a Glance
Composition
Core Synergy
What It Covers
Bangalore + Recon + Support
Find → deny → recover
Information, pressure, recovery
Bangalore + Skirmisher + Support
Smoke → move → reset
Mobility and sustain
Bangalore + Recon + Controller
Scout → deny → control
Information and positional control
Bangalore + Recon + Assault
Find → pressure → disrupt
Aggressive coordinated fights
Bangalore + Controller + Support
Deny → hold → recover
Defensive and late-game play
Bangalore + Assault + Skirmisher
Pressure → smoke → collapse
High-tempo combat
These are composition archetypes, not a ranking. The right setup depends on your team’s strengths, preferred fight distance, map position, and whether you are playing coordinated or solo queue.
What Bangalore Already Gives the Squad
Before choosing teammates, understand the jobs you already have covered.
EA currently classifies Bangalore as Assault. Assault Legends carry more ammunition per stack, have extra grenade slots, use weapons faster, and gain temporary reload and movement-speed benefits when their shield breaks. They can also access weapon attachments from the secret compartment of Supply Bins in Core modes. (EA Help)
Bangalore’s own kit adds three major pieces:
Visibility control
Smoke Launcher creates a smoke wall on impact and can interact with doors. (EA Help)
Repositioning
Double Time gives Bangalore a temporary speed increase when she is taking fire while sprinting. (EA Help)
Fight disruption
Rolling Thunder creates a creeping artillery strike that can force enemies to react to an area. (EA Help)
Put together, Bangalore naturally contributes:
Denial.
Movement.
Disruption.
Combat pressure.
That is why the other two squad slots should usually be chosen for what they add, rather than what they duplicate.
Bangalore’s Team-Building Question
Once Bangalore is selected, ask:
Who finds the enemy?
Who exploits the opening?
Who helps when the first push fails?
Those jobs do not necessarily require three different Legends.
A Recon Legend can provide information and help with shot-calling.
A Skirmisher can provide entry and mobility.
A Support Legend can provide recovery.
Bangalore can connect those pieces by changing the sightlines around the fight.
That is the foundation of a Bangalore-centered composition.
For a broader explanation of Apex classes and squad roles, check this Apex Legends Squad Composition Guide rather than repeating the entire class system here.
Bangalore + Recon: Find First, Smoke Second
Recon is one of the most natural complements to Bangalore because the two Legends approach information from different directions.
EA describes Recon Legends as focused on tracking enemies and gathering intel.
The basic sequence is:
Recon finds → Bangalore denies → squad moves
That is more useful than simply stacking information tools.
The Recon player can help establish:
where the enemy is
which player is exposed
whether another squad is nearby
which route is safest
where the enemy is likely to rotate
Bangalore then changes the amount of information the opposing team gets in return.
This is the key interaction.
Your squad starts the maneuver with information.
Then Bangalore makes the enemy work with less of it.
Bangalore + Bloodhound: Information Around the Smoke
Bloodhound is an obvious pairing, but the old “Bloodhound sees through Bangalore smoke” strategy should not be presented as current doctrine.
EA’s current Legend documentation describes smoke as capable of blocking threat-vision effects, so the useful interaction is information gathered before or around the smoke rather than assuming Bloodhound has unrestricted vision through it.
A better sequence is:
Scan → identify → Smoke → push
Bloodhound helps the squad understand the engagement.
Bangalore then changes its visual structure.
That makes the pairing useful without relying on an outdated smoke interaction.
Bangalore + Crypto: Information Before the Push
Crypto offers a more deliberate version of the same concept.
His Drone provides scouting and enemy information, while EMP can damage shields, slow affected enemies, and disable traps and certain deployables. (EA Help)
That creates a strong coordinated sequence:
Drone → EMP → Bangalore Smoke → push
Crypto identifies the structure of the fight.
Bangalore removes a key sightline.
The squad acts while the enemy is dealing with both problems.
This composition is better suited to teams that communicate than players who want to sprint into every fight without preparation.
Bangalore + Skirmisher: Turn Smoke Into Movement
A Skirmisher complements Bangalore by making the temporary opening created by Smoke easier to exploit.
EA describes the Skirmisher class around fast-paced combat and mobility.
The interaction is straightforward:
Bangalore creates the opening → Skirmisher takes it
That can mean:
crossing dangerous ground
closing distance
taking high ground
chasing a weakened enemy
escaping after a failed push
changing angles during a fight
The Bangalore player should not think of the smoke as the final destination.
The Skirmisher’s job is often to turn that visual opening into actual positional advantage.
Bangalore + Pathfinder
Pathfinder is a particularly clear example.
His Grappling Hook provides mobility, while Zipline Gun can create a route for the squad. (EA Help)
Pathfinder turns that temporary window into distance or a new angle.
That makes this pairing especially useful when the safest route is also the most exposed one.
Bangalore + Axle
Axle adds another form of mobility through Nitro Gate, which can launch players into a high-speed slide. EA currently classifies Axle as a Skirmisher and notes that both allies and enemies can use the gate.
The synergy is simple:
Smoke hides the transition.
Nitro Gate accelerates it.
For a coordinated squad, that can make Bangalore’s temporary visual advantage much easier to convert into a fast reposition.
The trade-off is that this is a mobility-heavy composition. You may gain more freedom of movement while giving up some recovery or information.
Bangalore + Support: Turn a Smoke Window Into Recovery
Support solves a different problem.
EA describes Support Legends around helping and healing the squad, with class benefits that include improved healing/revival utility and additional recovery options.
This creates a useful Bangalore sequence:
Smoke → recover → reposition
The Tactical does not have to be used only for an attack.
It can create the few seconds needed to:
revive a teammate
heal
recover from a poor trade
move away from a third party
stabilize before the next fight
That makes Support particularly attractive for squads that often survive the first exchange but struggle to survive the second.
Bangalore + Newcastle: Layered Protection
Newcastle provides an especially clear example of the Bangalore-plus-Support relationship.
His kit includes Mobile Shield, Retrieve the Wounded, and Castle Wall, giving him several ways to protect a teammate or establish a defensive position. (EA Help)
That lets the squad layer protection:
Smoke → Mobile Shield → revive or reposition
Bangalore disrupts the enemy’s information.
Newcastle adds physical protection and recovery.
Neither ability replaces the other.
That is what makes the pairing useful.
Bangalore + Lifeline: Make the Reset Productive
Lifeline provides another kind of recovery utility.
Her D.O.C. Heal Drone supports healing, while Combat Revive allows a teammate to be revived without Lifeline remaining locked to the interaction. (EA Help)
Bangalore can create the visual window.
Lifeline can turn that window into actual team recovery.
The composition is therefore less about overwhelming the enemy immediately and more about making a temporary advantage last longer.
Bangalore + Controller: Control What Happens After the Smoke
This is one of the more interesting Bangalore combinations.
Controllers specialize in area control and strategy. EA currently lists Legends such as Catalyst, Caustic, Rampart, and Wattson in the class.
Bangalore controls what the enemy can see.
A Controller can influence where the enemy can comfortably go.
That produces a useful two-stage interaction:
Bangalore denies the information.
Controller constrains the response.
That can be especially valuable around buildings, choke points, and late-game positions.
Bangalore + Catalyst: Deny the Angle, Control the Route
Catalyst can reinforce doors, deploy ferrofluid structures, and use her kit to influence movement through an area. (EA Help)
A Bangalore-Catalyst squad can therefore make an enemy solve two different problems.
First:
Where can we see?
Then:
Where can we go?
Bangalore handles the first problem with Smoke.
Catalyst can make the remaining route less comfortable.
This becomes particularly useful when the squad wants to fight around a building rather than immediately leave it.
Bangalore + Caustic: Change the Approach, Punish the Space
Caustic offers another form of area denial through Nox Gas Traps and Nox Gas Grenade. (EA Help)
The combination has a simple purpose:
Smoke makes the approach harder to read.
Gas makes certain positions harder to occupy.
This works best when the squad already knows where it wants the enemy to move.
The danger is over-denial.
Abilities that make an area miserable to enter are not automatically useful if the squad never converts them into a positional or combat advantage.
Bangalore + Assault: More Pressure, Fewer Answers
Bangalore is already Assault, so adding another Assault Legend creates a heavily combat-focused squad.
EA currently includes Bangalore, Fuse, Ash, Mad Maggie, Ballistic, and Revenant among the Assault roster.
The upside is straightforward:
More combat pressure.
The downside is equally important:
Fewer dedicated tools for information, mobility, or recovery.
That makes a double-Assault composition more appealing when your squad is confident it can convert pressure into knocks rather than repeatedly needing to reset.
Bangalore + Fuse: Turn Denial Into Pressure
Fuse is an easy example of how the Assault pairing can work.
His Knuckle Cluster provides repeatable explosive pressure, while The Motherlode influences a larger area. (EA Help)
A coordinated sequence could look like:
Smoke → enemy loses information → movement becomes predictable → Fuse applies explosive pressure
The value is not simply having more damage.
It is making the enemy uncomfortable in the limited space they still have available.
Bangalore + Recon + Support: The Flexible Core
For players who want a balanced three-player structure, this is a natural model:
Information + Denial + Recovery
The Recon player helps the squad understand the situation.
Bangalore controls sightlines and creates movement opportunities.
Support helps the squad survive after the first engagement.
This gives the team answers for:
Find → fight → reset → rotate → fight again
The composition is particularly attractive for players who do not want every match to become an all-in push.
Bangalore + Skirmisher + Support: The Forgiving Composition
This version swaps information for mobility.
Bangalore creates the opening.
Skirmisher exploits it.
Support helps the squad recover.
That gives the team strong answers for:
aggressive rotations
building entries
fast disengagements
chasing weak teams
recovering from a failed first push
Its weakness is information.
The team may need to rely more heavily on observation, audio, pings, and disciplined movement.
Bangalore + Recon + Controller: Information Into Territory
This is the more methodical composition.
Recon finds.
Bangalore denies.
Controller controls.
The result is a team that can locate an opponent, remove a key sightline, and then make the remaining space less comfortable.
It is especially appealing when your team prefers taking strong positions rather than constantly forcing movement.
The weakness is mobility.
Once the squad has to abandon its position, the composition may have fewer tools for making a rapid transition.
Bangalore + Recon + Assault: Find, Then Finish
This composition is built for pressure.
Recon identifies the opportunity.
Bangalore creates the visual opening.
The second Assault Legend helps turn that opening into damage.
The sequence is:
Find → Smoke → Pressure → Collapse
This is a good fit for coordinated players who are confident about target selection and commit timing.
It is less forgiving when the first engagement goes poorly.
Bangalore + Assault + Skirmisher: The High-Tempo Composition
This is the pure pressure version.
Bangalore creates disruption.
The Assault teammate adds more combat pressure.
The Skirmisher converts the temporary opening into movement or entry.
The team can move quickly from:
Pressure → Smoke → Entry → Collapse
The trade-off is recovery.
There is less room for a slow reset after the first attempt fails.
Controller tools help establish a difficult position to challenge.
Support helps the team survive the resulting engagements.
It can be valuable around:
strong buildings
chokepoints
late-game positions
defensible terrain
The weakness is rotation.
A squad that is excellent at holding ground still needs a plan for leaving that ground when the Ring changes.
Does a Bangalore Team Need Recon?
No.
Recon adds information, which makes Bangalore’s smoke more deliberate, but Bangalore does not become useless without it.
The better question is:
Does your squad already have enough information to make good decisions?
A disciplined team can gather plenty of information through map awareness, audio, pings, visual checks, and enemy behavior.
Recon is an addition, not a mandatory slot. EA’s class system describes Recon as information-focused, but it does not require every squad to contain one.
Does a Bangalore Team Need Support?
Again, no.
Support becomes more valuable when your squad regularly reaches the reset phase of a fight.
If you often win the first exchange but lose the next one while healing, recovery tools become much more attractive.
If your squad rarely gets the opening knock at all, another offensive or information-focused Legend may provide more immediate value.
Build around the problem your team actually has.
Does a Bangalore Team Need a Skirmisher?
Not necessarily.
Bangalore already has Double Time and can create movement opportunities with Smoke.
A Skirmisher becomes more appealing when the team wants to capitalize on those windows immediately.
That can mean:
take height
close distance
escape
chase
change angles
Mobility is therefore a multiplier for Bangalore rather than a requirement.
Avoid One-Dimensional Bangalore Comps
The easiest mistake is building a squad where every Legend wants to solve the same problem.
Three aggressively minded Legends can be terrifying when the first push works.
But what happens when the enemy survives?
Who provides information?
Who controls the next position?
Who helps recover?
Who gets the team out?
The opposite problem exists too.
Three defensive Legends may hold ground beautifully while struggling to rotate, chase, or convert damage into a finish.
The strongest compositions usually have enough overlap to reinforce one another without becoming copies of the same job.
The Most Important Part Is Ability Timing
A strong team composition on paper can still feel terrible in a match if the players use their abilities independently.
Consider this:
Recon identifies the target.
Bangalore cuts the sightline.
Skirmisher enters.
Support stays ready for the reset.
That is synergy.
Now imagine the same four actions happening at completely different moments.
The composition has not changed.
The timing has.
That is why a team’s communication and decision-making can matter more than the theoretical strength of the three Legends on the banner.
Bangalore Team Comp for Ranked
Ranked currently uses staggered Legend selection, meaning the players choose their Legends one at a time. Duplicate Legends are not allowed in the same squad, and class perks apply in Ranked. (EA Help)
That makes flexible team planning particularly useful.
A Bangalore player can communicate what the squad still lacks:
“We need information.”
“We already have mobility.”
“Let’s add recovery.”
“We need more pressure.”
That’s much more practical than trying to build around a fixed tier-list formula.
Keep a backup plan in mind, especially when teammates choose their Legends before you know the complete squad.
Bangalore Team Comp for Solo Queue
Solo queue changes the calculation because you cannot control what the other two players choose—or how aggressively they play.
That makes Bangalore’s flexibility particularly valuable.
If two teammates pick aggressive Legends, you do not necessarily need to become the third.
You can still provide:
Smoke for the entry
cover for the reset
disruption during the push
a safer rotation
Likewise, if your teammates are playing cautiously, Bangalore can become the player who creates the opening.
The best solo-queue composition is therefore often the one that leaves you with multiple ways to contribute when the original plan disappears.
For a deeper treatment of playing with unpredictable teammates, link this section to your Apex Legends Solo Queue Guide.
The Bangalore Composition Cheat Sheet
Once Bangalore is selected, use this quick check:
Need more information?
→ Consider Recon
Need faster entries or rotations?
→ Consider Skirmisher
Need stronger positional control?
→ Consider Controller
Need better recovery?
→ Consider Support
Already have those covered?
→ Consider Assault for more combat pressure
Then ask one final question:
What does this squad do when the first push fails?
That question catches a lot of bad compositions before the match even begins.
Common Bangalore Team Composition Mistakes
Picking teammates because they are popular
Popularity does not tell you whether the abilities actually fit your squad’s style.
Choosing three Legends with the same job
More aggression is not automatically more complete.
Assuming Bangalore must have a Recon teammate
Information is useful, but it can come from several sources.
Ignoring recovery
A composition should have a plan for the fight that comes after the first fight.
Building a defensive squad with no rotation plan
Eventually, the Ring moves.
Treating class as a permanent role
A class describes broad tools and perks. It does not dictate every action the player takes. EA’s current system separates class identity from the broader possibilities of individual Legend kits.
Throwing abilities without coordination
The same abilities become dramatically more useful when one creates the opening for another.
A Simple Bangalore Team-Building Framework
Start with Bangalore.
Step 1: Identify what she already provides
Denial + disruption + pressure + repositioning
Step 2: Identify the squad’s biggest gap
Choose the job you need most:
Information
Mobility
Control
Recovery
More pressure
Step 3: Plan for failure
Ask:
What happens if we don’t get the knock?
That third step is the one most lineup discussions skip.
A squad should not only have a plan for winning the first exchange.
It should have a plan for continuing after it fails.
Final Thoughts
There is no permanent Bangalore trio that solves every Apex match.
The more reliable approach is to start with what Bangalore already brings and then use the other two slots to fill the gaps.
She provides:
Visibility control.
Repositioning.
Disruption.
Combat pressure.
A Recon teammate can help the squad find the right engagement.
A Skirmisher can turn a smoke-created opening into actual movement.
A Controller can make the enemy’s remaining routes harder to use.
A Support Legend can transform a temporary window into a successful reset.
Another Assault Legend can add more pressure when the squad already has enough information and recovery.
That gives you a much better way to think about Bangalore team composition:
Find → Deny → Exploit → Recover
Not every job needs its own Legend.
The point is to make sure the three players collectively have enough tools to cover what the match demands.
When Bangalore is your anchor, don’t simply ask:
“Who is the best teammate for Bangalore?”
Ask:
“What does Bangalore already solve, and what does the rest of our squad still need?”
That question will survive balance patches much better than any static list of supposedly perfect trios.
Sources & Updates
EA’s current Legends guide documents the five Core-mode classes—Assault, Controller, Recon, Skirmisher, and Support—along with their broad roles and current Legend abilities. Bangalore is currently an Assault Legend. (EA Help)
EA’s current documentation confirms Bangalore’s Smoke Launcher, Double Time, and Rolling Thunder, as well as her current Assault-class benefits. (EA Help)
EA’s current Ranked documentation states that Legend selection is staggered, duplicate Legends are not permitted within the same team, and class perks apply in Ranked. (EA Help)
EA’s current game-mode documentation distinguishes Core modes from Wildcard; Wildcard allows simultaneous Legend selection and duplicate Legends within a squad, while Core modes use the one-Legend-per-squad structure. (EA Help)
EA’s February 2026 roadmap said a Legend Class/team-composition overhaul is planned for Season 32, while also noting that roadmap timing can shift during development. This article should therefore be reviewed when that change arrives. (EA)
Editorial note: The compositions and synergy frameworks in this guide are Loot Strategist recommendations based on documented abilities and squad-role interactions, not official EA rankings.
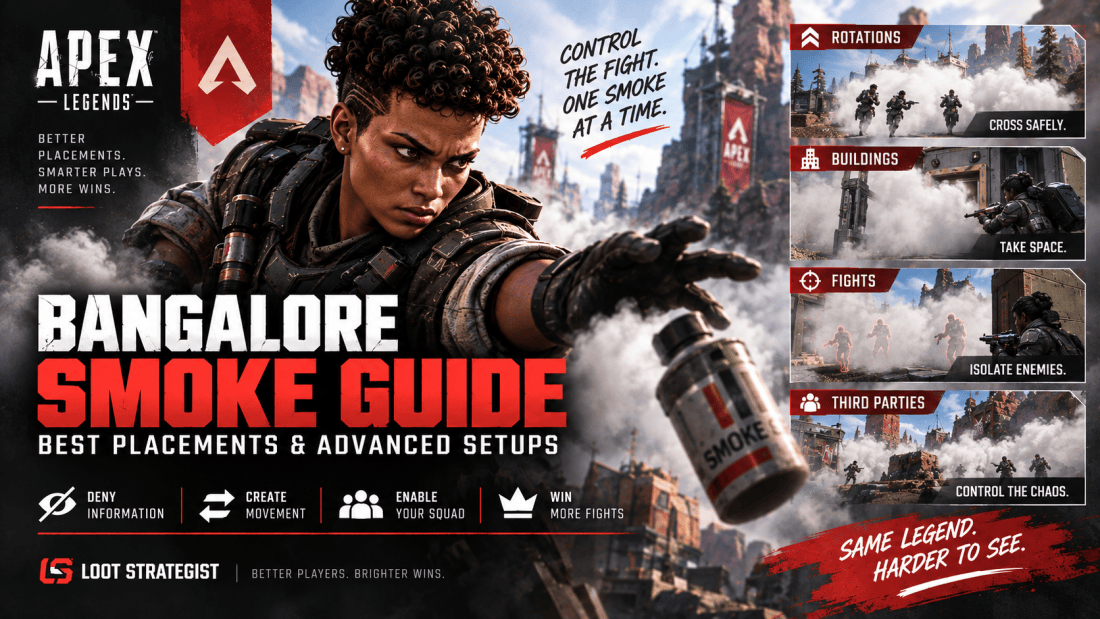
Bangalore’s Smoke Launcher is easy to use and surprisingly easy to waste.
The difference between an average smoke and a great one is rarely the size of the cloud. It is where the cloud lands, what information it removes, and what your squad does next.
EA’s current Bangalore documentation confirms that Smoke Launcher creates a smoke wall on impact and that its canisters can break or breach doors. The current Showdown tuning also gave the Tactical a 30-second cooldown, 2,900 projectile speed, and a 0.25-second pull-out time. Smoke can also be temporarily disabled by ordnance and abilities used inside or near it. (EA Help)
That makes Bangalore less about throwing smoke whenever a fight gets messy and more about controlling which parts of the fight the enemy is allowed to see.
This guide focuses specifically on that: practical smoke placements, repeatable setups, and the small positioning decisions that turn Bangalore’s Tactical into a real advantage.
Loot Strategist rule: Smoke the enemy’s strongest information before you smoke your own.
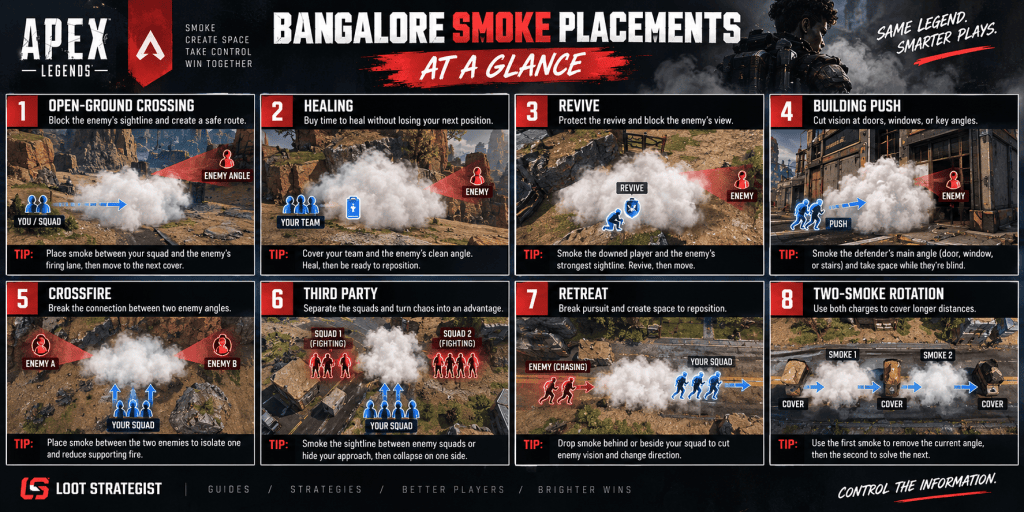
Bangalore Smoke Placements at a Glance
Situation
Where to Place Smoke
Immediate Follow-Up
Open-ground crossing
Between your squad and the strongest enemy sightline
Move to the next hard cover
Healing
Between your team and the enemy’s firing lane
Heal while preparing the next move
Revive
Cover the revive and the enemy’s clearest angle
Revive, then leave the smoke
Building push
On the defender’s doorway, window, or supporting angle
Take space while vision is disrupted
Enemy crossfire
Between the two enemy positions
Pressure the isolated player
Third party
Between the squads rather than directly on your own team
Collapse on one side
Retreat
Behind or beside your movement path
Change direction or reach new cover
Two-smoke rotation
First smoke on the current angle, second on the next
Move through in stages
False rotation
On the route enemies expect you to use
Reposition somewhere else
The placement should always answer a simple question:
What becomes harder for the enemy to do after this smoke lands?
1. Smoke the Strongest Enemy Advantage
Start here.
When an enemy squad has you under pressure, find the one sightline that matters most.
It could be:
a sniper watching the rotation
a player holding a window
a head-glitch on a ridge
a shotgun player controlling a doorway
a teammate providing a crossfire
That is your smoke target.
You do not always need to cover the entire enemy squad.
You need to remove the part of the fight that is currently making your position difficult.
Example
An enemy team is holding a building. One player watches the entrance while another watches your rotation from a window.
Smoking your own squad may hide everyone equally.
Smoking the window angle may be enough to let one teammate cross safely while another keeps pressure on the doorway.
That’s a much better trade.
2. Open-Ground Smoke Placement
Open terrain is where smoke can feel almost magical when it is placed correctly.
The mistake is treating the smoke as a destination.
You need three points:
Current cover → Smoke → Next cover
Your canister should create the bridge between those positions.
Good placement
Put the smoke across the enemy’s primary firing lane, with enough distance that your squad can move toward it and continue into the next safe position.
Bad placement
Drop it directly on your feet, run twenty meters, and discover that the smoke ends before you reach meaningful cover.
You have not solved the rotation.
You have simply delayed being exposed.
The moving-wall idea
On a long crossing, use the first smoke to remove the current threat and the next smoke to solve the next threat.
Do not fire both immediately unless the situation demands it.
A staggered sequence gives your squad more control over the route.
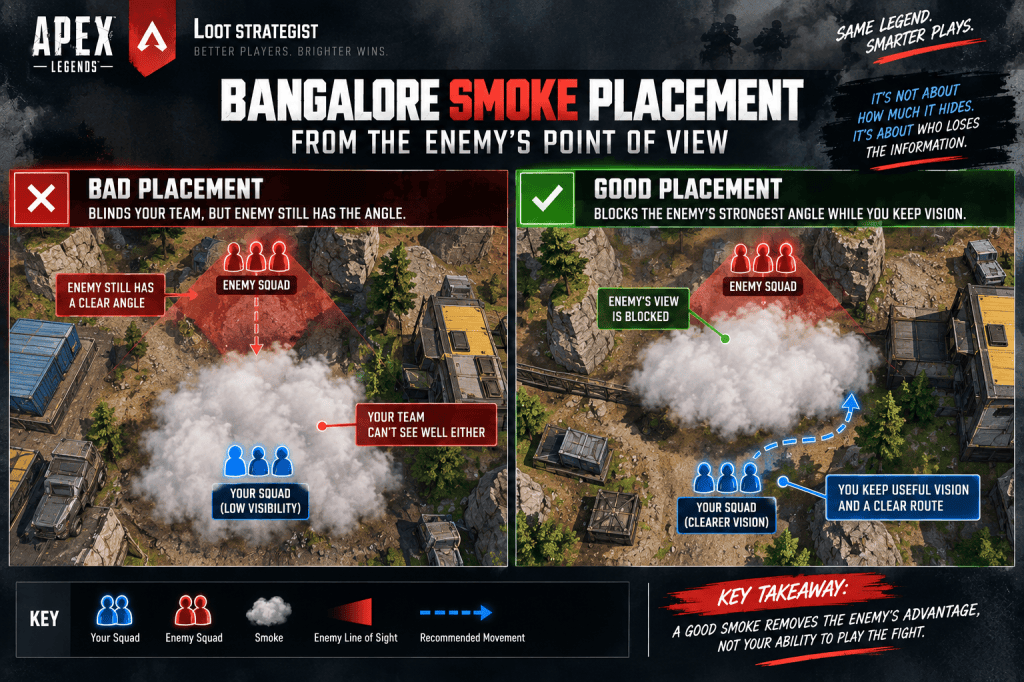
3. Edge Smoke vs. Center Smoke
This is one of the easiest ways to improve your placement without learning a hundred set plays.
Center smoke
A center smoke sits directly on the area your squad occupies.
It gives broad concealment but also removes a lot of your own vision.
Edge smoke
An edge smoke sits between your team and the enemy.
Your squad remains able to see one side of the fight while the opposing team loses the important angle.
For many situations, edge smoke is cleaner.
It creates asymmetry rather than turning the entire area into a visual coin flip.
When you have a strong position already, preserving some of your own information is valuable.
4. Smoke for Healing and Resets
A healing smoke has one job:
buy time without creating a worse position afterward.
That means the best placement usually covers both:
the player who needs to reset
and
the enemy’s clean firing lane.
Do not place the smoke simply because someone is using a Battery.
Look at the route the enemy would take to punish that Battery.
That’s the angle you need to break.
A better reset
Instead of:
Smoke → Heal → Sit there
think:
Smoke → Heal → Reposition
The final step matters because the smoke will eventually become less useful, and Bangalore’s current smoke can also be temporarily disabled by nearby ordnance and abilities. (EA)
5. Best Smoke Placement for a Revive
Revives become much easier to protect when you stop thinking only about the downed player.
Look at the enemy.
Where are they?
What can they see?
Which angle gives them the easiest shot?
Then place the smoke so that the enemy must either:
move,
push through the cloud,
or
give up that angle.
The revive itself should be treated as one part of the maneuver.
The second the teammate is back on their feet, the squad should already know where it is going next.
Smoke is buying that time.
6. Offensive Smoke: Cover the Push, Not the Panic
Bangalore’s smoke becomes much more dangerous when you stop treating it as a defensive ability.
Suppose one enemy is holding a powerful position and the other two are providing support from farther back.
A shotgun or SMG becomes more useful when Smoke has already compressed the engagement into the distance where those weapons excel.
7. Building Smoke: Doors, Windows, and Stairs
Buildings reward precise smoke placement.
You rarely need to fill the whole structure.
Instead, identify the defender’s strongest information source.
Doorways
Smoke can disrupt a defender’s ability to read the timing of an entrance. Bangalore’s canisters can also break or breach doors. (EA Help)
That combination creates a useful entry problem for the defender:
Do I hold?
Do I back up?
Do I push through?
Each choice changes the fight.
Windows
Windows are often more important than the main entrance because they allow defenders to create supporting fire.
A single well-placed smoke can remove that second angle without covering the entire building.
Stairs
Stairs compress movement.
If an enemy is relying on a staircase to control when your team can move between floors, smoking that route can remove some of their timing information.
You do not necessarily need to enter through it.
Sometimes the point is simply to make the defender stop trusting the angle.
8. Smoke the Crossfire, Not the Target
This is one of the highest-value advanced placements.
Imagine two enemies are holding separate angles:
Enemy A ← your squad → Enemy B
You are caught between them.
A common reaction is to smoke your own position.
Instead, look for the line connecting A and B.
If you place the smoke between those positions, you can break the relationship between their angles.
Now one enemy has less support.
That can create the opening your team actually needs.
The smoke did not blind the target.
It changed the geometry of the fight.
9. Isolate One Enemy With a Smoke Wall
You can use the same idea more aggressively.
Suppose three enemies are positioned:
A — B — C
B has moved slightly ahead.
A smoke wall between B and the other two can create a temporary separation:
A/C | Smoke | B
That gives your squad a short opportunity to focus B before the supporting players regain a clean line of sight.
The important word is temporary.
Do not stand around admiring the placement.
The smoke created the opening.
Your team has to use it.
10. Third-Party Smoke: Separate the Fight
Third parties become much more manageable when you stop thinking of two enemy squads as one giant problem.
Look at the relationship between them.
Setup A: Cut the squads apart
Smoke the sightline connecting the two teams.
One squad may lose the ability to support the other.
Setup B: Hide your approach
Smoke between your squad and the strongest angle, then move before the enemy can reconstruct your position.
Setup C: Block the escape
If one squad is already weakened, smoke the route they are most likely to use to leave.
Now your Tactical is influencing where the fight goes, not merely whether you can be seen.
That is a much stronger use of smoke.
11. The Reverse Smoke
Most players instinctively throw smoke forward.
Sometimes the better placement is behind you.
Imagine your squad has just won a fight and expects another team to arrive from the rear.
Instead of smoking the area in front, obscure the route behind you while the squad heals and repositions.
The same principle works during a retreat.
Smoke the route the enemy is using to maintain visual contact, then change direction.
The enemy expects the smoke to tell them where you are going.
Instead, use it to hide where you stopped going.
12. The Layered Smoke Setup
Two smoke charges can create a much better route when used as separate stages.
First smoke
Remove the current firing lane.
Move
Take the first piece of safe ground.
Second smoke
Solve the next sightline.
Move again
Reach the final piece of cover.
That is far better than dropping both smokes at once simply because you have them available.
Think of each canister as solving a different moment in the rotation.
13. The False Rotation Setup
Smoke can hide more than movement.
It can hide your intention.
Suppose your team is expected to rotate left.
Throwing smoke on the left can make that route look like your obvious plan.
Instead, use the visual disruption to reposition somewhere else.
This works because enemies often react to incomplete information.
Do not overuse it, though.
A trick stops being a trick once the enemy expects the trick.
14. Smoke From the Enemy’s Point of View
This is an excellent habit to practice.
After placing a smoke, mentally step into the enemy’s position.
Ask:
What can they still see?
Which teammate can they still shoot?
Which route remains open?
Can they walk around the cloud?
Can they push through it?
Have I actually removed their strongest angle?
That last question is the one that matters.
A smoke cloud can look enormous from your perspective while leaving the enemy’s most important sightline completely intact.
15. Use Smoke to Create an Angle, Not Just Cover One
A more advanced Bangalore play is to use smoke to manufacture a new angle.
For example:
Smoke the original angle → move while hidden → appear from another side
Now the enemy is no longer fighting the position they prepared for.
This pairs naturally with Bangalore’s Double Time.
Her passive temporarily increases her speed when she takes fire while sprinting, so the value of the movement is not simply getting away faster. It can help her change where the next peek comes from. (EA Help)
The smoke hides the transition.
Double Time helps accelerate it.
The new angle creates the payoff.
16. Know When Fighting Inside Smoke Is a Bad Idea
Smoke can encourage a close-range fight, but that does not mean every fight inside the cloud is favorable.
EA changed Smoke Launcher so players inside smoke can see nearby players within 20 meters with a white highlight, while that highlight is not visible from outside the smoke. EA specifically described the change as making close smoke fights more readable while preserving smoke’s sight-blocking and rotational role.
That means you should not assume:
“We are inside Bangalore smoke, so we automatically have the advantage.”
You still need:
better weapons
better health
better positioning
a clear target
a reason to take the fight
Sometimes the best play is to use the smoke to avoid the fight entirely.
17. Smoke + Weapon Range
This is where your smoke guide and loadout guide should reinforce each other.
If you’re carrying:
AR + Shotgun
you can use Smoke to move the fight from mid-range into the shotgun’s preferred distance.
If you’re carrying:
Marksman + SMG
you can use Smoke to close the gap after creating ranged pressure.
If you’re carrying:
Sniper + SMG
you can smoke your escape or approach once the enemy decides to push.
The weapon pairing changes how valuable a particular smoke placement becomes.
That is why there is no universal “best smoke spot.”
The correct placement depends partly on what you intend to do immediately afterward.
18. Reactive Smoke Changes the Timing
Bangalore’s smoke is no longer something you should treat as untouchable terrain.
EA’s Showdown changes made Smoke Launcher reactive, allowing nearby ordnance and abilities to disable the gas for five seconds.
That has a practical consequence:
Do not spend too much time standing around inside the smoke after you get what you needed from it.
Use the window.
Cross.
Heal.
Split the enemy.
Take the angle.
Reset.
Then move.
The smoke is there to create a favorable moment, not a permanent room.
19. Advanced Setup: Deny → Split → Collapse
This is one of the most useful repeatable setups to practice.
Deny
Smoke the enemy support angle.
Split
Wait for the smoke to separate one player from the rest of the squad’s vision.
Collapse
Your team immediately focuses the isolated player.
The important part is coordination.
If nobody acts on the separation, the smoke has simply delayed the fight.
Call the target before the canister lands.
20. Advanced Setup: Deny → Cross → Re-smoke
This is the open-ground version.
Deny
Remove the strongest firing lane.
Cross
Move to the next piece of cover.
Re-smoke
Use another smoke to solve the new angle.
This creates a controlled rotation instead of one giant panic cloud.
It’s particularly useful when the distance between cover points is too large for one smoke to solve safely.
21. Advanced Setup: Smoke → Fake → Reposition
This one is less about combat and more about creating uncertainty.
Smoke
Block the route enemies expect you to use.
Fake
Give them a reason to believe you’re taking that route.
Reposition
Move somewhere else while their attention is tied to the smoke.
This works best when the enemy has limited time to react.
It also works badly when you try to repeat it every fight.
22. Placement Mistakes to Stop Making
Smoking the entire area automatically
More smoke does not necessarily mean more control.
Smoking your own teammate’s winning angle
If your squad already has a clean firing lane, don’t erase it without a reason.
Placing smoke without a destination
A smoke that leaves you standing in the open when it clears has only postponed the problem.
Using both smokes at once every time
Save the second problem for the second canister.
Smoking the enemy and then waiting
If the smoke creates an opening, use it.
Assuming smoke equals safety
The enemy can still push, interact with the cloud, or challenge the fight from close range. (EA)
Forgetting the enemy’s perspective
Always check what information remains available to them.
23. Three Bangalore Smoke Drills
You can practice the placement logic in the Firing Range without trying to memorize map-specific lineups.
Drill 1: The Angle Cut
Choose a piece of cover.
Imagine an enemy holding a sightline.
Place the smoke so that it removes that angle while leaving part of your own vision intact.
Repeat from several distances.
Drill 2: The Smoke Corridor
Choose two pieces of cover.
Use one smoke to cross toward the first.
Then a second to reach the next.
The goal is to stop moving in the open the instant the first smoke ends.
Drill 3: The Isolation Test
Imagine three enemies positioned with one slightly separated.
Practice placing smoke between the isolated target and the support players.
Then immediately move toward the target.
The point is not to throw the perfect canister every time.
Do I need this smoke again in the next few seconds?
If you can answer those questions quickly, your smoke usage will become far more deliberate.
You don’t need a perfect lineup.
You need a clear purpose.
Final Thoughts
Bangalore’s Smoke Launcher is strongest when it changes the shape of the fight.
The best smoke is not necessarily the biggest one or the one that hides your whole squad.
It is the one that removes the enemy’s strongest option while giving your team a better one.
Smoke the firing lane.
Cut the crossfire.
Separate the support player.
Create the route.
Take the angle.
Then move again.
That is why Bangalore’s strongest smoke placements tend to follow the same underlying logic:
Deny → Create Space → Act → Leave
Once you start viewing Smoke Launcher as a positioning tool rather than a panic button, the Tactical becomes much easier to use well.
And when you are choosing weapons for those smoke-created fights, pair this guide with Apex Legends Bangalore Best Loadouts: Weapons for Every Range. Your smoke determines how the fight changes; your loadout determines what you can do with that opening.
Sources & Updates
EA’s current Bangalore documentation confirms that Smoke Launcher creates a smoke wall on impact and that Bangalore’s canisters can break or breach doors. Bangalore is currently classified as an Assault Legend.
EA’s Showdown patch notes introduced the modern Smoke Launcher tuning, including the 30-second cooldown, 2,900 projectile speed, 0.25-second pull-out time, door interaction, and reactive smoke behavior.
EA also changed smoke combat so nearby players inside the smoke can see one another with a white highlight within 20 meters, while that highlight is not visible from outside the smoke.
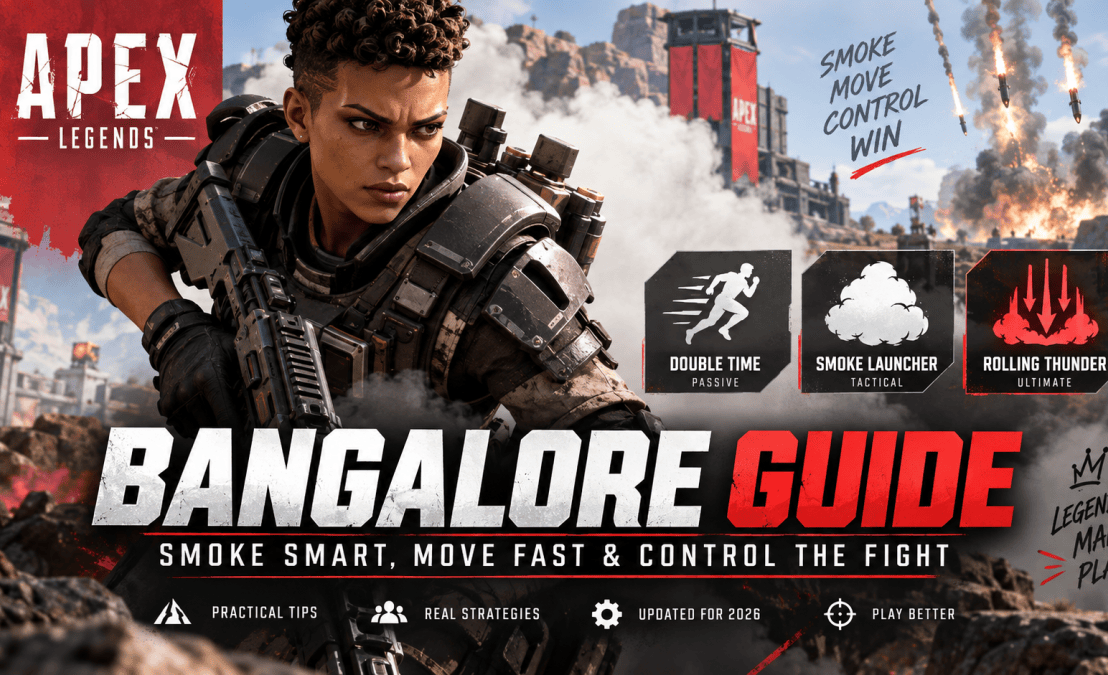
Apex Legends Bangalore Guide: Smoke Smart, Move Fast & Control the Fight
Bangalore is easy to underestimate.
At first glance, her kit looks straightforward: move faster when you’re under fire, launch smoke, call in an artillery strike. But that description misses what makes her difficult to master.
Bangalore is really a fight-control Legend. She can remove sightlines, create movement windows, disrupt defensive setups, break an enemy push, and give her squad a chance to reset when the fight starts going sideways.
The catch is that Smoke Launcher works both ways.
A good smoke can save your squad.
A bad smoke can blind your own teammates, erase a winning angle, and give the enemy exactly the reset they needed.
That tension is where Bangalore gets interesting.
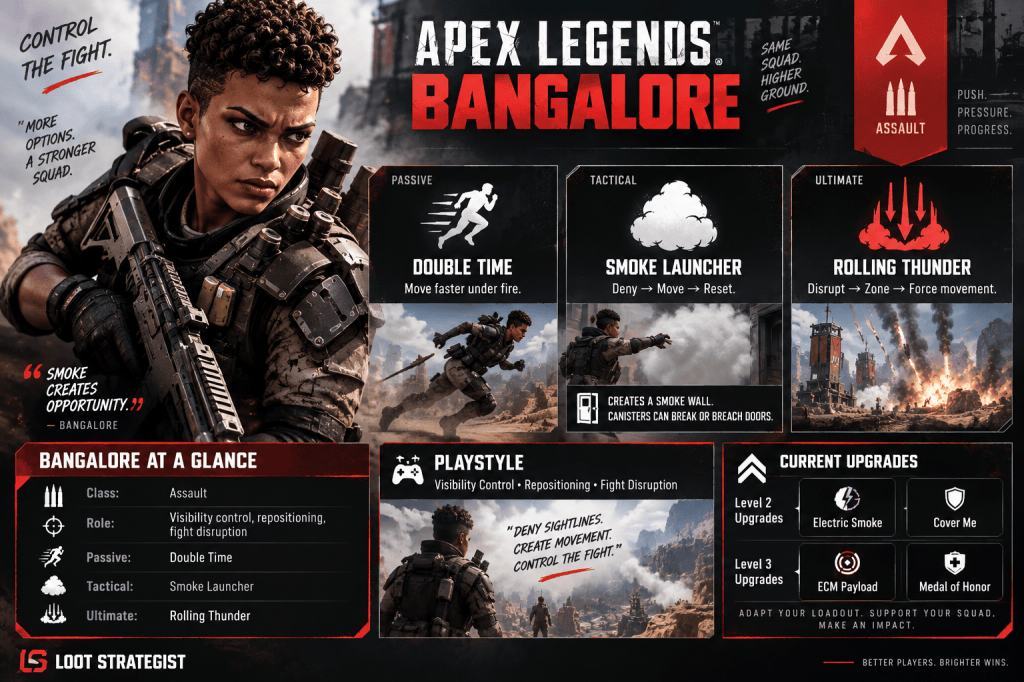
EA currently lists Bangalore as an Assault Legend with three core abilities: Double Time, Smoke Launcher, and Rolling Thunder. (EA) (EA Help)
This guide covers the current Bangalore kit, her modern Legend Upgrades, smarter smoke placement, Double Time movement, Rolling Thunder usage, common mistakes, and the situations where Bangalore’s abilities are most valuable.
Loot Strategist Bangalore Rule:Smoke should change the fight, not just hide it.
Bangalore’s Current Kit at a Glance
Ability
What it does
Passive — Double Time
Taking fire while sprinting temporarily makes Bangalore faster.
Tactical — Smoke Launcher
Fires a canister that creates a smoke wall on impact. The canister can also break or breach doors.
Ultimate — Rolling Thunder
Calls in an artillery strike that slowly creeps across the landscape.
Class — Assault
Bangalore benefits from the current Assault class system.
EA’s current Legend guide confirms these core abilities and Bangalore’s Assault classification.
There are also some important differences between today’s Bangalore and the one described in old launch-era guides. In the 2025 Showdown update, EA increased Double Time’s speed bonus by 5%, reduced Smoke Launcher’s cooldown to 30 seconds, increased its projectile speed, shortened its pull-out time, added stronger door interaction, and made the smoke reactive to nearby ordnance and abilities. Rolling Thunder’s cooldown was reduced to 210 seconds and its firing sequence was sped up.
So, yes: your old Bangalore muscle memory may need an update.
Bangalore’s Real Strength: Control the Information
Smoke should change the fight, not just hide it.
Bangalore doesn’t need wallhacks to gain an advantage.
She can decide how much information the enemy gets.
Her abilities can influence:
what the enemy can see
which sightline remains useful
where your squad can move
when an enemy push becomes awkward
how long your team has to reset
That’s the foundation of Bangalore’s playstyle.
A smoke wall doesn’t have to hide your entire squad to be useful.
It only needs to remove the most valuable piece of enemy information for long enough to change the next few seconds.
That’s a much better way to think about Bangalore than simply:
“Throw smoke when you’re in trouble.”
The Bangalore Framework
Think about Bangalore’s kit as four linked actions:
Deny
Remove the enemy’s most useful sightline.
Move
Use the temporary information gap to reach a better position or create a new angle.
Pressure
Attack while the enemy is forced to adjust.
Reset
When the exchange turns bad, use the same tools to regain control.
Deny → Move → Pressure → Reset
The four steps won’t always happen in that order, and you don’t need to force every ability into the sequence.
The important part is that each ability should create a reason for the next action.
Passive: Double Time
Double Time triggers when Bangalore takes fire while sprinting and temporarily increases her movement speed. EA’s current Legend documentation confirms the core behavior, while the 2025 Showdown update increased the passive’s speed by 5%. (EA Help)
It is easy to treat Double Time as an escape button.
That’s only half of it.
A better Bangalore player uses the speed boost to change the geometry of the fight.
You can use Double Time to:
reach cover
cross a dangerous gap
break line of sight
change sides of a building
create a new peek
move toward a knocked teammate
The speed matters because it gives you options.
Don’t Waste Double Time Running in a Straight Line
Getting faster doesn’t automatically make you safer.
You can trigger Double Time and still run straight into another enemy’s line of fire.
Instead, give the speed a destination.
Think:
Cover
Corner
Teammate
New angle
Escape route
The passive is at its best when the extra speed gets you somewhere the enemy can’t easily punish.
Speed without a destination is just faster bad positioning.
That’s particularly important when several squads are fighting.
A route that looks safe from one enemy can run directly into another.
Use Double Time to Create a New Peek
Imagine you’re holding the right side of a rock.
An enemy is watching that exact angle.
You take a hit.
Double Time activates.
Rather than sprinting directly backward, use the speed to swing around the rock.
Now your next peek comes from a different direction.
The enemy didn’t suddenly get worse at aiming.
They simply lost their prediction.
That’s one of the cleanest ways to turn Bangalore’s passive into offensive utility.
Double Time and a Knocked Teammate
Bangalore’s current Level 3 Medal of Honor upgrade makes Double Time trigger when she runs toward knocked allies while also improving revive speed. (EA Showdown patch notes) (EA)
That creates a particularly useful rescue tool.
You can use the passive to:
reach a knocked teammate
cross danger faster
create a safer revive path
break away from an enemy angle before attempting the revive
The mistake is treating the speed itself as the objective.
It isn’t.
The objective is getting the teammate back into the fight without turning yourself into the next knock.
Smoke Launcher Is Bangalore’s Centerpiece
Smoke Launcher is the ability most closely associated with Bangalore, and for good reason.
EA’s current Bangalore documentation says it creates a smoke wall and can break or breach doors.
The current Showdown tuning also matters:
30-second cooldown
2900 projectile speed
0.25-second pull-out time
Canister breaks and travels through doors
Smoke can be disabled for five seconds by ordnance and abilities used inside or nearby
These aren’t just patch-note numbers.
They affect how the tactical should actually be used.
Smoke is now better suited to short, deliberate windows than endless battlefield clutter.
The Three Jobs of Bangalore Smoke
Good Bangalore smoke usually solves one of three problems.
Deny
Remove an enemy’s useful line of sight.
Move
Give your squad a temporary path through danger.
Reset
Create a short window to heal, revive, reload, or reposition.
A smoke can accomplish more than one job.
That’s great.
But before you fire it, know what you want the smoke to accomplish.
Ask:
What sightline am I removing?
Where are we going?
What reset am I buying?
Those three questions give you a much better smoke than simply throwing the canister at your own feet.
Smoke the Enemy’s Advantage
Suppose an enemy team is holding a building and watching the only open route toward them.
You could smoke your own squad.
Or you could smoke the enemy’s sightline.
The second option is often better.
Now the enemy has to decide whether to:
hold blind
move
give up an angle
push through
Your squad has gained something even though you haven’t dealt a single point of damage.
That’s the value of information denial.
Don’t Automatically Smoke Your Own Team
This is the classic Bangalore mistake.
Your squad is holding a strong position with a clean view of the enemy.
You get pressured.
You panic.
Smoke lands across the entire area.
Now:
your team can’t see
the enemy can’t see
your follow-up damage is gone
the enemy gets time to heal
You may have solved the immediate threat while destroying your own advantage.
Self-smoke absolutely has its uses.
It just needs a reason.
When Self-Smoke Is Actually Good
Use your own smoke when visibility is currently hurting your squad more than it helps.
Good examples:
Reviving under enemy sightlines
Healing behind weak cover
Crossing an exposed section
Breaking several enemy sightlines simultaneously
Disengaging from a losing fight
Creating a temporary approach
In those situations, you’re not “hiding.”
You’re buying time.
The destination still matters.
Smoke Should Lead Somewhere
One of the easiest Bangalore habits to develop is:
Smoke → Move → Hard Cover
not:
Smoke → Stand in Smoke
Smoke disappears.
Your new position doesn’t.
If your smoke lets you cross an open area but leaves you standing in the open when it clears, you’ve only delayed the problem.
Use the tactical to reach something better:
rock
building
head-glitch
corner
teammate
new angle
The smoke is the bridge.
It should not be the destination.
Smoke Can Split an Enemy Team
You don’t always need to smoke all three opponents.
Sometimes the best smoke creates a small gap between two enemies.
Imagine:
Two opponents are holding one side of the fight.
A third player is slightly separated.
A smoke wall cuts the support line.
Now your squad may be able to pressure one player without taking immediate fire from all three.
That is a much more valuable use of smoke than simply covering everything.
The goal isn’t maximum visual obstruction.
It is useful asymmetry.
Smoke Before the Push
Don’t save Smoke Launcher exclusively for disaster.
Proactive smoke can make an enemy’s defensive position much harder to hold.
For example:
Smoke their strongest angle.
Move while they lose vision.
Create a second angle.
Attack from there.
Now your smoke has created an advantage instead of merely hiding a disadvantage.
This is where Bangalore begins to feel like a control Legend rather than a panic-button Legend.
Smoke After the Damage
Smoke can also protect the moment immediately after you’ve gained an advantage.
Suppose your teammate cracks an enemy.
The opponent retreats behind cover.
You can use smoke to:
protect your teammate’s reposition
cut off supporting fire
allow a safer swing
create a route toward the isolated target
The important thing is that the smoke should support the advantage you already created.
Don’t erase your own angle immediately just because the fight got exciting.
Smoke Can Break or Breach Doors
EA’s current Legend documentation explicitly says Bangalore’s smoke canisters can break or breach doors.
That gives Smoke Launcher another use in buildings.
A defender sitting safely behind a doorway may suddenly have:
a damaged door
reduced visibility
a less predictable entrance
and
less control over the timing of the push
This is one reason Bangalore’s current tactical is more than a smoke grenade.
It is also utility for disrupting defensive setups.
Bangalore Smoke Is Now Reactive
Showdown added an important interaction: Bangalore’s smoke can be disabled for five seconds when ordnance or abilities are used inside or near it. (EA Showdown patch notes) (EA)
That changes one part of the old Bangalore instinct.
Don’t assume:
“I smoked this area, so nobody can see or interact with it.”
The enemy can challenge the smoke with the right resources.
That means you should be especially careful about sitting still inside your own smoke once opponents have tools available to disrupt it.
The stronger sequence is often:
Smoke → Act → Leave or convert the advantage.
Not:
Smoke → Camp.
Fighting Inside Bangalore’s Smoke
Sometimes you have no choice.
Sometimes the enemy is forced inside with you.
But fighting in smoke isn’t automatically advantageous.
In the 2024 Double Take update, EA changed smoke combat so players inside Bangalore’s smoke within 20 meters receive a white highlight visible to other players inside the smoke. EA also removed Bloodhound’s threat vision through smoke and gas and removed smoke/gas threat vision from the 4x–10x Digital Threat scope. (EA)
That means the old Bangalore rule of:
“Smoke everything and let your team see through it”
isn’t current.
Smoke still denies long-range sightlines, but close-range fights inside the cloud are more readable for everyone who is in there.
Don’t choose that fight automatically.
Bangalore and Bloodhound: Forget the Old Meta
If you’ve watched old Apex guides, you’ve probably seen the classic:
Bangalore smoke + Bloodhound scan/ultimate
combination.
That interaction changed.
EA removed Bloodhound’s threat vision through Bangalore’s smoke and specifically cited the Bangalore/Bloodhound combination as having become too dominant.
Bloodhound has since been reworked again for Season 30, with a new passive, tactical behavior, and ultimate. EA’s current Marked documentation describes the reworked Bloodhound around tracking trails, White Ravens, snapshot scans, and the new Allfather’s Cloak ultimate.
So don’t build your Bangalore guide—or your Bangalore gameplay—around old smoke-vision advice.
The current strength of the combo is coordination and information control, not guaranteed smoke vision.
Don’t Smoke Just Because You’re Being Shot
This might be the most important Bangalore habit to break.
Getting shot does not automatically mean:
Smoke now.
You might actually need:
Cover
Movement
A teammate
A new angle
A reset
Sometimes Double Time already gives you the escape tool you need.
Sometimes smoking only makes the situation harder to read.
Before pressing the tactical, ask:
What gets better after I throw this?
If the answer is “I don’t know,” take another second.
When You Should Save Your Smoke
A Bangalore player can be too aggressive with the tactical.
Having both charges available creates flexibility.
One charge might solve the current problem.
The second might save you sixty seconds later.
Think about saving a charge when:
You’re already safe
Your squad has a strong angle
The current smoke would not change anything
You expect another fight soon
You’re about to rotate into a risky area
You are waiting for a reset opportunity
The best Bangalore players aren’t constantly throwing smoke.
They’re making smoke available when it matters most.
Rolling Thunder Is a Space-Control Tool
Rolling Thunder calls in an artillery strike that slowly creeps across the landscape. EA currently lists it as Bangalore’s Ultimate, and Showdown reduced its cooldown to 210 seconds while shortening the firing sequence. (EA; EA Showdown patch notes) (EA Help)
The common mistake is judging the ultimate by damage alone.
Its best use is often:
Zone
Deny
Disrupt
Buy time
Think about where you want the enemy to stand after the explosions begin.
Use Rolling Thunder to Move Enemies
Suppose another squad is holding a strong defensive position.
You don’t necessarily need to kill them with Rolling Thunder.
You need to make their preferred location unpleasant enough that they have to move.
That can force them:
out of cover
away from an angle
toward your squad
away from their teammate
into a less defensible area
Now your team has something to work with.
The ultimate created movement.
Your guns create the punishment.
Don’t Throw Rolling Thunder Directly on the Enemy Every Time
If the enemy has plenty of room to run, the ultimate can become little more than a loud warning.
Instead, think about:
Where do I want them to go?
Then place the ultimate to make other areas unattractive.
A good Bangalore ultimate can make the enemy choose between:
staying and taking the pressure
or
moving into the position your squad wants
That’s more powerful than simply hoping someone stands on a missile.
Rolling Thunder and Smoke Work Together
These abilities solve different parts of the same problem.
Rolling Thunder makes an area dangerous.
Smoke can hide the route your team uses while the enemy loses comfortable positions.
That gives you:
denied space
plus
denied information
plus
a movement window
The combination is particularly strong when your team already knows where it wants to go.
Don’t use both simply because both are ready.
Bangalore’s Current Legend Upgrades
This is another area where old guides are especially unreliable.
EA rebuilt Bangalore’s Legend Upgrade tree in Showdown. The old Ultimate Cooldown+ and Tactical Cooldown choices were removed; Cover Me moved to Level 2; Electric Smoke was added at Level 2; Refuge was integrated into Cover Me; and Level 3 gained ECM Payload and Medal of Honor. (EA Showdown patch notes)
Level 2: Electric Smoke
Electric Smoke electrifies Smoke Launcher and gives the tactical additional utility against enemy deployables. EA’s patch notes specify damage to enemy Ultimates and destruction of Tactical deployables.
This is the upgrade to think about when your Bangalore game revolves around breaking defensive setups.
Level 2: Cover Me
Cover Me moved to Level 2 in Showdown, with the former Refuge functionality integrated into it. EA’s earlier Bangalore upgrade documentation describes Cover Me as an upgrade that auto-pings enemies who trigger Double Time, while Refuge provided health regeneration inside Bangalore’s smoke. (EA Breakout patch notes; EA Showdown patch notes) (EA)
In practical terms, it leans harder into information and sustain around Bangalore’s own smoke.
Level 3: ECM Payload
ECM Payload electrifies Rolling Thunder, adds damage, and destroys enemy deployables.
This is the upgrade that pushes Bangalore further toward breaking entrenched defensive setups.
Level 3: Medal of Honor
Medal of Honor makes revives faster and causes Double Time to trigger while running toward knocked allies.
This is particularly useful when your matches regularly come down to recovering teammates under pressure.
The important part for an evergreen article is not declaring one universal winner.
Your upgrade should match the problem your squad is trying to solve.
Bangalore’s Upgrade Tree Is About How You Want to Fight
The choices are easier to understand when you stop thinking of them as “good versus bad.”
Think instead:
Electric Smoke → more tactical pressure against defensive utility.
Cover Me → more support and information around smoke/Double Time.
ECM Payload → stronger ultimate utility against enemy setups.
Medal of Honor → stronger teammate recovery and movement toward knocks.
EA’s 2026 Marked midseason patch notes, published September 14, do not list a Bangalore balance change, so the Showdown Bangalore tuning remains the latest Bangalore-specific change in EA’s published patch history as of this review.
Who Should Play the “Aggressive” Bangalore?
Don’t get trapped by the idea that Bangalore needs to be your entry fragger.
Her kit can support several jobs:
First contact
Angle creation
Rotations
Resets
Teammate recovery
Defensive disruption
That makes her flexible.
A Bangalore who takes every fight first can waste a lot of what makes the Legend valuable.
Often, the better move is to create the opportunity and let a teammate capitalize.
Bangalore in a 3v3
In a standard three-versus-three fight, Bangalore can contribute without being the first player through every doorway.
She can:
deny an enemy angle
open a new entry
cover a reposition
create a temporary split
protect a reset
force movement with Rolling Thunder
The strongest Bangalore play often makes the fight easier for the other two players.
That’s one reason smoke placement is such an important skill.
Bangalore in a Third Party
Third parties create exactly the sort of messy battlefield Bangalore can exploit.
But don’t automatically smoke everything.
Choose the problem.
Need to hide a wounded teammate?
Smoke the line of fire.
Need to stop another squad from seeing the first team?
Smoke the connecting sightline.
Need to escape?
Smoke the route, then move.
Need to isolate one squad from another?
Use the smoke wall to cut visibility between them.
Bangalore is at her best when the chaos becomes more useful to your team than the enemy.
Bangalore in Open Terrain
Open ground is where Smoke Launcher can create huge value.
Long sightlines are dangerous.
Smoke temporarily removes them.
But smoke isn’t hard cover.
It doesn’t stop bullets forever.
Use:
Smoke → movement → hard cover
not:
Smoke → stand still
The second approach simply creates a delayed problem.
Bangalore in Buildings
Buildings create a different set of problems.
Smoke can interact with:
doors
windows
stairs
hallways
entries
Because Smoke Launcher can breach doors under the current Bangalore kit, it can help disrupt defensive setups as well as deny vision. (EA Help)
But indoor smoke can become dangerous quickly.
You have less space.
Enemy movement is harder to predict.
Your own squad can block itself.
And opponents can challenge the smoke at close range.
Don’t treat a tiny room filled with smoke as automatically favorable.
The “Smoke and Run” Habit
This is the beginner Bangalore sequence:
Get shot → Smoke → Run
Sometimes that’s exactly what you need.
But Bangalore offers more.
Try:
Get shot → Smoke → reposition → new angle → re-engage
or:
Get shot → Smoke → cover teammate → reset
or:
Get shot → Smoke enemy sightline → pressure while they can’t respond cleanly
The smoke should be the start of your next decision, not the end of the previous one.
Common Bangalore Mistakes
Smoking Your Own Winning Angle
You had the better sightline.
Then you erased it.
Don’t.
Using Both Smoke Charges Automatically
Two charges provide flexibility. Spending both without changing the fight can leave you with nothing when the next problem appears.
Smoking Without a Destination
Temporary visibility denial is only useful if it helps you reach or protect something.
Staying in Your Own Smoke Too Long
Smoke is a window, not a permanent base.
Treating Double Time Like Invulnerability
The passive gives you speed, not immunity.
Throwing Rolling Thunder Because It’s Ready
An ultimate should create a tactical problem for the enemy.
Fighting in Smoke Without Knowing Why
Reduced visibility affects everybody.
Following Old Bloodhound Advice
Bloodhound no longer has the old threat vision through smoke. (EA)
Ignoring the Current Upgrade Tree
Tactical Cooldown, Ultimate Cooldown+, and Refuge are not the current Bangalore upgrade choices.
Using Every Ability at Once
Smoke + Double Time + Rolling Thunder can create a huge window.
It can also become three wasted resources if there is no clear follow-up.
The Bangalore Five-Second Check
Before using an ability, ask:
What am I denying?
Where am I going?
Who benefits from this?
What happens after the smoke disappears?
What will the enemy be forced to do?
That’s enough.
You don’t need an enormous flowchart in your head while bullets are flying.
You need a few questions that become automatic.
A Practical Bangalore Fight
Imagine an enemy team is holding a building while your squad sits behind weak cover.
A panic Bangalore smokes the entire area and runs forward.
A better sequence looks like this:
1. Identify the defender’s strongest sightline.
2. Smoke that sightline instead of the entire battlefield.
3. Move into better cover while the vision is blocked.
4. Keep one useful angle open for your teammate.
5. Use Double Time if incoming fire triggers it and the speed helps you reach the new position.
6. Fight once you’ve reached real cover.
7. Save the remaining smoke charge for the next reset, reposition, or push.
The ability didn’t win the fight.
It changed where the fight could happen.
Your team still had to finish it.
How to Practice Bangalore
Bangalore is a good example of why ability practice shouldn’t be reduced to mechanical repetition.
Take one weakness into the Firing Range.
Smoke placement
Pick an imaginary enemy sightline.
Ask:
What am I denying?
Then place the smoke and move to the position you wanted.
Double Time
When the passive triggers, don’t simply sprint.
Pick a destination:
Cover
New angle
Teammate
Exit
Rolling Thunder
Choose an imaginary enemy position.
Instead of asking where you might hit someone, decide:
Where do I want them to go?
Then place the ultimate around that objective.
EA’s current Legend and gameplay documentation supports using Bangalore’s kit as a combination of movement, smoke control, and artillery pressure; the real skill is learning to turn those tools into decisions rather than firing them on cooldown.
The Bangalore Checklist
Before Smoke Launcher
What sightline am I removing?
Where are we moving?
Who benefits?
Do I still need visibility from this position?
Before using Double Time aggressively
Where am I going?
Is that destination actually safer?
Can I reach another useful angle?
Before Rolling Thunder
Where do I want the enemy to move?
What space am I denying?
Can my squad capitalize?
After the ability
Did the fight actually change?
If the answer is no, you may have spent the resource without creating an advantage.
Frequently Asked Questions
Is Bangalore good for beginners?
Yes. Her abilities are easy to understand, but mastering Smoke Launcher takes practice because poor smoke placement can hurt your own team as easily as it can disrupt the enemy.
What does Bangalore’s Smoke Launcher do?
It fires a canister that creates a smoke wall on impact. EA also says the canisters can break or breach doors.
How many Smoke Launcher charges does Bangalore have?
Bangalore currently has two Smoke Launcher charges. EA’s Showdown update retained two charges while reducing the tactical cooldown to 30 seconds.
How long is Bangalore’s Smoke Launcher cooldown?
The current documented cooldown is 30 seconds. Showdown reduced it from 35 seconds to 30 seconds.
Does Bangalore’s smoke deal direct damage?
No. EA removed Smoke Launcher’s direct damage in the Shadow Society update.
Can Bangalore’s smoke break doors?
Yes. EA’s current Legend guide says the smoke canisters can break or breach doors.
Can Bloodhound see through Bangalore’s smoke?
Not with the old threat-vision mechanic. EA removed Bloodhound’s threat vision through smoke and gas in the Double Take update.
Does Digital Threat still see through Bangalore’s smoke?
No. EA removed threat vision through smoke or gas from the 4x–10x Digital Threat scope in the same update.
What does Bangalore’s Double Time do?
Taking fire while sprinting temporarily makes Bangalore faster. EA later increased its speed by 5% in Showdown.
What does Rolling Thunder do?
It calls in an artillery strike that slowly creeps across the landscape. Its current documented cooldown is 210 seconds following the Showdown update.
What are Bangalore’s current Legend Upgrades?
At Level 2, the current options are Electric Smoke and Cover Me. At Level 3, they are ECM Payload and Medal of Honor. EA removed the older Ultimate Cooldown+ and Tactical Cooldown options and integrated Refuge into Cover Me during the Showdown rework.
Which Bangalore upgrade is best?
There isn’t one universal answer. Electric Smoke and ECM Payload add more utility against enemy deployables, while Cover Me and Medal of Honor lean more toward support, information, sustain, and teammate recovery. Choose according to the problems your squad is actually facing.
Should Bangalore smoke her own team?
Sometimes. Self-smoke can protect a revive, heal, retreat, or exposed crossing. The problem is using it without a clear purpose and deleting your own team’s most valuable sightline.
What is Bangalore’s biggest mistake?
Using Smoke Launcher as a panic button instead of a way to create a specific advantage.
Final Thoughts
Bangalore isn’t powerful because she makes the battlefield difficult to see.
She’s powerful because she can decide when visibility matters.
Double Time helps her escape and reposition when enemies apply pressure.
Smoke Launcher can deny sightlines, create movement windows, disrupt doors and defensive setups, and buy time for a reset. Its current tuning also makes it faster to deploy and more useful for breaching, while nearby ordnance and abilities can temporarily disable the smoke.
Rolling Thunder can reshape where an enemy team is willing to stand.
Her current Legend Upgrade tree then gives her additional ways to specialize those strengths, including stronger smoke/anti-deployable utility, better support around smoke, stronger ultimate utility, and faster teammate recovery.
Put it together and the pattern becomes simple:
Deny → Move → Pressure → Reset.
Take away the enemy’s best sightline.
Move while their information is limited.
Pressure them from the better position.
Then disappear before they regain control.
And keep the most important Bangalore rule in your head:
Smoke should change the fight, not just hide it.
Don’t smoke because you’re scared.
Don’t waste Double Time simply because it activated.
Don’t throw Rolling Thunder because the icon is glowing.
Use each ability to make the next few seconds better for your squad.
That’s what turns Bangalore from a smoke machine into a genuine fight-control Legend.
Related Apex Legends Guides
Apex Legends Combat Guide — Execute gunfights with better peeks, trades, pressure, angle changes, and resets.
EA’s current Legend Guide was checked for Bangalore’s current class, Double Time, Smoke Launcher, and Rolling Thunder descriptions. It also confirms that Bangalore’s Smoke Launcher can break or breach doors.
EA’s Showdown Patch Notes were checked for Bangalore’s most recent published ability tuning, including the 5% Double Time speed increase, 30-second Smoke Launcher cooldown, faster projectile and pull-out speed, door interaction, reactive smoke behavior, 210-second Rolling Thunder cooldown, and the current Legend Upgrade tree.
EA’s Double Take update was checked for the removal of Bloodhound threat vision through smoke/gas, removal of Digital Threat smoke/gas vision, and the addition of white highlights for players fighting inside Bangalore smoke.
EA’s current Marked documentation and September 14, 2026 Midseason Patch Notes were checked for later Bangalore changes. The September midseason notes list other Legend balance changes but no Bangalore adjustment, so the Showdown tuning remains the relevant Bangalore-specific baseline for this review.
Editorial note: Current mechanical information in this guide is based on EA documentation. The Deny → Move → Pressure → Reset framework, smoke-placement rules, examples, and tactical recommendations are Loot Strategist editorial analysis intended to help players apply Bangalore’s kit in actual matches.
Update policy: Apex Legends is a live-service game. Recheck Bangalore’s ability values and Legend Upgrade choices after future Legend-system, Smoke Launcher, or Rolling Thunder changes. Avoid carrying old Bloodhound/Digital Threat smoke-vision advice into future revisions unless EA restores those mechanics.
Winning gunfights in Apex Legends isn’t simply about who lands the most bullets.
The player who wins is often the one who exposes less of their body, takes the cleaner peek, recognizes when the exchange has changed, and knows when to disappear before the enemy gets the chance to answer.
That’s what makes Apex combat difficult.
You need to deal damage, but dealing damage requires exposure. You need to stay aggressive, but aggression creates risk. You need to pressure a weakened enemy without turning a good position into a bad chase.
EA’s current guidance recommends keeping your crosshair where enemies are likely to appear, predicting their movement, practicing hip-fire for fast close-range combat, and using the Firing Range to work on weaker shots. EA also recommends keeping grenades available because they can force enemies out of cover or buy time to reposition. (EA Help)
This guide focuses on what happens once the gunfight is already underway.
Your broader Fight Guide covers whether an engagement is worth taking. Your Positioning Guide covers how to choose and use a position. Your Aim Guide covers the mechanics of improving your aim.
This guide connects those pieces.
It is about how to execute the gunfight.
Loot Strategist combat rule: Show less. Deal more. Reset before the enemy does.
What Actually Wins a Gunfight in Apex Legends?
A gunfight is a series of exposure windows.
You expose yourself to deal damage.
You disappear to avoid damage.
You change your angle to make the next exposure more favorable.
You repeat that process until somebody loses the fight.
That means good combat is built around:
Information
Cover
Exposure
Damage
Timing
Reset
You won’t always control all six.
You can, however, improve the quality of the decisions you make with them.
Excellent aim doesn’t save you when you’re standing in the open.
Perfect cover doesn’t save you if you keep showing the same angle to an enemy who is waiting for you.
The goal is to make every time you become vulnerable worth the risk.
The Gunfight Framework
When contact begins, think through five steps:
1. Cover
Know what will stop the enemy’s next burst.
2. Peek
Expose yourself with a specific purpose.
3. Pressure
Use damage, angles, or timing to make the opponent uncomfortable.
4. Convert
Turn a meaningful advantage into damage, space, a knock, or a forced retreat.
5. Reset
Get out of the enemy’s firing window before the exchange turns against you.
This isn’t a checklist you need to recite during every firefight.
With practice, it becomes a rhythm.
Cover Is Part of Your Weapon
Your gun isn’t the only tool that wins gunfights.
Good cover lets you:
Break line of sight
Protect yourself while reloading
Create repeatable peeks
Buy time to heal
Move to another angle
Allow teammates to trade
EA’s beginner guidance also emphasizes staying close to your squad and using movement intelligently, which reinforces a basic combat rule: don’t create a fight you can’t support or escape. (EA Help)
But “I’m behind cover” isn’t enough.
A piece of cover can protect you from one angle while leaving you exposed to another.
It can also trap you.
The better question is:
Can I fight from this cover and still get out?
That question matters far more than whether the object technically blocks bullets.
Fight Close to Your Reset Point
One of the simplest improvements you can make is staying close to the part of your cover that actually protects you.
If you are several steps away from safety, every bad exchange takes longer to recover from.
Working close to cover gives you a much shorter path between:
firing
and
disappearing
That doesn’t mean standing motionless beside a rock.
You still need enough room to move.
The point is to reduce unnecessary exposure.
What Is a Good Peek?
A peek is a controlled exposure from cover to gather information, deal damage, or force a response.
The best peeks have a job.
You might peek to:
Check where an enemy is
Deal a burst of damage
Force someone off an angle
See whether another squad has arrived
Create an opening for your teammate
A bad peek usually happens because you feel obligated to keep shooting.
There is no tactical purpose.
You’re simply visible.
And every second you’re visible is another second the enemy gets to shoot back.
Three Useful Peeking Patterns
There is no universal “best peek.”
The right one depends on the enemy’s position and how much risk you’re willing to take.
Short Peek
Expose only what you need.
Fire or gather information, then return to cover.
This is useful when:
The enemy is holding your angle
You want information
You only need a short burst
You don’t want to commit
Wide Swing
Move farther beyond your original cover edge and attack from a larger angle.
A wide swing can work when the enemy is heavily pre-aiming the position you’ve already shown.
It is riskier because you’re exposing more of yourself.
Use it when the change in angle is worth the additional exposure.
Reposition Peek
Disappear, move around your cover, and reappear from somewhere the enemy wasn’t expecting.
This is particularly effective after you’ve shown the same angle several times.
The point isn’t movement for its own sake.
It’s breaking the opponent’s prediction.
Never Give the Enemy the Same Peek for Free
This is one of the easiest habits to fix.
Peek left.
Shoot.
Hide.
Peek left.
Shoot.
Hide.
The opponent now knows:
where you’ll appear
when you’ll appear
roughly how far you’ll swing
You’ve made their job easier.
Change the pattern.
Delay the next peek.
Change sides.
Take a different angle.
Let your teammate show themselves.
Wide swing after several short peeks.
Or don’t peek at all.
A good opponent should have to keep guessing.
Don’t solve the puzzle for them.
Don’t Peek Because You Want to Shoot
Sometimes the correct combat decision is doing nothing.
You have line of sight.
The enemy is visible.
You could shoot.
That doesn’t mean you should.
Maybe your teammate is moving into a stronger position.
Maybe the opponent has a better angle.
Maybe they’re waiting for you to repeek.
Maybe another squad just entered the area.
Information and timing can be worth more than another 20 damage.
Every exposure should accomplish something.
Crosshair Placement Happens Before the Peek
Your Aim Guide already covers crosshair placement in detail, so this is the combat version.
Don’t step into the open and then begin searching for the enemy.
Have your crosshair roughly where the target is likely to appear.
EA’s current guidance specifically recommends keeping your crosshair where enemies might appear and predicting their movement before they move. (EA Help)
That changes:
Peek → Find target → Aim → Shoot
into:
Peek → Shoot
The second sequence is faster because less of your exposure window is spent searching.
Pre-Aim the Most Likely Threat
Before moving around cover, ask:
Where is the enemy most likely to be?
Then prepare for that angle.
If they’re holding the left side of a doorway, don’t expose your whole body while looking somewhere else.
If they’re likely to swing around a rock, have your crosshair ready for that swing.
Players sometimes appear to have unbelievably fast aim when the real difference is simpler:
They were already looking where the enemy appeared.
Damage Is Not the Same as Advantage
Landing damage is useful.
But damage only matters because of what it changes.
Suppose you deal 80 damage and take 100.
You didn’t win that exchange.
Now suppose you deal 60 damage and force the enemy behind cover while your teammate gains an angle.
That’s different.
The useful question after a burst is:
What changed?
Did the enemy:
stop shooting?
give up an angle?
move away from a teammate?
lose access to strong cover?
give your teammate a better opening?
become vulnerable to a second angle?
If nothing meaningful changed, more damage isn’t necessarily the answer.
What to Do After You Gain the Advantage
The fight state changed.
Your next decision should change with it.
Before the advantage, you may be:
trading
gathering information
protecting your cover
waiting for a mistake
After the advantage, you can look for:
a second angle
controlled pressure
a teammate swing
space
an isolated target
You don’t need to sprint forward.
You need to convert the advantage into something useful.
A Crack Is an Opportunity, Not an Order
Cracking an enemy feels like a green light.
It isn’t always one.
Before exposing yourself again, consider:
Where is the target?
Where are their teammates?
Where are you?
Can your teammate follow?
What happens if the target reaches cover?
What happens if another squad arrives?
A damaged enemy is easier to finish.
They’re also often more defensive.
That’s why your next move can be a reposition rather than an immediate push.
Your Fight Guide covers the larger question of whether to continue an engagement. Here, the combat lesson is narrower:
Once you deal meaningful damage, change the way you fight the next exchange.
The Peek-and-Reset Cycle
Strong gunfighters don’t remain exposed throughout the entire exchange.
They cycle:
Peek
→
Damage
→
Cover
→
Reload
→
Reposition
→
Peek again
That rhythm keeps the enemy from enjoying a clean, uninterrupted window.
It also gives you a chance to reassess the fight instead of automatically repeating the last action.
A useful rule:
If being exposed is no longer producing value, stop being exposed.
Reload Behind Cover
This should become automatic.
When a magazine ends, and safe cover is one step away, use it.
Break line of sight.
Reload.
Come back.
The enemy doesn’t need to know when you’re reloading.
There are exceptions, of course. A target may be one bullet from death, or your pressure may be preventing a push.
But even then, know where you can disappear.
A reload is a small moment of vulnerability.
Treat it that way.
Healing Is Part of Combat
Healing isn’t something that only happens after the fight.
It’s part of the fight whenever you’ve created enough time to do it.
A strong reset looks like:
Break line of sight
Create space
Heal
Reload
Reassess
A weak reset is:
Hide behind a tiny object
Start a Battery
Get pushed
Cancel the heal
Die
The healing item wasn’t the problem.
You didn’t create enough time to use it.
The “One More Peek” Trap
This is one of the most common ways players throw a fight.
You’ve already:
lost the health trade
shown the same angle
failed to create a new advantage
Then you peek again because the enemy feels close to dying.
That final peek is often the one that gets you killed.
You don’t need to win every exchange immediately.
Sometimes the enemy survives.
That’s fine.
Disappear.
Recover.
Find another angle.
Fight them again when the circumstances are better.
Use Angles to Make Cover Worse
You don’t always need better aim.
Sometimes you need a better line of sight.
Imagine an enemy hiding behind a rock.
From your current angle, only their head is visible.
Move sideways.
Now more of their body is exposed.
The enemy didn’t become easier to kill.
Your angle improved.
When you’re struggling to damage someone behind cover, ask:
“Am I fighting the player, or am I fighting their cover?”
If you’re fighting the cover, change the angle.
Don’t Stand in Your Teammate’s Firing Lane
Two players can be close without standing on top of each other.
If both teammates use exactly the same angle, the enemy gets one simple target.
A better setup lets each player threaten from a different line while remaining close enough to trade.
You don’t need a giant flank.
Sometimes moving two meters to the side completely changes the fight.
This is one of the simplest ways to make your teammate’s damage more valuable without requiring better aim.
The Trade Is More Important Than the Highlight
You don’t have to win every duel yourself.
Suppose your teammate gets cracked.
You take the enemy’s angle.
They turn toward you.
Your teammate gets behind cover and heals.
You’ve accomplished something important without getting a knock.
You bought time.
Team fighting is about more than individual damage totals.
Sometimes the most valuable combat action is forcing the enemy to look somewhere else.
Your dedicated Team Fighting Guide goes deeper into focus fire, crossfires, isolation, and synchronized pushes. Here, remember the practical rule:
Be close enough to help, but don’t make yourself the easiest shared target.
Fight Around an Exit
Aggression is much safer when you know where you’re going next.
Before committing to an exposed angle, know:
Where is my next piece of cover?
Where can I heal?
Where is my teammate?
What happens if another squad appears?
This doesn’t mean playing passively.
It means keeping an escape option available.
A strong aggressive position has a way out.
A weak aggressive position only has a way forward.
Close-Range Gunfights
Close-range combat compresses every decision.
You have less time to:
Aim
Reload
Move
React
EA specifically recommends practicing hip-fire for fast close-range combat. (EA Help)
Don’t turn every close-range exchange into a stationary ADS duel.
Use:
Cover edges
Short movement bursts
Hip-fire when appropriate
Weapon switching when necessary
Immediate access to your next piece of cover
The closer the enemy gets, the more important the decision made before the fight becomes.
Mid-Range Gunfights
Mid-range fights reward disciplined peeking.
You’re close enough to apply sustained pressure, but far enough away that cover and angles can dominate the exchange.
Avoid predictable repeeks.
A useful sequence is:
Peek
Damage
Hide
Change the angle
Reappear
Now the enemy has to solve a new problem instead of waiting for the same target to return.
Long-Range Gunfights
Long-range combat is often more about information and pressure than immediate elimination.
Ask:
Can this damage accomplish something?
Can I maintain my position?
Will I reveal my squad?
Do I have enough ammunition?
Can the enemy simply retreat?
A long-range exchange can be successful even without a knock.
You might force an enemy away from:
high ground
cover
a rotation path
a healing position
That’s pressure.
Use it when it helps the larger fight.
Doorways and Corners: The Execution Rule
Doorways are useful because they give you a narrow exposure point.
They’re also dangerous because opponents know exactly where you’re likely to appear.
Instead of thinking about doorway combat as a positioning problem, think about exposure timing.
Don’t:
Stand in the center of the doorway
Repeatedly expose the same angle
Reload in the opening
Do:
Peek the edge
Fire
Return to cover
Change your timing or angle
Make the defender guess
The same principle applies to rocks, windows, walls, and other predictable geometry.
Grenades Can Change the Gunfight
A grenade isn’t useful merely because it deals damage.
It can change the enemy’s available options.
EA specifically notes that grenades can force enemies out of cover, deal damage from range, or buy time when retreating or gaining high ground. (EA Help)
Use them to:
Break a defensive hold
Force movement
Prevent a retreat
Buy time
Create an opening
Then follow up on the change.
A grenade that forces someone into the open is valuable because of what you do afterward.
Use Damage to Shrink the Enemy’s Options
This is one of the best ways to understand pressure.
A damaged enemy often has fewer good choices.
Maybe they have to:
heal
leave the angle
move behind a different piece of cover
stay with their teammate
give up high ground
That means your goal isn’t always “deal maximum damage.”
Sometimes it’s:
Make every available choice worse for the enemy.
That is how small advantages turn into winning fights.
When You’ve Been Cracked
Getting cracked doesn’t mean the fight is over.
The first priority is to stop the incoming damage.
Break line of sight.
Get behind meaningful cover.
Don’t immediately peek again because you think the opponent might be weak too.
Once you’ve created space:
Heal
Reload
Check your teammate
Locate the enemy
Decide what changed
A fight can swing because one player survives the two seconds that looked hopeless.
When Your Teammate Gets Cracked
Your teammate taking heavy damage often changes the enemy’s focus.
Use that.
You can:
Take a supporting angle
Apply enough pressure to stop the push
Force the enemy into cover
Buy your teammate time to heal
Don’t automatically launch a counter-push.
Sometimes the winning move is simply making the enemy stop shooting long enough for your teammate to recover.
What to Do After You Crack an Enemy
The response depends on what else changed.
Crack + isolated target
Increase pressure.
Crack + strong cover
Hold the angle or create a new one.
Crack + nearby teammates
Coordinate before exposing yourself again.
Crack + weak squad
Protect your position.
Crack + third party approaching
Convert quickly only when the fight remains safe; otherwise prepare for the new threat.
The crack gives you information.
Your next action should use that information.
You Can Win a Gunfight Without a Knock
This is particularly important for newer players.
Suppose you force an enemy away from:
high ground
a doorway
a healing position
a strong head-glitch-like angle
or
the route your squad needs
and your team takes that space.
You achieved something meaningful without eliminating the opponent.
Kills are valuable.
But space is also a combat resource.
A good exchange can leave the enemy alive but in a much worse position.
That’s still a win.
The 5-Second Combat Check
When the fight gets chaotic, ask:
Where is my cover?
Where is the enemy’s cover?
Who has the health advantage?
Who has the angle advantage?
What changes if I move?
That’s enough.
You don’t need twenty rules running through your head while bullets are flying.
Five useful questions are better than twenty half-remembered tips.
A Practical Gunfight Example
Imagine you’re fighting an enemy behind a rock.
Your first peek deals significant damage.
You immediately return to cover.
Instead of repeeking the same side, your teammate shifts slightly.
The enemy expects your original angle.
You appear from somewhere else.
They take more damage and retreat.
Your squad now controls more space.
Notice what happened.
You didn’t suddenly become more accurate.
The fight improved because you changed the exposure pattern.
That’s the skill this guide is really trying to teach.
How to Practice Combat
Don’t go into the Firing Range and mindlessly shoot targets for twenty minutes.
Give yourself one combat problem.
For example:
I lose every peek.
Practice exposing yourself, firing, returning to cover, and changing sides.
I die after cracking enemies.
Practice damage → cover → reposition instead of immediately chasing.
I get killed while reloading.
Practice ending every magazine near cover.
I keep standing in my teammate’s angle.
Practice creating two useful lines of fire while remaining close enough to trade.
EA’s current guidance recommends the Firing Range for weak areas and specifically mentions tracking, flicking, recoil, movement, hip-fire, and other aim practice. (EA Help)
The important part is to practice the decision around the shot, not only the shot itself.
Build a Combat Improvement Loop
After a match, don’t ask:
“Why did I lose?”
That question is too broad.
Ask:
“What was the last combat decision that put me somewhere I couldn’t recover?”
Maybe it was:
Repeating a known peek
Staying exposed during a reload
Chasing damage without a safe angle
Ignoring your exit
Taking the same angle repeatedly
Refusing to reset
Standing directly behind your teammate
Now you have something specific to fix.
Take that problem into your next session.
That is how combat practice becomes measurable rather than random.
The Combat Checklist
Before exposing yourself:
Do I have cover?
Where is the enemy?
What am I trying to accomplish?
Where do I go if the exchange turns bad?
During the exchange:
Am I gaining anything from being exposed?
Did the fight state change?
Should I change my angle?
Can my teammate capitalize?
After taking damage:
Can I break line of sight?
Can I reset?
Am I about to repeat the same mistake?
That’s enough to build good habits.
Final Thoughts
Winning Apex gunfights isn’t about staying exposed longer than the enemy.
It’s about making your exposure more valuable.
Use cover.
Peek with a purpose.
Keep your crosshair ready.
Don’t give the enemy the same angle repeatedly.
Turn damage into pressure.
Turn pressure into space.
Then reset before the enemy gets the chance to reverse the exchange.
The biggest change is mental.
Stop asking:
“Can I hit this player?”
Start asking:
“What does this peek accomplish?”
That question changes the way you fight.
You stop chasing every crack.
You stop taking the same repeek.
You stop standing in the open because you have a good shot.
And you start treating each gunfight as a sequence of exposure windows and decisions.
Show less. Deal more. Reset before the enemy does.
That’s the combat habit worth taking into your next match.
EA’s current Best Settings for Apex Legends on PC guide was checked for crosshair placement, predicting enemy movement, hip-fire practice, Firing Range training, and current performance/aim guidance. (EA Help)
EA’s current How to Play Apex Legends guide was checked for beginner combat fundamentals, squad proximity, movement, and grenade use. (EA Help)
EA’s current Apex Legends Terms Guide was checked for official gameplay terminology. (EA Help)
EA continues to update Apex Legends throughout 2026, including changes to maps, loot, weapons, and other gameplay systems. Because this guide deliberately avoids temporary weapon-meta recommendations, its core combat framework is designed to remain useful through those changes. (EA)
Editorial note: Mechanical and terminology references are based on EA’s official documentation. The Cover → Peek → Pressure → Convert → Reset framework, exposure-window concept, combat examples, diagnostic questions, and tactical recommendations are Loot Strategist editorial analysis intended to help players apply those mechanics in actual matches.
Update policy: Review this guide after major changes to movement, weapons, abilities, shields, or combat systems. Avoid adding temporary weapon-meta advice unless the page is deliberately being converted from an evergreen guide into a seasonal article.
Apex Legends Positioning Guide: Cover, Height, Angles & Playable Space
Winning a fight in Apex Legends often starts before anyone fires a shot.
Two players can have similar weapons, armor, and aim, yet one can have a major advantage because they are fighting from cover, holding a better angle, controlling useful space, or keeping an escape route available.
That’s positioning.
It is more than finding the highest roof or crouching behind the nearest rock. Good positioning gives you more useful choices while forcing the enemy to make harder ones.
You can peek without exposing yourself for long. You can change angles. You can heal safely. You can support a teammate. You can retreat without crossing an open field.
A weak position takes those options away.
This Apex Legends positioning guide explains how to evaluate cover, height, angles, space, and playable zones so you can make better positioning decisions in almost any fight.
The Positioning Framework
When you reach a new piece of terrain, run five questions through your head:
Cover
What protects me from incoming fire?
Threat
What can I attack from here, and who can attack me?
Options
How many useful choices do I have if the enemy moves?
Support
Can my teammates help me quickly?
Exit
Where do I go if this position stops being good?
Cover → Threat → Options → Support → Exit
A position does not have to score perfectly in every category.
A rooftop with excellent sightlines but weak cover can still be useful for a short peek.
A building with strong cover but only one exit can be excellent until the enemy controls that exit.
The point is to recognize what you’re gaining and what you’re giving up.
1. Cover Comes First
Height and angles can help you win a fight.
Cover helps you survive long enough to use them.
EA’s current beginner guidance encourages players to stay with their squad and use movement and terrain intelligently; its grenade guidance also specifically identifies forcing enemies out of cover and buying time to retreat or gain high ground as useful tactical purposes. (EA Help)
For positioning, the most useful cover generally does more than block bullets.
Good cover lets you:
peek,
break line of sight,
heal,
reload,
change sides,
and move toward another piece of terrain.
A huge object with no escape can be worse than a smaller piece of cover connected to a better route.
Think of cover as a platform for decisions, not merely protection.
2. Work the Edge of Your Cover
Standing directly in front of cover wastes part of its value.
Instead, use the edges.
Peek.
Take the shot.
Break line of sight.
Change the angle.
Return when you have another opportunity.
This forces the enemy to expose themselves while allowing you to limit your own exposure.
It also makes your position harder to predict.
The goal is not to hide permanently.
The goal is to control how much of the fight you have to expose yourself to.
3. One Piece of Cover Is Fine. A Chain Is Better.
Look beyond the object immediately in front of you.
Imagine:
Rock → wall → building
If the first piece becomes unsafe, you already have another option.
Now imagine:
One rock → open ground → cliff
The rock may be excellent for the first few seconds, but once the enemy takes another angle, your choices disappear.
This is why strong positioning often involves a cover chain.
You don’t need hard cover every meter.
You need enough connected terrain that one bad exchange doesn’t leave you stranded.
4. High Ground Is Only Valuable When You Can Play It
High ground gives you visibility and often better attack angles.
But elevation by itself is not a strategy.
A rooftop with no cover can leave you exposed from several directions.
A hilltop with one escape route can become a trap.
A tower can provide a perfect view while offering a terrible place to heal.
So instead of asking:
“Is this higher?”
ask:
“What does this height actually give me?”
Useful high ground usually offers some combination of:
Cover
Sightlines
Room to move
Support
A safe way down
A useful next position
High ground is an advantage when it improves your options.
It is a liability when it removes them.
5. The Difference Between Good Height and Bait Height
Before committing to elevated terrain, check five things:
Can you fight from it?
Does the terrain actually provide usable angles?
Can you survive from it?
Is there enough cover to withstand pressure?
Can your squad support you?
Are teammates close enough to trade?
Can you leave?
What happens when the enemy pushes?
Is it still playable when the Ring changes?
A position can be excellent for the next 20 seconds and terrible afterward.
That doesn’t necessarily make it bad.
It means you should treat it as temporary high ground, not a permanent home.
6. Create Angles Instead of Simply Moving Closer
One of the easiest positioning mistakes is assuming that closing the distance automatically improves your fight.
It doesn’t.
Sometimes the best move is sideways.
An enemy behind cover may be difficult to damage from the front.
Move around that cover, and the geometry changes.
Suddenly they have to decide whether to expose themselves to you or move into another angle.
This is why small lateral movements can be more valuable than simply walking forward.
A better angle can create more pressure without requiring more risk.
7. Stop Repeating the Same Peek
Once you fire from the same position, the enemy has information.
If you peek the exact same side again, you’re making their job easier.
After a meaningful exchange, consider:
A different side of the cover
A wider angle
A slightly different elevation
A nearby piece of terrain
A teammate’s angle
You don’t need a spectacular flank.
Sometimes shifting a few meters is enough to change the fight.
The objective is to keep your position from becoming predictable.
8. Use Space as a Resource
Space is not just the ground between you and the enemy.
It determines:
Where you can move.
Where the enemy can move.
How quickly teammates can help.
Where you can heal.
Which angles are available.
That makes space something you can gain, lose, and control.
Push an enemy away from a rock, and you gain the area around it.
Take the other side of a building and you control another route.
Occupy the center of a useful area and you may force the opponent toward predictable exits.
This is why positioning is really about usable space, not just personal safety.
9. A Playable Zone Is More Than Being Inside the Ring
Being inside the Ring does not automatically mean you’re well positioned.
EA’s terminology describes a “good spot” as a strong position in the Ring, including areas with substantial cover.
For practical positioning, think of a playable zone as an area where you can:
fight,
heal,
reposition,
receive support,
and move again when the situation changes.
Compare:
Inside the Ring + exposed + one exit
with:
Inside the Ring + cover + multiple routes + room to fight
Both are technically playable.
Only one gives you much freedom.
The second is the position you should prefer.
10. A Strong Position Gives You a Next Position
A position should not be evaluated in isolation.
When you take cover, look beyond it.
Where is your next piece of protection?
When you take a building, where is the second exit?
When you climb high ground, how do you get down safely?
When you win an angle, where will the enemy move?
Think:
Position → Next Position → Exit
This prevents one of the most common positioning mistakes: taking a strong first position that leaves you with nowhere to go afterward.
11. Never Let Cover Become a Prison
Cover can create a false sense of safety.
A building with one entrance can become a trap.
A rock beside a cliff can eliminate your retreat.
A corner can protect you from one direction while exposing you to another.
Before committing, identify at least one fallback.
The best positions give you another answer when the enemy changes the question.
That might mean another doorway, another rock, another elevation change, or simply enough room to move around your current cover.
12. Position Yourself So You Can Be Supported
This is where individual positioning meets squad play.
You do not have to stand beside your teammates.
You do have to remain supportable.
Ask:
If an enemy pushes me right now, can one of my teammates help before I’m knocked?
If yes, the position is probably workable.
If no, a brilliant angle may simply be a lonely one.
EA’s current beginner guidance specifically recommends sticking close to your squad so teammates can help when you’re attacked. (EA Help)
A flank that forces the enemy to split their attention can be excellent.
A flank that takes you 40 meters away from your squad for a slightly better angle usually isn’t.
14. Make the Enemy’s Cover Worse
Positioning isn’t only defensive.
You can use your position to reduce the value of theirs.
Suppose an enemy is safely behind a rock.
You don’t need to walk directly toward the rock.
You can:
Take the side angle.
Control the retreat.
Take better elevation.
Use ordnance to force movement.
Move into space that makes their cover less useful.
EA specifically identifies grenades as a way to get enemies out of cover and buy time for a retreat or a high-ground play. (EA Help)
The objective isn’t always to shoot someone immediately.
Sometimes the better play is to make their current position stop working.
15. Reposition Between Exchanges
You do not need a dramatic movement every time you fire.
Small changes are often enough.
After an exchange, consider moving:
To the other side of your cover.
Behind a second piece of terrain.
To a slightly wider angle.
Closer to your team’s support.
Toward a better escape route.
Repeatedly appearing in exactly the same location gives your opponent useful information.
Small repositioning removes that predictability while preserving the strength of your original position.
16. Position Around Buildings
Buildings can be excellent defensive terrain because they provide cover, multiple rooms, elevation changes, and different angles.
They can also create predictable entrances.
Before holding one, identify:
Primary entrance
Secondary exit
Vertical access
Windows or exterior angles
Nearby fallback terrain
Don’t treat the building as a box.
Treat it as a network of positions.
The strongest player inside may not be the person holding the doorway.
It may be the player who controls the space the enemy needs to cross to reach the doorway.
17. Positioning in Open Terrain
Open ground is dangerous because your movement and exposure are easier to read.
When caught outside, look for the nearest useful terrain:
Rock
Wall
Building
Slope
Dip
Elevation change
Don’t stand in the open searching for the perfect fight.
Reach the best available piece of terrain first.
Then reassess.
And when moving between cover, your Apex Legends Movement Guide is the better resource for the mechanics themselves. This guide’s concern is the choice of destination, not how to perform the movement.
18. Small Geometry Can Win Big Fights
Not every positioning advantage comes from obvious high ground.
A small ridge can hide part of your body.
A shallow slope can change which angle an enemy has.
A box can block one firing line.
A doorway can restrict movement.
A corner can let you expose less of yourself while still attacking.
Players often overlook these details because they don’t look strategically important.
But combat is built from geometry.
The question is always:
How much of me can the enemy see, and how much of them can I see?
That’s the real value of small terrain advantages.
19. Heal Where You Can React
Healing is also a positioning decision.
The nearest piece of cover isn’t necessarily the safest.
Before starting a heal, consider:
Can the enemy see the cover?
Can they swing around it?
Can they throw ordnance onto it?
Can I move if they push?
Can my teammate cover the approach?
A good healing position gives you enough time to restore your resources without trapping you when the enemy changes direction.
You’re not simply looking for a place where bullets can’t currently reach you.
You’re looking for a place where you can react when they do.
20. Know When to Abandon a Good Position
Positioning is temporary.
The Ring changes.
The enemy gains an angle.
A teammate gets forced away.
A third squad arrives.
Your cover becomes compromised.
A position that was excellent five seconds ago may now be poor.
Ask:
Does this position still give me more useful options than the enemy?
If not, leave it.
Don’t defend a position just because you spent time taking it.
Good positioning means knowing when a position has stopped being good.
21. Endgame Positioning: Space Gets More Valuable
Late in a match, available space becomes more limited.
That increases the value of:
Cover
Exit routes
Useful height
Information
Support
A position that is merely comfortable early in a match may be extremely valuable late because fewer safe areas remain.
But the same rule still applies:
Don’t chase a position simply because it is technically inside the Ring.
Look for the area that allows you to survive the current pressure and still make the next move.
22. Don’t Let the Center of the Ring Decide for You
Central positioning can be strong.
It can also make you visible to teams arriving from multiple directions.
A slightly offset position with strong cover and several exits may be much more useful.
This is why distance to the center isn’t enough.
Evaluate:
Cover
Threat
Options
Support
Exit
The same five-part framework works whether you’re in an early-game POI or the final playable area.
23. A Practical Positioning Test
When two locations look equally attractive, compare them directly.
Position A
Good height.
Weak cover.
One exit.
Poor teammate support.
Position B
Lower ground.
Strong cover.
Two exits.
Better angle.
Easy teammate support.
Position B may be the better choice even though it looks less impressive.
That’s the point of the framework.
You’re not choosing the location that looks strongest.
You’re choosing the one that behaves strongest when the fight changes.
Common Apex Legends Positioning Mistakes
Standing in the open because you have the better weapon
Weapons don’t replace cover.
Taking high ground just because it is high
Elevation without useful cover or an exit can become a trap.
Repeating the same peek
The enemy gets free information about your position.
Flanking farther than your team can support
Your angle may be good while your timing is terrible.
Treating the Ring as the destination
Inside the zone does not automatically mean playable.
Staying behind cover that only protects one side
You can still be exposed to the rest of the enemy squad.
Fighting from a dead end
A strong first exchange doesn’t matter if your next move is impossible.
Refusing to abandon a once-good position
Good positions have expiration dates.
Moving for a better angle without checking the route
The path to an angle may be more dangerous than the angle itself.
Standing directly beside teammates
You reduce your squad’s ability to create useful angles.
Standing too far away
You turn yourself into an isolated target.
How to Practice Better Positioning
You don’t need a special positioning drill.
Instead, review where you were standing when you lost a fight.
Ask:
What protected me?
What could see me?
Where could I retreat?
Could my teammate help?
What angle did the enemy have?
Was there a nearby position that gave me more options?
Then identify one recurring problem.
Maybe you always fight from exposed ground.
Maybe you take aggressive angles that your teammates cannot support.
Maybe you hold high ground without checking the escape route.
Maybe you stay in one position too long.
Fix one problem at a time.
That is more useful than trying to memorize dozens of positioning rules.
The Apex Legends Positioning Checklist
Before taking a position, ask:
What is my cover?
What can I threaten from here?
How many useful options do I have?
Can my squad support me?
Where do I go if this position fails?
Then look one step farther:
What is my next position?
That’s it.
You don’t need a complicated formula once the concepts become familiar.
Positioning by Situation
Holding a building
Use the building as a network of angles rather than standing on one doorway.
Holding high ground
Prioritize cover and an escape route over elevation alone.
Fighting around a rock
Work the sides and look for a second piece of cover.
Crossing open ground
Move toward the nearest connected playable terrain.
Taking a flank
Make sure your team can support the angle.
Healing
Choose cover that still lets you react to a push.
Endgame
Prioritize playable space, exits, and support rather than simply chasing the center.
Final Thoughts
Good positioning doesn’t make you impossible to kill.
It changes the terms of the fight.
You have more cover.
More useful angles.
More room to move.
More opportunities to support your squad.
More ways to disengage.
And, most importantly, more choices.
That’s why the strongest position isn’t always the highest building or the exact center of the Ring.
It’s the location that gives you useful answers when the enemy changes the situation.
Use:
Cover → Threat → Options → Support → Exit
Then keep looking one step ahead.
Where do you move if the enemy pushes?
Where do you heal?
Where does your teammate help?
Where does the enemy have to expose themselves?
Where do you go when the Ring changes?
Apex Legends gives you better odds when you stop treating positioning as a place to stand and start treating it as a resource you manage.
The enemy doesn’t need to be out-aimed if they are forced into worse choices.
And when your position consistently gives you more options than theirs, you’ve already made the fight easier before the first shot lands.
Frequently Asked Questions
What is positioning in Apex Legends?
Positioning is where you place yourself relative to enemies, teammates, cover, terrain, the Ring, and available escape routes. Good positioning gives you useful attack and defensive options while limiting the enemy’s choices.
Is high ground always better in Apex Legends?
No. High ground is valuable when it provides useful sightlines while maintaining cover, support, mobility, and an escape route. Height without those advantages can be surprisingly weak.
What is the most important part of positioning?
Cover is usually the first consideration because it determines how safely you can take damage, heal, peek, and reposition. From there, look at threat, available options, teammate support, and your exit.
How do I create better angles?
Use the edges of cover and make small lateral adjustments rather than repeatedly peeking from the same location. A modest change in angle can make the enemy’s cover much less effective.
Should I flank by myself?
Only when the angle is still supportable and the risk is justified. A flank that puts you too far from your teammates can turn a strong angle into an isolated fight.
What makes a position playable?
A playable position gives you enough cover and space to fight, heal, reposition, receive teammate support, and retreat when circumstances change. Being inside the Ring alone doesn’t make a location strategically strong.
When should I leave a good position?
Leave when it stops giving you useful options—for example, when the Ring forces you out, an enemy gains a stronger angle, your cover becomes compromised, or your retreat route disappears.
How do I improve my positioning?
After each bad fight, analyze your location instead of only your aim. Ask what protected you, what could see you, where you could retreat, and whether you had another nearby position that offered better options.
How does positioning differ from rotation?
Positioning is primarily about where you stand and how you use the terrain around you. Rotation is about moving from one area to another and choosing the route and destination. Your Apex Legends Rotation Guide covers the macro side.
How does positioning differ from movement?
Movement is how your character physically traverses the game world. Positioning is the decision about where you should be and why. Your Apex Legends Movement Guide covers movement mechanics separately.
Sources & Updates
Last reviewed: September 2026
EA’s current How to Play Apex Legends guidance was used for durable gameplay references involving staying with your squad, movement, grenades, cover, and using utility to create or escape from positions. (EA Help)
EA’s terminology documentation was checked for the concept of a good spot in the Ring and related gameplay language.
EA’s current Apex news and update documentation confirms that the game remains actively updated during Season 30: Marked, with balance and gameplay changes continuing through September 2026. This guide intentionally avoids temporary weapon rankings, Legend-tier claims, or map-specific positions that could quickly become obsolete. (EA)
The practical framework in this guide—Cover → Threat → Options → Support → Exit—is Loot Strategist editorial analysis designed to help readers evaluate positions rather than memorize fixed locations.
Apex Legends is a team game, but three players fighting in the same area are not automatically fighting as a team.
Coordinated fighting is about making three sets of actions serve one objective. One player creates pressure. Another takes a useful angle. A third controls an escape route or prepares the next move. When the timing is right, the squad collapses on the advantage before the enemy can recover.
That is very different from three players independently taking aim at whichever enemy happens to be in front of them.
Our existing Apex Legends Fight Guide covers the bigger question of whether to engage, push, reset, or disengage. This guide starts one step later:
Once your squad has decided to fight, how do you make all three players more effective together?
The simplest framework is:
Focus → Space → Sync → Collapse → Reset
That is the foundation for everything that follows.
The Team-Fight Framework
Focus
Choose the enemy who gives your squad the best opportunity.
Space
Create useful angles without separating so far that teammates become isolated.
Sync
Make sure your pressure and movement happen close enough together to matter.
Collapse
When the enemy formation breaks, take space together and convert the opening.
Reset
After the fight changes, rebuild your formation before the next engagement.
This is not a rigid sequence. Fights move too quickly for that.
Think of it as a checklist for keeping three players pointed toward the same problem.
1. Focus Fire: Same Target, Different Jobs
Focus fire is the easiest team-fighting concept to understand and one of the easiest to execute badly.
Three teammates can all shoot the same enemy and still fail to create a meaningful advantage if the target has strong cover and the squad is standing in poor positions.
The better version is:
Same target. Different jobs.
One player keeps the target occupied.
Another takes an angle that punishes movement.
The third supports the pressure, watches for the target’s teammates, or prepares to cut off the retreat.
EA’s official terminology describes “focus” as concentrating attacks on one enemy. (EA Help)
The practical goal is not simply to produce a lot of damage. It is to make one enemy’s survival increasingly difficult.
2. Pick the Target Your Team Can Actually Pressure
Don’t choose a target just because their health bar looks attractive.
Look at the enemy formation first.
A 100-health player standing between two teammates may be a worse target than a full-health player who has drifted 15 meters away from support.
Look for:
Isolation — Can the target receive immediate help?
Cover — How safely can they hide?
Escape — Where can they move?
Support — Who can punish your push?
Access — Can your whole squad reach the fight?
This leads to an important team-fighting rule:
Choose the target that three players can pressure, not necessarily the target with the lowest health.
That single adjustment can make focus fire far more effective.
3. Create Space Without Creating Three Solo Fights
A team needs enough spacing to produce different angles.
Too little space, and your squad becomes one large target.
Too much space, and you’ve created three separate fights.
The best spacing is practical rather than numerical.
Ask:
If this teammate gets pushed right now, can I help before they are knocked?
If the answer is yes, the spacing is probably workable.
If the answer is no, the angle may be clever but the formation is too spread out.
EA’s current beginner guidance similarly recommends staying close enough to support your squad while avoiding landing directly on top of one another. (EA Help)
That principle continues into combat.
4. Build Crossfires That Actually Work
A crossfire is useful when an enemy cannot use one piece of cover to protect themselves from every attacker.
Imagine an enemy behind a rock.
Player A holds the front.
Player B moves far enough left to create a second line of sight.
The enemy can no longer comfortably fight Player A without exposing themselves to Player B.
That’s the value of a crossfire.
But distance alone doesn’t make a crossfire.
A good crossfire needs three things:
Threat — both angles must matter.
Support — teammates must be able to help one another.
Collapse potential — once the enemy moves, the squad can follow up together.
A bad crossfire looks like three teammates scattered across the map.
A good one looks like one enemy trying to solve several connected problems.
5. Same Objective, Different Jobs
This is the central idea behind coordinated team fighting.
Your squad does not need three players doing the same thing.
It needs three players working toward the same result.
For example:
Player 1 — Pressure
Keeps the enemy occupied.
Player 2 — Support Angle
Punishes movement and creates the second threat.
Player 3 — Cutoff
Covers the retreat, watches the flank, or prepares to collapse.
Those jobs can rotate constantly.
The player holding the cutoff may become the aggressor.
The player creating pressure may need to fall back.
The point is not permanent roles.
It is shared intent.
6. Isolate the Enemy by Controlling Their Options
“Look for isolated enemies” is useful advice.
Making an enemy isolated is better.
A squad can create isolation by controlling the space between one player and their teammates.
For example:
An enemy backs away from your pressure.
One teammate moves to cut off the shortest route back.
Another keeps their attention from the front.
The third player closes the remaining space.
Suddenly, the target is alone even though the enemy team started together.
This is the key:
Isolation is often created by positioning, not discovered by accident.
Grenades and other ordnance can help force players away from cover or deny parts of a position; EA specifically lists those as strategic uses for grenades. (EA Help)
Use the tools your squad has to make the enemy formation worse.
7. Attack the Formation, Not Just the Health Bar
An enemy team is a shape.
Sometimes all three players are stacked tightly.
Sometimes two are together and one is ahead.
Sometimes one is healing while another holds the angle.
Sometimes a player has rotated to a completely different building.
That arrangement tells you more than the health bars alone.
Ask:
Who can support whom?
Which player is hardest to reach?
Which player is closest to becoming isolated?
Where is the escape route?
You are looking for a weakness in the formation.
Once the formation breaks, your squad has something to exploit.
8. Sync the Push
A coordinated push is mostly a timing problem.
One player pushing first and hoping the others follow is not synchronization.
It creates a staggered fight.
The first player gets focused.
They retreat.
The second player arrives late.
The third is still moving.
Now the enemy gets three manageable engagements instead of one difficult team fight.
A better sequence is:
Pressure → position → call → collapse
The call does not need to be elaborate.
“Cracked left. Swing.”
Or:
“One isolated. Now.”
Or:
“Hold. Wait for me.”
The objective is to make sure the squad’s movement reaches the enemy at roughly the same moment.
9. A Team Push Should Improve the Fight
Don’t push simply because the enemy is nearby.
A good push should improve at least one part of the situation.
You should be gaining:
Space
A stronger angle
Closer access to an isolated target
Control of an escape route
A numbers advantage
A better position for the next exchange
If every step forward exposes another teammate without giving anything back, the push is probably getting worse.
That is where coordinated teams stop thinking about momentum and start thinking about conversion.
10. Change Targets When the Fight Changes
Focus fire is not a commandment.
Your initial target can stop being the correct target.
Imagine:
You begin pressuring Player A.
Player A reaches excellent cover.
At the same time, Player B swings wide and becomes isolated.
Continuing to shoot Player A because “that’s who we called” makes no sense.
Switch.
All three players should understand the reason for the change.
That is why short callouts matter:
“Switch.”
“Right side.”
“Isolated.”
“New target.”
Good teams don’t simply share targets.
They share changes in priority.
11. Trade for Your Teammates
You don’t need to win your own duel every time.
Sometimes your most useful action is punishing the enemy for attacking someone else.
Suppose an enemy swings at your teammate.
Your teammate takes heavy damage.
Instead of watching the duel, you take the angle and punish the attacker.
Now the enemy has a problem:
If they keep attacking your teammate, another player will damage them.
That is a trade.
Trading makes aggressive enemy plays expensive.
It also gives your teammate confidence to take space because they know the squad can respond when the fight turns.
12. Communication Should Be Short Enough to Use
A team callout has three useful pieces:
State — What happened?
Action — What should we do?
Timing — When?
For example:
“Cracked left. Swing now.”
That’s more useful than narrating the entire fight.
Apex’s ping system is also designed to communicate enemies, locations, and movement without voice chat. EA explicitly recommends using pings to communicate with teammates and alert them to nearby enemies. (EA Help)
Good communication doesn’t mean talking constantly.
It means providing the information that changes what your teammates should do.
13. Buildings and Open Ground Require Different Coordination
In buildings
Avoid turning every push into three players entering through the same doorway.
One player can create pressure.
Another can hold an adjacent angle.
A third can cover the route the enemy is most likely to use.
You want the enemy to deal with more than one threat without giving them three isolated targets.
In open terrain
Spacing becomes more dangerous because there may be less cover between teammates.
Don’t spread out simply to create a theoretical crossfire.
Move from one usable piece of terrain to another.
Rocks, walls, slopes, buildings, and elevation changes can become temporary anchors for your formation.
The question is not:
“How far apart can we get?”
It is:
“How much useful space can we control while remaining able to trade?”
14. When the First Knock Happens
A knock creates a numbers advantage.
It does not automatically solve the fight.
This is where coordinated teams should become calmer, not more frantic.
Immediately identify:
Where are the remaining enemies?
Can they support one another?
Can we take space safely?
Is the knocked player worth finishing now?
Is another squad approaching?
Then choose the next action.
You might collapse.
You might hold the better position.
You might finish the knock.
You might prepare for the remaining two players.
The key is that everyone understands what happens next.
15. Reset as a Team
A coordinated squad should know how to stop fighting together as well as start fighting together.
Once the exchange turns bad—or once the immediate fight is won—rebuild the formation.
Use:
Cover → Heal → Reload → Regroup → Scan → Decide
Regroup is especially important.
One teammate shouldn’t be behind a rock healing while another is already pushing the next building and the third is looting.
Get the squad back into a state where everyone can contribute.
Our existing Apex Legends Fight Guide covers the broader engage/reset/disengage decision. This article’s focus is narrower: make the reset happen as a squad rather than three separate players reacting individually.
16. Don’t Let a Won Fight Become Three Solo Plays
This is where many teams throw away an advantage.
They get a knock.
One player chases.
Another opens a death box.
The third watches a completely different angle.
The enemy team is no longer fighting the squad.
They are fighting three distracted players.
After an advantage, switch from damage mode to control mode.
Secure the area.
Watch the approaches.
Rebuild health and ammunition.
Then decide whether another push is worthwhile.
The same principle applies after a squad wipes: the next danger often comes from somewhere else.
17. Third Parties Change Your Formation
When another squad enters the fight, don’t continue your original plan by habit.
EA defines a third party as another squad joining an existing fight. (help.ea.com)
The squad that was previously your opponent may suddenly become temporary cover, an obstacle, or a source of pressure.
Your priorities can change from:
“Finish this team.”
to:
“Keep our squad alive and preserve our position.”
That may mean:
pulling back,
taking cover,
changing angles,
finishing a vulnerable enemy quickly,
or leaving the area.
Coordination matters most when the plan changes.
18. Use Legend Abilities to Support the Team Fight
Your Legend choice matters, but this article doesn’t need to become another class guide.
EA currently divides Legends into Assault, Controller, Recon, Skirmisher, and Support, with different class benefits and roles. (EA Help)
For team fighting, think more simply:
Information helps the squad choose an angle.
Mobility helps the squad take or abandon space.
Control helps restrict enemy movement.
Offensive utility helps create pressure.
Recovery helps the team survive mistakes.
The best ability is usually the one that makes the whole squad’s next decision easier, not the one that produces the flashiest individual play.
19. Solo Queue: Coordinate With the Team You Actually Have
Perfect synchronization is difficult with random teammates.
You can still create basic structure.
Ping the target.
Stay close enough to trade.
Mirror a teammate’s reasonable commitment.
Don’t build your entire plan around an assumption that nobody else has heard.
A teammate pushing alone does not always mean you should blindly follow. But if you can safely support their play, doing so may turn a reckless push into a successful team fight.
The enemy takes manageable damage instead of facing a decisive threat.
Everyone stands at the same angle
One piece of cover protects the entire squad.
Everyone creates their own flank
Your crossfire becomes three isolated 1v1s.
One player pushes before the others are ready
The enemy gets an easy isolated target.
The squad never switches targets
Players keep following an old plan after the fight has changed.
A knock causes panic
Everyone rushes forward without checking terrain or the remaining enemies.
Nobody trades for the teammate taking damage
The squad behaves like three separate players.
Everyone talks, but nobody calls the decision
Communication becomes noise instead of information.
The squad wins the fight and immediately scatters
The next enemy gets three separate targets.
These mistakes are often more serious than raw aim because they determine whether your mechanical skill gets the support it needs.
The Team-Fight Checklist
Before committing, ask:
Who are we focusing?
Where is everyone standing?
Can we trade for each other?
Which angle creates the most pressure?
How do we isolate the target?
When the opening appears:
Are we ready to move together?
After the knock:
Where are the remaining enemies?
After the fight:
Cover → Heal → Reload → Regroup → Scan → Decide
That is enough.
You don’t need a complicated tactical system to start fighting better as a team.
A Simple Team-Fight Scenario
Imagine an enemy squad is holding a building.
One player is watching the front door.
The second is on a side angle.
The third is deeper inside.
Instead of sending three players through the front:
Player 1 pressures the entrance.
Player 2 moves toward the side.
Player 3 watches the likely escape route.
The defender at the entrance backs away.
That movement exposes the side.
Player 2 gets damage.
The enemy tries to retreat farther inside.
Player 3 closes the exit.
Now the enemy squad has a choice:
Stay and fight from a worse position.
Or move into another player’s line of fire.
That is the entire point of coordinated team fighting.
You are not simply adding three sources of damage.
You are taking away the enemy’s good choices.
How to Practice Team Fighting
Don’t try to fix everything at once.
After a bad engagement, identify one coordination failure.
If your squad constantly spreads too far apart, work on support distance.
If you deal damage without getting meaningful advantages, work on focus fire.
If your pushes fail, work on synchronization.
If enemies keep escaping, work on cutoffs.
If your squad wins the first fight and loses the second, work on resets and awareness after the engagement.
The goal is not to make every match perfect.
It’s to make the same mistake less often.
Final Thoughts
Strong team fighting isn’t about making three players act like one person.
It’s about making three different players work toward the same outcome.
Focus the right target.
Create space without breaking support range.
Build crossfires that actually threaten the enemy.
Use pressure to isolate players.
Sync the push instead of trickling in.
Switch targets when the fight changes.
Trade for teammates when they take pressure.
And after the fight, regroup before the next problem finds you.
The most useful mental model is:
Focus → Space → Sync → Collapse → Reset
One player can create the opening.
Another can make the opening larger.
The third can make the escape route disappear.
Then the squad moves together.
That’s coordinated Apex.
Not three players standing beside one another.
Three players creating one advantage.
Frequently Asked Questions
What is focus fire in Apex Legends?
Focus fire means concentrating your squad’s attacks on one enemy rather than spreading damage across several targets. The goal is to create a decisive problem for one player instead of manageable pressure across the whole squad. EA’s terminology also uses “focus” for concentrating attacks on one enemy. (EA Help)
How do I create a crossfire in Apex Legends?
Use two or more useful angles that the enemy cannot comfortably defend with one piece of cover. Keep the angles close enough for teammates to support one another, and be ready to collapse when the enemy moves.
How do I isolate an enemy?
Use pressure, positioning, and utility to separate a player from their teammates. Cut off the easiest route back to their squad while another teammate maintains pressure.
Should all three teammates shoot the same enemy?
Concentrated pressure is usually useful, but the squad should not stand in the exact same position. The strongest setup is generally the same target, different jobs.
When should we push together?
Push when your squad has created a meaningful opening and everyone is close enough to contribute. A synchronized push is much stronger than three players arriving seconds apart.
What should we do after getting a knock?
Find the remaining enemies, assess the terrain, and decide whether the knock can be converted into space, another knock, an elimination, or a stronger position. Don’t assume the knock automatically means “rush.”
How important are crossfires?
Very. A good crossfire can force an enemy to choose between exposing themselves to one teammate or another. But a crossfire that leaves teammates too far apart can create more problems than it solves.
What should I say in voice chat?
Keep calls short and actionable. Examples include “Cracked left,” “Swing now,” “Hold,” “Switch,” “Isolated,” and “Reset.” The exact vocabulary matters less than making sure teammates understand the state of the fight and the intended action.
Can team fighting work in solo queue?
Yes, although perfect coordination is unlikely. Use pings, maintain support distance, mirror reasonable teammate decisions, and communicate simple priorities rather than expecting random teammates to follow a detailed plan. EA specifically supports ping-based squad communication. (EA Help)
How can I practice coordinated team fighting?
Pick one coordination problem per session—focus fire, spacing, crossfires, synchronized pushes, target switching, or resets—and work on that one habit deliberately.
Sources & Updates
EA’s current How to Play Apex Legends guidance was used for durable gameplay references involving squad communication, pinging enemies and locations, staying close enough to support teammates, movement, and strategic use of grenades. (EA Help)
EA’s current Legends Guide was used to verify the five current Legend classes—Assault, Controller, Recon, Skirmisher, and Support—and their broad team functions. (EA Help)
EA’s current terminology documentation was used for established gameplay terminology such as third party and related combat language. (EA Help)
The practical frameworks in this article—Focus → Space → Sync → Collapse → Reset, target switching, formation-based isolation, synchronized pushes, and the distinction between stacking and genuine teamwork—are Loot Strategist editorial analysis rather than official EA rules.
This guide deliberately avoids temporary weapon rankings and Legend tier-list recommendations so that the core team-fighting advice remains useful as Apex balance changes.
Editorial Note:Tiers and gene recommendations reflect post-launch Title Update 5 balancing, co-op high-rank expeditions, and Fatalis/PvP meta optimization.
With over 140 companions available in Monster Hunter Stories 2: Wings of Ruin, building the ultimate team requires looking past pure nostalgia. Success in high-rank co-op dens, Special Lair runs, and competitive PvP boils down to three core factors: base stat scaling, attack tendencies (Power, Speed, Technical), and bingo board flexibility via the Rite of Channeling.
Whether you need a heavy hitter to clear the S-Rank Fatalis trial or an early-game carry, this comprehensive Monstie Tier List breaks down the absolute best companions in the current meta.
Ranmar (Velocidrome), Royal Ludroth, Kulu-Ya-Ku, Pukei-Pukei
👑 S-Tier: The Definitive Endgame Meta
S-Tier Monsties feature unmatched base stat distributions, high critical-hit ratios, and innate gene skills that dominate head-to-head (HtH) clashes.
1. Silver Rathalos (Power / Fire)
Riding Actions: Fly
Why It’s Top Tier: Silver Rathalos sits atop the Fire damage meta. Boasting higher base elemental attack and defense stats than Teostra or Dreadking Rathalos, its signature Solar Flare gene delivers catastrophic single-target damage with a high burn chance.
Best Gene Synergy: Slot in Hellblade Gene (XL) for Flame Aura and Fire Boost Gene (XL) to maximize your Fire Bingo multipliers.
2. Bloodbath Diablos (Speed / Non-Elemental)
Riding Actions: Roar, Ground Dive
Why It’s Top Tier: The unquestioned king of raw physical burst. Bloodbath Diablos outpaces standard Speed monsties with incredible critical hit rates and its devastating Savage Roar skill, which hits all enemies while ignoring elemental resistances.
Best Gene Synergy: Build around Non-Elem Boost (XL), Might Gene (XL), and Critical Gene (XL) for maximum head-to-head damage multipliers.
3. Boltreaver Astalos (Technical / Thunder)
Riding Actions: Fly
Why It’s Top Tier: Boltreaver solves the longstanding issue of Technical monsties lacking raw speed. With immense critical hit scaling and paralysis application, it locks down bosses in high-rank co-op expeditions before they can enter enraged phases.
Best Gene Synergy: Pair with Thunderlord Gene (L) and Critical Eye to guarantee consistent crit-paralyze loops.
4. Soulseer Mizutsune (Speed / Water)
Riding Actions: Dash
Why It’s Top Tier: Water-element monsties are notoriously rare in the endgame, but Soulseer Mizutsune completely dominates this niche. Its high speed and dodge-buff mechanics make it nearly untouchable in high-rank PvP duels.
⚔️ A-Tier: High-Rank & Co-Op Powerhouses
While slightly edged out by S-Tier variants in raw stat caps, A-Tier monsties are essential for clearing high-rank dens and building specialized elemental coverage.
1. Nergigante (Power / Non-Elemental)
Why You Need It: Nergigante is the easiest S/A-tier monstie to acquire immediately upon entering the Terga region. Its self-healing passive (Calamity Slash) makes it the safest choice for soloing the Elder Lair.
2. Silverwind Nargacuga (Speed / Non-Elemental)
Why You Need It: While Bloodbath Diablos deals slightly more raw damage, Silverwind Nargacuga remains mandatory for farming. Its Stealth riding action allows you to bypass trash mobs in Co-Op Expeditions, saving hours when grinding Super Rare High-Rank Dens.
3. Velkhana & Kushala Daora (Technical / Ice)
Why You Need Them: Both Ice-type Elder Dragons dominate the Ice meta. Velkhana edges ahead in single-target skill damage, making it the primary counter for endgame Dragon-element boss trials.
🐣 Best Early-to-Mid Game Monsties (Campaign Carry)
If you are still working through the story campaign, do not waste time hyper-optimizing genes early on. Grab these easily accessible monsties:
Tigrex / Royal Tigrex (Speed – Alcala Region): Can be fought early as a Royal Monster in Harzgai Rocky Hill. Gives you immediate access to 5-star stats and the Ivy Climb riding action.
Nargacuga (Speed – Alcala Region): Unlocks the essential Stealth skill, making egg hunting significantly faster.
Zamtrios (Technical / Ice – Loloska Region): Excellent mid-game wall breaker that handles the sudden jump in dragon/fire enemy difficulty in the snow region.
🧬 Rite of Channeling: Core Rules for Endgame Builds
Prioritize Elemental Bingo Lines: Always complete bingo lines (horizontal, vertical, or diagonal) matching your monstie’s primary element to hit maximum damage caps.
Keep the Primary Tendency Pure: Avoid mixing too many off-type genes onto a natural Power or Speed monstie unless building a specific PvP surprise counter. Sticking to their natural tendency preserves their highest stat growth curve.
Always Run Head-to-Head (HtH) Master: High-Rank endgames revolve around winning Head-to-Head clashes to build Kinship gauge quickly. Ensure every endgame build includes HtH Master (XL) or Self-Improvement (XL).
💡 Planning your full gaming backlog? Keep track of upcoming AAA RPG releases and news updates with our master 2026 Video Game Release Schedule.
What’s more mortifying than striding into a boss battle, confident in your finely-tuned gaming abilities, only to have your posterior handed to you? Nothing. And let’s face it, Elden Ring isn’t for the faint of heart. Luckily, FromSoftware has bestowed a gift upon us mortals in the form of Elden Ring Runes, for those who want to take a breather from the chaos. This game boasts a breathtaking open world that’s chock-full of content, but with great freedom comes great responsibility. You might find yourself in a precarious situation, under-leveled and overwhelmed, losing your grip on reality and your controller.
One boss that’s been giving players fits is the notorious Starscourge Radahn. Fear not, my friends, for we’ve got the lowdown on what level you should be at to take on this formidable foe. Make no mistake, Radahn isn’t a pushover. You’ll want to be somewhere in the 70-80 level range if you’re planning to take him on. This will ensure that you’re dealing sufficient damage to the boss while not getting annihilated in one hit. Your health pool and attack power are also important factors to consider, alongside your level. Furthermore, your personal skills and weapon level can make or break your chances in this fight. Keep in mind that the recommended level may vary based on whether you’re fighting Radahn alone or with some backup.
Asking what level to fight Radahn in Elden Ring is a common inquiry among players, and answers can be as diverse as they come. But if you want the real deal, keep reading. We’ve got the lowdown on what level to fight Radahn in Elden Ring, so buckle up and get ready to kick some Radahn butt.
What Level Should I Be Fighting Starscourge Radahn?
Starscourge Radahn in Elden Ring is notorious for being one of the game’s hair-pulling difficulty spikes, leaving players teetering on the brink of despair. This boss fight is certainly not for the faint of heart and is sure to give even the most seasoned players a run for their money.
In order to stand a fighting chance against Radahn, we highly recommend that you level up your character to at least 70-80. These levels will serve you well if you invest them wisely in Vigor and Attack Power, tailored to complement your character build. This will not only allow you to deal enough damage to the boss but also give you a much-needed boost to your health and defensive capabilities, giving you a better chance to survive and conquer this formidable foe.
Make no mistake, taking on Starscourge Radahn is no walk in the park, but with the right preparation and strategy, victory is within reach. So, sharpen your blades, hone your skills, and gear up for one of Elden Ring’s most challenging battles yet.
Who is Starscourge Radahn
In the wondrous world of Elden Ring lies a boss that is as elusive as he is difficult – Starscourge Radahn. Situated in the confines of Redmane Castle, this boss is not exactly mandatory, but if you’re looking to unlock one of the game’s endings or complete a few NPC questlines, you’ll have to take him down.
Born to Queen Rennala and Radagon, Radahn is a demi-god by birthright, with the power and prowess to match. During the Shattering, he battled Malenia to a stalemate, showcasing his might in a way that few others could. But despite his impressive pedigree, Radahn’s mind has been ravaged by the Scarlet Rot, driving him into a state of feral madness that we must contend with in battle.
Make no mistake, this boss is not just a test of your combat skills, but also a feast for the eyes. With his stunning visual design and impressive armor set, Radahn is a boss that you won’t soon forget. So, ready your weapons and brace yourself for the fight of your life.
Suggested Level to Fight Radahn
Fighting the mighty Radahn in Elden Ring is not a feat for the faint of heart, but fear not, dear adventurer, for we have a suggestion to level the playing field. While the ideal level for taking on this demi-god boss is certainly subjective, we recommend a range of 70-80 to keep things fair and square. This way, you can enjoy a well-balanced and thrilling fight that won’t feel like a cakewalk or a hopeless endeavor.
Of course, leveling up beyond this range doesn’t necessarily guarantee an easy victory. You see, Radahn is a formidable foe, and his ferocious attacks can catch even the most seasoned players off guard. So, even if you’re at a higher level, you’ll still need to bring your A-game and stay on your toes if you hope to emerge victorious.
All in all, taking on Radahn is a test of your mettle as a warrior, and your level is just one factor in the equation. With the right tactics, equipment, and mindset, you can overcome this challenge and emerge triumphant, no matter what level you’re at.
The Importance of Weapon Level
When it comes to slaying bosses in Elden Ring, your character’s level is just the tip of the iceberg. In fact, what truly matters is the level of your weapon, as it determines the amount of punishment you can dish out and take in return.
An upgraded weapon can be your saving grace, not only against the likes of Starscourge Radahn but also every other area and boss in the game. You may have heard tales of lower-level players putting Radahn in his place, while others at level 105 have met their untimely demise at his hands.
A higher-level weapon ensures a fair and balanced battle, providing you with a decent damage output and more powerful weapon skills to help you wriggle out of tight spots – particularly in a fight as intense as Radahn’s. So, don’t overlook the importance of upgrading your weapon, dear warrior, if you wish to emerge victorious in the realm of Elden Ring.
Factors to Consider When Fighting
Playstyle and Character Build
When it comes to facing formidable foes like Radahn, it’s essential to consider your character’s build and playstyle. It’s no secret that Magic builds can act as glass cannons, effortlessly obliterating enemies from a safe distance without breaking a sweat.
On the other hand, pure melee builds have to get up close and personal, quite literally. Engaging in a brawl demands a more generous HP pool to avoid being knocked out in one fell swoop, along with greater attack power if you want to bring down the boss in a reasonable amount of time. So, whether you prefer a magical or physical approach, remember that your build and style can make all the difference in your quest to conquer Elden Ring’s fiercest foes.
StatsAllocation
Stat allocation is a crucial factor to consider when tackling tough bosses like Starscourge Radahn in Elden Ring. It’s important to understand that levels don’t necessarily reflect power but rather the number of times you’ve invested Runes into the game’s Base Attributes.
Investing your Stat points wisely can be the deciding factor in your success against Radahn. For instance, a pure Strength player who allocated most of their points towards boosting their Health and Attack Power will likely have an easier time than someone who spread their points across multiple Attributes. So, dear warriors, remember to allocate your Stats strategically to achieve maximum efficiency and conquer the challenges of Elden Ring with ease.
Summons
Prepare for a thrilling and singular experience when facing the Starscourge Radahn in Elden Ring. What sets this boss fight apart from the rest is the ability to summon up to five NPCs to join you in battle, adding to the excitement and unpredictability of the encounter. Without giving away any spoilers, the NPCs’ involvement in the fight ties into the game’s ongoing narrative.
There are eight unique NPCs that you can summon for this particular fight, and they can be resummoned if needed. By enlisting the help of these NPCs, you can take on Radahn at a much lower level than if you were to go it alone. With Radahn’s focus divided between multiple targets, your subpar Attributes may be compensated for, making the risk much more manageable. So, don’t hesitate to call upon your NPC allies and face Radahn with confidence.
The Importance of Skill
Hop aboard the git gud express! The concept is simple: Radahn can be faced at any point in the game, depending on your skill level. Believe it or not, some players complete the game without donning a single piece of armor or leveling up.
If you’re a master of Elden Ring, then you may find tackling Starscourge Radahn at a lower level than recommended a piece of cake. On the flip side, for those who haven’t quite mastered the game yet, it may be a struggle. But don’t fret! You can take on Radahn at your own pace, whether you’re a seasoned pro or a newbie. So, grab your controller and show Radahn who’s boss!
Tips to Defeat Starscourge Radahn
In Elden Ring, even the highest-level players can find themselves six feet under if they’re not careful. The ruthless Starscourge Radahn will put your skills to the test, so buckle up and listen up for some valuable tips to survive this boss fight:
Make use of the summons: As previously mentioned, you can summon up to five NPCs to help you in battle. This will divide Radahn’s attention and make the fight more manageable.
Keep your summons alive: Your NPC allies will only be helpful if they’re alive, so keep an eye on their health and prioritize healing them when needed.
Do not get greedy: Radahn hits hard, so don’t get too greedy with your attacks. Be patient and wait for the right opportunity to strike.
Maintain a safe distance in the second phase: In the second phase of the fight, Radahn becomes mounted on his horse, making him much more mobile. Keep a safe distance to avoid his attacks and wait for an opening.
Move-in after his Hail of Arrows attack and go to town while he is unmounted: When Radahn unleashes a Hail of Arrows attack, it leaves him vulnerable for a short time after. Take advantage of this opportunity to strike while he’s
dismounted.
Mount your horse: If you’re having trouble avoiding Radahn’s attacks, consider mounting your horse to increase your mobility.
A good shield can be better against his arrows than rolling out of harm’s way: Rolling may seem like a good option to avoid Radahn’s arrows, but a good shield can be much more effective in protecting you.
Summons make his moveset unpredictable, so soloing can sometimes be better: While summons can be helpful, they can also make Radahn’s moveset unpredictable. Consider soloing the fight if you’re having trouble with your NPC allies.
Radahn is weak to Rot: Lastly, Radahn is weak to Rot, so consider using weapons that deal Rot damage to increase your chances of victory.
Remember, the key to defeating Starscourge Radahn is to stay patient, be observant, and most importantly, don’t give up.
Conclusion
Our discussion on the optimal level to confront the Starscourge Radahn in Elden Ring has come to a close. We have endeavored to provide a comprehensive analysis of the facts so that you can decide whether to face this formidable foe or not. It must be said that any recommendation regarding a boss’s appropriate level is subjective, and depends on one’s appetite for both risk and reward. However, we have offered a balanced suggestion for those who relish the interplay between pleasure and pain.
We welcome your feedback in the comments section below on the usefulness of this guide. And to all, you Tarnished out there, best of luck in your perilous journeys.
Elden Ring has been a long time coming, but who would have thought that the hype would be this big?
It’s official: it’s in the papers. Elden Ring is FromSoft’s biggest and most hyped launch to date. The latest game from the iconic studio that brought us the Soulslike, Soulsborne, Soulbornkiro, whatever you’d like to call it, genre has attracted over 750,000 concurrent Steam players. There’s been a spate of negative user reviews generating thanks to its inconsistent PC performance; this success can be even seen in gaming marketplaces that specialize in selling game accounts and other types of services. Publisher Bandai Namco has yet to announce the game’s official launch sales, but we’ve seen massive success just from Steam alone, so it’s easy to assume that the numbers are above 1,000,000 at launch if the PC numbers alone are anything to go by.
Comparing Elden Dark to Other Dark Souls Games
On launch day, Elden Ring hit a peak concurrent player count on Steam of 764,835 players. When you compare that to Dark Souls 3 which had 129,975 players and Sekiro: Shadows Die Twice which had an all-time peak of 125,315 players, you can see just how huge these numbers are on PC. If we crunch the numbers, we can see that Elden Ring had nearly six times more concurrent players than Dark Souls 3’s highest ever peak. The player numbers will constantly change on Steam – no game sits at the top forever, after all.
Performance is A Big Issue
It’s not all good news for Elden Ring despite hitting such high numbers. The game has attracted a swathe of negative reviews on Steam thanks to its dubious performance on PC. Digital Foundry’s statement of Elden Ring’s performance being a mixed bag right now is putting it lightly, to say the least. Even with the 1.02 available to download now, PC users can see stutters of up to 250 milliseconds in length when new areas, effects, and enemies appear on the screen. At its worst, Elden Ring players experience “tumbling frame-time issues” that drop the frame rate from 60 to 40. A look at the Steam reviews shows that over 7,000 of them consist of negatives shows that these performance issues are not lost on PC players despite the patch update.
What’s All the Hype About Anyway?
A big part of the hype surrounding Elden Ring is the great track record that Hidetaka Miyazaki (the game’s director) and FromSoftware have had over the best decade. This has built a trusting relationship between fans of the games and the developers, as each new mechanic added to the game before its official launch was received positively.
Another reason why fans are hyped about Elden Ring even after its release is that it’s the spiritual successor to the Dark Souls series due to its graphics, story, and overall medieval setting being the perfect fit for the franchise. Especially since the last FromSoftware title, Sekiro: Shadows Die Twice, was set in Sengoku Era Japan, players were itching for a more Gothic experience featuring magic and greatswords than samurais and katanas.
Lastly, the story is more intricate this time around, as fans will experience a mythos built from the ground up by George R. R. Martin, writer of the novels that the Game of Thrones series was based on.
Final Thoughts
Due to FromSoftware’s attempt at making the game accessible to as many computers as possible, they’ve essentially taken on a situation more difficult than if they were to just leave these PC players behind. Elden Ring is facing serious performance issues on PC to the point that they aren’t just minor inconveniences anymore, leading to a lot of players from that platform selling their game accounts on gaming marketplaces. Almost all GPUs – yes, even the super expensive ones – struggle when going outside into the beautiful horizon but run fine indoors. This is likely due to the game using DirectX 12, a software developed by Microsoft that has been known to produce fluctuations and aggressive stutters in modern games since it takes a different approach to memory management. Variable refresh rate technologies like FreeSync and G-Sync alleviate the issues to some degree, but that’s now how it should be as not everyone has access to those.
It remains to be seen what Bandai Namco does about this situation as the day-one patch didn’t address these issues one bit. This is even more strange if you consider that FromSoftware’s last two games, Sekiro and Dark Souls 3, had no problems across all platforms. In the meantime, there are still a lot of players actively grinding through Elden Ring, even if it currently faces a lot of problems.