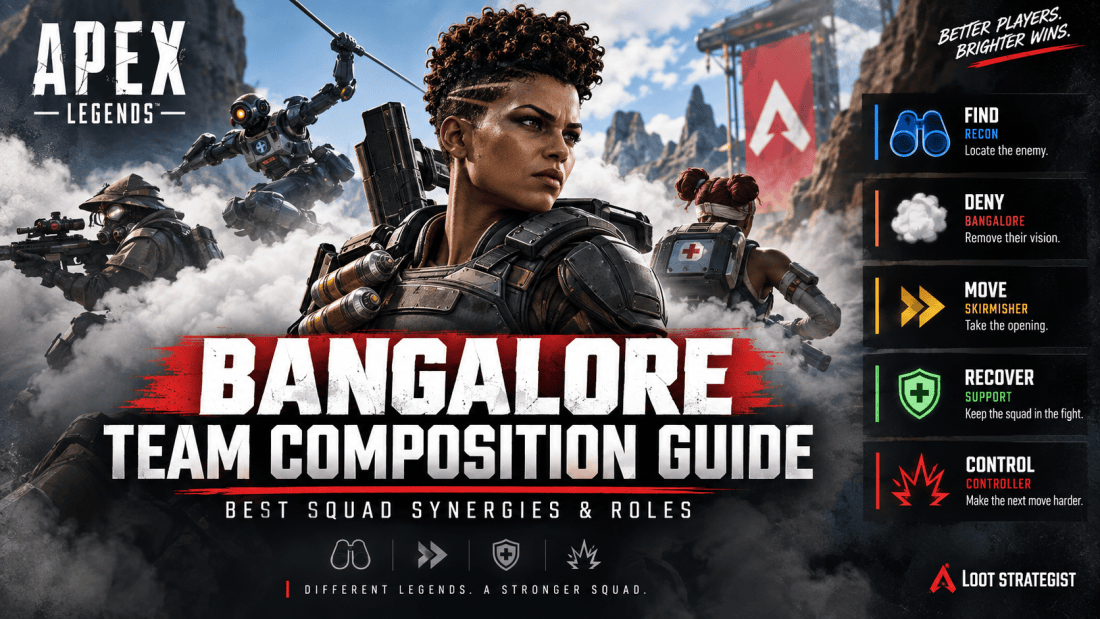
Tag: Apex Legends Season 30

Apex Legends Loot Guide: How to Loot Faster and Smarter

Apex Legends Loot Guide: How to Loot Faster and Smarter

Apex Legends isn’t won by the player with the fullest backpack.

It’s won by the player who gets combat-ready quickly, understands what is actually useful, and knows when to stop searching and start moving.

That matters more than ever in Season 30.

Respawn has tightened the Core loot economy, removed several older high-tier loot sources, changed how Arsenals work, reduced some attachment spawn rates, and completely changed how Energy weapon ammunition works. (EA)

So an older loot guide can give you perfectly reasonable advice that is simply outdated.

This Apex Legends Loot Guide focuses primarily on Core modes—Ranked and Unranked—while explaining where Wildcard works differently. EA currently describes Core as the standard competitive experience and Wildcard as a faster Freestyle mode with a deliberately simplified loot system. (EA Help)

The goal isn’t to teach you how to open every bin on the map.

It’s to teach you what is worth your time.


Apex Legends Loot Guide at a Glance

Need the quick answer?

Use this order:

1. Get a usable weapon

2. Get the ammunition it needs—or understand the weapon’s Energy stockpile

3. Check your starter gear

4. Find additional shields and health healing

5. Get a second weapon

6. Take important upgrades

7. Share useful resources

8. Leave when the next upgrade isn’t worth the time

The simplest version is:

Get ready to fight, then get out.

EA’s current beginner guidance similarly emphasizes getting weapons, matching ammunition, useful attachments, shield and health healing, and increasing inventory capacity without wasting time searching the exact same areas as teammates. (EA Help)


What Should You Loot First in Apex Legends?

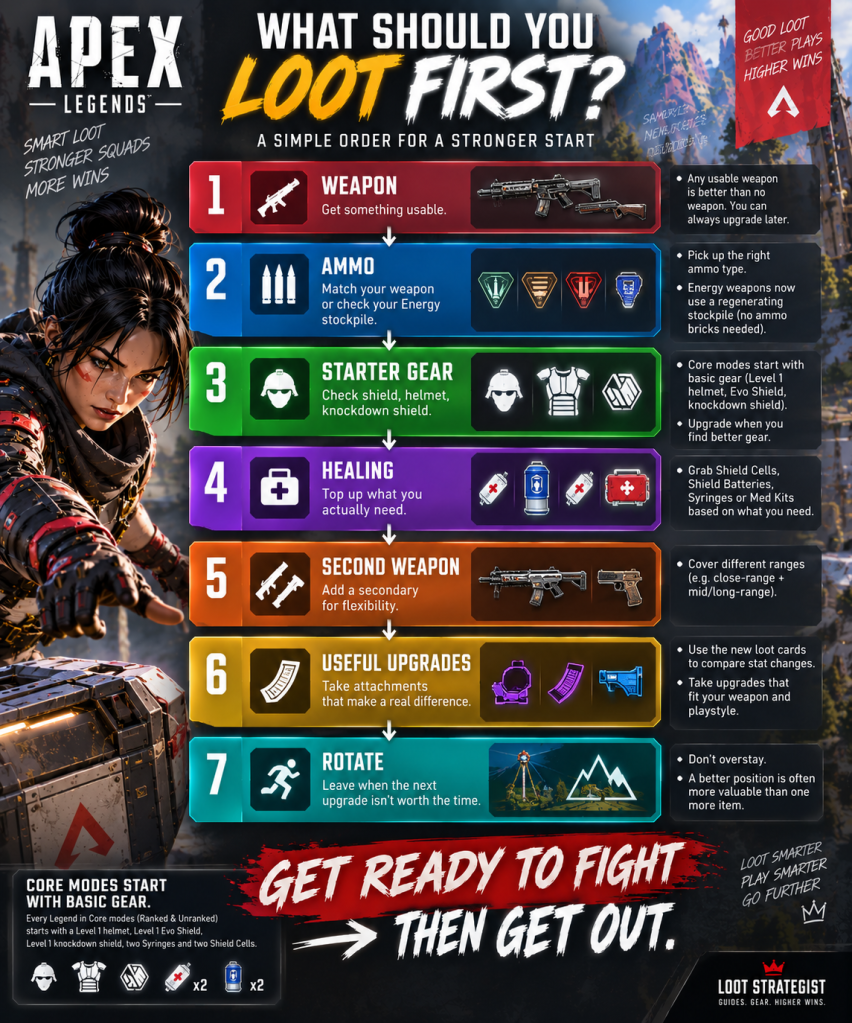
Apex Legends loot guide showing the recommended order for weapons, ammo, starter gear, healing, a second weapon, upgrades, and rotation

In Core modes, you don’t begin completely empty.

Every Legend starts with a basic starter kit containing a Level 1 helmet, Level 1 Evo Shield, Level 1 Knockdown Shield, two Syringes, and two Shield Cells. (EA Help)

That changes your opening priorities.

Your first goal should usually be:

Weapon → ammo → check starter gear → second weapon → useful healing/resources → upgrades

Don’t spend your opening minute searching for a full inventory.

You don’t need one.

You need enough equipment to survive the next fight.


Core vs. Wildcard Loot

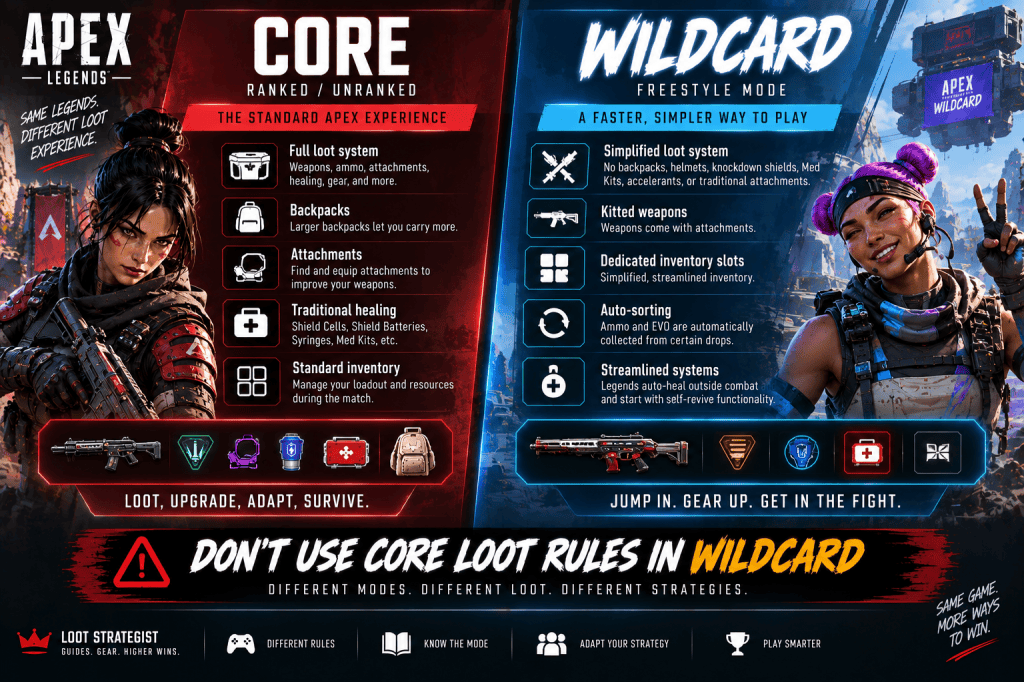
Apex Legends guide comparing Core and Wildcard loot systems, inventory, weapons, healing, and attachments

Before going any further, make sure this guide matches the mode you’re playing.

EA currently separates Apex into Core and Freestyle modes.

Core includes:

Ranked

Unranked

Wildcard belongs to Freestyle and uses a significantly simplified loot system. (EA Help)

In Wildcard:

  • There are no backpacks, helmets, knockdown shields, med kits, accelerants, or traditional attachments in the loot pool.
  • Inventory is simplified into dedicated slots.
  • Weapons arrive kitted.
  • Ammo and EVO are automatically collected from certain drops.
  • Legends auto-heal outside combat.
  • Players start with self-revive functionality. (EA Help)

So most of this article is written for Core BR.

That’s important because a loot strategy designed around Ranked doesn’t translate one-for-one into Wildcard.


The First Rule of Looting: Get Combat-Ready

The biggest beginner mistake is trying to build the perfect inventory before you can fight.

You don’t need:

Your dream weapon

Your favorite optic

A full stack of every consumable

Every purple attachment

You need something that can win the next engagement.

Your first usable weapon is usually more valuable than another thirty seconds of searching.

Once you’re capable of defending yourself, your next decision is no longer:

“What else can I loot?”

It’s:

“Is staying here actually worth it?”


Land Close to Your Squad

Looting starts with your drop.

EA currently recommends landing close to your teammates without landing directly on top of them, allowing everyone to search different nearby areas while staying close enough to support one another. (EA Help)

A good landing pattern is:

Same POI

Different buildings

Close enough to help

That is much more efficient than three players opening the same bins.


Don’t Loot the Same Building as Your Teammate

If your teammate is already searching a large building, take another room or another structure.

You are not fighting your squad for loot.

You’re trying to get three players equipped as quickly as possible.

EA specifically advises players not to search exactly the same loot spots, especially in larger buildings. (EA Help)

A simple system works:

Player 1 → Building A

Player 2 → Building B

Player 3 → Building C

Then regroup.

That’s faster than splitting to opposite sides of the map.


The Early-Game Loot Priority

Your first few seconds should be about survival.

1. Weapon

Take the first usable weapon.

2. Ammo

Collect enough for the weapon you’re carrying.

3. Check Your Starter Gear

You already have a basic helmet, Evo Shield, Knockdown Shield, Syringes, and Shield Cells in Core modes. (EA Help)

4. Second Weapon

Once the immediate danger is manageable, complete the loadout.

5. Healing

Top up what you’ll realistically need.

6. Important Attachments

Take meaningful upgrades.

7. Move

Don’t turn preparation into procrastination.


Weapon First, Perfect Weapon Later

Suppose you land and find:

Mozambique

You can use it.

Then twenty seconds later you find:

Peacekeeper

That’s an upgrade.

You didn’t lose anything by taking the first weapon.

The mistake is spending forty seconds refusing every mediocre gun because you are waiting for your favorite.

A bad weapon you can shoot is better than the perfect weapon that hasn’t appeared yet.


How Much Ammo Should You Carry?

There is no universal number that works for every loadout.

Your ammo needs depend on:

Weapon

Fire rate

Range

How often you fight

Inventory size

How quickly your squad rotates

A player using a rapid-fire weapon may burn ammunition much faster than someone playing at longer ranges.

So instead of memorizing:

“Always carry X stacks.”

Use:

Carry enough for the next fight, then adjust based on your actual usage.

That is more flexible and more useful.


Understanding Apex Legends Ammo

EA currently lists the game’s ammunition categories as:

Light

Heavy

Energy

Shotgun

Sniper

Arrows

along with other weapon-specific ammunition rules. (EA Help)

For ordinary weapons, the old rule still applies:

If you need it, carry it.

For Energy weapons, there is an important exception.


The New Energy Ammo System

Season 30 changed Energy weapons substantially.

Traditional Energy ammo bricks were removed from Core and Wildcard.

Instead, Energy weapons come with their own regenerating ammunition stockpile. You no longer need to pick up conventional Energy ammo bricks for those weapons. (EA)

That changes inventory management.

If you’re carrying an Energy weapon:

Don’t reserve backpack space for old-style Energy ammo stacks.

Pay attention to the weapon’s stockpile instead.

The important tactical point is that the stockpile regenerates over time, and regeneration isn’t something you can rely on while continuously firing. EA’s Season 30 documentation explains that the new system replaces traditional Energy ammo pickups with the weapon-specific stockpile. (EA)

So don’t assume:

“I have an Energy weapon, therefore I’m carrying infinite ammunition.”

You still need to manage when and how you’re using it.


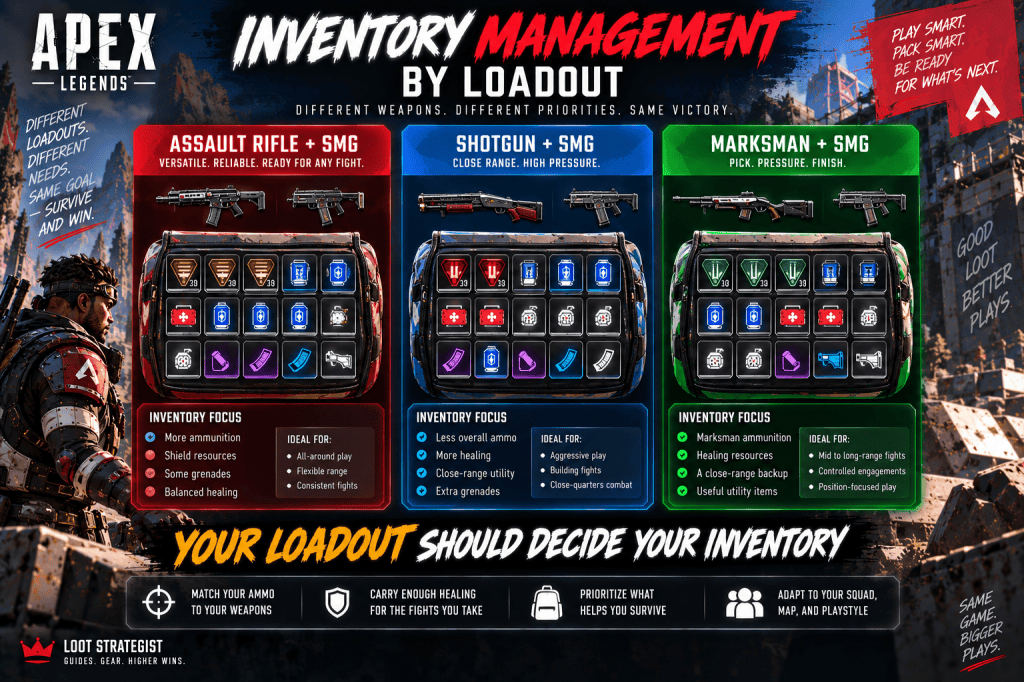
Build Your Ammo Around Your Loadout

Apex Legends inventory guide comparing backpack priorities for assault rifle and SMG, shotgun and SMG, and marksman and SMG loadouts

Your two weapons should influence your inventory.

Assault Rifle + SMG

You will often want:

More ammunition

Shield resources

Some grenades

Shotgun + SMG

You’ll typically need:

Less overall ammunition

More healing

More close-range utility

Marksman + SMG

You may need:

Marksman ammunition

A reliable close-range weapon

Enough shields to reset between fights

The exact numbers change.

The principle doesn’t.

Your inventory should serve your weapons, not the other way around.


Attachments: Take the Upgrade That Matters

An attachment is valuable when it changes how effectively you can use the weapon.

Ask:

Does it improve control?

Does it improve handling?

Does it improve the weapon’s practical range?

Will I actually notice the difference?

Does it fit the way I play?

If yes, take it.

If not, save the slot.


Season 30’s New Attachment Loot Cards

Season 30 also made attachments easier to evaluate.

EA added loot cards that show the stat change an attachment will provide when equipped, while weapon pickup cards can compare a weapon you’re holding with one you’re considering. (EA)

That’s useful because newer players no longer have to guess whether a particular attachment is genuinely improving the weapon.

Use the information.

If the improvement is meaningful, take it.

If the change doesn’t matter for your weapon or playstyle, move on.


Corrupted Attachments: Should You Take Them?

Season 30 introduced Corrupted Attachments.

These are deliberately different from ordinary upgrades.

EA describes them as attachments that provide significant stat bonuses while also applying a negative trade-off. Only one Corrupted Attachment can be equipped to a weapon at a time. (EA)

That means you shouldn’t automatically think:

Corrupted = better

Think:

Corrupted = trade-off

An attachment may improve one part of the weapon while making another part worse.

So ask:

Does the benefit suit this weapon?

Can I tolerate the drawback?

Does it match my playstyle?

A powerful downside can outweigh a powerful bonus.


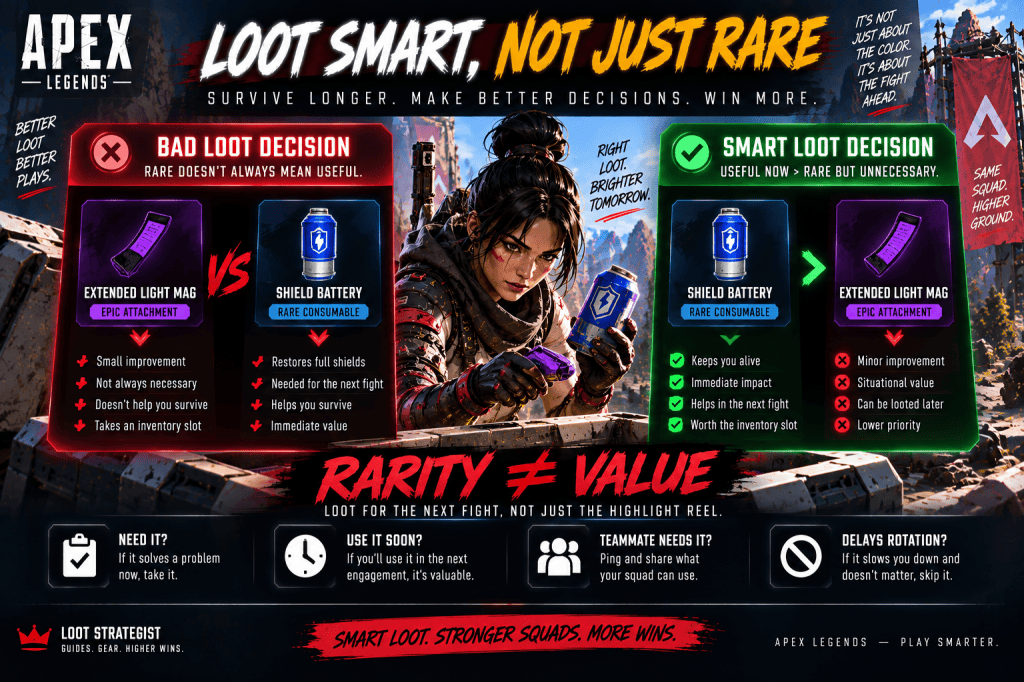
Don’t Chase Every Purple Attachment

This is where rarity becomes misleading.

A purple attachment doesn’t automatically deserve a backpack slot.

Suppose you have:

Good weapon

Good shields

Enough healing

Enough ammo

and then find an attachment that produces only a modest improvement.

Meanwhile, the Ring is closing.

Take the small upgrade only if the time and position justify it.

Otherwise:

Leave it.


Backpacks and Inventory Space

In Core modes, larger backpacks let you carry more resources.

EA’s beginner guidance specifically recommends looking for larger backpacks as part of your normal looting progression. (EA Help)

But more space isn’t automatically better.

A backpack full of:

Unused ammo

Attachments for weapons you don’t use

Too many grenades

isn’t an efficient inventory.

The goal is not:

“Fill every slot.”

It’s:

“Fill the right slots.”


Build Your Inventory Around the Next Fight

Your inventory should change as the match develops.

Early Game

Prioritize:

Weapons

Ammo

Shield resources

Healing

Mid Game

Add:

Better attachments

More grenades

Survival tools

Extra resources for the squad

Late Game

Think more carefully about:

Space

Shield recovery

Grenades

Ammo efficiency

Survival items

By the late game, every slot has more opportunity cost.


Healing: Don’t Ignore Health Recovery

EA’s current beginner guide highlights Shield Cells, Shield Batteries, Syringes, and Med Kits as core healing resources. (EA Help)

Your exact inventory mix depends on your shield status, playstyle, and upcoming fight.

But there is a simple mistake worth avoiding:

Six Shield Batteries + almost no health healing

doesn’t necessarily mean you’re prepared.

You need resources for both layers of survivability.


Shield Healing vs. Health Healing

Shield Cells

Fast and useful for topping up armor.

Shield Batteries

Stronger shield restoration, but slower.

Syringes

Basic health recovery.

Med Kits

Larger health restoration.

You don’t need every item in equal quantities.

You need enough of each to survive the types of damage you’re actually taking.


Grenades Are Inventory, Not Decoration

Grenades can:

Force enemies out of cover

Interrupt a revive

Punish players trapped inside a building

Create space

Block routes

Finish weak enemies

If you use grenades constantly, carry more.

If you never throw them, reconsider whether they’re earning their inventory slot.


Survival Items

EA currently identifies Survival items such as:

Heat Shields

Evac Towers

Mobile Respawn Beacons

as tools that protect or reposition players. (EA Help)

These are situational.

A Heat Shield can be priceless during a bad Ring rotation.

An Evac Tower may transform a dangerous crossing into a manageable one.

A Mobile Respawn Beacon can preserve a match after an elimination.

But if carrying one prevents you from holding essential healing or ammunition, the trade-off matters.


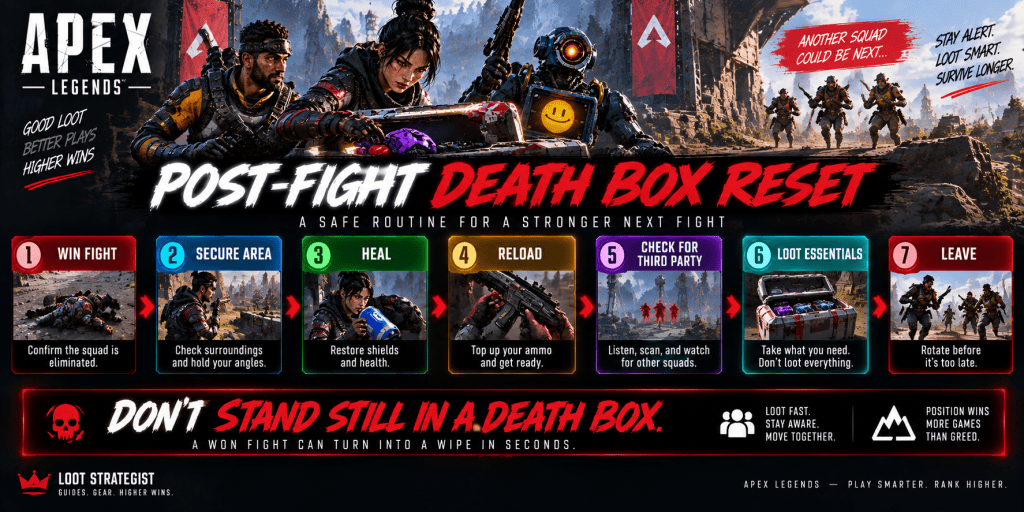
Looting Death Boxes

Apex Legends death box reset showing the steps to secure an area, heal, reload, check for third parties, loot essentials, and leave

Death boxes are among the richest loot sources in a match.

They’re also one of the easiest places to die.

After a fight, don’t immediately start grabbing everything.

Use:

Secure the area

Heal

Reload

Check for another squad

Loot

Leave

This is one of the most important loot habits in Apex.


Loot the Best Death Box First

You don’t have to inspect every box.

Look for:

Your missing essentials

Useful ammo

Batteries

Grenades

Important attachments

Better weapons

Resources your teammates need

Take what improves your next fight.

Then move.


The Post-Fight Looting Trap

You win.

Everyone starts looting.

Nobody watches the surrounding terrain.

Another squad arrives.

Now the team that won the fight loses the next one while standing over the first squad’s boxes.

That’s why your reset order matters.

Win the fight.

Recover.

Scan the surroundings.

Then loot.


Looting While the Ring Is Moving

This is another classic mistake.

Your squad finds a death box.

The Ring is already closing.

Someone says:

“Just one more thing.”

That’s how “one more thing” becomes a long run through damage.

Before committing to the box, ask:

How far is the next safe position?

How much time do we have?

Is the loot actually useful?

Are enemies likely to rotate through here?

Sometimes the correct answer is:

Leave the box.


How Long Should You Loot?

There is no perfect number of seconds.

Use a simpler rule:

Once your inventory can support the next fight, your next upgrade should justify the time and risk required to find it.

If you’re already equipped and the area is becoming dangerous, move.

A slightly better backpack won’t save you from being late to the Ring.


The Loot Value Test

Apex Legends loot guide comparing rare attachments with useful survival items to show why rarity does not equal value

Whenever you’re unsure whether to pick something up, run through five questions:

Do I need it?

Take it.

Will I use it soon?

Probably take it.

Does a teammate need it more?

Ping or share it.

Is it only valuable because of rarity?

Then think twice.

Will it delay our rotation?

If yes, the loot may not be worth it.

This system works better than memorizing a giant list of “must-have” items.


Where Should You Loot?

There is no permanent “best loot spot.”

POIs change.

Loot distributions change.

Match pacing changes.

And Season 30’s World’s Edge update itself changed several named locations and the way players move through the map. EA’s Season 30 materials specifically highlight changes to World’s Edge and its updated POIs. (EA)

So rather than memorizing one sacred landing spot, learn how to evaluate a good POI.

Look for:

Enough loot for your squad

Multiple nearby buildings

A useful next rotation

Manageable contest risk

Access to resources

Good terrain after looting

A POI that gives you slightly less loot but an excellent rotation can be more valuable than a high-loot area surrounded by enemies.


Should You Land at the Highest-Loot POI?

Not automatically.

High-value areas can attract more squads.

That gives you a trade-off:

More potential loot

versus:

More contest risk

In Ranked, that decision matters even more.

A squad capable of winning a contested drop may benefit from it.

A team trying to climb consistently may prefer a quieter landing with enough loot to fight.

There is no universal answer.


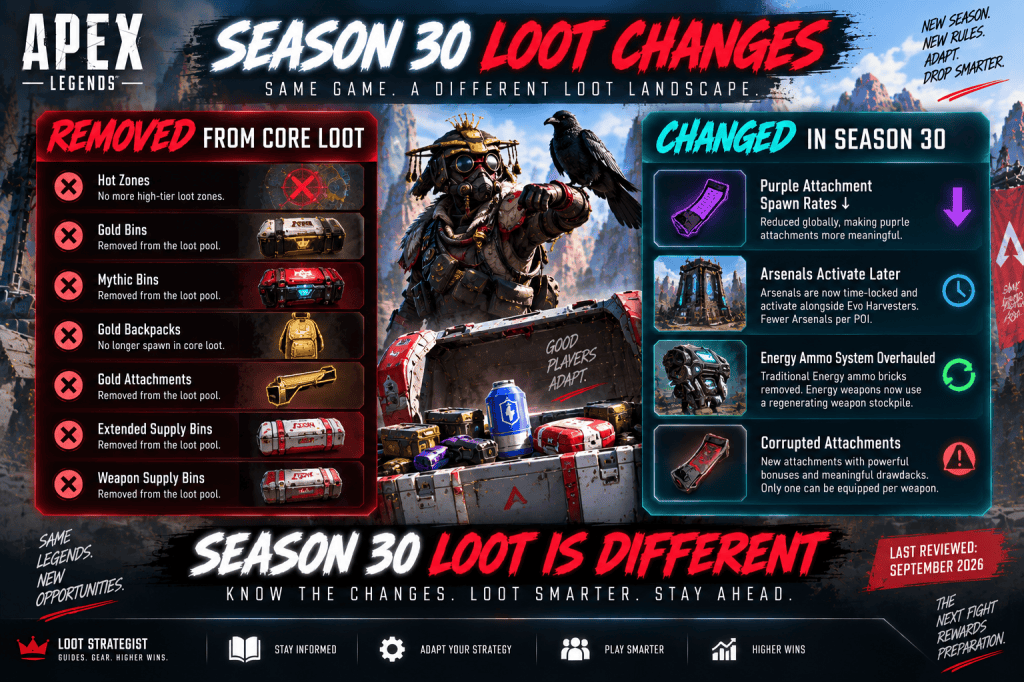
Season 30 Loot Changes You Need to Know

Apex Legends Season 30 loot changes showing removed Core loot and updated attachment, Arsenal, Energy ammo, and Corrupted Attachment systems

This is the section that makes this guide more valuable than older loot articles.

Season 30 changed the Core loot system substantially.

EA removed:

Hot Zones

Gold Bins

Mythic Bins

Gold Backpacks

Gold Attachments

Extended Supply Bins

Weapon Supply Bins

It also reduced purple attachment spawn rates globally. (EA)

That means older guides that tell you to rely on those systems may be outdated.


Hot Zones Are Gone

This deserves special attention because Hot Zones were a familiar part of older Apex loot advice.

Season 30 removed them from Core loot. (EA Help)

So don’t use an old “land at the Hot Zone for guaranteed top-tier loot” strategy as though it still describes the current Core game.

That’s precisely why this article should be reviewed after meaningful loot-system changes.


Gold Backpacks and Gold Attachments Are Gone From Core Loot

Season 30 also removed Gold Backpacks and Gold Attachments from the normal Core loot pool. (EA)

The notable exception is the 4–10x Digital Sniper Threat Sight, which EA says remains unaffected by the broader Gold Attachment removal. (EA)

That means a modern loot guide shouldn’t tell players to spend their entire drop searching for the old Gold-item system.


Purple Attachments Are More Meaningful Now

EA reduced purple attachment spawn rates in Season 30 while maintaining the overall attachment quantity. (EA)

That makes meaningful attachment upgrades a little more significant.

But the basic rule still stands:

Don’t delay a rotation just because you haven’t completed your ideal loadout.


How Arsenals Work Now

Season 30 also changed Arsenals.

They no longer activate immediately at match start.

Instead, they activate alongside Evo Harvesters, and EA reduced the number of Arsenals available per POI.

Their Upgrade Panels can upgrade an attachment slot by one tier, with Purple as the maximum, and can provide an Optic when a weapon doesn’t already have one. (EA)

That makes an Arsenal more useful as part of your mid-match upgrade path than as an automatic first stop after landing.


Don’t Confuse Loot With Progression

Apex now has several systems that interact with equipment and progression.

You have:

Loot

EVO

Legend upgrades

Arsenals

Replicators

Survival items

The best route isn’t always:

“Get every upgrade immediately.”

Sometimes the better route is:

Loot essentials → rotate → gain EVO → revisit upgrades when safe

Think in terms of match tempo.


Smart Looting for Solo Queue

Solo queue creates another challenge.

You can’t assume your teammates will:

Share ammunition

Ping useful loot

Rotate quickly

Stop looting

Watch the Ring

That makes self-sufficiency more valuable.

Carry enough to survive without constantly relying on someone else’s inventory.

But still ping useful resources.

EA explicitly recommends using pings to communicate loot and other important information. (EA Help)

For the broader strategy, see our Apex Legends Solo Queue Guide.


Smart Looting for Ranked

Ranked makes time and risk more important.

A loot detour may cost:

Position

Ring timing

Information

Health

A safer rotation

Before extending a loot trip, ask:

Does this upgrade materially improve our chances in the next fight?

If the answer is no, move.

That habit can be worth more than another rare attachment.


Don’t Become the Squad’s Inventory Manager

Helping teammates is good.

Managing every item they own is not.

Ping useful equipment.

Share excess resources.

Give someone a Shield Battery when they need one.

But don’t stand in one building for two minutes because somebody still wants a particular optic.

At some point, the best loot decision is:

Go.


Loot Faster by Learning Your Loadouts

The more weapons you understand, the faster you loot.

Suppose you see:

Assault Rifle

You already know what ammo and attachments make sense.

Suppose you find:

SMG

You know what secondary range it covers.

That reduces decision time.

You don’t have to stand there debating every item.

Your loadout makes the decision for you.


Stop Reopening the Same Bins

This sounds almost too obvious.

It’s also common.

You search an area.

You walk twenty meters.

Then come back.

Then reopen the same bin.

You probably missed something.

That’s okay.

Keep moving.

Apex rewards momentum.


Don’t Loot an Area After It Has Become Unsafe

This is a critical distinction.

An area can go from:

Safe

to:

Maybe unsafe

to:

Definitely unsafe

very quickly.

Gunfire starts nearby.

A squad rotates through.

The Ring shifts.

Your escape route closes.

Your loot priorities should change immediately.

Don’t keep looting simply because you started.


A Smart Looting Routine

Here’s the entire process in one sequence:

Land

Stay near teammates and spread across nearby buildings.

Arm

Find a usable weapon and its ammunition.

Stabilize

Check your starter gear and top up your healing.

Equip

Take a second weapon and useful upgrades.

Share

Ping or give teammates what they need.

Rotate

Leave once the next upgrade no longer justifies the time.

Reset

After every fight, heal, reload, check your surroundings, then loot.

Rebuild

Replace resources as you spend them.

That’s the loop.


Common Apex Legends Looting Mistakes

Staying Too Long in One POI

More loot isn’t automatically more value.

Chasing the Perfect Loadout

A functional loadout is enough to fight.

Taking Every Rare Attachment

Rarity doesn’t guarantee meaningful value.

Carrying Too Much Ammo

Unused ammunition occupies space.

Ignoring Healing

Good weapons don’t compensate for an empty healing inventory.

Looting Immediately After a Fight

Another squad may already be coming.

Forgetting the Ring

The best death box in the world isn’t worth dying outside the zone.

Ignoring Teammates

Looting is a squad activity.

Treating Gold as Automatically Better

Season 30 has also changed which Gold items even exist in Core loot. (EA)

Using Old Loot Guides

Live-service games punish outdated information.


A Simple Core-Mode Loot Checklist

Before leaving your landing area, ask:

Do I have a usable weapon?

Do I have the correct ammunition or understand my Energy stockpile?

Have I checked my starter gear?

Do I have a second weapon?

Do I have shields and health healing?

Do I have enough resources for the next fight?

Does my squad need anything?

Do we know where we’re rotating?

If the answers are mostly yes:

Leave.


Loot Rule

The best loot isn’t the rarest loot. It’s the loot that keeps you alive long enough to use it.

A purple attachment is useless if you die carrying it.

A full backpack doesn’t matter if your squad is trapped outside the Ring.

A perfect loadout doesn’t help if you spent five minutes building it while another team took the best position.

Good looting is a balance between:

Resources

Time

Risk

Position

Squad needs

The strongest looters aren’t the people who search everything.

They’re the people who know when they’ve found enough.


Final Thoughts

Looting looks simple.

Open a bin.

Pick something up.

Move on.

But good loot management is really a game of priorities.

You need a weapon before you need the perfect attachment.

You need enough ammunition before you need another stack of grenades.

You need a survivable position before you need one more purple upgrade.

And after a fight, you need to know whether it’s safe to loot at all.

Season 30 makes those decisions even more important. Hot Zones are gone. Gold Backpacks and Gold Attachments are out of the normal Core pool. Purple attachments are less common. Arsenals activate later. Energy weapons use regenerating ammunition instead of traditional Energy ammo bricks. Corrupted Attachments add meaningful bonuses with trade-offs. (EA)

So don’t approach Apex loot as a hunt for the rarest possible inventory.

Approach it as a question of tempo:

What do I need now?

What will help in the next fight?

And is the upgrade worth staying here for?

Get equipped.

Get organized.

Take what matters.

Then move.


Related Apex Legends Guides

Apex Legends Beginner Guide — Learn the fundamentals of landing, movement, weapons, healing, positioning, and squad play.

Apex Legends Best Legends Guide — Find the right Legend for beginners, Ranked, solo queue, mobility, support, defense, and other playstyles.

Apex Legends Tier List — See which Legends currently dominate the Season 30 meta and why pick rate isn’t the same as power.

Apex Legends Settings Guide — Optimize FOV, sensitivity, graphics, audio, controller, and FPS settings.

Apex Legends Solo Queue Guide — Learn how to adapt to random teammates, communicate, and make better decisions without a premade squad.

Apex Legends Squad Composition Guide — Learn how to combine Legend classes and squad roles into a more effective team.


Sources & Updates

Last reviewed: September 7, 2026

This guide primarily covers Core Apex Legends modes, including Ranked and Unranked. EA currently distinguishes Core from Freestyle modes such as Wildcard; Wildcard uses a much simpler loot and inventory system and is therefore not treated as the default context for the loot recommendations above. (EA Help)

EA’s current beginner guide was used to verify Core-mode looting advice, including landing near—but not directly on top of—teammates, splitting nearby loot areas, prioritizing weapons and ammunition, and gathering useful healing and equipment. (EA Help)

EA’s current terminology guide was used to verify the Core-mode starter kit, Shield Core, Supply Bins, Survival items, and other core loot terminology. Every Legend in Core modes starts with a Level 1 helmet, Level 1 Evo Shield, Level 1 Knockdown Shield, two Syringes, and two Shield Cells. (EA Help)

EA’s official Season 30: Marked Patch Notes were used to verify the removal of Hot Zones, Gold and Mythic Bins, Gold Backpacks, Gold Attachments, Extended Supply Bins, Weapon Supply Bins, and the reduction in purple attachment spawn rates. The same source was used to verify the updated Arsenal system, weapon-comparison loot cards, attachment stat cards, and the new Energy ammunition system. (EA)

EA’s current Season 30 documentation also confirms that Energy weapons now use regenerating ammunition stockpiles rather than traditional Energy ammo bricks, and that Corrupted Attachments provide strong bonuses with negative trade-offs and are limited to one per weapon. (EA Help)

EA’s Season 30 materials were also used to verify the current World’s Edge updates and changed POIs. Because map layouts and loot conditions can change, this guide deliberately avoids claiming that one location is a permanently “best” loot spot. (EA)

Editorial note: Loot priorities, inventory recommendations, rotation advice, and other strategy in this article are Loot Strategist editorial guidance. They are not official EA rules and should be adapted to the player’s weapons, squad, map, mode, and playstyle.

Apex Legends Tier List: Best Legends for Season 30

Apex Legends Tier List: Best Legends for Season 30

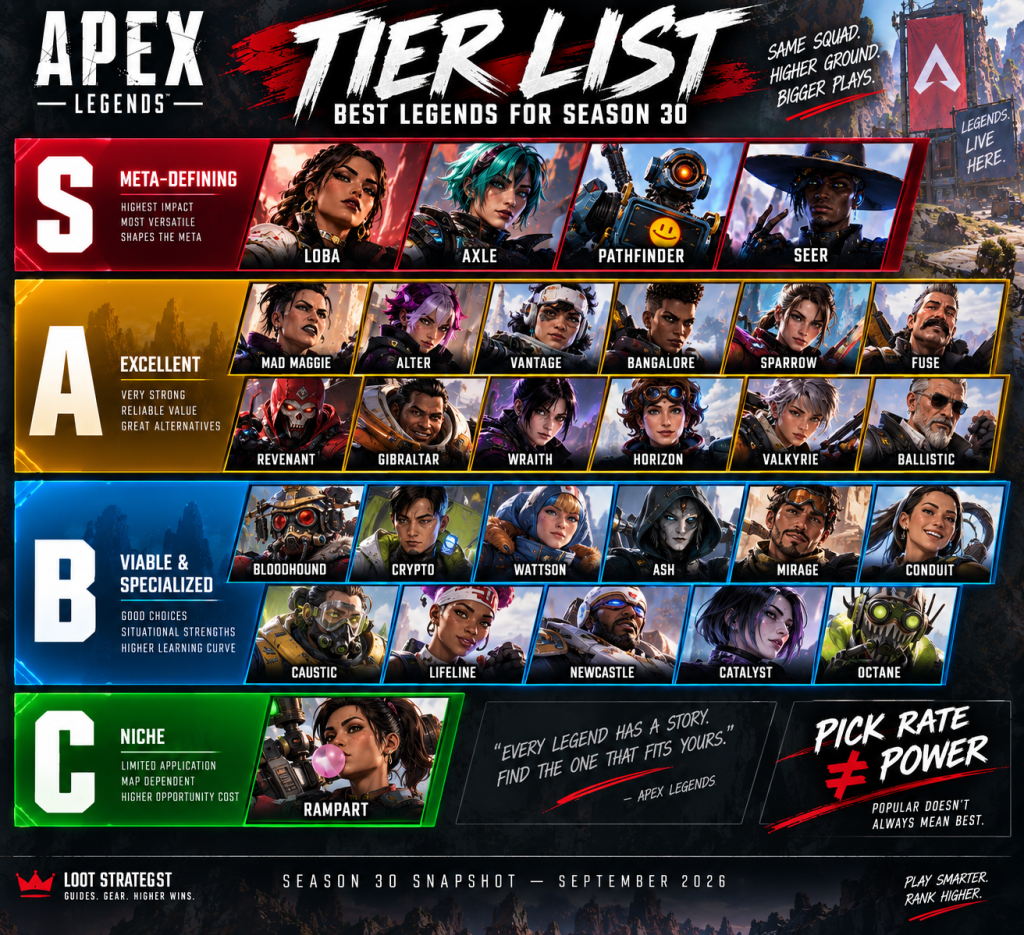
Apex Legends has 28 Legends, and the strongest pick can change surprisingly quickly.

One balance patch can push a forgotten character into the spotlight. A popular Legend can get nerfed and suddenly become less attractive. A supposedly “weak” specialist can still post excellent results when a skilled player builds an entire strategy around the kit.

That’s why a useful Apex Legends Tier List needs more than an S-to-C chart.

This Season 30: Marked ranking looks at current competitive strength, practical squad value, flexibility, combat impact, reliability, and specialist potential. We also use current high-level pick-rate and RP-performance data as evidence—but not as an automatic ranking machine.

The result is a tier list designed to answer the question players actually care about:

Who is worth learning right now?

Season 30 note: This ranking is a current snapshot, not a permanent verdict. Respawn launched Season 30 on August 4, 2026 and introduced a Bloodhound rework, Loba and Rampart buffs, and balance changes to Axle, Seer, and Valkyrie.


Apex Legends Tier List at a Glance

Apex Legends Season 30 tier list ranking all 28 Legends from S-tier to C-tier
TierLegends
S-TierLoba, Axle, Pathfinder, Seer
A-TierMad Maggie, Alter, Vantage, Bangalore, Sparrow, Fuse, Revenant, Gibraltar, Wraith, Horizon, Valkyrie, Ballistic
B-TierBloodhound, Crypto, Wattson, Ash, Mirage, Conduit, Caustic, Lifeline, Newcastle, Catalyst, Octane
C-TierRampart

That gives every current Legend a place.

And that last point matters: 28 Legends in the roster means 28 names in the tier list.

For competitive context, ApexRanked’s September 6, 2026 snapshot tracks 823 current Apex Predators across 170,269 Season 30 Split 1 appearances. Loba leads tracked pick rate at 20.2%, followed by Axle at 19.3%, Pathfinder at 11.7%, Seer at 9.4%, and Mad Maggie at 6.7%.


What S, A, B, and C Mean

A tier list is only useful when the tiers actually mean something.

S-Tier — Meta-Defining

These Legends combine exceptional current strength with broad practical value and strong competitive relevance.

They don’t need a perfect team composition to be useful.

A-Tier — Excellent

These Legends are highly effective and can absolutely carry a strong game plan, but they usually have a clearer weakness, narrower specialization, or higher opportunity cost than S-tier choices.

B-Tier — Viable and Specialized

These Legends can perform very well but generally have more specific applications, higher learning requirements, or fewer ways to influence a match than the leaders.

B-tier does not mean bad.

C-Tier — Niche

These Legends can still work and can be terrifying in the right hands.

They simply have a larger competitive opportunity cost, stronger map dependence, or fewer consistently useful situations.


How We Ranked the Legends

Our ranking uses six criteria.

Current Meta Strength

How effective is the Legend in the current Season 30 environment?

Combat Impact

How much can the kit change an engagement?

Team Utility

Does the Legend make the rest of the squad better?

Flexibility

Can the Legend contribute across different phases of a match?

Reliability

Can the kit create value consistently rather than only in specific scenarios?

Specialist Potential

Can the Legend become exceptionally strong when mastered, even if relatively few players use them?

We then compare those factors with current data.

That distinction is important because pick rate is not the same thing as power.


Why Pick Rate Isn’t the Same as Strength

Apex Legends tier list guide comparing Loba and Ballistic pick rates, RP performance, and tracked game samples

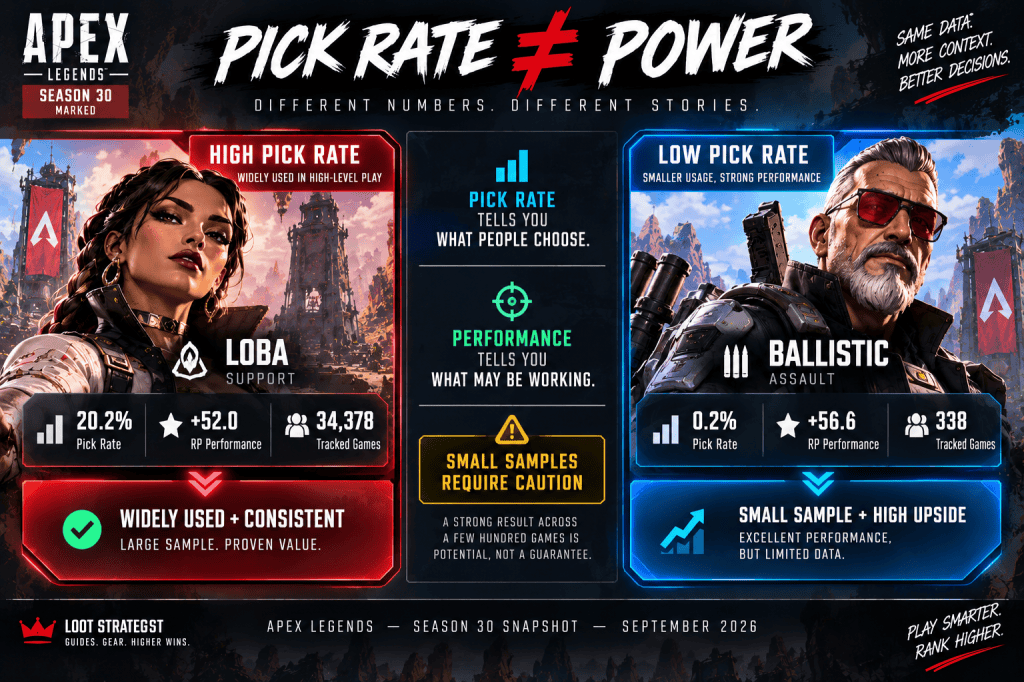
The current Season 30 data makes this especially obvious.

ApexRanked has Loba at:

20.2% pick rate

and Ballistic at:

0.2% pick rate

Yet Ballistic currently shows the highest RP-performance figure in the tracked Predator sample:

+56.6 RP

Loba sits at:

+52.0 RP.

That doesn’t mean Ballistic should automatically replace Loba at the top of the list.

Ballistic has only 338 tracked games in this dataset, compared with Loba’s 34,378.

The useful conclusion is:

Ballistic may have excellent specialist potential, but the evidence is much thinner.

That’s why we use data as evidence and editorial judgment as the final layer.


S-Tier Legends

These are the four Legends currently offering the strongest overall combination of competitive relevance, flexibility, and practical value.

Loba

Loba is our current #1 overall pick.

Her Jump Drive provides mobility, her Passive helps identify high-rarity loot, and her Black Market can improve team access to nearby resources.

Then Season 30 made her even more attractive.

EA reduced her Tactical equip time from 0.6 seconds to 0.4 seconds, increased its range, reduced travel time, and shortened Black Market Boutique’s cooldown from 150 seconds to 120 seconds. Respawn said the changes were intended to improve her survivability and team support.

The competitive numbers line up with that.

Loba currently leads ApexRanked’s Predator pick-rate table at 20.2%, with more than 34,000 tracked appearances.

Why She Is S-Tier

Excellent general utility

Strong solo-queue value

Useful mobility

Resource control

Works in many squad compositions

Best For

Ranked

Solo queue

Flexible squads

Players who value resources and positioning


Axle

Axle remains the other major meta-defining mobility pick.

Her kit lets her change engagement distance quickly, create movement opportunities, and put pressure on teams from awkward angles.

Respawn has been actively tuning her because her mobility and Kickstart drone created too much pressure in too many situations. Season 30 reduced her maximum slide-boost time from five seconds to three seconds, while also changing her Ultimate so it can affect Axle herself and her allies.

Even after those changes, she remains extremely popular at the highest level.

ApexRanked’s September 6 snapshot puts Axle at 19.3% pick rate and 32,794 tracked appearances.

Why She Is S-Tier

Exceptional mobility

Strong fight creation

Excellent repositioning

High ceiling

Best For

Aggressive players

Mechanical players

Mobility-focused squads


Pathfinder

Pathfinder is the most straightforward S-tier mobility recommendation.

His value isn’t limited to flashy movement.

He can give a squad:

Better angles

Faster rotations

High-ground access

Escape options

More freedom to choose where fights happen

That versatility is why Pathfinder continues to appear frequently in high-ranked play.

ApexRanked currently has him at 11.7% pick rate, with 19,872 tracked appearances. His RP-performance figure sits at +52.5.

Why He Is S-Tier

Broad utility

Reliable movement

Strong rotations

Works with many squad styles

Best For

Movement players

Shot-callers

Aggressive repositioning

Ranked


Seer

Seer is the most information-oriented member of the S-tier group.

That makes his strength somewhat different from Loba or the movement Legends.

Seer can help a squad understand what is happening before committing to the fight.

Respawn has also demonstrated how much power information can provide: Season 30 reduced the turn slow on his Tactical because the ability had become frustrating and oppressive when used repeatedly.

ApexRanked currently has Seer at 9.4% pick rate across 16,022 tracked appearances.

Why He Is S-Tier

Strong information

Fight control

Excellent with coordinated teammates

High value before the first shot

Best For

Information-focused players

Coordinated squads

Shot-callers


A-Tier Legends

A-tier Legends are excellent.

The difference is that their strengths are usually a little more specific than those of the S-tier group.

Mad Maggie

Maggie is one of the best answers to an enemy team that refuses to leave cover.

Her kit is built to apply pressure and force movement, making her especially useful against defensive setups.

She currently sits at 6.7% pick rate in the Predator dataset.

Best For

Breaching

Aggressive squads

Close-range pressure


Alter

Alter offers mobility and unusual ways of interacting with space.

She becomes especially valuable in squads that know how to think beyond the obvious route.

Her current Predator pick rate is 5.7%, putting her firmly among the more frequently selected Legends at the top of the ladder.

Best For

Creative rotations

Unpredictable movement

Advanced players


Vantage

Vantage offers information and ranged pressure, but her value depends heavily on whether the squad knows how to convert that information into an advantage.

Her current Predator pick rate is 3.5%.

Best For

Scouting

Long-range pressure

Information-heavy squads


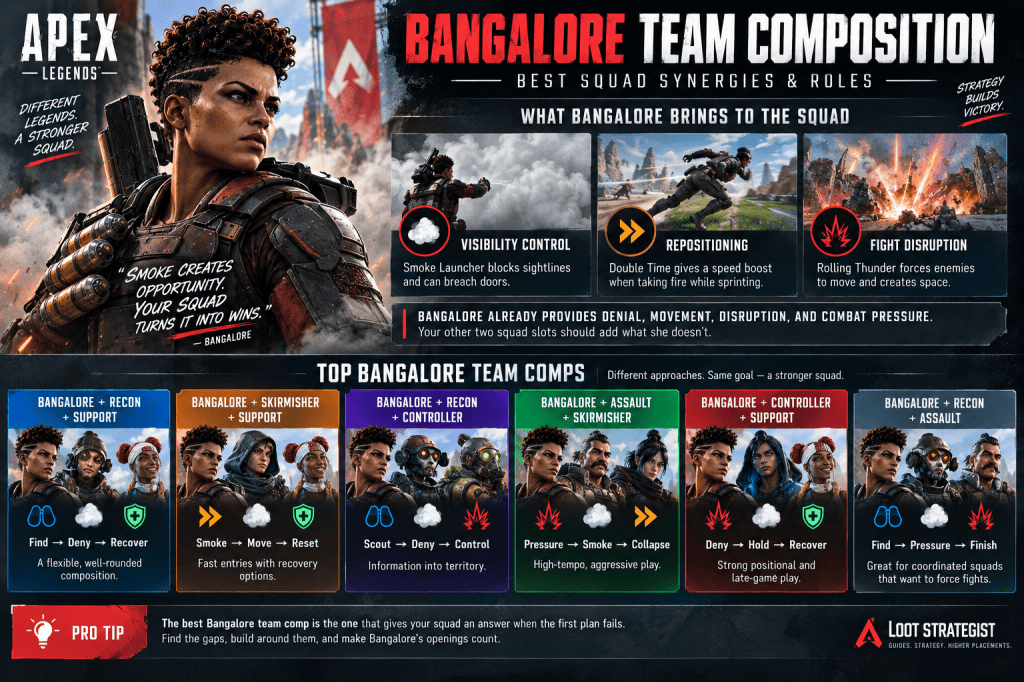
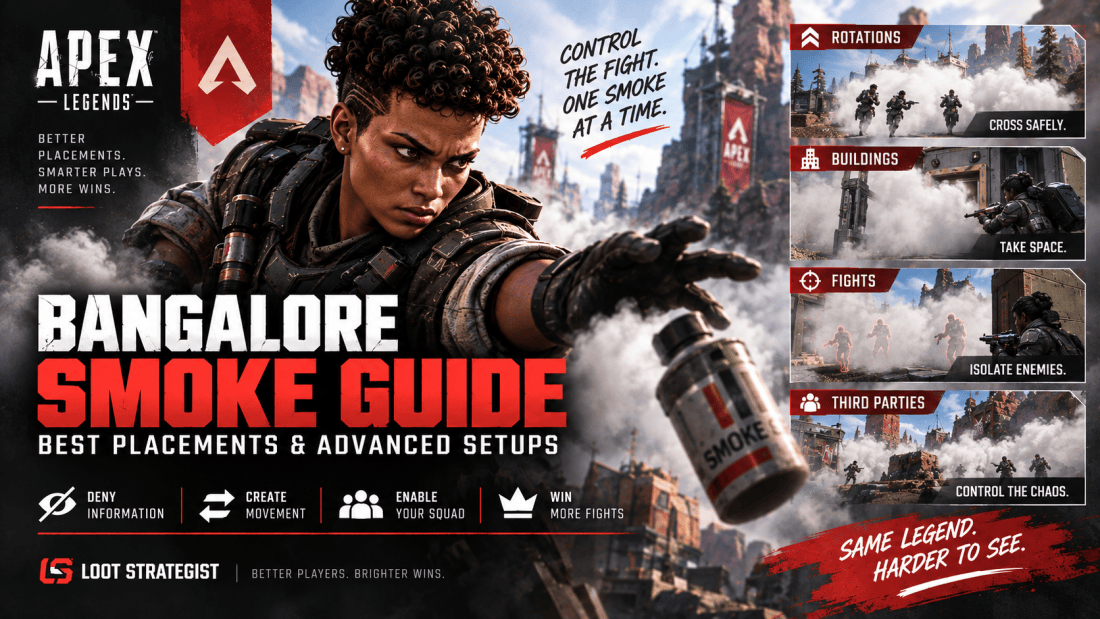
Bangalore

Bangalore remains one of the safest all-purpose choices in Apex.

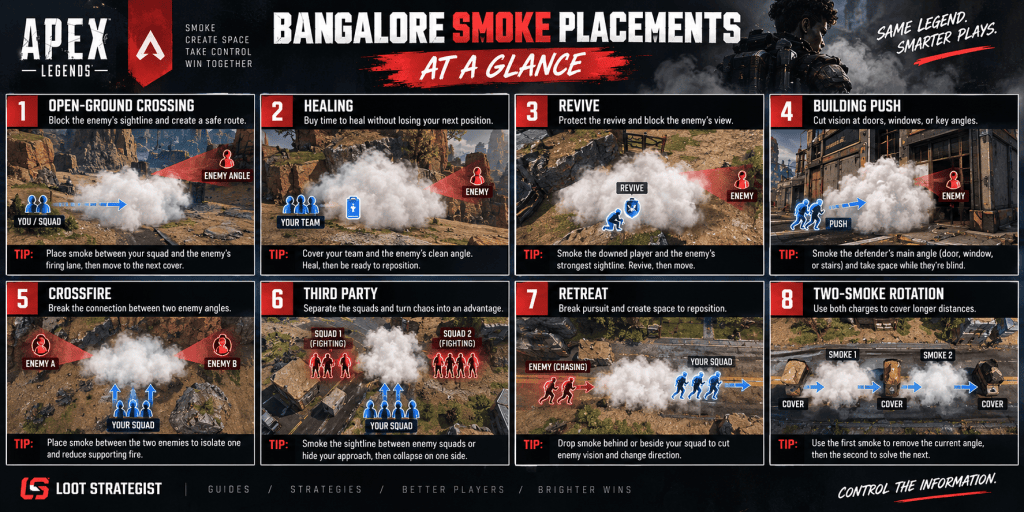
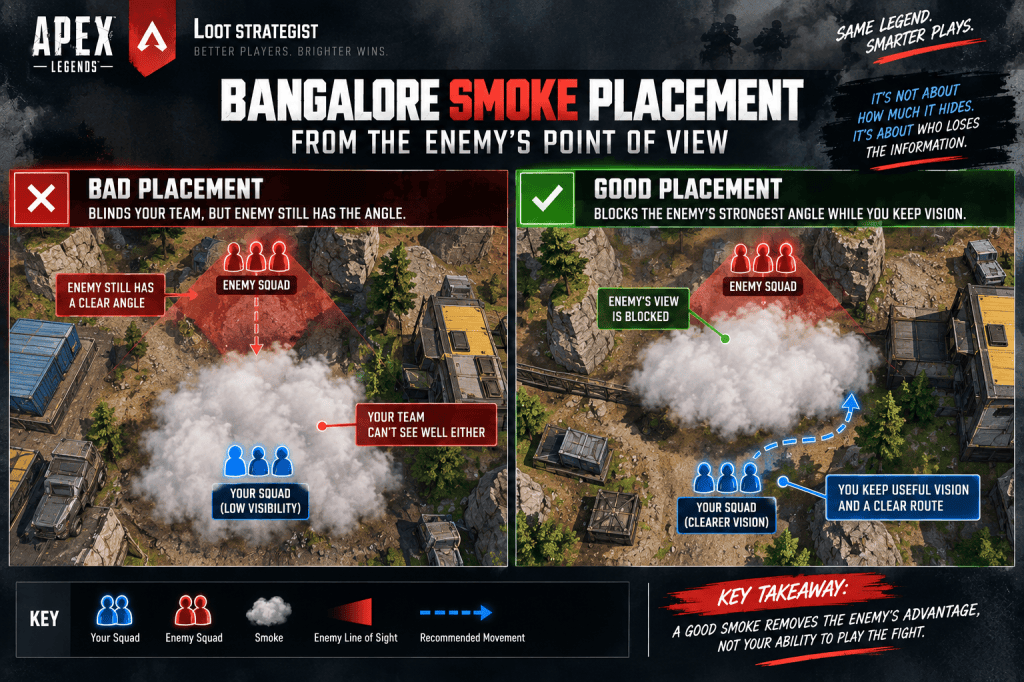
Smoke creates cover.

Double Time can help reposition under fire.

Rolling Thunder controls space.

The kit is straightforward enough for newer players but still useful at high levels.

Best For

Beginners

Solo queue

Balanced squads

Repositioning


Sparrow

Sparrow has established meaningful competitive presence, with a 3.3% Predator pick rate in the current dataset.

His value rises when teammates actually use the information and movement his kit provides.

Best For

Active scouting

Coordinated fights

Mobile squads


Fuse

Fuse excels at creating problems for players who think cover makes them untouchable.

His offensive utility can force enemies to move, weaken fortified positions, and make defensive setups uncomfortable.

Best For

Area denial

Aggression

Breaking defensive teams


Revenant

Revenant rewards players who understand timing.

His aggressive mobility can make him extremely dangerous, but poor timing can leave him isolated.

He currently has around 1.9% Predator pick rate.

Best For

Aggressive players

Close-range pressure

Confident entry players


Gibraltar

Gibraltar’s value comes from protection and fight control.

A well-timed Dome can completely change an engagement.

The downside is tempo.

Fast-moving squads can sometimes get more value from mobility-oriented picks.

Best For

Coordinated squads

Defensive fighting

Emergency protection


Wraith

Wraith remains useful because she gives aggressive players another way to escape a bad commitment.

Her Portal also provides a way to create safer movement options for the squad.

She currently sits around 1.5% pick rate in the Predator dataset.

Best For

Solo queue

Aggressive repositioning

Flexible squads


Horizon

Horizon becomes especially useful when vertical positioning matters.

She can create high-ground opportunities that other squads may not be able to answer as easily.

The trade-off is greater map and situation dependence.

Best For

Vertical fights

High-ground play

Coordinated pushes


Valkyrie

Valkyrie remains valuable for teams that prioritize macro movement and rotation options.

She received another balance adjustment in Season 30 as Respawn continued tuning mobility-heavy Legends.

She’s still useful.

She’s simply less automatic than she once was.

Best For

Rotations

Map mobility

Repositioning


Ballistic

Ballistic is the most interesting A-tier placement.

His current pick rate is only 0.2%, with just 338 tracked appearances in the Predator sample. Yet he posts the highest RP-performance figure at +56.6.

That’s too interesting to ignore.

It’s also too small a sample to blindly call him S-tier.

So we place him in A as a high-upside specialist.

Best For

Weapon-focused aggression

Experienced players

Players who understand fight timing


B-Tier Legends

B-tier means viable, not bad.

These are often strong choices for specific players, teams, maps, or situations.

Bloodhound

Season 30 completely refreshed Bloodhound.

The Passive now displays enemy footsteps and introduces White Ravens for tracking. The Tactical has a three-second full-body scan followed by four snapshot scans, while the new Allfather’s Cloak Ultimate provides a temporary cloaking effect within its area.

Yet Bloodhound currently has only a 0.7% Predator pick rate.

At the same time, the tracked RP-performance number is +54.7, second only to Ballistic.

That’s exactly why we don’t use pick rate as the tier itself.

Best For

Tracking

Aggressive recon

Players learning information play


Crypto

Crypto is another specialist whose numbers need context.

He currently has only 0.6% Predator pick rate, but posts +55.4 RP performance across 1,036 tracked games.

That suggests impressive potential when mastered.

The problem is execution.

Time spent controlling the drone is time not spent directly fighting.

Best For

Coordinated squads

Scouting

Advanced information play


Wattson

Wattson remains excellent when the squad can decide where it wants to fight.

Her value rises in controlled positions and late-game setups.

It falls when the squad is constantly forced to rotate.

Best For

Endgame positioning

Building control

Defensive squads


Ash

Ash remains a functional aggressive mobility option, but she faces significant competition from the stronger current movement picks.

Best For

Aggression

Mobility

Target isolation


Mirage

Mirage rewards players who understand misdirection and timing.

His deception can still create clutch situations, particularly in lower- and mid-level lobbies.

The higher the skill level of the opposition, the more important good timing becomes.

Best For

Mind games

Solo queue

Clutch situations


Conduit

Conduit is one of the better Support picks for players who want to stay active during fights.

Her value becomes much clearer when the squad plays aggressively and her abilities can keep teammates fighting.

Her current Predator pick rate is 0.4%, but her tracked RP performance is a respectable +51.9.

Best For

Aggressive support

Team sustain

Coordinated fights


Caustic

Caustic remains dangerous when the enemy has to enter controlled space.

The problem is the same one that affects many defensive specialists:

Apex eventually makes you move.

Best For

Area denial

Building defense

Close-range control


Lifeline

Lifeline is still one of the simplest ways to bring recovery utility into a squad.

Her current Predator pick rate is only 0.3%, but that says much more about high-level meta preferences than it does about her usefulness to an ordinary player.

Best For

Beginners

Support players

Recovery-focused squads


Newcastle

Newcastle can be extremely strong when a squad understands how to fight around his defensive abilities.

His current pick rate is only 0.3%, so the dataset doesn’t show widespread competitive adoption, but he remains an attractive specialist for coordinated defensive recovery.

Best For

Revives

Defensive recovery

Coordinated squads


Catalyst

Catalyst can reshape how enemies enter and exit an area.

That control is valuable, but it requires a squad that knows how to capitalize on it.

Best For

Area control

Defensive squads

Endgame positions


Octane

Octane belongs in B-tier for a simple reason:

He’s still fun, mobile, and perfectly capable of taking over a lobby in the right hands.

But the current game offers stronger overall movement options.

ApexRanked has Octane at 2.6% Predator pick rate and +43.6 RP performance in its September 6 snapshot.

That makes him a viable movement choice without giving him the same overall value as Axle or Pathfinder.

Best For

Aggressive players

Movement practice

Fast-paced casual play


C-Tier Legend

C-tier is the narrowest category in this list.

It’s not a “never play this character” warning.

It’s a statement about competitive opportunity cost.

Rampart

Rampart is the clearest example.

Respawn actually buffed her in Season 30 because the team felt she still struggled to compete despite previous improvements. The developer notes describe her as extremely strong when she can bunker into a favorable position, but difficult to make work otherwise.

That perfectly describes her current tier.

Give Rampart:

Time

Strong ground

A favorable Ring

A defensible position

and she can become terrifying.

Give her:

A bad rotation

Open terrain

Constant movement

and the value falls quickly.

Her current Predator pick rate is only 0.2% across 321 tracked appearances.

Best For

Defensive specialists

Prepared positions

Players who enjoy controlling space


What the Current Meta Actually Looks Like

The headline is straightforward:

Loba + Axle + Pathfinder

is currently the most common trio tracked by ApexRanked.

The combination has appeared 2,967 times with an average +56.2 RP in the current Season 30 Split 1 dataset.

That combination makes sense.

Axle provides aggressive movement.

Loba supplies resources and flexible utility.

Pathfinder handles mobility and rotation.

It’s a good example of what the current meta rewards:

mobility + resources + flexible positioning

But it doesn’t mean every player should copy that squad.

A different combination may suit your team better.


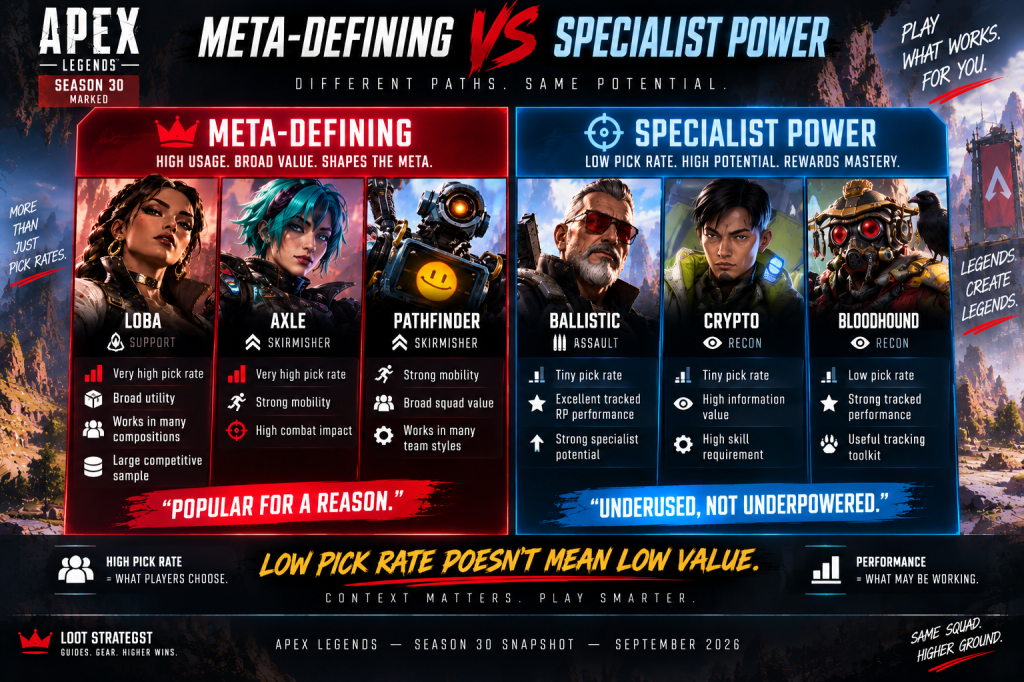
The Most Interesting Low-Pick Legends

Apex Legends tier list comparison showing meta-defining Legends versus low-pick specialist Legends

Current data gives us another story that deserves attention.

Ballistic

0.2% pick rate

+56.6 RP

Crypto

0.6% pick rate

+55.4 RP

Bloodhound

0.7% pick rate

+54.7 RP

Those are excellent performance numbers compared with their relatively tiny pick rates.

But the sample sizes matter.

Ballistic has only 338 tracked games.

Loba has more than 34,000.

You shouldn’t read those numbers as:

“Ballistic is secretly the strongest Legend.”

Read them as:

“Some low-pick specialists can perform extremely well when the right player uses them.”

That’s a much more defensible conclusion.


Why Tier Lists Shouldn’t Be Static

Season 30 already demonstrates how quickly things move.

Bloodhound received a rework.

Loba was buffed.

Rampart was buffed.

Axle was nerfed.

Seer was nerfed.

Valkyrie was adjusted.

Respawn also changed the weapon and loot systems, which can indirectly alter the value of Legend kits.

A Legend doesn’t need a direct buff to become stronger.

Sometimes the environment changes around them.

That’s why this article should be reviewed when there is a meaningful balance patch, not only when a new Season starts.


When Should You Ignore the Tier List?

You should ignore it when:

You’re still learning the game.

You don’t understand the S-tier kit.

Your squad already has too much overlapping utility.

The map doesn’t suit the Legend.

You simply play another Legend dramatically better.

A tier list describes relative strength.

It does not play the match for you.


Best Legends by Role

For readers who don’t care about tier letters, here’s the more practical version.

RoleStrong Choices
OverallLoba, Axle, Pathfinder
AggressionAxle, Mad Maggie, Revenant
MobilityAxle, Pathfinder, Wraith
InformationSeer, Vantage, Bloodhound
SupportLoba, Lifeline, Conduit
DefenseRampart, Wattson, Catalyst
Solo QueueLoba, Bangalore, Pathfinder, Wraith
BeginnersBangalore, Lifeline, Pathfinder
RankedLoba, Axle, Pathfinder, Seer, Mad Maggie
BreachingMad Maggie, Fuse
SpecialistBallistic, Crypto

For playstyle-specific recommendations, see our Apex Legends Best Legends Guide.


Tier List vs. Best Legends Guide

These pages should answer different questions.

Apex Legends Tier List

“Who is strongest right now?”

Useful for:

Meta watchers

Ranked players

Competitive players

Players deciding which Legends deserve practice time

Apex Legends Best Legends Guide

“Who is best for my playstyle?”

Useful for:

Beginners

Solo queue players

Mobility players

Support players

Defensive players

That distinction keeps both pages useful instead of making them duplicate one another.


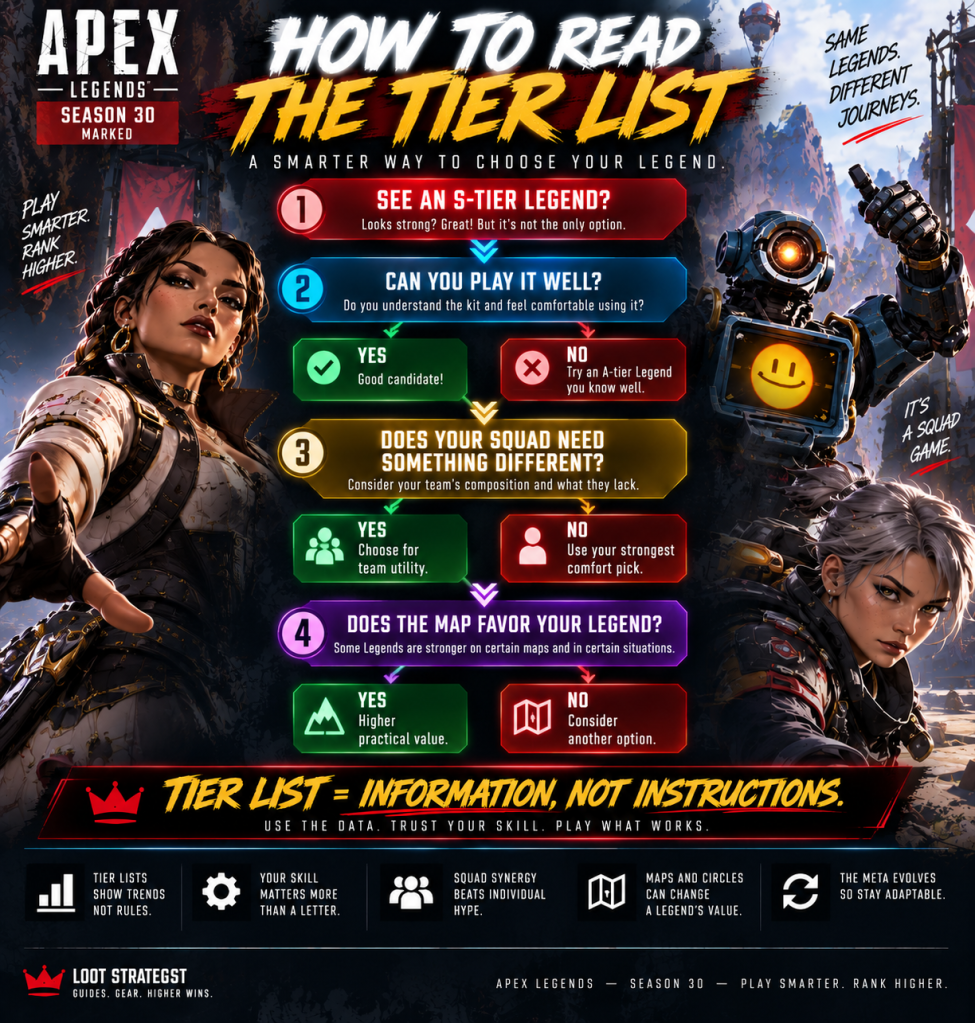
How to Use This Tier List

Apex Legends tier list guide showing how to choose a Legend based on skill, squad needs, and map suitability

Don’t read:

S-tier = must play

Read:

S-tier = currently deserves serious attention

Then ask:

Can I play the Legend well?

Does my squad benefit from the kit?

Does the map support the Legend?

Do I understand the weaknesses?

If the answers line up, that’s probably a strong choice.


Tier List Rule

Don’t chase the letter. Chase the advantage.

The strongest Legend on paper can be a poor pick in your hands.

A specialist can be excellent when you’ve mastered the exact situation they are designed to solve.

And a balanced Legend that gives you several useful options can be worth more than a character with one spectacular trick.

That’s why this list treats:

meta strength

usage

performance

flexibility

and specialist value

as separate pieces of the puzzle.


Final Verdict

For Season 30, our current S-tier group is:

Loba

Axle

Pathfinder

Seer

They combine the strongest overall mix of current usage, competitive relevance, and broad practical value. Loba, Axle, Pathfinder, and Seer are also the four most-picked Legends in ApexRanked’s current Predator dataset.

Below them, A-tier is full of excellent alternatives, including Mad Maggie, Alter, Vantage, Bangalore, Sparrow, Fuse, Revenant, Gibraltar, Wraith, Horizon, Valkyrie, and Ballistic.

And some of the most interesting names aren’t near the top of the pick-rate chart.

Ballistic, Crypto, and Bloodhound all post exceptional RP-performance figures despite very small shares of Predator play.

That’s exactly why a good tier list needs context.

The current meta tells you who is popular.

Performance data tells you what may be working.

Game knowledge tells you why.

And your own skill determines how much of that strength you can actually use.


Final Thoughts

Apex Legends tier lists are useful.

They become dangerous when players treat them as commandments.

The current Season 30 meta clearly favors a few standout picks, especially Loba, Axle, Pathfinder, and Seer. But the same data also shows that lower-pick specialists can perform extremely well in the right hands.

So use this list as a roadmap, not a rulebook.

Learn the S-tier Legends.

Understand the A-tier options.

Don’t dismiss B-tier specialists.

And never feel bad about playing a lower-ranked Legend that you genuinely understand.

Apex is too fast, too complicated, and too dependent on team decisions for one letter to tell the entire story.

The better question isn’t:

“Who’s S-tier?”

It’s:

“Who gives me the best advantage for the way I play Apex?”

That’s where the real tier list starts.


Related Apex Legends Guides

Apex Legends Best Legends Guide — Find the best Legend for your playstyle, whether you prefer Ranked, solo queue, mobility, support, or aggressive fights.

Apex Legends Squad Composition Guide — Learn how to build stronger squads around complementary Legend roles rather than simply stacking high-tier characters.

Apex Legends Ranked Guide — Learn how RP, placement, rotations, fights, splits, and competitive decision-making work.

Apex Legends Solo Queue Guide — Learn how to adapt to random teammates and make stronger decisions without a premade squad.

Apex Legends Settings Guide — Optimize FOV, sensitivity, graphics, audio, controller, and FPS settings.


Sources & Updates

Last reviewed: September 7, 2026

This article is a Season 30: Marked snapshot. Tier placements should be revisited after major Legend balance changes, meaningful meta shifts, or significant changes to the game’s maps, weapons, or systems.

EA’s official Legend guide confirms that Apex Legends currently has 28 Legends divided into five classes: Assault, Controller, Recon, Skirmisher, and Support.

EA’s official Season 30: Marked patch notes, published August 3, 2026, were used to verify the season’s Bloodhound rework, Loba and Rampart buffs, and balance changes affecting Axle, Seer, and Valkyrie.

EA’s current Season 30 information also confirms the Bloodhound rework, including enemy-footprint tracking, White Ravens, updated Tactical scanning, and the Allfather’s Cloak Ultimate.

Competitive usage data comes from ApexRanked’s September 6, 2026 Season 30 Split 1 Predator dataset, which tracks 823 current Apex Predators across 170,269 match appearances. The dataset records Legend pick rates, RP performance, and common trio compositions.

Current tracked pick rates place Loba at 20.2%, Axle at 19.3%, Pathfinder at 11.7%, Seer at 9.4%, Mad Maggie at 6.7%, Alter at 5.7%, and Octane at 2.6%.

The same dataset shows why pick rate is not used as an automatic tier calculation: Ballistic currently has +56.6 RP performance across 338 tracked games, Crypto +55.4 across 1,036, and Bloodhound +54.7 across 1,107, while Loba has +52.0 across 34,378.

ApexRanked currently lists Axle / Loba / Pathfinder as the most common tracked trio in Season 30 Split 1, appearing 2,967 times with +56.2 RP in its current dataset.

Editorial methodology: Loot Strategist’s tier placements combine current competitive usage, RP-performance context, combat impact, team utility, flexibility, reliability, specialist potential, and editorial judgment. Small samples are treated cautiously and are not allowed to overrule large-sample competitive evidence by themselves.

Editorial note: This is Loot Strategist‘s analysis, not an official EA ranking. The phrase “S-tier,” “A-tier,” “B-tier,” and “C-tier” represents our editorial assessment of relative usefulness within the Season 30 environment.