
Apex Legends Bangalore Smoke Guide: Best Smoke Placements & Advanced Setups
Bangalore’s Smoke Launcher is easy to use and surprisingly easy to waste.
The difference between an average smoke and a great one is rarely the size of the cloud. It is where the cloud lands, what information it removes, and what your squad does next.
EA’s current Bangalore documentation confirms that Smoke Launcher creates a smoke wall on impact and that its canisters can break or breach doors. The current Showdown tuning also gave the Tactical a 30-second cooldown, 2,900 projectile speed, and a 0.25-second pull-out time. Smoke can also be temporarily disabled by ordnance and abilities used inside or near it. (EA Help)
That makes Bangalore less about throwing smoke whenever a fight gets messy and more about controlling which parts of the fight the enemy is allowed to see.
This guide focuses specifically on that: practical smoke placements, repeatable setups, and the small positioning decisions that turn Bangalore’s Tactical into a real advantage.
Loot Strategist rule: Smoke the enemy’s strongest information before you smoke your own.
Bangalore Smoke Placements at a Glance
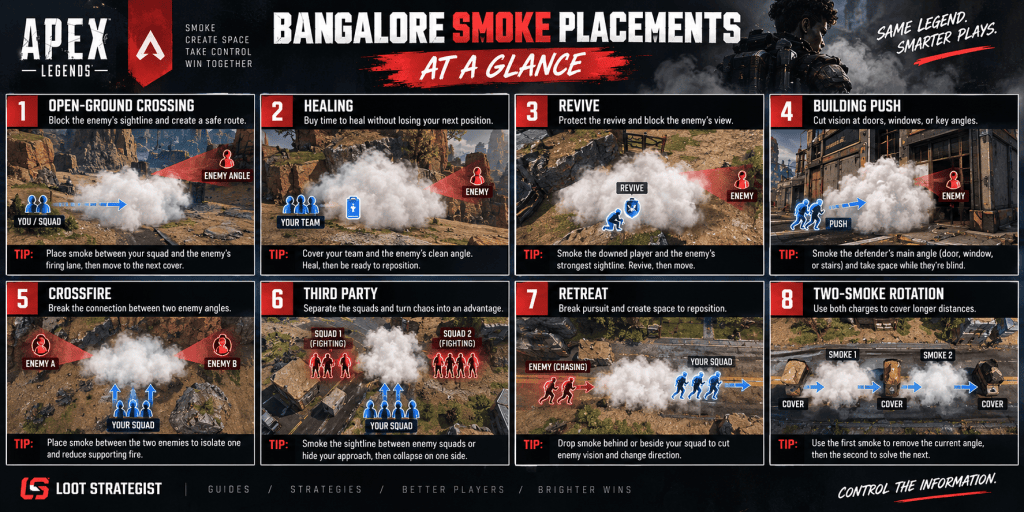
| Situation | Where to Place Smoke | Immediate Follow-Up |
|---|---|---|
| Open-ground crossing | Between your squad and the strongest enemy sightline | Move to the next hard cover |
| Healing | Between your team and the enemy’s firing lane | Heal while preparing the next move |
| Revive | Cover the revive and the enemy’s clearest angle | Revive, then leave the smoke |
| Building push | On the defender’s doorway, window, or supporting angle | Take space while vision is disrupted |
| Enemy crossfire | Between the two enemy positions | Pressure the isolated player |
| Third party | Between the squads rather than directly on your own team | Collapse on one side |
| Retreat | Behind or beside your movement path | Change direction or reach new cover |
| Two-smoke rotation | First smoke on the current angle, second on the next | Move through in stages |
| False rotation | On the route enemies expect you to use | Reposition somewhere else |
The placement should always answer a simple question:
What becomes harder for the enemy to do after this smoke lands?
1. Smoke the Strongest Enemy Advantage
Start here.
When an enemy squad has you under pressure, find the one sightline that matters most.
It could be:
- a sniper watching the rotation
- a player holding a window
- a head-glitch on a ridge
- a shotgun player controlling a doorway
- a teammate providing a crossfire
That is your smoke target.
You do not always need to cover the entire enemy squad.
You need to remove the part of the fight that is currently making your position difficult.
Example
An enemy team is holding a building. One player watches the entrance while another watches your rotation from a window.
Smoking your own squad may hide everyone equally.
Smoking the window angle may be enough to let one teammate cross safely while another keeps pressure on the doorway.
That’s a much better trade.
2. Open-Ground Smoke Placement
Open terrain is where smoke can feel almost magical when it is placed correctly.
The mistake is treating the smoke as a destination.
You need three points:
Current cover → Smoke → Next cover
Your canister should create the bridge between those positions.
Good placement
Put the smoke across the enemy’s primary firing lane, with enough distance that your squad can move toward it and continue into the next safe position.
Bad placement
Drop it directly on your feet, run twenty meters, and discover that the smoke ends before you reach meaningful cover.
You have not solved the rotation.
You have simply delayed being exposed.
The moving-wall idea
On a long crossing, use the first smoke to remove the current threat and the next smoke to solve the next threat.
Do not fire both immediately unless the situation demands it.
A staggered sequence gives your squad more control over the route.
3. Edge Smoke vs. Center Smoke
This is one of the easiest ways to improve your placement without learning a hundred set plays.
Center smoke
A center smoke sits directly on the area your squad occupies.
It gives broad concealment but also removes a lot of your own vision.
Edge smoke
An edge smoke sits between your team and the enemy.
Your squad remains able to see one side of the fight while the opposing team loses the important angle.
For many situations, edge smoke is cleaner.
It creates asymmetry rather than turning the entire area into a visual coin flip.
When you have a strong position already, preserving some of your own information is valuable.
4. Smoke for Healing and Resets
A healing smoke has one job:
buy time without creating a worse position afterward.
That means the best placement usually covers both:
the player who needs to reset
and
the enemy’s clean firing lane.
Do not place the smoke simply because someone is using a Battery.
Look at the route the enemy would take to punish that Battery.
That’s the angle you need to break.
A better reset
Instead of:
Smoke → Heal → Sit there
think:
Smoke → Heal → Reposition
The final step matters because the smoke will eventually become less useful, and Bangalore’s current smoke can also be temporarily disabled by nearby ordnance and abilities. (EA)
5. Best Smoke Placement for a Revive
Revives become much easier to protect when you stop thinking only about the downed player.
Look at the enemy.
Where are they?
What can they see?
Which angle gives them the easiest shot?
Then place the smoke so that the enemy must either:
move,
push through the cloud,
or
give up that angle.
The revive itself should be treated as one part of the maneuver.
The second the teammate is back on their feet, the squad should already know where it is going next.
Smoke is buying that time.
6. Offensive Smoke: Cover the Push, Not the Panic
Bangalore’s smoke becomes much more dangerous when you stop treating it as a defensive ability.
Suppose one enemy is holding a powerful position and the other two are providing support from farther back.
You can smoke your own squad and walk forward.
Or you can smoke the supporting sightline.
Now the isolated defender has less help.
That creates a much better entry.
Offensive smoke works especially well when:
- one enemy is separated
- the supporting angle is obvious
- your squad already knows the target
- you have a close-range weapon ready
- the enemy cannot easily change positions
This is where the Bangalore Best Loadouts article can be linked naturally.
A shotgun or SMG becomes more useful when Smoke has already compressed the engagement into the distance where those weapons excel.
7. Building Smoke: Doors, Windows, and Stairs
Buildings reward precise smoke placement.
You rarely need to fill the whole structure.
Instead, identify the defender’s strongest information source.
Doorways
Smoke can disrupt a defender’s ability to read the timing of an entrance. Bangalore’s canisters can also break or breach doors. (EA Help)
That combination creates a useful entry problem for the defender:
Do I hold?
Do I back up?
Do I push through?
Each choice changes the fight.
Windows
Windows are often more important than the main entrance because they allow defenders to create supporting fire.
A single well-placed smoke can remove that second angle without covering the entire building.
Stairs
Stairs compress movement.
If an enemy is relying on a staircase to control when your team can move between floors, smoking that route can remove some of their timing information.
You do not necessarily need to enter through it.
Sometimes the point is simply to make the defender stop trusting the angle.
8. Smoke the Crossfire, Not the Target
This is one of the highest-value advanced placements.
Imagine two enemies are holding separate angles:
Enemy A ← your squad → Enemy B
You are caught between them.
A common reaction is to smoke your own position.
Instead, look for the line connecting A and B.
If you place the smoke between those positions, you can break the relationship between their angles.
Now one enemy has less support.
That can create the opening your team actually needs.
The smoke did not blind the target.
It changed the geometry of the fight.
9. Isolate One Enemy With a Smoke Wall
You can use the same idea more aggressively.
Suppose three enemies are positioned:
A — B — C
B has moved slightly ahead.
A smoke wall between B and the other two can create a temporary separation:
A/C | Smoke | B
That gives your squad a short opportunity to focus B before the supporting players regain a clean line of sight.
The important word is temporary.
Do not stand around admiring the placement.
The smoke created the opening.
Your team has to use it.
10. Third-Party Smoke: Separate the Fight
Third parties become much more manageable when you stop thinking of two enemy squads as one giant problem.
Look at the relationship between them.
Setup A: Cut the squads apart
Smoke the sightline connecting the two teams.
One squad may lose the ability to support the other.
Setup B: Hide your approach
Smoke between your squad and the strongest angle, then move before the enemy can reconstruct your position.
Setup C: Block the escape
If one squad is already weakened, smoke the route they are most likely to use to leave.
Now your Tactical is influencing where the fight goes, not merely whether you can be seen.
That is a much stronger use of smoke.
11. The Reverse Smoke
Most players instinctively throw smoke forward.
Sometimes the better placement is behind you.
Imagine your squad has just won a fight and expects another team to arrive from the rear.
Instead of smoking the area in front, obscure the route behind you while the squad heals and repositions.
The same principle works during a retreat.
Smoke the route the enemy is using to maintain visual contact, then change direction.
The enemy expects the smoke to tell them where you are going.
Instead, use it to hide where you stopped going.
12. The Layered Smoke Setup
Two smoke charges can create a much better route when used as separate stages.
First smoke
Remove the current firing lane.
Move
Take the first piece of safe ground.
Second smoke
Solve the next sightline.
Move again
Reach the final piece of cover.
That is far better than dropping both smokes at once simply because you have them available.
Think of each canister as solving a different moment in the rotation.
13. The False Rotation Setup
Smoke can hide more than movement.
It can hide your intention.
Suppose your team is expected to rotate left.
Throwing smoke on the left can make that route look like your obvious plan.
Instead, use the visual disruption to reposition somewhere else.
This works because enemies often react to incomplete information.
Do not overuse it, though.
A trick stops being a trick once the enemy expects the trick.
14. Smoke From the Enemy’s Point of View
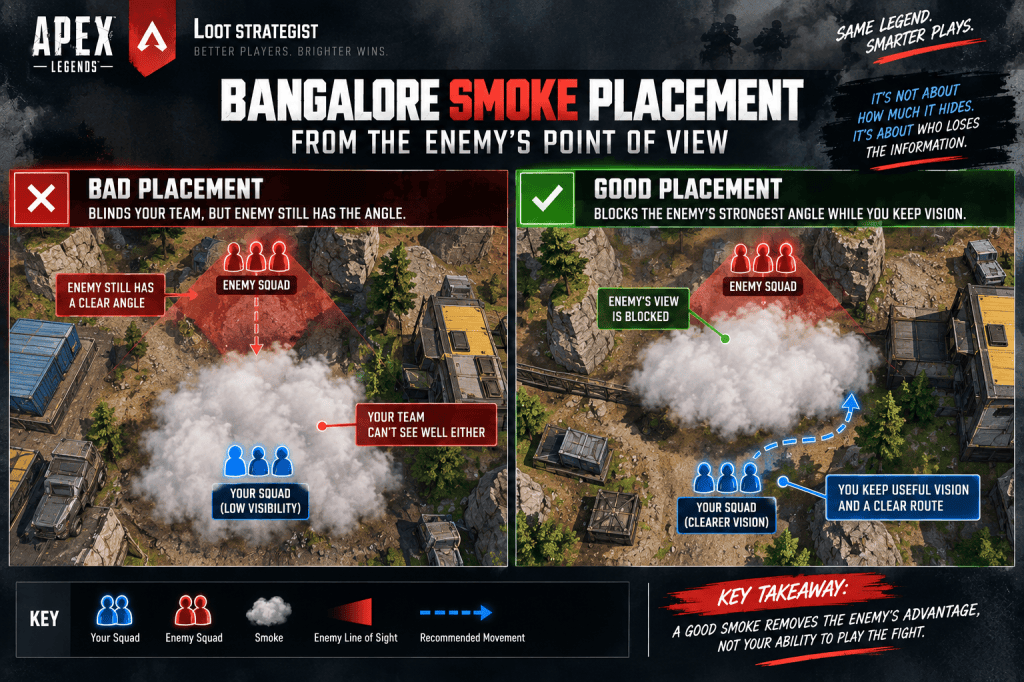
This is an excellent habit to practice.
After placing a smoke, mentally step into the enemy’s position.
Ask:
What can they still see?
Which teammate can they still shoot?
Which route remains open?
Can they walk around the cloud?
Can they push through it?
Have I actually removed their strongest angle?
That last question is the one that matters.
A smoke cloud can look enormous from your perspective while leaving the enemy’s most important sightline completely intact.
15. Use Smoke to Create an Angle, Not Just Cover One
A more advanced Bangalore play is to use smoke to manufacture a new angle.
For example:
Smoke the original angle → move while hidden → appear from another side
Now the enemy is no longer fighting the position they prepared for.
This pairs naturally with Bangalore’s Double Time.
Her passive temporarily increases her speed when she takes fire while sprinting, so the value of the movement is not simply getting away faster. It can help her change where the next peek comes from. (EA Help)
The smoke hides the transition.
Double Time helps accelerate it.
The new angle creates the payoff.
16. Know When Fighting Inside Smoke Is a Bad Idea
Smoke can encourage a close-range fight, but that does not mean every fight inside the cloud is favorable.
EA changed Smoke Launcher so players inside smoke can see nearby players within 20 meters with a white highlight, while that highlight is not visible from outside the smoke. EA specifically described the change as making close smoke fights more readable while preserving smoke’s sight-blocking and rotational role.
That means you should not assume:
“We are inside Bangalore smoke, so we automatically have the advantage.”
You still need:
- better weapons
- better health
- better positioning
- a clear target
- a reason to take the fight
Sometimes the best play is to use the smoke to avoid the fight entirely.
17. Smoke + Weapon Range
This is where your smoke guide and loadout guide should reinforce each other.
If you’re carrying:
AR + Shotgun
you can use Smoke to move the fight from mid-range into the shotgun’s preferred distance.
If you’re carrying:
Marksman + SMG
you can use Smoke to close the gap after creating ranged pressure.
If you’re carrying:
Sniper + SMG
you can smoke your escape or approach once the enemy decides to push.
The weapon pairing changes how valuable a particular smoke placement becomes.
That is why there is no universal “best smoke spot.”
The correct placement depends partly on what you intend to do immediately afterward.
18. Reactive Smoke Changes the Timing
Bangalore’s smoke is no longer something you should treat as untouchable terrain.
EA’s Showdown changes made Smoke Launcher reactive, allowing nearby ordnance and abilities to disable the gas for five seconds.
That has a practical consequence:
Do not spend too much time standing around inside the smoke after you get what you needed from it.
Use the window.
Cross.
Heal.
Split the enemy.
Take the angle.
Reset.
Then move.
The smoke is there to create a favorable moment, not a permanent room.
19. Advanced Setup: Deny → Split → Collapse
This is one of the most useful repeatable setups to practice.
Deny
Smoke the enemy support angle.
Split
Wait for the smoke to separate one player from the rest of the squad’s vision.
Collapse
Your team immediately focuses the isolated player.
The important part is coordination.
If nobody acts on the separation, the smoke has simply delayed the fight.
Call the target before the canister lands.
20. Advanced Setup: Deny → Cross → Re-smoke
This is the open-ground version.
Deny
Remove the strongest firing lane.
Cross
Move to the next piece of cover.
Re-smoke
Use another smoke to solve the new angle.
This creates a controlled rotation instead of one giant panic cloud.
It’s particularly useful when the distance between cover points is too large for one smoke to solve safely.
21. Advanced Setup: Smoke → Fake → Reposition
This one is less about combat and more about creating uncertainty.
Smoke
Block the route enemies expect you to use.
Fake
Give them a reason to believe you’re taking that route.
Reposition
Move somewhere else while their attention is tied to the smoke.
This works best when the enemy has limited time to react.
It also works badly when you try to repeat it every fight.
22. Placement Mistakes to Stop Making
Smoking the entire area automatically
More smoke does not necessarily mean more control.
Smoking your own teammate’s winning angle
If your squad already has a clean firing lane, don’t erase it without a reason.
Placing smoke without a destination
A smoke that leaves you standing in the open when it clears has only postponed the problem.
Using both smokes at once every time
Save the second problem for the second canister.
Smoking the enemy and then waiting
If the smoke creates an opening, use it.
Assuming smoke equals safety
The enemy can still push, interact with the cloud, or challenge the fight from close range. (EA)
Forgetting the enemy’s perspective
Always check what information remains available to them.
23. Three Bangalore Smoke Drills
You can practice the placement logic in the Firing Range without trying to memorize map-specific lineups.
Drill 1: The Angle Cut
Choose a piece of cover.
Imagine an enemy holding a sightline.
Place the smoke so that it removes that angle while leaving part of your own vision intact.
Repeat from several distances.
Drill 2: The Smoke Corridor
Choose two pieces of cover.
Use one smoke to cross toward the first.
Then a second to reach the next.
The goal is to stop moving in the open the instant the first smoke ends.
Drill 3: The Isolation Test
Imagine three enemies positioned with one slightly separated.
Practice placing smoke between the isolated target and the support players.
Then immediately move toward the target.
The point is not to throw the perfect canister every time.
It is to make the placement decision quickly.
For a broader training routine, link this section to your Apex Legends Firing Range Practice Guide.
24. The Five-Question Smoke Check
Before pressing Tactical, quickly ask:
What am I hiding?
Whose angle am I removing?
Where does my squad go next?
What happens if they push through the smoke?
Do I need this smoke again in the next few seconds?
If you can answer those questions quickly, your smoke usage will become far more deliberate.
You don’t need a perfect lineup.
You need a clear purpose.
Final Thoughts
Bangalore’s Smoke Launcher is strongest when it changes the shape of the fight.
The best smoke is not necessarily the biggest one or the one that hides your whole squad.
It is the one that removes the enemy’s strongest option while giving your team a better one.
Smoke the firing lane.
Cut the crossfire.
Separate the support player.
Create the route.
Take the angle.
Then move again.
That is why Bangalore’s strongest smoke placements tend to follow the same underlying logic:
Deny → Create Space → Act → Leave
Once you start viewing Smoke Launcher as a positioning tool rather than a panic button, the Tactical becomes much easier to use well.
And when you are choosing weapons for those smoke-created fights, pair this guide with Apex Legends Bangalore Best Loadouts: Weapons for Every Range. Your smoke determines how the fight changes; your loadout determines what you can do with that opening.
Sources & Updates
EA’s current Bangalore documentation confirms that Smoke Launcher creates a smoke wall on impact and that Bangalore’s canisters can break or breach doors. Bangalore is currently classified as an Assault Legend.
EA’s Showdown patch notes introduced the modern Smoke Launcher tuning, including the 30-second cooldown, 2,900 projectile speed, 0.25-second pull-out time, door interaction, and reactive smoke behavior.
EA also changed smoke combat so nearby players inside the smoke can see one another with a white highlight within 20 meters, while that highlight is not visible from outside the smoke.


One thought on “Apex Legends Bangalore Smoke Guide: Best Smoke Placements & Setups”