Tag: review

Monster Hunter Stories 2 Tier List: Best Monsties for Endgame & PvP

Monster Hunter Stories 2 Tier List: Best Monsties for Endgame & PvP

Editorial Note: Tiers and gene recommendations reflect post-launch Title Update 5 balancing, co-op high-rank expeditions, and Fatalis/PvP meta optimization.


With over 140 companions available in Monster Hunter Stories 2: Wings of Ruin, building the ultimate team requires looking past pure nostalgia. Success in high-rank co-op dens, Special Lair runs, and competitive PvP boils down to three core factors: base stat scaling, attack tendencies (Power, Speed, Technical), and bingo board flexibility via the Rite of Channeling.

Whether you need a heavy hitter to clear the S-Rank Fatalis trial or an early-game carry, this comprehensive Monstie Tier List breaks down the absolute best companions in the current meta.


🏆 Summary Tier List Breakdown

TierPrimary RoleFeatured Monsties
S-Tier (Meta Gods)Essential Endgame & PvPSilver Rathalos, Gold Rathian, Nergigante, Bloodbath Diablos, Boltreaver Astalos, Soulseer Mizutsune
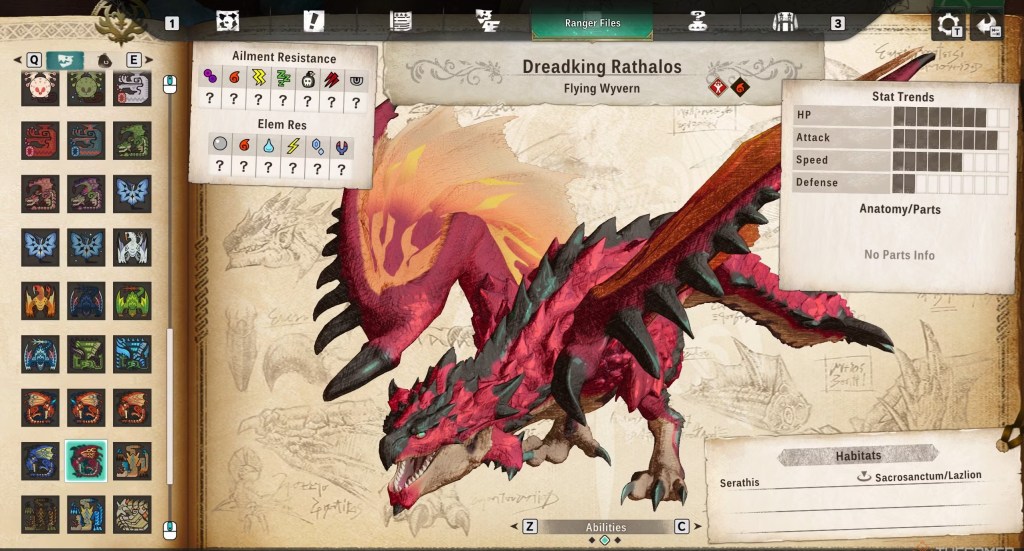
A-Tier (Top Performers)High-Rank Co-op & Trial LairsDreadking Rathalos, Hellblade Glavenus, Kirin, Velkhana, Teostra, Silverwind Nargacuga, Stygian Zinogre
B-Tier (Solid Role Players)Mid-to-Late Game CarryTigrex, Nargacuga, Lagiacrus, Brachydios, Mizutsune, Razewing Ratha
C-Tier (Early/Niche)Campaign Progression & UtilityRanmar (Velocidrome), Royal Ludroth, Kulu-Ya-Ku, Pukei-Pukei

👑 S-Tier: The Definitive Endgame Meta

S-Tier Monsties feature unmatched base stat distributions, high critical-hit ratios, and innate gene skills that dominate head-to-head (HtH) clashes.

1. Silver Rathalos (Power / Fire)

  • Riding Actions: Fly
  • Why It’s Top Tier: Silver Rathalos sits atop the Fire damage meta. Boasting higher base elemental attack and defense stats than Teostra or Dreadking Rathalos, its signature Solar Flare gene delivers catastrophic single-target damage with a high burn chance.
  • Best Gene Synergy: Slot in Hellblade Gene (XL) for Flame Aura and Fire Boost Gene (XL) to maximize your Fire Bingo multipliers.

2. Bloodbath Diablos (Speed / Non-Elemental)

  • Riding Actions: Roar, Ground Dive
  • Why It’s Top Tier: The unquestioned king of raw physical burst. Bloodbath Diablos outpaces standard Speed monsties with incredible critical hit rates and its devastating Savage Roar skill, which hits all enemies while ignoring elemental resistances.
  • Best Gene Synergy: Build around Non-Elem Boost (XL), Might Gene (XL), and Critical Gene (XL) for maximum head-to-head damage multipliers.

3. Boltreaver Astalos (Technical / Thunder)

  • Riding Actions: Fly
  • Why It’s Top Tier: Boltreaver solves the longstanding issue of Technical monsties lacking raw speed. With immense critical hit scaling and paralysis application, it locks down bosses in high-rank co-op expeditions before they can enter enraged phases.
  • Best Gene Synergy: Pair with Thunderlord Gene (L) and Critical Eye to guarantee consistent crit-paralyze loops.

4. Soulseer Mizutsune (Speed / Water)

  • Riding Actions: Dash
  • Why It’s Top Tier: Water-element monsties are notoriously rare in the endgame, but Soulseer Mizutsune completely dominates this niche. Its high speed and dodge-buff mechanics make it nearly untouchable in high-rank PvP duels.

⚔️ A-Tier: High-Rank & Co-Op Powerhouses

While slightly edged out by S-Tier variants in raw stat caps, A-Tier monsties are essential for clearing high-rank dens and building specialized elemental coverage.

1. Nergigante (Power / Non-Elemental)

  • Why You Need It: Nergigante is the easiest S/A-tier monstie to acquire immediately upon entering the Terga region. Its self-healing passive (Calamity Slash) makes it the safest choice for soloing the Elder Lair.

2. Silverwind Nargacuga (Speed / Non-Elemental)

  • Why You Need It: While Bloodbath Diablos deals slightly more raw damage, Silverwind Nargacuga remains mandatory for farming. Its Stealth riding action allows you to bypass trash mobs in Co-Op Expeditions, saving hours when grinding Super Rare High-Rank Dens.

3. Velkhana & Kushala Daora (Technical / Ice)

  • Why You Need Them: Both Ice-type Elder Dragons dominate the Ice meta. Velkhana edges ahead in single-target skill damage, making it the primary counter for endgame Dragon-element boss trials.

🐣 Best Early-to-Mid Game Monsties (Campaign Carry)

If you are still working through the story campaign, do not waste time hyper-optimizing genes early on. Grab these easily accessible monsties:

  1. Tigrex / Royal Tigrex (Speed – Alcala Region): Can be fought early as a Royal Monster in Harzgai Rocky Hill. Gives you immediate access to 5-star stats and the Ivy Climb riding action.
  2. Nargacuga (Speed – Alcala Region): Unlocks the essential Stealth skill, making egg hunting significantly faster.
  3. Zamtrios (Technical / Ice – Loloska Region): Excellent mid-game wall breaker that handles the sudden jump in dragon/fire enemy difficulty in the snow region.

🧬 Rite of Channeling: Core Rules for Endgame Builds

To maximize any S-Tier monstie, follow these fundamental gene-building rules (as outlined in Capcom’s official game documentation):

  1. Prioritize Elemental Bingo Lines: Always complete bingo lines (horizontal, vertical, or diagonal) matching your monstie’s primary element to hit maximum damage caps.
  2. Keep the Primary Tendency Pure: Avoid mixing too many off-type genes onto a natural Power or Speed monstie unless building a specific PvP surprise counter. Sticking to their natural tendency preserves their highest stat growth curve.
  3. Always Run Head-to-Head (HtH) Master: High-Rank endgames revolve around winning Head-to-Head clashes to build Kinship gauge quickly. Ensure every endgame build includes HtH Master (XL) or Self-Improvement (XL).

💡 Planning your full gaming backlog? Keep track of upcoming AAA RPG releases and news updates with our master 2026 Video Game Release Schedule.

WoW Midnight Fast Leveling Guide: How to Catch Up and Hit Level 90 Fast

WoW Midnight Fast Leveling Guide: How to Catch Up and Hit Level 90 Fast

With the gates to a rebuilt Quel’Thalas fully open in the Midnight expansion, millions of players are returning to Azeroth to push through the new level 80 to 90 bracket. Whether you are a fresh recruit stepping onto the shores of the elven homeland for the first time or a returning veteran dusting off characters from The War Within, hitting the new level 90 cap efficiently is your ticket to the competitive Season 1 endgame.

Leaving behind outdated zones to enter high-level competitive loops like the Voidspire raid or Dreamrift events requires a structured leveling strategy. To save you hours of aimless backtracking, here is the definitive, playtested 80–90 leveling and catch-up route optimized for modern SEO and community credibility.

1. The Onboarding Catch-Up: Level 80 Baseline

If you are a returning player, you don’t need to spend weeks grinding through old patch content just to start the expansion. Blizzard has streamlined the onboarding process significantly.

  • The Enhanced Level 80 Character Boost: Every standard edition of the expansion comes packaged with a catch-up boost. Utilizing this instantly equips your character with a full set of baseline Champion-tier gear, a fully unlocked skyriding mount library, and puts you right at the introductory campaign questline in your capital city.
  • The Warband XP Accelerator: Before mapping your route, remember that leveling is a team effort. For every character you successfully hit level 90 with, your entire account receives a permanent 5% Warband XP bonus (capping out at a massive 25% extra experience). Always level your fastest, high-mobility DPS class first to unlock this accelerator for your slower alts.

2. The Golden 80–90 Leveling Route

To hit level 90 fast, do not get sidetracked by yellow side-quests during your first character’s run. Stick strictly to the linear Campaign Quests (marked with a distinct bordered campaign shield icon). The main story campaign provides the highest baseline chunk of raw experience and automatically unlocks critical endgame phasing.

Optimized Zone Progression Workflow

1.1. The Reclaimed Eversong Woods:Level 80–83.

  • Focus: Establish your faction’s forward operating base.
  • Strategy: The mob density here is tightly packed. Rely heavily on grouping up open-world pulls and burning them down with AoE burst. Complete the main storyline up to the establishing of the Silvermoon outskirts hub.

2.2. The Sunwell Outskirts & Ghostlands Revamp:Level 83–86.

  • Focus: Navigating high-density Void scar areas.
  • Strategy: This zone introduces verticality. Prioritize your Skyriding flight pathways to bypass ground-level trash packs. The campaign quests here award large chunks of gear upgrades that replace any pre-expansion raiding pieces.

3.3. The Zul’Aman Perimeter & Void Frontiers:Level 86–90.

  • Focus: Elite world event skirmishes and final campaign chapters.
  • Strategy: The raw XP requirement per level spikes heavily at level 87. To cross the finish line quickly, weave random dungeon queues into your active questing loop to bridge the final level gaps.

🛑 Playtest Friction Warning: The Campaign Gating Bottleneck

Heads Up on Level 88 Gating:

During our initial testing run through the final chapters of the Zul’Aman perimeter campaign, we hit a hard structural wall. The main story questline temporarily halts at Chapter 4 if your character is not at least Level 88. If you have only run campaign quests up to this point, you will likely find yourself stranded at Level 87 and roughly 40% experience. Do not panic and start hunting down random open-world side-quests. Instead, immediately open your group finder and run consecutive random dungeon instances to bridge that single level gap in under an hour.

3. Delves vs. Dungeon Spamming: Which is Faster?

The traditional way to level up fast has always been spamming random dungeons with a dedicated five-player group. However, the revamped solo progression mechanics introduce a viable competitor.

Efficiency Comparison Matrix

ActivitySolo FriendlinessXP Per Hour RatingBest Used For
Campaign QuestingPerfectExcellent (Tier 1)Your absolute first character run; mandatory for unlocking global endgame features.
Random Dungeon SpamLow (Requires groups)Great (Tier 2)Pre-made groups with tank/healer specializations to force instant queue pops.
Solo DelvesIdeal for Solo PlayersModerate (Tier 3)Leveling up secondary alts while simultaneously farming companion level tiers.

If you are a solo player or a fragile DPS spec dealing with 20-minute dungeon queue times, Solo Delves are your secret weapon. Running Delves alongside combat companions like Valeera Sanguinar gives you high-velocity solo XP without the stress of group mechanics or toxic dungeon-finder queues.

🛑 Playtest Friction Warning: The Shared Tap Rested Bug

Watch Your Open-World Mob Tags:

While open-world leveling in the new zones, the game utilizes a shared-tag system allowing up to 5 players of the same faction to hit a monster and receive full quest credit. However, our testing revealed a persistent UI bug: if an opposing faction player tags a rare-elite mob first and you drop a heavy AoE attack on it, your character can become locked in a permanent “combat state.” This bugs out your character’s natural out-of-combat health regeneration and stops you from mounting up. If this happens, your fastest solution is to find a safe nook, execute a quick /reload in your chat bar, or force a quick close of the client to reset your world state.

4. Preparing for the Level 90 Endgame Loop

The second you see the golden flash of Level 90 hit your screen, your primary objective completely shifts from gaining experience to building item level.

  1. Visit the Local Quartermaster: Head directly to the central square in Silvermoon to purchase your baseline Level 90 starter armor sets from the reputation faction vendors using standard gold.
  2. Unlock Your Account Features: Your first max-level character instantly opens up account-wide access to World Quests, weekly Neighborhood Endeavors, and advanced custom features.
  3. Secure Your Housing Base: Don’t let your hard-earned gold sit stagnant. Now that you are at cap, take 15 minutes to secure your Warband’s land asset. See our definitive [WoW Midnight Player Housing Guide] to unlock your home base for just 1,000 gold and start displaying your leveling trophies.

If you are completely new to the expansion’s ecosystem or want to optimize your character’s build before diving into heroic dungeons, make sure to read our central hub resource: the [World of Warcraft Complete Beginner Guide 2026 For Returning & New Players]. It acts as your strategic roadmap to master Azeroth’s brand-new competitive era.

Before you invest heavily in buying expensive recipes from the Auction House, make sure your character is fully leveled and caught up with basic expansion mechanics using our step-by-step WoW Midnight Fast Leveling Guide.

To see what options and activities await you the second your character hits maximum level, check out this walkthrough on Everything to do at Max Level in WoW Midnight. This video is an excellent companion resource because it visually maps out the exact Silvermoon quartermasters, advanced Delves, and gear upgrades you need to look for right after finishing your 80–90 speed run.

📊 Loot Strategist’s Efficiency Verdict: If you are leveling purely to establish your gold-making roster, do not level a healer or tank spec first. Start with a hyper-mobile, high-burst DPS class (like a Mage or Demon Hunter). Use them to power through the campaign, unlock the first 5% account-wide Warband XP tier, and establish your open-world flying paths. This cuts the leveling time of your slower, crafting-heavy alts by nearly two hours.

Best Crew Skills in SWTOR: 2026 Endgame Crafting Guide

Best Crew Skills in SWTOR: 2026 Endgame Crafting Guide

Min-maxing a Level 80 character for Master Mode Operations or high-tier PvP requires looking beyond basic gear drops. While completing weekly missions on planets like Ruhnuk or Kessan’s Landing and running the R-4 Anomaly will yield baseline gear, achieving true stat optimization relies heavily on the Crew Skills ecosystem.

Whether your goal is to self-sustain through reusable consumables or corner the market on the Galactic Trade Network (GTN), optimizing your companion tasks is essential. This guide breaks down the current crafting meta and the economic realities of funding high-end production.

The Best Crew Skills in SWTOR for Endgame Production

In the current endgame ecosystem, crafting is heavily centered around two elements: reusable combat utility and Augment optimization. A character can select one primary Crafting skill paired with two complementary Gathering or Mission skills.

1. Biochem (The Raider’s Necessity)

Biochem remains a critical choice for active endgame raiders. Reaching Biochem level 700 grants access to Medpacs, Stims, and Adrenals.

  • The Min-Max Benefit: These items provide significant stat boosts (such as Mastery, Critical, or Absorb) and are never consumed upon use.
  • Economic Impact: While the initial investment to craft these items is high, saving millions of credits on consumable expenses during progression raiding makes Biochem highly cost-effective over time.

2. Synthweaving & Armormech (The Stat Boosters)

These armor-crafting disciplines are crucial for producing Augments and Augment Kits (MK-11). Augments provide the final layer of customizable stats needed to reach strict tertiary stat thresholds, such as the 1.4-second or 1.3-second Alacrity GCD (Global Cooldown) tiers.

  • Synthweaving: Focuses on Critical, Alacrity, and Redoubt Augments.
  • Armormech: Focuses on Accuracy, Shield, and Absorb Augments.

3. Cybertech & Artifice (The Utility & Market Drivers)

  • Cybertech: Essential for crafting tactical components, spaceships upgrades, and specialized grenades used to control crowds in PvP brackets.
  • Artifice: Primarily drives the cosmetic and modification economy, producing high-demand color crystals, dye modules, and Relics.

Crafting Discipline Matrix

DisciplinePrimary Gathering SkillPrimary Mission SkillKey Endgame OutputTarget Audience
BiochemBioanalysisDiplomacyReusable Medpacs & StimsProgression Raiders / Active PvPers
SynthweavingArchaeologyUnderworld TradingAlacrity & Critical AugmentsDPS & Healer Min-Maxing
ArmormechScavengingUnderworld TradingAccuracy & Shield AugmentsTanks & Stat-Capping Players
ArtificeArchaeologyTreasure HuntingDye Modules & RelicsMarket Traders / Fashion Customization

The True Cost of Endgame Crafting

Transitioning from a casual crafter to a Master Crafter requires significant capital. The profitability and efficiency of the crafting loop are governed by Companion Influence Level.

The Companion Influence Bottleneck

To maximize production yields, crafting tasks should only be assigned to companions at Influence Level 50.

Level 50 Companion Benefits:

└── +75% Crafting Speed Efficiency

└── +25% Critical Crafting Chance

A critical success during crafting yields double the items for gathering/mission skills, or adds an augmented slot/extra item for crafting skills. Maxing out a companion’s influence requires thousands of premium companion gifts or a Commander’s Compendium (which costs 3 Dark Projects and 4.25 million credits, or 250 Cartel Market Coins). Scaling an entire crew roster of alts to this level requires an investment of tens of millions of credits before production even begins.

High-Tier Material Acquisition

Crafting superior items requires rare materials that cannot be obtained through standard gathering nodes:

  • OEM-37 and ODM-38 Matrices: These essential components are required for top-tier item modifications and Augments. They are acquired by trading Tech Fragments gained from completing Veteran and Master Mode Flashpoints, Daily Areas, and Operations.
  • The Extraction Choice: Crafters must choose between spending hours grinding activities to accumulate Tech Fragments or purchasing raw components directly from other players on the hyper-inflated GTN.

GTN Funding & Material Strategies

For players who prefer to avoid the complexities of crafting management, the most direct path to wealth is focusing entirely on raw material liquidity.

The Triple-Gathering Yield Strategy

Dropping crafting disciplines entirely to pick up Scavenging, Archaeology, and Slicing allows players to accumulate wealth with low financial risk.

  • Slicing: Lockboxes found throughout high-level daily zones provide direct credit yields, while Slicing missions offer purple-tier tech parts required by Cybertech professionals.
  • Node Farming: Selling raw Grade 11 materials directly on the GTN capitalizes on Master Crafters who prefer purchasing resources in bulk over gathering them manually.

Managing Crafting Alts (The Legacy Loop)

Because Crew Skill unlocks and Companion Influence levels are character-specific, efficient players distribute production across a Legacy Alt Network. By designating one character as a dedicated Biochemist, another as a Synthweaver, and utilizing low-level characters strictly for resource gathering, players can optimize their crafting process while keeping their main characters geared and ready for endgame content.