
The right Apex Legends settings won’t suddenly turn you into a Predator, but the wrong ones can make an already demanding game harder than it needs to be.
A cluttered image can hide an enemy.
A poor sensitivity can make tracking feel inconsistent.
Unstable FPS can make the game feel less responsive.
And if your music is louder than the footsteps you’re trying to hear, your headset isn’t doing you any favors.
The tricky part is that there is no single configuration that works perfectly for everyone. EA’s current settings guide explicitly recommends experimenting with mouse and controller settings based on your own preferences, playstyle, hardware, and comfort. It currently recommends trying an FOV between 90 and 110, while noting that 110 is common among competitive players.
So rather than giving you one giant list of numbers and telling you to copy them blindly, this Apex Legends Settings Guide gives you practical starting points for:
PC graphics
Mouse and keyboard
Controller
FOV
Audio
FPS
120 FPS console play
Accessibility
And just as importantly, we’ll explain why you’d change a setting in the first place.
The Best Apex Legends Settings at a Glance
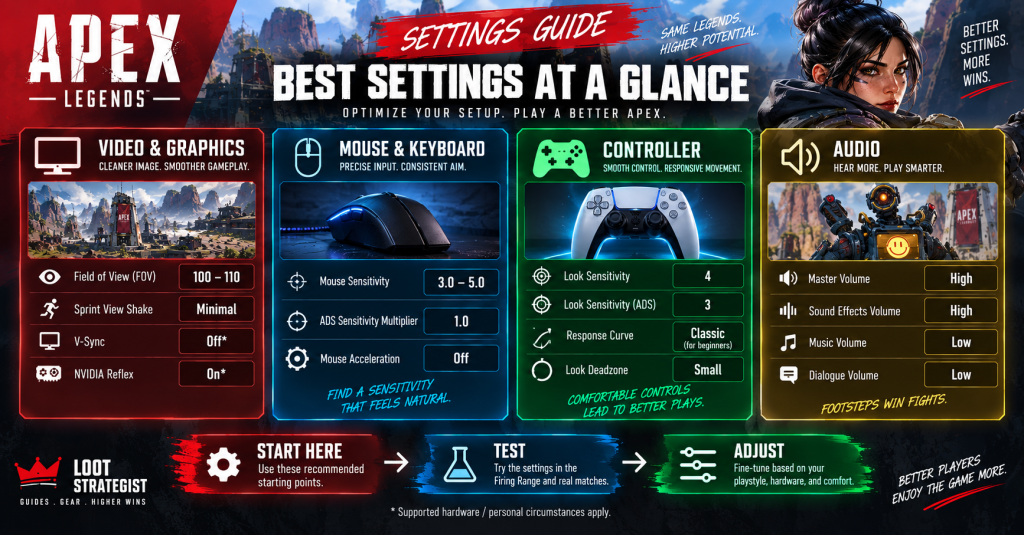
Here is a practical baseline.
Think of it as a starting configuration, not a universal law.
| Setting | Recommended Starting Point |
|---|---|
| FOV | 100–110 |
| Sprint View Shake | Minimal |
| V-Sync (PC) | Off unless you need it for tearing |
| NVIDIA Reflex | Enabled on supported NVIDIA hardware |
| Adaptive Resolution FPS Target | Off unless you have frequent FPS drops |
| Anti-Aliasing | None for performance-focused play |
| Texture Streaming Budget | Low or Medium |
| Texture Filtering | Bilinear |
| Ambient Occlusion | Disabled |
| Sun Shadow Coverage | Low |
| Sun Shadow Detail | Low |
| Spot Shadow Detail | Low |
| Dynamic Spot Shadows | Disabled |
| Volumetric Lighting | Disabled |
| Model Detail | Low |
| Effects Detail | Low |
| Ragdolls | Low |
| Mouse Sensitivity | 3.0–5.0 |
| ADS Mouse Sensitivity Multiplier | 1.0 |
| Mouse Acceleration | Off |
| Controller Sensitivity | 4-3 |
| Controller Response Curve | Classic for beginners |
| Look Deadzone | Small, or lower if your controller is stable |
| Master Volume | High |
| Sound Effects Volume | High |
| Music Volume | Low |
| Dialogue Volume | Low |
These values closely follow EA’s current PC recommendations where applicable, while the broader ranges are Loot Strategist’s practical starting points. EA specifically notes that personal preference matters for mouse and controller settings, and that lower graphics settings can improve performance.
Why Apex Legends Settings Matter
Settings don’t make decisions for you.
They can remove friction between your intentions and what happens on screen.
A few examples:
A too-high sensitivity can make small corrections difficult.
A too-low sensitivity can make turning and target switching sluggish.
An unnecessarily high graphics preset can consume performance that your system could otherwise use for a more stable frame rate.
A noisy audio mix can bury useful gameplay sounds under music and dialogue.
A poor button layout can force you to take your thumb away from the right stick at exactly the wrong moment.
None of these settings make you a better player by themselves.
They simply determine how much your setup gets in the way.
Best Apex Legends FOV
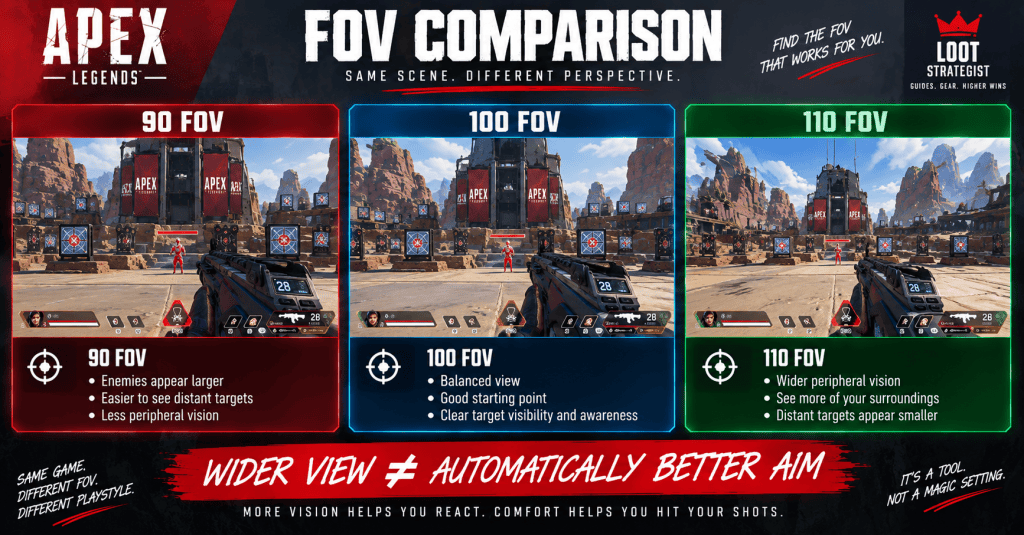
Field of View (FOV) controls how much of the game world you can see around your character.
A higher FOV gives you a wider view.
The trade-off is that distant objects and enemies appear smaller.
EA currently recommends experimenting between 90 and 110 FOV, with 110 being common among competitive players. EA also notes that Apex starts new players at 70 FOV by default.
Our Recommended Starting Point
I’d start at:
100 FOV
Then test:
104
106
110
Give each setting enough time to become familiar.
If you keep changing FOV every few matches, you’re never really adapting to any of them.
90–100 FOV
This can be comfortable if you:
- Struggle to see distant targets
- Play on a smaller display
- Prefer a less zoomed-out image
- Value target size more than peripheral vision
106–110 FOV
This can suit players who:
- Fight aggressively
- Value peripheral awareness
- Spend a lot of time moving
- Are comfortable tracking smaller targets
There is no achievement for playing at 110.
Use the widest FOV you can aim comfortably with.
Sprint View Shake
Apex’s camera movement can become distracting during sprinting.
EA currently recommends Minimal or personal preference for Sprint View Shake.
For competitive play, I’d start with:
Minimal
It gives you a steadier visual reference during movement.
That doesn’t make the game look as dramatic.
That’s probably fine.
Best Apex Legends PC Graphics Settings
If your main goal is performance, EA’s current advice is straightforward: lower graphics settings to maximize FPS and responsiveness. It specifically recommends lowering options individually if you’re unsure how they affect your system.
That doesn’t mean every PC should look like a potato.
It means you should decide where your hardware budget matters.
For competitive play, stable performance usually matters more than fancy shadows.
Display Mode
Recommended: Full Screen
EA recommends Full Screen for a single-monitor setup and Windowed for players using more than one display.
If you’re playing on one monitor, Full Screen is the obvious starting point.
Aspect Ratio
Recommended: Native
Use your monitor’s normal aspect ratio unless you have a very specific reason not to.
There is no need to complicate this.
Resolution
Recommended: Native resolution
Start with your monitor’s native resolution.
Only lower it when you actually need the additional performance.
If your system already delivers a stable frame rate, sacrificing image sharpness for extra headroom may not be worthwhile.
Brightness
Recommended: Slightly above default
EA recommends increasing brightness slightly to help visibility.
Don’t push it so far that dark environments become washed out.
You want more detail—not a gray filter over the entire map.
Best Advanced Video Settings for Performance
EA’s current PC guidance supports the following performance-oriented configuration.
| Setting | Starting Point |
|---|---|
| V-Sync | Disabled unless needed for screen tearing |
| NVIDIA Reflex | Enabled on supported NVIDIA GPUs |
| Adaptive Resolution FPS Target | Disabled unless FPS drops |
| Anti-Aliasing | None |
| Texture Streaming Budget | Low or Medium |
| Texture Filtering | Bilinear |
| Ambient Occlusion | Disabled |
| Sun Shadow Coverage | Low |
| Sun Shadow Detail | Low |
| Spot Shadow Detail | Low |
| Dynamic Spot Shadows | Disabled |
| Volumetric Lighting | Disabled |
| Model Detail | Low |
| Effects Detail | Low |
| Impact Marks | Low or Disabled |
| Ragdolls | Low |
These aren’t sacred numbers.
They’re a sensible performance-first baseline.
If you have a powerful system and prefer higher image quality, increase settings gradually and watch your performance.
NVIDIA Reflex
If you have a supported NVIDIA GPU, EA currently recommends:
NVIDIA Reflex: Enabled
The purpose is to reduce system latency so your inputs can feel more responsive.
It doesn’t improve your aim by itself.
It simply helps reduce unnecessary delay between your input and what appears on screen.
Adaptive Resolution FPS Target
This setting is best viewed as a safety net.
Stable FPS?
Leave it:
Disabled
Frequent FPS drops?
Consider:
Enabled
EA currently recommends leaving it disabled unless you regularly experience frame-rate drops.
The goal isn’t to force the lowest possible image quality.
It’s to prevent your game from collapsing when your hardware gets pushed.
Texture Streaming Budget
EA currently recommends Low or Medium as a competitive starting point.
Your actual choice should take your available VRAM and system performance into account.
There’s little value in choosing a larger budget if it causes stuttering or instability.
Best Apex Legends Mouse Settings
Mouse sensitivity is where copying somebody else’s setup becomes especially unreliable.
EA currently suggests 3.0–5.0 sensitivity as a competitive starting range, with:
ADS Mouse Sensitivity Multiplier: 1.0
Mouse Acceleration: Off
EA also notes that sensitivity depends on factors such as your aiming style, desk space, and how you balance speed and precision.
My Starting Point
Try:
3.0 sensitivity
1.0 ADS multiplier
Mouse acceleration off
Then leave the sensitivity alone long enough to build familiarity.
What Is eDPI in Apex Legends?
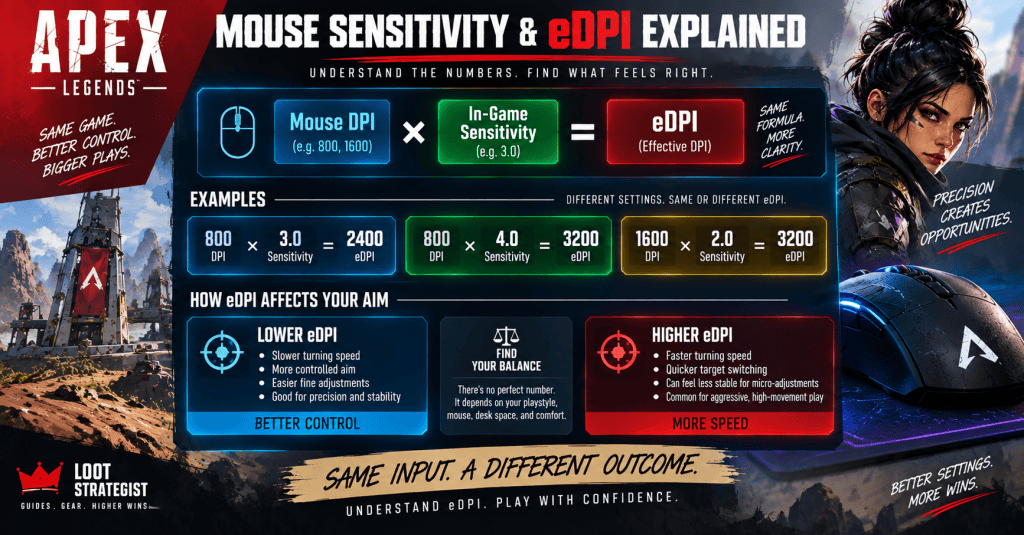
This is worth understanding if you compare PC settings.
eDPI = Mouse DPI × In-game sensitivity
For example:
800 DPI × 3.0 sensitivity = 2400 eDPI
Another player might use:
1600 DPI × 1.5 sensitivity = 2400 eDPI
Those two setups can produce a similar overall sensitivity despite having different DPI and in-game values.
That’s why comparing only the sensitivity number can be misleading.
eDPI isn’t an official Apex requirement.
It’s simply a useful comparison tool for PC players.
Does DPI Matter?
Yes.
Your mouse’s DPI changes how much your cursor moves for a given physical mouse movement.
EA identifies 400, 800, and 1600 DPI as common values and notes that DPI interacts with your in-game sensitivity.
A common mistake is seeing a professional player’s:
“Sensitivity 2.0”
and copying it without checking their DPI.
That’s not a complete setup.
How to Find the Right Mouse Sensitivity
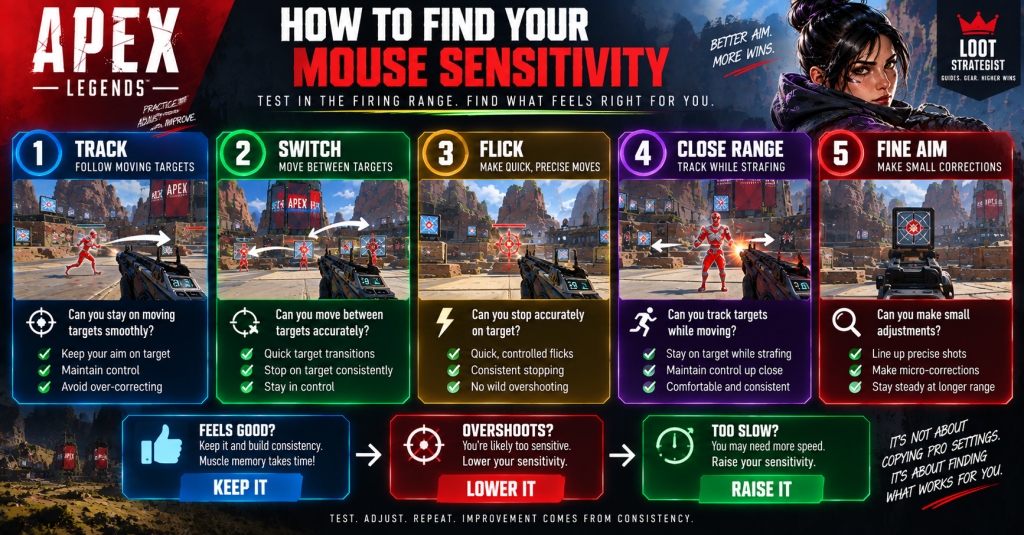
Don’t change sensitivity every five minutes.
Use the Firing Range.
EA recommends testing different settings by tracking moving targets, switching between targets, flicking, and varying your shooting patterns.
Test 1: Tracking
Follow a moving target.
Can you stay on target without constantly correcting?
Test 2: Target Switching
Move from one target to another.
Can you stop the crosshair accurately?
Test 3: Close-Range Movement
Strafe while aiming.
Does the sensitivity remain manageable?
Test 4: Fine Corrections
Aim at a distant target.
Can you make small adjustments without repeatedly overshooting?
You don’t need laboratory precision.
You need a sensitivity that feels repeatable.
Best Apex Legends Controller Settings
EA currently notes that 4-3 is a common competitive controller setup:
Look Sensitivity: 4
Look Sensitivity (ADS): 3
That makes it a sensible baseline.
For response curve, the situation is more nuanced.
EA’s accessibility documentation lists several response curves and describes Classic as the default, while its current PC settings guide notes that some competitive players use Linear.
Our recommendation
Beginner: 4-3 Classic
Experienced player: 4-3 or another comfortable setup
Advanced player: Experiment with Linear only when you understand why you want it
Linear can feel immediate.
It can also make existing stick drift much more noticeable.
Controller Deadzone Explained
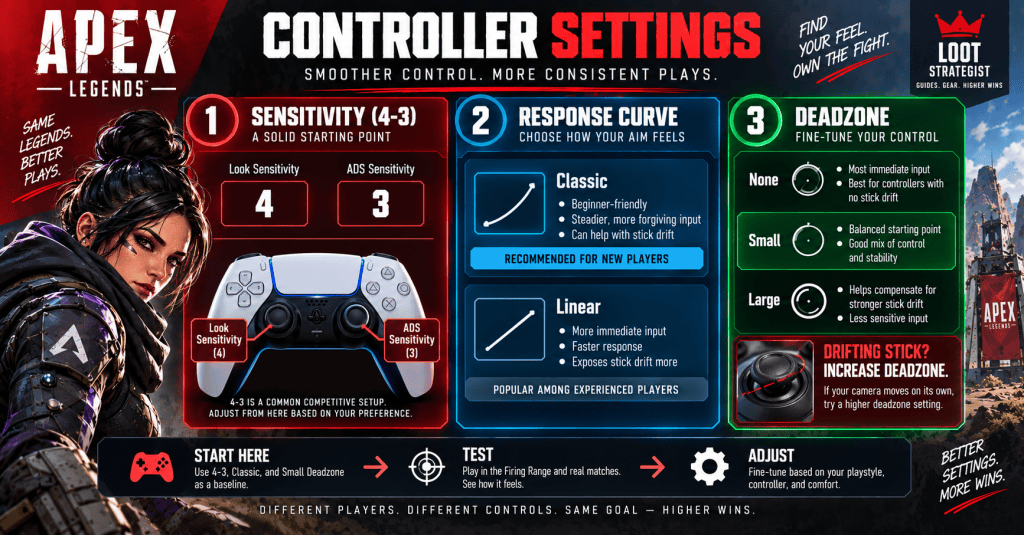
This is one setting older Apex guides often overlook.
EA currently lists Look Deadzone options of:
None
Small
Large
The default is Small. EA explains that deadzone can prevent your camera from drifting when you’re not touching the stick, while a smaller deadzone can allow greater aiming control. Movement Deadzone can likewise prevent unwanted movement drift.
Our starting recommendation
Healthy controller: Small
No drift and you want more immediate input: Try None
Stick drift: Increase the deadzone
Don’t automatically choose None because somebody online called it the “best” option.
A controller that constantly drifts isn’t giving you better aim.
Controller Button Layout
EA currently lists six preset controller layouts and identifies Default as the recommended layout, while also describing alternatives such as Bumper Jumper, Button Puncher, Evolved, Grenadier, and Ninja. Evolved puts jump on LB and crouch on the right stick, allowing jumping and sliding without sacrificing camera control.
Our practical recommendation
New player: Start with Default.
Want easier movement access: Try Evolved.
Already comfortable: Keep your existing layout unless it is actively causing problems.
The best layout is the one that lets you perform movement and combat actions without fighting the controller.
Hold or Toggle Crouch?
EA’s current controller documentation gives you both options.
For most players:
Hold is worth learning if you regularly slide, crouch, and move aggressively.
Toggle can feel more comfortable for players who prefer a simpler input model.
Don’t change it because somebody said one option is objectively superior.
Test both.
Controller Vibration
This one is genuinely personal.
EA allows controller vibration to be turned On or Off.
My recommendation:
Turn it off if vibration distracts you or interferes with your aim.
Otherwise, leave it on.
There is no need to pretend everyone experiences controller vibration the same way.
Best Apex Legends Audio Settings
Audio information is critical in Apex.
EA’s current PC settings guide recommends:
Master Volume: high
Sound Effects Volume: high
and reducing:
Dialogue
Music
Lobby Music
when the goal is to make enemy sounds easier to hear.
Recommended Starting Point
| Audio Setting | Starting Point |
|---|---|
| Master Volume | High |
| Sound Effects | High |
| Dialogue | Low |
| Music | Low |
| Lobby Music | Low |
The objective is simple:
Make useful gameplay sounds easier to isolate.
Best Apex Legends Audio Settings for Footsteps
There is no magic slider labeled:
“Make footsteps perfect.”
The best starting point is the official audio mix above.
Then make sure your headphones or speakers are comfortable and clearly reproducing positional sound.
I would avoid aggressive third-party EQ presets unless you understand what your hardware is doing.
Different headsets produce different results.
An EQ profile that sounds excellent on one pair can sound awful on another.
Apex Legends Voice Chat Settings
EA’s current voice-chat guide lets you select your input device, choose Open Mic or Push to Talk on PC, adjust the Open Mic threshold, and change Incoming Voice Chat Volume. Push to Talk is currently available on PC.
For solo queue:
PC: Push to Talk is useful when background noise is a problem.
Console: Use whichever microphone mode keeps your communication clean.
You can also enable incoming voice-to-text or have incoming text chat played as speech through the Accessibility settings.
Best Accessibility Settings
Accessibility settings aren’t “easy mode.”
They exist so players can get useful information in a way that works for them.
EA currently supports options including:
Colorblind modes
Subtitles
Subtitle size
Damage-number display
Incoming damage feedback
Ping opacity
Controller options
Voice-to-text
Text-to-speech
Use whichever options improve clarity and comfort.
Colorblind Settings
EA currently provides three colorblind options designed to compensate for different types of color-vision deficiency.
If the default color scheme makes important information difficult to separate, try the available modes and choose whichever gives you the clearest visual distinction.
There is no reason to keep a setting that makes the game harder to read simply because it is the default.
Damage Numbers
EA currently provides:
Stacking
Floating
Both
or:
Off
Stacking combines recent damage into a total, while Floating shows damage events individually. Both displays the two systems together.
Our recommendation
Stacking is a good starting point for most players.
Try Floating if you prefer more immediate shot-by-shot feedback.
Ping Opacity
EA’s current accessibility documentation allows pings to remain clearly visible or become more faded.
For solo queue and Ranked, I’d keep them:
Clearly visible
Pings are too important to your squad’s communication to make them hard to notice.
Incoming Damage Feedback
EA also allows players to change how incoming damage indicators are displayed, including 2D, 3D, or both.
My recommendation:
Start with the default 3D indicator.
Experiment only if you have a specific visibility problem.
Best Apex Legends Settings for Visibility
Visibility doesn’t mean:
Turn every graphic setting to Low.
It means removing unnecessary clutter while keeping the picture clear enough to identify targets and terrain.
Prioritize:
Stable FPS
Comfortable FOV
Clear enemy visibility
Readable UI
Minimal unnecessary camera movement
EA’s competitive graphics guidance follows the same broad principle by recommending lower-impact visual settings when the goal is performance.
How to Show FPS in Apex Legends
Before changing graphics settings, find out whether you actually have an FPS problem.
Apex includes a Performance Display option that can show performance information while you play.
Steam users can also use Steam’s FPS overlay.
On PC, EA additionally documents using the launch option:
+fps_max
to cap the frame rate. For example:
+fps_max 200
limits the game to 200 FPS.
Don’t pick a random cap just because someone on YouTube uses it.
First determine what your system can maintain consistently.
Should You Cap Your FPS?
There is no universal number.
Your ideal cap depends on:
GPU
CPU
monitor refresh rate
game settings
how stable your frame time is
For a 144 Hz monitor, for example, some players may prefer a cap around that range or another stable value based on their system.
The useful word here is:
stable
A frame rate that moves wildly between 100 and 180 can feel worse than a stable result that your system maintains consistently.
Apex Legends 120 FPS on PS5 and Xbox Series X|S
This is one of the most important settings sections for current console players.
EA currently says PlayStation 5 and Xbox Series X|S players can enable 120 FPS mode when they have a 120 Hz display and compatible HDMI equipment. In Apex, this requires selecting Performance graphics mode.
PS5
Make sure your console is configured for 120 Hz output.
Then:
Apex Legends → Settings → Video → Graphics Mode → Performance
Apply the setting.
Xbox Series X|S
Set the display refresh rate to:
120 Hz
Then:
Apex Legends → Settings → Video → Graphics Mode → Performance
EA’s current instructions also require a display and HDMI connection capable of supporting 120 Hz.
Should You Prioritize FPS or Image Quality?
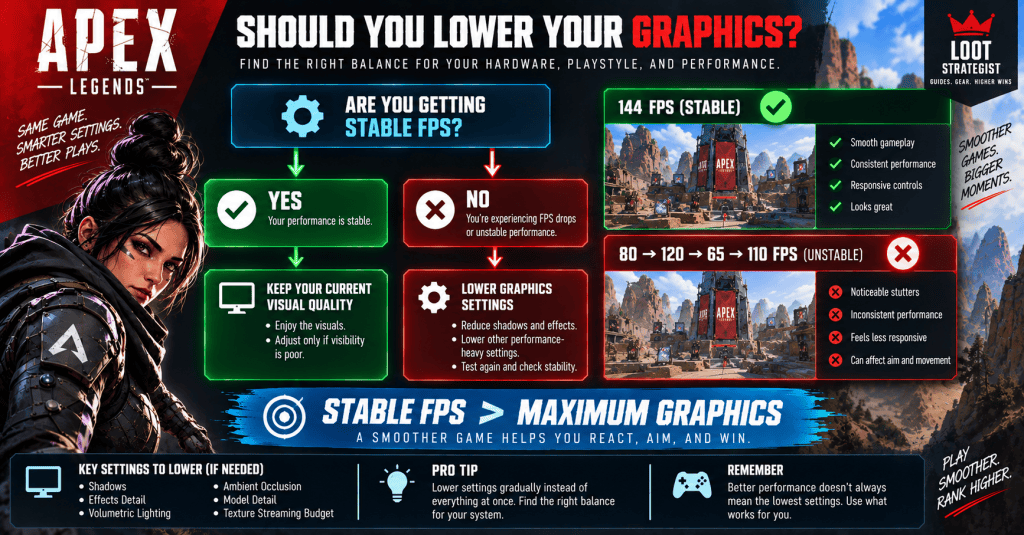
For competitive play, my preference is:
Stable performance first.
That doesn’t mean everyone needs the lowest settings possible.
If your hardware can maintain a stable frame rate while keeping some visual quality, there’s no reason to destroy the image just to copy a professional setup.
EA’s current PC guidance does, however, specifically recommend lower graphics settings when maximizing FPS and performance.
Best Apex Legends Settings for Beginners
New players don’t need an extreme competitive setup.
I’d start with:
FOV: 90–100
Sprint View Shake: Minimal
Mouse Sensitivity: 3.0
ADS Multiplier: 1.0
Mouse Acceleration: Off
Controller: 4-3 Classic
Look Deadzone: Small
Graphics: Performance-focused settings appropriate for your hardware
Master Volume: High
Sound Effects: High
Music: Low
Dialogue: Low
Then stop changing things every match.
Give yourself time to adapt.
Best Apex Legends Settings for Competitive PC Players
For a performance-oriented PC starting point:
FOV: 100–110
V-Sync: Off unless needed
NVIDIA Reflex: Enabled on supported NVIDIA hardware
Adaptive Resolution FPS Target: Off unless needed
Graphics: Mostly Low
Texture Streaming Budget: Low or Medium
Mouse Sensitivity: 3.0–5.0
ADS Multiplier: 1.0
Mouse Acceleration: Off
These are grounded in EA’s current PC recommendations, with the FOV range reflecting the broader 90–110 range EA currently suggests.
Best Apex Legends Settings for Controller Players
A strong starting point is:
Look Sensitivity: 4
ADS Sensitivity: 3
Response Curve: Classic
Look Deadzone: Small
Movement Deadzone: Small
Vibration: Personal preference
EA’s current documentation supports 4-3 as a common competitive sensitivity and identifies Classic as the default controller response curve.
If you already have strong controller mechanics, experiment from there rather than resetting everything simply because a guide recommends it.
Best Apex Legends Settings for Solo Queue
Solo queue increases the value of information.
I’d prioritize:
Sound Effects: High
Music: Low
Dialogue: Low
Ping Opacity: Clearly visible
Comfortable FOV: 100–110
Reliable movement controls
Stable FPS
Your goal is to hear enemies, communicate quickly, and keep your controls predictable.
For the strategic side of solo queue, see our Apex Legends Solo Queue Guide.
Best Apex Legends Settings for Ranked
Ranked doesn’t require completely different settings.
It requires consistency.
Once you’ve found a sensitivity and FOV that work, stop changing them because you lost three games.
Keep your performance stable.
Keep your audio readable.
Use controls you can execute automatically.
And spend your time improving your decision-making rather than endlessly rebuilding your settings menu.
For the competitive strategy itself, see our Apex Legends Ranked Guide.
How Often Should You Change Your Settings?
Not very often.
Change something when:
You have identified a specific problem.
For example:
“My controller drifts.”
Change deadzone.
“I can’t comfortably track at this sensitivity.”
Lower it.
“My FPS collapses during big fights.”
Lower the appropriate graphics settings.
“My FOV feels too zoomed out.”
Reduce it.
That’s a better process than changing six settings because somebody uploaded a new “INSANE PRO SETTINGS” video.
The One-Change Rule
When you’re troubleshooting your configuration:
Change one major variable at a time.
Test it.
Play a few matches.
Then decide whether it helped.
This makes cause and effect much easier to understand.
If you simultaneously change your FOV, sensitivity, response curve, deadzone, button layout, and graphics, you’re not testing a setting.
You’re replacing your entire muscle memory.
Common Apex Legends Settings Mistakes
Copying a Professional Player’s Setup
Their DPI, monitor, controller, grip, vision, hardware, and muscle memory aren’t yours.
Use their setup as a reference.
Not an instruction manual.
Using 110 FOV Automatically
110 is common competitively.
That doesn’t mean it’s automatically best for you.
Running Maximum Graphics on Weak Hardware
Pretty shadows don’t help when your frame rate collapses during a fight.
Changing Sensitivity Constantly
Your aim needs consistency to develop.
Using No Deadzone on a Drifting Controller
Lower deadzone can improve responsiveness, but existing stick drift makes the trade-off obvious.
Turning Music Up While Trying to Hear Footsteps
EA currently recommends lowering music and dialogue when prioritizing gameplay audio.
Ignoring Accessibility Settings
If an accessibility option improves your ability to see or interpret information, use it.
Changing Settings Because You Lost
Three bad games don’t automatically mean your sensitivity is wrong.
A Simple Apex Settings Checklist
Before you leave the settings menu, ask:
Can I see enemies comfortably?
Can I track targets without fighting my sensitivity?
Can I hear gameplay sounds clearly?
Can I move without awkward controls?
Is my frame rate stable?
Can I communicate quickly?
Does my FOV feel natural?
Does my controller drift?
Have I given the new setup enough time to adapt?
If most answers are yes, stop tinkering.
Go play.
Loot Strategist’s Settings Rule
Don’t copy someone’s settings. Copy the reason they use them.
A player might use 110 FOV because they value peripheral vision.
Another might use 100 because they prefer larger targets.
Someone might run very low graphics because their priority is consistent performance.
A controller player might use Linear because they prefer raw stick input and have a controller stable enough to handle it.
Those are useful ideas.
The numbers aren’t universal.
Your best Apex Legends settings are the ones you can use comfortably, consistently, and confidently.
Final Thoughts
There is no secret configuration that turns average aim into elite aim.
Your settings can’t teach you how to rotate.
They can’t teach you when to disengage.
They can’t make you position better.
What they can do is remove unnecessary friction.
A sensible FOV gives you a comfortable view.
A stable sensitivity gives you repeatable aim.
Clear audio gives you information.
Good keybinds let you move without fighting your own controls.
A stable frame rate gives you a more consistent experience.
That’s what you should be chasing.
Start with a sensible baseline.
Change one thing.
Test it in the Firing Range.
Play enough matches to adapt.
Keep what works.
Then stop thinking about your settings and start thinking about the enemy.
That’s usually when you’ve found the right setup.
Related Apex Legends Guides
Apex Legends Beginner Guide — Learn the fundamentals of movement, weapons, looting, positioning, healing, and squad play.
Apex Legends Best Legends Guide — Find the right Legend for your playstyle, from beginners and solo queue to Ranked, mobility, support, and defense.
Apex Legends Ranked Guide — Learn how RP, placement, rotations, fight selection, and competitive decision-making work.
Apex Legends Squad Composition Guide — Build stronger teams by combining complementary Legend classes and squad roles.
Apex Legends Solo Queue Guide — Learn how to communicate, position, adapt to random teammates, and make better decisions without a premade squad.
Sources & Updates
Last reviewed: September 6, 2026
Apex Legends settings can change between seasons, platform updates, and balance changes. This guide therefore distinguishes EA’s documented recommendations from Loot Strategist’s editorial starting points.
EA’s current Best Settings for Apex Legends on PC guide was used to verify recommendations for FOV, mouse sensitivity, ADS sensitivity, mouse acceleration, controller sensitivity, PC graphics settings, FPS performance, and audio. EA currently recommends experimenting with settings based on personal preference and suggests a 90–110 FOV range, 3.0–5.0 mouse sensitivity as a competitive starting range, 1.0 ADS sensitivity multiplier, mouse acceleration off, and 4-3 controller sensitivity as a commonly used competitive setup.
EA’s current controller/accessibility documentation was used to verify response-curve options, controller button layouts, look and movement deadzones, damage-number settings, ping opacity, incoming damage indicators, vibration, and other accessibility options. EA identifies Small as the default Look Deadzone and recommends increasing deadzone only when needed to address drift; smaller deadzones can provide more control.
EA’s current voice-chat documentation was used to verify voice-chat controls, including Open Mic, Push to Talk on PC, microphone selection, open-mic threshold, and incoming voice-chat volume.
EA’s current FPS documentation was used to verify the 120 FPS mode available on PlayStation 5 and Xbox Series X|S with compatible 120 Hz displays and HDMI equipment, as well as the Performance graphics mode and the +fps_max PC launch option.
Editorial note: FOV ranges, sensitivity starting points, controller configurations, graphics preferences, and other recommendations in this article are Loot Strategist’s editorial starting points unless explicitly attributed to EA. There is no universally perfect Apex Legends configuration, and players should adjust settings according to their hardware, controls, comfort, and playstyle.

