Tag: APEX LEGENDS Tips

Apex Legends Ranked Guide: How to Climb Faster and Smarter

Apex Legends Ranked Guide: How to Climb Faster and Smarter

Apex Legends Ranked changes the way you think about a match.

In Unranked, a reckless push can be a funny story five minutes later. In Ranked, that same push can erase a chunk of progress you spent the last few games earning.

That’s why climbing is not simply a matter of getting more kills.

Ranked rewards a combination of placement, eliminations, and skill-based bonuses, while the cost of entering a match rises as you move up the ladder. The higher you climb, the more valuable consistency becomes.

This Apex Legends Ranked Guide explains how the current system works, how RP is earned and spent, what the ranks require, how Ranked splits and Ladders work, and—most importantly—how to make better decisions when you actually want to climb.

The aim isn’t to promise a secret trick that will carry you to Master.

It is to help you build a Ranked game plan that works.

What Is Apex Legends Ranked?

Ranked is Apex Legends’ competitive mode, where players progress through a ladder by earning Ranked Points (RP) through their match performance. Matchmaking is based on current RP, and matches become more challenging as your RP rises.

The current ranked progression is:

Rookie → Bronze → Silver → Gold → Platinum → Diamond → Master → Apex Predator

Rookie through Diamond use four divisions, such as Bronze IV through Bronze I. Once you reach Master, you can compete for the Apex Predator title; Apex Predators are the top 750 players per platform within Master.

That means Ranked has two very different experiences.

At the lower tiers, you’re learning how the system works.

At the top end, you’re competing for position against players who are already highly skilled.


How to Unlock Ranked

New players below Level 20 must complete Road to Ranked, which consists of three sets of challenges. Completing all three unlocks Ranked access. Players who already had Ranked access before the system was introduced keep that access.

That requirement is actually useful.

Use your early matches to become comfortable with movement, looting, positioning, healing, weapons, and your preferred Legends.

Ranked should be where you refine those skills—not where you first discover what your Tactical ability does.


How Ranked RP Works
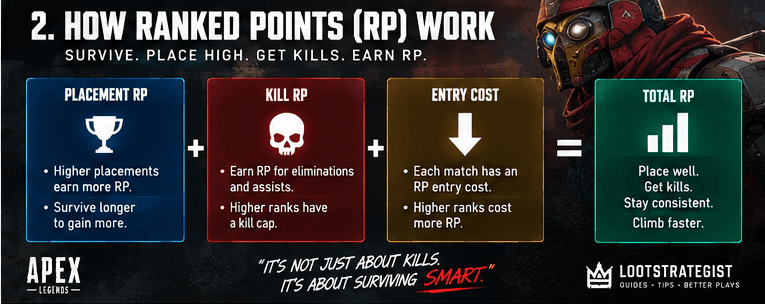
Apex Legends Ranked Points guide showing how placement, eliminations, and entry costs affect RP

Ranked Points are the currency of progression.

You gain RP from:

  • Placement
  • Eliminations
  • Skill-based bonuses

Higher placement increases the value of your eliminations, so kills and survival are tied together rather than functioning as completely separate goals.

This is why a five-kill game that ends early isn’t automatically better than a three-kill game that reaches the late game.

The useful question is not:

“How many kills did I get?”

It’s:

“How much RP did my decisions create?”


Ranked Entry Costs

Every Ranked match has an entry cost, and that cost increases as you climb.

RankRP Entry Cost
Rookie0 RP
Bronze10 RP
Silver20 RP
Gold38 RP
Platinum48 RP
Diamond65 RP
Master / Predator90 RP

EA’s current Ranked documentation confirms these costs and notes that you can finish a match with less RP than you started with.

That distinction matters.

At higher ranks, a bad game doesn’t merely mean “I didn’t gain anything.”

It can mean you lost progress.

This is why climbing becomes increasingly dependent on avoiding low-value deaths.


How Much RP Do You Need to Rank Up?

Each division requires a set amount of RP to move forward.

EA currently lists the following progression requirements:

PromotionRP Required
Rookie250 RP
Bronze divisions500 RP
Silver IV → III500 RP
Silver III → II500 RP
Silver II → I500 RP
Silver I → Gold IV750 RP
Gold divisions750 RP
Platinum IV → III750 RP
Platinum III → II750 RP
Platinum II → I1,000 RP
Platinum I → Diamond IV1,000 RP
Diamond divisions1,000 RP

The amount needed within a division increases as you reach higher ranks.

For example, moving from Bronze II to Bronze I requires 500 RP, while moving from Platinum II to Platinum I requires 1,000 RP.

That is one reason a strategy that works comfortably in Bronze can feel much less effective in Platinum.

Every mistake becomes more expensive.


How Ranked Scoring Works

EA currently divides Ranked scoring into three main components:

Placement

Eliminations

Bonuses

Placement determines a base part of your score, while kills and assists contribute additional RP. The value of eliminations rises as your team places higher.

Kills and Assists

Your personal kills and assists count toward your score.

A kill or assist counts as one kill for scoring purposes.

If your squad eliminates an enemy without you dealing damage to that player, you can receive half a kill through the participation system.

There is also an important limit:

Once you have more than eight kills, the value of subsequent kills, assists, and participations is halved.

That doesn’t mean getting nine kills is suddenly bad.

It means that once you’ve built a strong elimination total, throwing away a good position purely to chase another kill makes less sense.


Higher-Ranked Enemies Give Bonus RP

EA currently gives a bonus when you eliminate an opponent ranked above you.

The bonus scales according to the rank difference:

Rank differenceBonus
1 tier higher+15%
2 tiers higher+25%
3 tiers higher+35%
4+ tiers higher+50%

Your placement still determines the underlying value of the elimination.

Think of this as a reward for beating stronger opponents, not a reason to hunt them down recklessly.

An enemy being higher ranked does not make your fight automatically favorable.


Top-Five Streaks Can Earn Bonus RP

Ranked also rewards consecutive top-five finishes.

EA’s current system gives:

Second consecutive top-five: +10 RP

Third: +20 RP

Fourth: +30 RP

Fifth and subsequent: +40 RP

The streak resets whenever you finish outside the top five.

This is another reason not to treat every match as an all-or-nothing kill race.

Consistent top-five finishes can build momentum over several games.


Understanding the Apex Legends Ranked Ladder
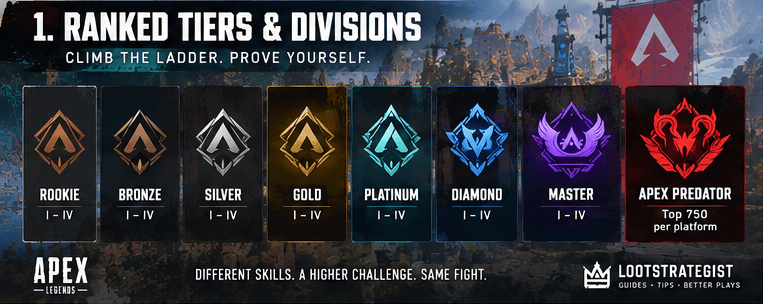
Apex Legends Ranked tiers showing progression from Rookie through Apex Predator

The current rank structure is:

RankDivisions
RookieRookie
BronzeIV–I
SilverIV–I
GoldIV–I
PlatinumIV–I
DiamondIV–I
MasterMaster
Apex PredatorTop 750 per platform

Rookie is designed as an introductory tier, while Apex Predator is reserved for the top 750 players per platform within Master.

Rookie

Rookie is where newer Ranked players begin learning the competitive system.

Once you’ve progressed out of Rookie, you cannot be placed back into it.

Bronze and Silver

These ranks are where you should concentrate on clean fundamentals.

Learn rotations.

Improve your aim.

Stop taking fights from terrible positions.

Gold

Gold is where inconsistent decision-making becomes much more noticeable.

A few unnecessary deaths can erase the gains from a strong match.

Platinum

Platinum is a meaningful step up.

Players are generally more disciplined about positioning, rotations, and taking favorable fights, so careless decisions tend to get punished quickly.

Diamond

Diamond demands consistency.

You need to be much more deliberate about when you fight, where you rotate, and how you spend your resources.

Master

Master is a different level of competition.

Mechanical skill matters, but decision-making and consistency are increasingly important.

Apex Predator

Predator is the top end of the ladder: the top 750 players per platform within Master.

Reaching the threshold isn’t the same as securing the title.

You are competing against other players for those positions.


How Ranked Matchmaking Works

Ranked matchmaking is based on your current RP.

For your first Ranked experience, your hidden skill value from Unranked Trios helps determine your starting rank and RP.

For players who have played Ranked before, the system uses their hidden Ranked skill value. Matches become more difficult as RP increases.

EA also recommends checking the distribution of player ranks in the lobby before the match begins so you can adapt your strategy to the competition.

Don’t overthink it.

You don’t need to memorize the lobby.

Just recognize that a stronger-looking lobby may reward a more conservative opening, while a lower-pressure lobby can give you more room to take fights.


How Drop Zones Work in Ranked

This is one of the current Ranked mechanics worth knowing.

EA says Ranked matches can currently begin in two different ways:

Dropship

or

Drop Zone.

With the normal Dropship format, a Jumpmaster chooses where the squad lands.

In a Drop Zone match, which is used when the lobby meets a certain threshold of Diamond, Master, or Predator players, your squad is assigned a POI before Legend selection. Your team then independently jumps toward that area, although you can adjust your landing to contest nearby zones.

This can change how you approach the opening.

Pay attention to the loading screen.

Know where your assigned area is.

Watch whether nearby squads are likely to contest.

Then make a decision before you are already falling out of the sky.


Ranked Legend Selection Is Different
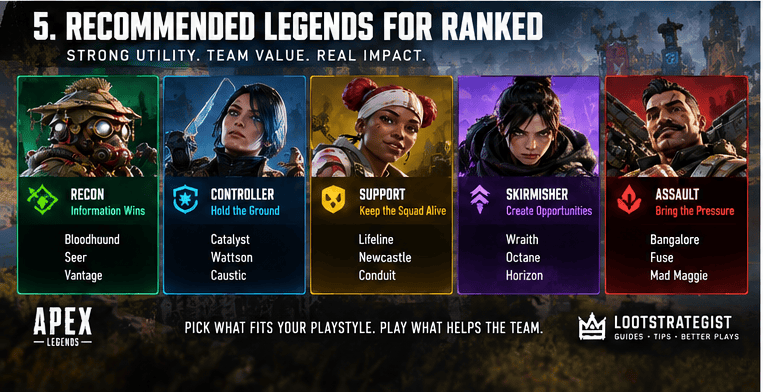
Apex Legends Ranked guide showing recommended Legend roles for different squad strategies

Legend selection in Ranked is staggered, meaning players choose one at a time.

You also cannot stack the same Legend on one team.

Ranked includes Legend class perks, and you can collect Legend Amps that provide additional passive abilities during the match.

That makes team composition more relevant than simply picking three characters you individually enjoy.

You don’t need a professional-level composition.

You do need a squad whose abilities make sense together.


Ranked EVO and Shield Cores

Ranked currently uses an upgrade system in which EVO progresses your armor and Legend level during the match.

EA lists three Legend levels for the armor progression:

Level 1 — White

Level 2 — Blue

Level 3 — Purple

EVO can be earned through dealing damage, finding EVO Harvesters, and collecting EVO Caches.

Ranked armor is fueled by a Shield Core rather than the older system of simply swapping armor.

Enemy death boxes contain Shield Cores tied to the defeated player’s Legend Level, while the displayed color of a dropped Core represents the charge remaining in that Core.

For beginners, you don’t need to memorize every Shield Core edge case.

The important lesson is to understand that your armor progression and remaining shield charge are separate considerations.


The Best Ranked Strategy Is Consistency

There is no single strategy that works perfectly every match.

Sometimes you’ll land uncontested and have excellent loot.

Sometimes another squad will be in your building before you’ve even found a weapon.

Sometimes your rotation will give you strong ground.

Other times the Ring will make your preferred route impossible.

Good Ranked players adapt to those situations.

Your job is not to force the match to behave the way you wanted.

It’s to make the best decision from the position you’re actually in.


How to Choose Fights in Ranked

Before committing to a fight, consider four things:

Position

Do you have cover?

Do you have a useful angle?

Do you have an escape route?

Numbers

Are your teammates nearby?

Is everyone healthy enough to fight?

Resources

Do you have ammunition, shields, and healing?

Exit

What happens if the enemy pushes back?

If those four factors look favorable, the fight may be worthwhile.

When several of them are missing, you’re taking a much larger gamble.

A fight doesn’t have to be guaranteed to be worth taking.

It simply needs to make sense.


Don’t Hot Drop Every Ranked Match

Hot dropping can be useful for practicing mechanics.

That doesn’t make it the best strategy for climbing.

A chaotic opening can end before your squad has a chance to stabilize, particularly when another team lands on the same loot.

Unless your squad has a reason to contest a POI, a controlled opening usually gives you more time to acquire weapons, shields, and information.

You can find a fight after you’re prepared.

You cannot always recover from one you started unprepared.


Rotate Early
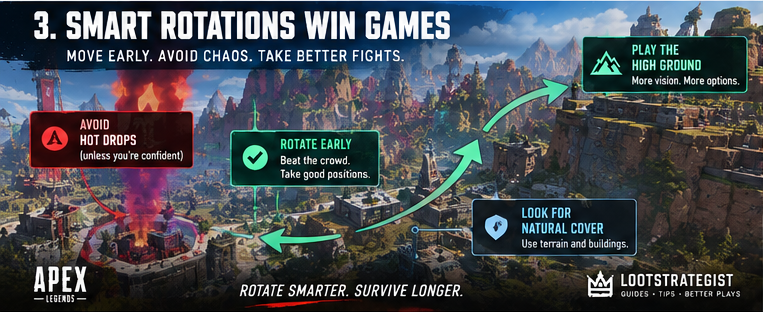
Apex Legends Ranked rotation guide showing smart early rotations and strong positioning

Late rotations create problems that did not need to exist.

You wait.

You loot.

The Ring moves.

You finally rotate.

The only available route now goes directly through a team holding high ground.

The better approach is to think one rotation ahead.

Ask:

Where does the squad want to be next?

Then move while you still have options.

Early rotation isn’t about running away from combat.

It’s about giving yourself the ability to decide which combat you actually want.


Play for Position Before the Endgame

You shouldn’t start thinking about your final position only when there are three squads left.

Your mid-game choices determine where you can play later.

Prioritize:

  • Cover
  • High ground
  • Defensible terrain
  • Escape routes
  • Useful sightlines
  • Rotations that don’t funnel you through predictable choke points

A strong position can make the enemy move first.

That is often more valuable than one additional elimination.


Learn to Recognize a Bad Fight

A bad fight often has warning signs before the first shot.

Your squad is split.

You’re low on shields.

You are fighting uphill.

The enemy has cover.

You have no escape route.

The Ring is closing.

Another team is shooting nearby.

Any one of these may be manageable.

Several at once should make you reconsider.

The best Ranked decision sometimes happens before the fight starts.


Don’t Chase a Losing Fight

One of the most expensive habits in Ranked is refusing to disengage.

You crack an enemy.

They retreat.

You follow.

They reach cover.

Another squad arrives.

Now you’re fighting two teams.

The original damage doesn’t matter anymore.

Once the conditions change, change with them.

Backing out of a bad engagement isn’t wasted time.

It preserves your squad and your next opportunity to earn RP.


Reset After Every Fight

Make this routine automatic:

Heal.

Reload.

Check ammunition.

Check your surroundings.

Recover teammates when safe.

Check the Ring.

Then loot.

The order can change slightly depending on the situation, but the principle stays the same.

A squad that immediately opens death boxes after every fight is vulnerable to the squad that heard the gunfire from two buildings away.

The loot will still be there.

Your shields may not be.


Solo Queue Ranked Tips

Solo queue requires a different mindset because your teammates won’t always want the same things you do.

You don’t control their decisions.

You do control your own.

Adapt to Your Team

Watch how your teammates play during the first few minutes.

Are they aggressive?

Do they rotate early?

Do they split during loot?

Do they prefer holding positions?

Use that information.

A flexible player can get much more value from an imperfect squad than someone who insists every teammate follow the same plan.

Don’t Follow Every Bad Push

Supporting your squad doesn’t mean copying a terrible decision.

If a teammate runs into a hopeless 1v3, don’t automatically turn it into a 2v3.

Look for an angle.

Provide cover.

Be ready for a retreat.

Preserve your position if the push is clearly lost.

Communicate

Use pings for enemies, loot, rotations, and danger.

A concise ping at the right moment is worth more than frantic communication after the fight has already started.


Ranked With a Premade Squad

A full squad has something a solo player doesn’t:

predictability.

You can create routines.

One player can make rotation calls.

Another can focus on scouting.

Another can manage support and recovery.

The exact division doesn’t matter as much as having a shared plan.

Decide before the match how your squad generally wants to play.

That prevents three players from making three different decisions when the first enemy appears.


Learn When to Play for Placement

There are moments when the correct play is to fight.

There are also moments when another team doing the fighting is exactly what you want.

Suppose your squad has:

  • Good Ring position
  • Strong cover
  • Healthy resources
  • Multiple escape routes
  • Two enemy squads already fighting

You don’t necessarily gain anything by rushing into the middle of that fight.

Let them weaken each other.

Then decide whether the resulting position is favorable.

Patience isn’t passivity.

It’s choosing when the fight is cheapest to take.


Ranked Splits and Resets

Ranked splits happen twice each Season: once at the start and once at the announced second split.

Your RP is reset when the split occurs.

For Split Two, EA’s current reset structure is:

Previous RankSplit-Two Reset
Bronze IV–IBronze IV — 1,000 RP
Silver IV–ISilver IV — 3,250 RP (+250 demotion protection)
Gold IV–IGold IV — 5,750 RP (+250 demotion protection)
Platinum IV–IPlatinum IV — 8,750 RP (+250 demotion protection)
Diamond IV–IIIPlatinum III — 9,250 RP
Diamond II–IPlatinum II — 10,000 RP
Master and abovePlatinum I — 11,000 RP

These are the current values in EA’s Ranked documentation.

Because Ranked systems can be changed between seasons, this is one section worth rechecking whenever Respawn publishes new Ranked patch notes.


Ranked Rewards

At the start of the next Season, you receive rewards based on the highest rank you achieved during the previous Season.

That highest rank can come from either split. EA also distinguishes the badge presentation depending on whether you match or surpass your first-split rank in the second split.

Ranked also has Auras, cosmetic effects that display your current rank in matches.

They range from gray for Rookie to red for Predator.

The rewards are nice.

The more useful reward, though, is knowing that your level of play has actually improved.


Can You Play Ranked With Friends?

Ranked parties have matchmaking restrictions.

EA’s current rules require players in a premade Ranked squad to be within two ranks of each other.

For example, a Bronze player can party with Rookie, Bronze, Silver, and Gold players, but not Platinum or higher. Premade squads are matched using the highest RP value in the squad.

Temporary matchmaking tests can alter those rules, so check the latest patch notes when Respawn announces an experiment or change.


Ranked Ladders Explained

Ranked Ladders are a separate leaderboard system.

EA currently describes each Ladder as a skill-based leaderboard with a maximum of 100 players.

You need at least five Ranked matches to establish a Ladder result, and your Ladder score is based on your five best Ranked RP scores during that period. Cross-play must be enabled, and you can compete with or without a squad.

The current Ladder tiers are:

TierLeaderboard Position
Tier 1Top 10%
Tier 2Top 10–30%
Tier 3Top 30–50%
Tier 4Bottom 50%

EA’s current Ranked page says Ladders run weekly from Tuesday through Sunday, while the Season 30 Marked update specifically extended Ranked Ladders to five days.

Because the exact Ladder schedule can be seasonal, use the in-game Compete tab as the final reference for active dates.


How to Improve Your Ranked Climb
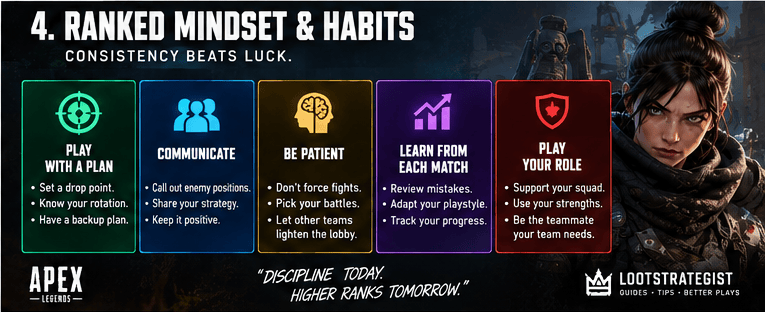
Apex Legends Ranked guide showing recommended Legend roles for different squad strategies

You don’t need to review every game like a professional player.

Start with your deaths.

After a bad match, ask:

Was my position good?

Was my squad together?

Did I have enough resources?

Did we choose the fight?

Did I rotate too late?

Could I have escaped?

If you keep giving the same answer, you’ve found the skill you need to work on.

That is much more useful than simply saying, “I need better aim.”


Stop Trying to Fix Everything at Once

Improvement becomes easier when you give yourself one target.

For a few matches, focus on positioning.

Then work on close-range gunfights.

Then practice movement.

Then work on rotations.

Then communication.

Once each habit becomes more automatic, combine them.

Trying to overhaul your entire gameplay at once usually creates another problem:

You start thinking about everything except the fight in front of you.


Don’t Tilt Queue

A bad Ranked session can turn into a disaster surprisingly quickly.

You lose RP.

You get frustrated.

You take a reckless fight to win it back.

You lose more RP.

Then you queue again because now you really need the points.

That cycle is rarely productive.

Take a break when you’re no longer making calm decisions.

There is no bonus RP for emotional damage.


The Biggest Ranked Mistakes to Avoid
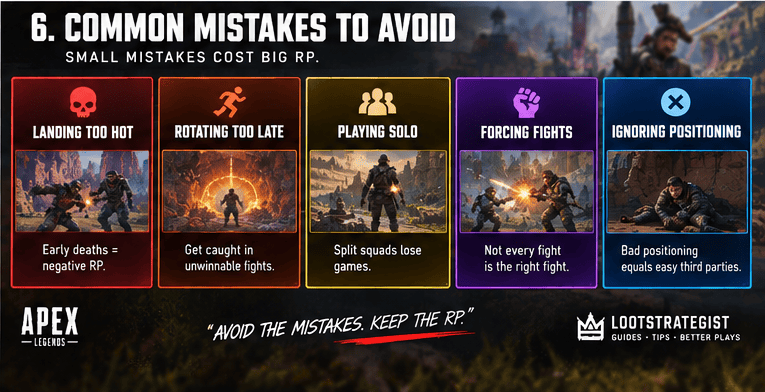
Apex Legends Ranked mistakes guide showing common errors such as bad rotations, unnecessary fights, poor positioning, and weak communication

Chasing Every Fight

Not every enemy is worth fighting.

Rotating Too Late

Late rotations leave you with fewer options.

Splitting From Your Squad

An isolated player is easier to eliminate and harder to support.

Refusing to Disengage

A good fight can become a terrible one in seconds.

Looting Without Checking for Third Parties

Gunfire attracts attention.

Chasing Kills Instead of Position

Kills contribute to RP, but dying in a terrible position contributes to someone else’s match.

Ignoring the Ring

A late rotation can force a fight you could have avoided.

Changing Legends Constantly

You learn much more from a Legend when you actually understand the kit.

Playing Tilted

Bad decisions compound.

Ignoring Your Deaths

Your mistakes are information.

Use them.


A Simple Ranked Game Plan

Early Game

Land with your squad.

Get a practical weapon combination.

Secure ammunition, shields, and healing.

Identify nearby squads.

Take a fight only when the opening makes sense.

Mid Game

Rotate before you’re forced to.

Prioritize strong positions.

Take favorable engagements.

Reset after fights.

Watch for third parties.

Late Game

Value position over unnecessary kills.

Keep the squad together.

Preserve resources.

Hold useful terrain.

Make the next rotation before you desperately need it.

That’s the basic loop.

The details change from match to match.

The principles don’t.


Loot Strategist’s Ranked Rule

Don’t ask how many kills you can get this match.

Ask:

“What decision gives my squad the best chance of finishing higher?”

Sometimes the answer is a fight.

Sometimes it’s a rotation.

Sometimes it’s holding your position.

Sometimes it’s letting another squad leave.

And sometimes it’s walking away from a fight that looks tempting but offers almost no upside.

Ranked is built from hundreds of small decisions.

The flashy moments are simply the easiest ones to remember.


Final Thoughts

Apex Legends Ranked gets easier to understand once you stop thinking of RP as something you have to chase every minute.

Think about creating good outcomes consistently.

Take favorable fights.

Rotate early.

Use cover.

Stay close to your squad.

Reset after engagements.

Pay attention to the Ring.

Don’t chase an enemy simply because they are running away.

And when you lose, figure out why.

You won’t win every match.

You won’t gain RP every session.

Some games will end because the squad made one terrible call.

Others will end because another team simply played the situation better.

That’s part of competitive Apex.

What matters is whether you are making better decisions than you were ten matches ago.

That is what makes the climb sustainable.


Related Apex Legends Guides

Apex Legends Beginner Guide — Start here if you’re still learning Apex fundamentals such as weapons, movement, positioning, looting, healing, and squad play.

Apex Legends Octane Guide — Learn how to use Octane’s mobility without sacrificing your squad’s positioning.

Apex Legends Movement Guide — Learn the movement fundamentals that become increasingly important as your skill level rises.

Apex Legends Best Weapons Guide — Build a reliable loadout around weapons you can use consistently.

Apex Legends Solo Queue Guide — Learn how to adapt when you’re climbing without a premade squad.


Sources & Updates

Last reviewed: September 6, 2026

Apex Legends Ranked systems can change during a Season, so this guide separates current game mechanics from Loot Strategist’s editorial recommendations.

Current Ranked mechanics—including RP progression, entry costs, scoring, rank divisions, matchmaking, Drop Zones, Ranked splits, rewards, party restrictions, Shield Cores, and Ranked Ladders—were checked against EA’s official How Apex Legends Ranked Works documentation.

Season-specific Ranked information was also checked against the official Apex Legends: Marked Patch Notes released for Season 30. Those notes state that Ranked Ladders were extended to five days.

Editorial note: Gameplay recommendations in this guide—including fight selection, rotations, positioning, solo queue habits, and climbing strategy—are Loot Strategist’s editorial advice. They are not presented as official EA rules.
Apex Legends Weapons Guide: Best Guns, Weapon Types & Beginner Tips

Apex Legends Weapons Guide: Best Guns, Weapon Types & Beginner Tips

Choosing a weapon in Apex Legends is about more than picking up the gun with the highest damage.

You need to think about range, recoil, magazine size, ammo availability, attachments, your second weapon, and even the Legend you’re playing. A weapon that feels incredible in a close-range fight can become awkward when you’re trying to pressure another squad from a distance.

That is why there isn’t one weapon that is simply the best gun in Apex Legends for everyone.

EA’s own weapons guide recommends trying different guns and learning which weapons feel comfortable at different ranges. For newer players, Assault Rifles and SMGs are a particularly useful starting point because they cover a wide variety of encounters.

This Apex Legends weapons guide breaks down the major weapon types, explains how to choose a loadout, and covers practical tips for getting more value from the guns you find during a match.

Apex Legends Weapon Types Explained

Apex Legends divides its guns into several weapon categories, each designed around different combat situations.

Understanding those roles is more useful than memorizing a tier list because weapon balance changes regularly.

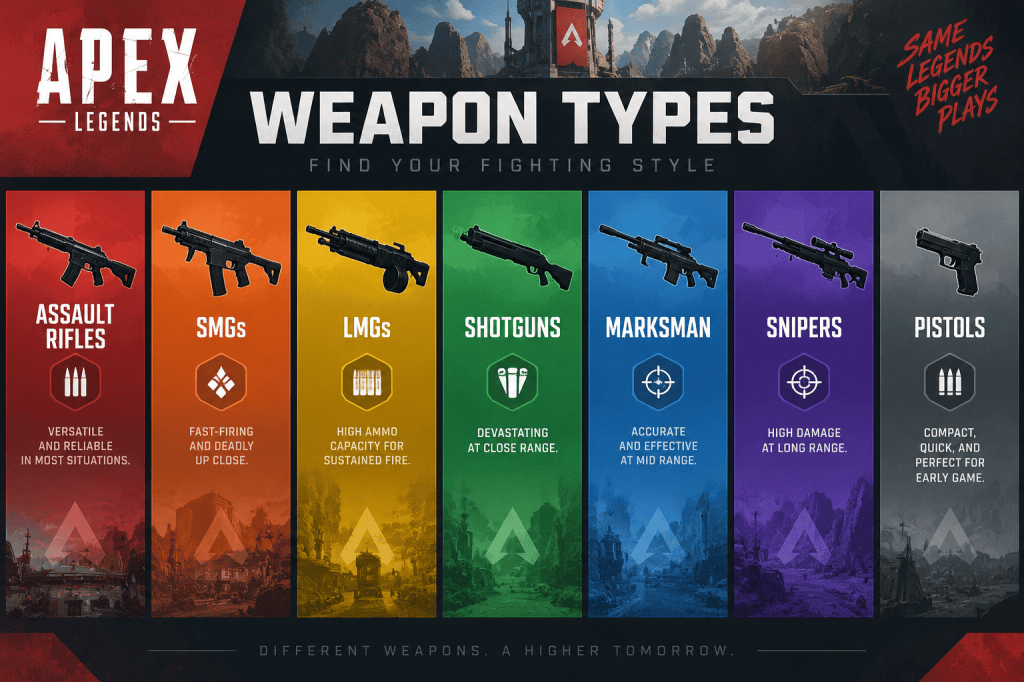
Apex Legends weapon types infographic showing seven categories—Assault Rifles, SMGs, LMGs, Shotguns, Marksman, Snipers, and Pistols—represented by recognizable weapon silhouettes.

Assault Rifles

Assault Rifles are some of the most versatile weapons in Apex Legends.

They’re generally useful at close-to-mid range and can be effective for players who are still learning how to manage different engagements.

Examples include:

  • HAVOC Rifle
  • VK-47 Flatline
  • Hemlok Burst AR
  • R-301 Carbine
  • Nemesis Burst AR

The biggest advantage of an Assault Rifle is flexibility.

You can use one to pressure an enemy across a street, fight around a building, or support a teammate during a medium-range engagement.

For beginners, the R-301 Carbine is an especially approachable starting point because of its relatively manageable handling. EA also specifically recommends it as a beginner-friendly weapon.

Submachine Guns

SMGs are built around faster, closer-range engagements.

They’re particularly useful when fights move inside buildings or when you need to follow up quickly after closing the distance.

SMGs reward:

  • Good tracking.
  • Confident movement.
  • Close-range positioning.
  • Knowing when to reload.
  • Staying close enough for your weapon’s strengths to matter.

A common mistake is carrying an SMG and then taking every fight from too far away.

If your weapon is strongest at close range, your positioning should help you get there safely.

Light Machine Guns

LMGs generally offer larger magazines and sustained fire.

That can make them useful when suppressing an enemy position or maintaining pressure while your teammates reposition.

The trade-off is that they can feel less agile than some lighter weapons.

They’re particularly useful when you want to keep firing rather than constantly resetting your weapon.

Shotguns

Shotguns specialize in close-range burst damage.

They can be extremely effective when you’re fighting around doors, corners, buildings, and other tight spaces.

The catch is obvious: you need to be close enough for the weapon to do its job.

Shotguns also punish missed shots more severely than many automatic weapons. If you fire and miss during a close-range fight, the opponent may have enough time to punish you before you can fire again.

That makes shotguns excellent weapons for players who are comfortable with movement and positioning.

Marksman Weapons

Marksman weapons occupy an interesting middle ground.

They’re generally suited to players who want more range than an SMG or Assault Rifle can comfortably provide without committing fully to a traditional sniper.

They can be useful for:

  • Mid-to-long-range pressure.
  • Opening damage before a rotation.
  • Holding an angle.
  • Punishing enemies who stay exposed.

However, weapon balance between Marksman weapons and other categories changes over time.

Respawn has specifically discussed moving away from a Marksman-dominated meta during 2026, so it’s better to think of this category in terms of its role rather than assuming Marksman weapons will always dominate long-range encounters.

Sniper Rifles

Sniper Rifles are designed for long-range engagements.

They allow you to pressure enemies who are too far away for most close-range weapons to use effectively.

The downside is that they can be awkward when another squad suddenly pushes into close range.

If you choose a sniper, your second weapon becomes especially important.

You don’t want to discover halfway through a fight that both weapons are designed for long-range engagements.


What Is the Best Gun in Apex Legends?

There isn’t a universal answer.

The strongest weapon for you depends on how you play and what the match gives you.

A weapon that has excellent statistics on paper isn’t automatically the best choice if you can’t control its recoil or consistently land shots with it.

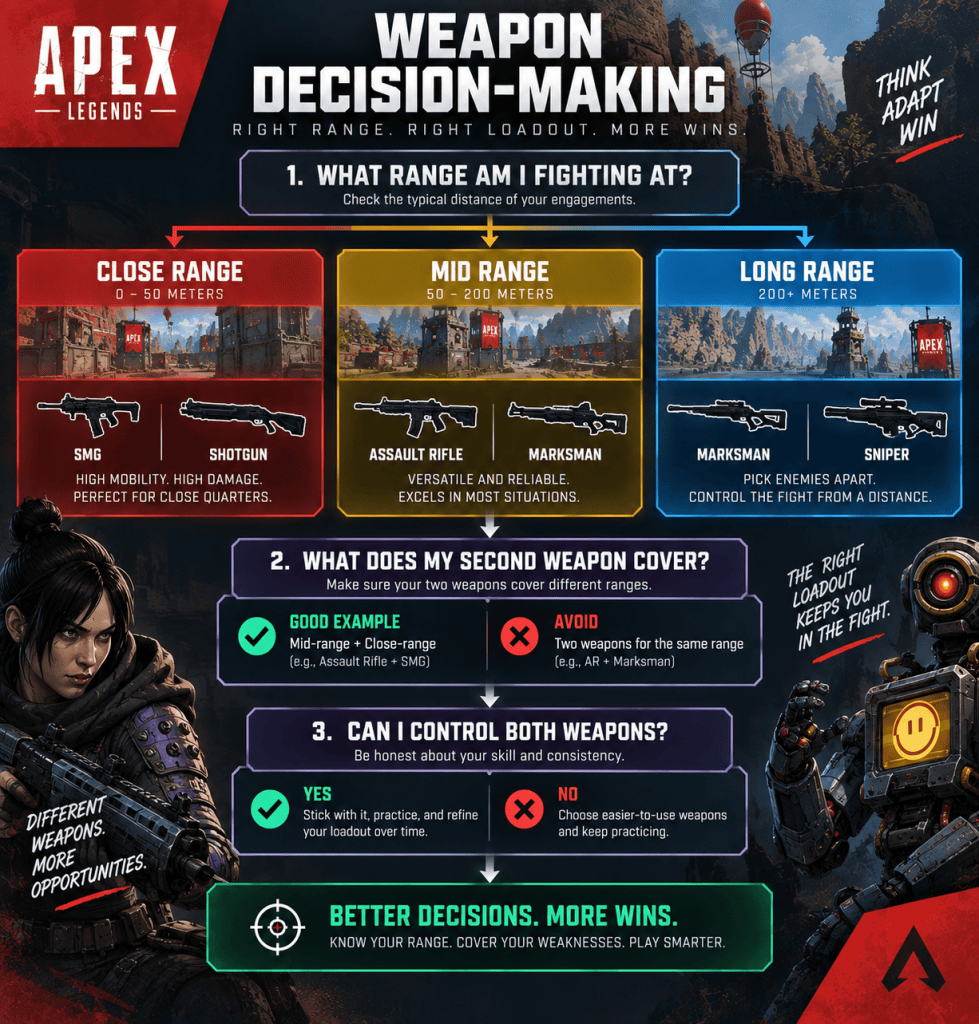
Instead, ask three questions:

What range am I fighting at?

If most of your fights happen inside buildings, a shotgun or SMG may make more sense than a sniper.

Can I control the weapon?

A weapon with theoretically excellent damage won’t help much if your shots consistently miss.

Does it complement my second weapon?

Your two weapons should ideally cover different situations.

That third question is particularly important for beginners.


Best Weapons for Beginners

If you’re still learning Apex Legends, don’t worry about mastering every gun immediately.

Start with weapons that help you understand the fundamentals.

R-301 Carbine

The R-301 is a strong beginner choice because it is versatile and relatively easy to understand.

It can handle a range of encounters and gives new players an opportunity to practice tracking, recoil control, and positioning without requiring an extremely specialized playstyle.

If you find one early in a match and feel comfortable with it, there is little reason to abandon it simply because another weapon has a higher reputation.

Flatline

The VK-47 Flatline offers a different feel from the R-301.

It rewards players who are comfortable with its recoil and damage profile.

If you’re transitioning from easier-to-control weapons, spend some time in the Firing Range before deciding whether you like it.

Alternator

The Alternator can be approachable for players who prefer a straightforward automatic weapon.

It can work well in close-to-mid-range encounters and is useful while you’re learning how to track moving targets.

Volt

The Volt is another useful option for players who enjoy close-range automatic fire.

Its current energy-weapon ammunition system is different from the traditional ammo system many longtime players remember, so newer guides that describe it as simply consuming conventional Energy Ammo are outdated.

Peacekeeper

The Peacekeeper is a good weapon to practice if you want to improve your close-range accuracy.

It can be rewarding when your timing and aim are good, but it is less forgiving when you repeatedly miss.


The Best Weapon Depends on Your Range

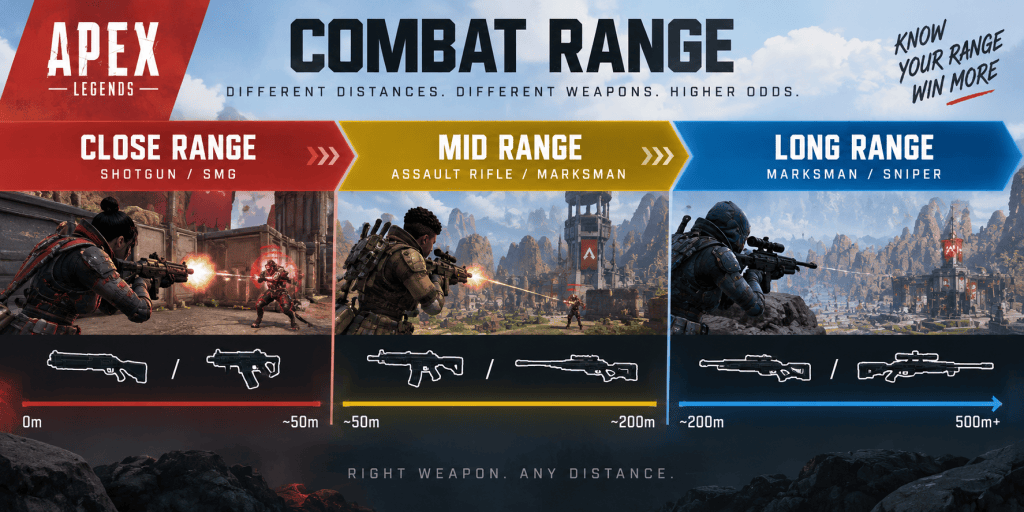
Apex Legends combat range infographic showing recommended weapons by distance: Shotguns and SMGs for close range, Assault Rifles and Marksman weapons for mid range, and Marksman and Sniper weapons for long range.

One of the easiest ways to improve your weapon choices is to think about engagement range.

Close Range

Good options include:

  • SMGs
  • Shotguns
  • Certain Pistols

Close-range weapons work best when you’re fighting around buildings, corners, doors, and tight cover.

Movement also becomes extremely important here.

Your recent movement practice should complement your weapon choice. If you’re carrying an SMG or shotgun, being able to strafe, slide, change direction, and use cover can make a huge difference.

Mid Range

This is where Assault Rifles and many Marksman weapons become useful.

Mid-range fights give you enough distance to avoid some of the chaos of a point-blank fight while still allowing consistent pressure.

For beginners, this is often the easiest range to learn because you have more time to react than you would in a shotgun duel.

Long Range

Snipers and certain Marksman weapons are designed for this role.

Long-range fights can be useful for:

  • Gathering information.
  • Cracking shields.
  • Forcing enemies out of cover.
  • Creating opportunities for your squad to rotate.
  • Punishing teams that remain exposed.

But don’t fall into the trap of shooting from far away simply because you can.

If you’re dealing 20 or 30 damage repeatedly without creating an opportunity for your team, you may be better off rotating into a stronger position.


How to Build a Good Two-Gun Loadout

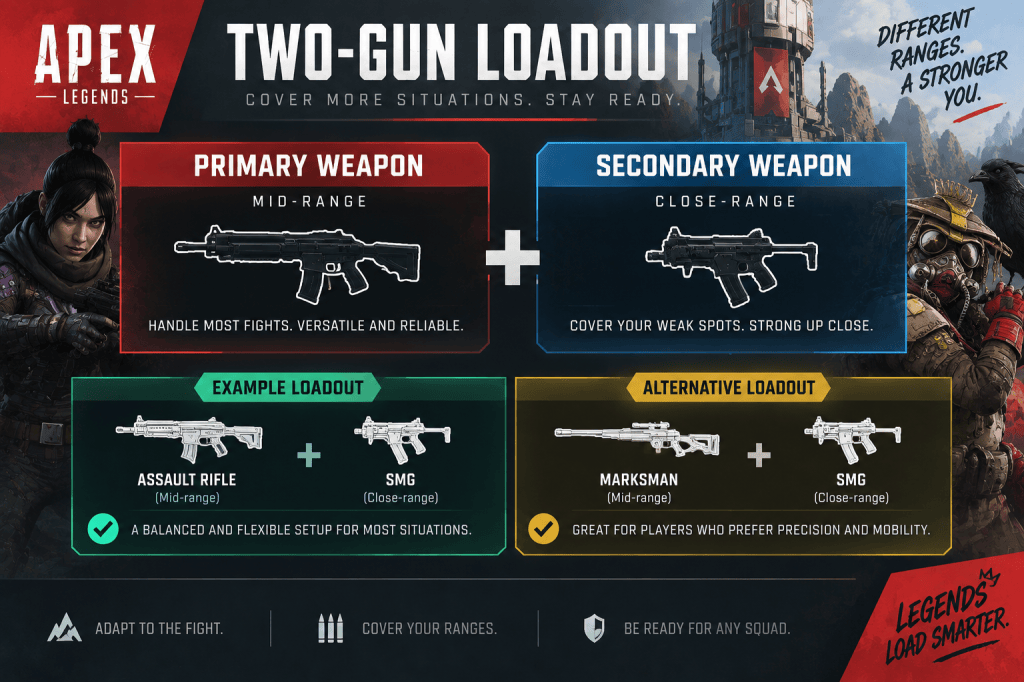
Apex Legends two-gun loadout infographic showing a mid-range primary weapon paired with a close-range secondary, with example Assault Rifle + SMG and alternative Marksman + SMG combinations.

Your two weapons should generally complement each other.

A simple beginner setup is:

Mid-range weapon + close-range weapon

For example:

Assault Rifle + SMG

This gives you a weapon for sustained mid-range fights and another for aggressive close-range engagements.

Another option is:

Marksman + SMG

This gives you more range while keeping a strong close-range option.

You could also use:

Sniper + Shotgun

This setup gives you a very strong range split, but it requires more confidence because both weapons are specialized.

The important thing is to avoid creating unnecessary overlap.

If both weapons are strongest at exactly the same range, you may find yourself poorly equipped when the fight changes distance.


Don’t Choose a Weapon Before Considering Your Second Gun

This is an easy mistake to make when looting.

You find a weapon you like, grab it immediately, and then spend the next several minutes looking for another gun that uses the same type of ammo or fills the same role.

Instead, think in pairs.

For example:

“I have a strong mid-range weapon. Now I need something for close range.”

That simple thought process makes looting more efficient.

It also helps prevent awkward loadouts.


Ammo Management in Apex Legends

Ammo management is part of weapon selection.

EA currently lists several ammunition systems, including Light, Heavy, Energy, Shotgun Shells, Sniper Ammo, Mythic Ammo, and Arrows. Some special ammunition systems behave differently from traditional floor-loot ammo.

One particularly important current change is the Energy weapon rework introduced with the Marked update.

Energy Ammo was removed as a conventional lootable item. Energy weapons instead have their own ammunition stockpile, which regenerates over time. Different weapons have different stockpile sizes, and the regeneration pauses while firing or reloading.

That means old guides explaining energy weapons as if they work exactly like Light or Heavy Ammo are no longer accurate.

For newer players, the bigger lesson is simple:

Don’t fill your inventory with ammo just because you have space.

Carry what your weapons actually need, pay attention to how much ammunition you are using, and make sure you have enough supplies for the fights you’re likely to take.


Weapon Attachments Matter

Finding the right attachment can change how comfortable a weapon feels.

Depending on the weapon, attachments can improve areas such as:

  • Magazine capacity.
  • Reloading.
  • Handling.
  • Recoil control.
  • Optics.
  • Hip-fire performance.
  • Other weapon-specific characteristics.

But don’t spend half a match searching for a perfect attachment.

A weapon you can use confidently with a basic setup is usually more valuable than a weapon sitting in your inventory while you search for one missing attachment.

Prioritize Attachments That Solve a Problem

Instead of thinking:

“I need the best attachment.”

Think:

“What is currently making this weapon difficult to use?”

If you’re constantly running out of bullets during a fight, a better magazine can matter.

If you struggle to control recoil, an attachment that improves handling or recoil can be more valuable.

If you’re fighting primarily at longer distances, the right optic can make target acquisition easier.

This is a much more useful way to think about attachments.


Don’t Chase Every Hop-Up

Hop-Ups can modify or enhance certain weapons, but their availability and implementation can change between seasons.

A common beginner mistake is seeing a Hop-Up and immediately deciding that they need the corresponding weapon.

Instead, start with the weapon.

If you already like the gun and find the relevant attachment, great.

Don’t build your entire loadout around finding one particular Hop-Up unless you already understand why you want it.

Apex has also moved toward locked Hop-Up systems in previous updates, so older loot guides can describe systems that no longer work the same way.


Weapon Choice Should Match Your Playstyle

Your Legend and weapons don’t have to match perfectly, but they can complement each other.

Aggressive Players

If you enjoy pushing enemies and taking close-range fights, consider weapons that reward:

  • Fast tracking.
  • Quick movement.
  • Close-range accuracy.
  • Rapid follow-up damage.

SMGs and shotguns are natural options to experiment with.

Defensive Players

If you prefer holding buildings, controlling angles, and forcing enemies to approach you, weapons that provide sustained pressure or reliable mid-range damage can be more comfortable.

Long-Range Players

If you prefer watching an enemy squad from a distance and looking for opportunities to punish exposure, Marksman weapons and Sniper Rifles may suit you better.

Just remember that eventually the fight may come to you.

Having a second weapon capable of handling close-range pressure is important.


Match Your Weapon to Your Legend

Some Legend abilities can make certain weapon styles more comfortable.

For example, a mobility-focused Legend can make it easier to close distance with an SMG or shotgun.

That doesn’t mean you need to force a particular weapon onto a particular Legend.

Instead, think about what your Legend allows you to do.

If your Legend can quickly reposition, you may be able to take angles that make a close-range weapon more effective.

If your Legend specializes in holding an area, you may get more value from weapons that let you control an approach.

This is where weapon choice becomes part of your overall game plan rather than an isolated decision.


The Biggest Weapon Mistakes Beginners Make

1. Chasing the “Meta” Gun

A weapon can be strong without being the right weapon for you.

If you can’t control it, your personal results may be worse than with a supposedly weaker weapon that you understand.

2. Carrying Two Weapons for the Same Range

Running two close-range weapons can leave you struggling to pressure enemies across open terrain.

Likewise, carrying two long-range weapons can become painful when another squad pushes your building.

Think about coverage.

3. Ignoring Recoil

Damage numbers don’t matter if your shots aren’t connecting.

Spend time in the Firing Range learning how your weapon behaves.

4. Reloading in the Open

A magazine running dry doesn’t mean you should stand still and reload.

Use cover, reposition, or break line of sight when possible.

This connects directly to the movement fundamentals covered in an Apex Legends movement guide.

5. Staying in a Bad Fight Because You Have the “Right” Weapon

A good gun doesn’t fix bad positioning.

If you’re exposed, outnumbered, or being pushed from multiple angles, repositioning may be more important than continuing to fire.

6. Spending Too Long Looting

The perfect loadout doesn’t matter if another squad reaches the next position before you do.

Get weapons that work, grab useful attachments, secure enough ammunition, and keep moving.


How to Practice Your Weapons

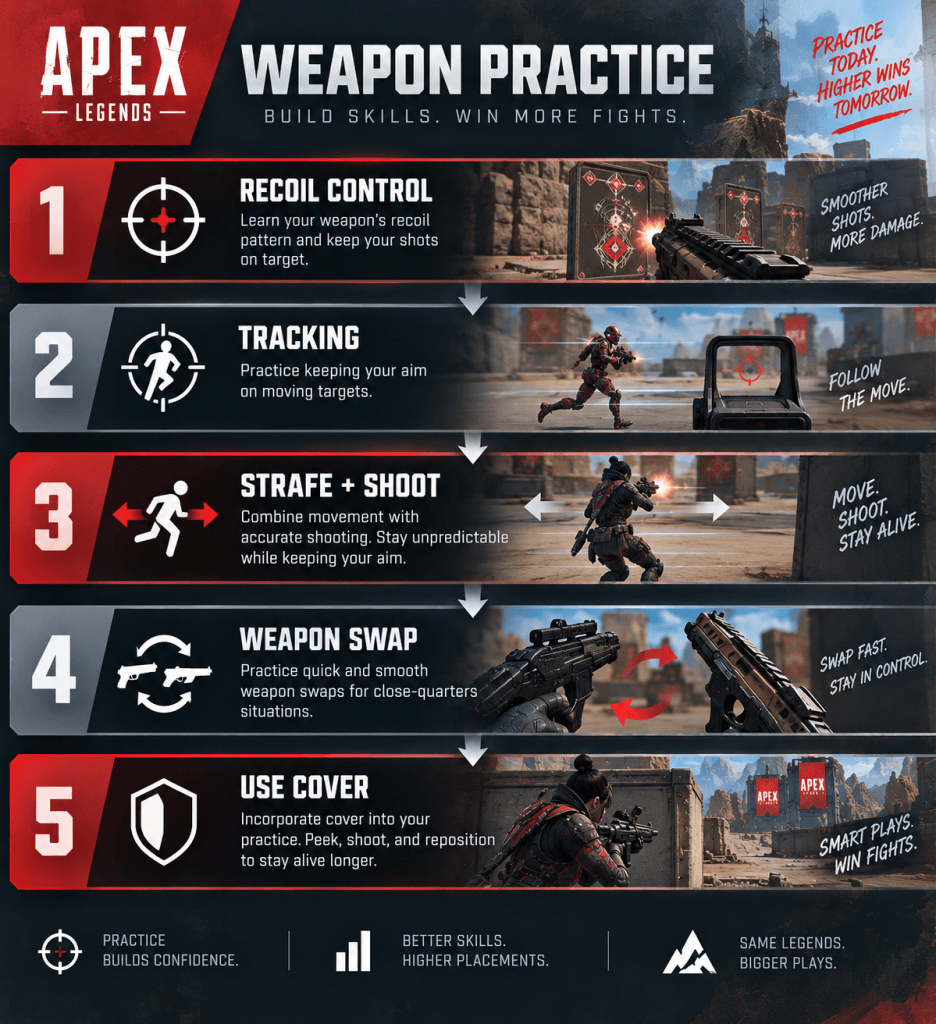
Apex Legends weapon practice infographic showing five steps: recoil control, tracking moving targets, strafing while shooting, quick weapon swaps, and using cover effectively.

The Firing Range is one of the best places to become comfortable with a weapon before relying on it in a real match.

Don’t just shoot at a stationary target.

Practice situations that resemble actual fights.

Drill 1: Recoil Control

Choose one automatic weapon.

Fire at a target while controlling the recoil.

Start at a comfortable range, then move farther away.

Drill 2: Tracking

Move around while keeping your crosshair on a target.

This is particularly useful for SMGs and other weapons that require sustained tracking.

Drill 3: Strafe + Shoot

Combine your weapon practice with movement.

Strafe left and right while firing and maintain your crosshair placement.

This connects your aim training with the movement skills you’ve already been practicing.

Drill 4: Weapon Swap

Practice switching between your two weapons.

You don’t want to spend several seconds fumbling through your inventory during a fight.

Learn which weapon you reach for at each range.

Drill 5: Cover

Practice firing from behind cover, retreating, reloading, and re-peeking from a slightly different angle.

This teaches an important lesson:

Good shooting is not just about aim. It’s also about giving yourself safe opportunities to shoot.


How to Choose a Weapon After Landing

The first weapon you find doesn’t need to be your final weapon.

Early in a match, prioritize functionality.

If you find an SMG and a shotgun, you can fight.

If you find an Assault Rifle and a pistol, you can fight.

You don’t need to spend the next five minutes searching for your dream loadout.

As you rotate, you can gradually improve your weapons and attachments.

This is especially important during contested drops when another squad is already nearby.

A usable weapon now is more valuable than a theoretically better weapon that you might find later.


What If You Find a Weapon You Don’t Like?

Use it long enough to understand why you dislike it.

Is the recoil difficult?

Is the fire rate uncomfortable?

Are you fighting at the wrong range?

Does the weapon require more precise aim than you’re currently comfortable with?

Sometimes the problem isn’t the weapon.

Sometimes you’re asking it to do something it wasn’t designed to do.

If you consistently dislike a weapon after giving it a fair test, move on.

Apex gives you enough weapon variety that you can build a loadout around your strengths.


How to Improve Your Weapon Choice Over Time

Apex Legends weapon decision-making flowchart showing how to choose weapons based on combat range, select a complementary second weapon, and use a loadout that the player can control confidently.

You don’t need to memorize every weapon statistic.

Instead, start paying attention to what happens in your matches.

After a fight, ask:

Did I lose because my weapon was weak, or because I used it badly?

Was I fighting at the wrong range?

Did my second weapon give me another option?

Did I run out of ammunition?

Did I miss because I couldn’t control the recoil?

These questions are much more useful than simply checking which weapon currently has the highest pick rate.

Apex is constantly changing.

Respawn’s 2026 updates have already adjusted weapon damage, recoil, magazine sizes, ammo systems, weapon rotations, and other mechanics.

Learning how to evaluate a weapon will therefore remain useful even when the meta changes.


A Simple Beginner Weapon Checklist

Before committing to a loadout, ask yourself:

  • Do I have a weapon for my preferred fighting range?
  • Does my second weapon cover a different range?
  • Can I control both weapons?
  • Do I have enough ammunition?
  • Do I have useful attachments without spending too much time looting?
  • Can I fight effectively indoors?
  • Can I pressure enemies at medium range?
  • Do my weapons work with the way I like to play?

If the answer is mostly yes, your loadout is probably good enough.

You don’t need a perfect setup.

You need a setup you understand.


Final Thoughts

The best weapons in Apex Legends aren’t necessarily the ones at the top of a tier list.

The best weapon for you is the one you can control, understand, and use at the range where your fights actually happen.

For beginners, start with versatile weapons such as Assault Rifles and SMGs. Learn how each weapon behaves, practice recoil and tracking in the Firing Range, and build two-gun loadouts that cover different situations.

From there, experiment.

Try shotguns if you want to improve your close-range fighting. Try Marksman weapons if you enjoy controlling longer angles. Test Snipers if you prefer patient, long-range engagements.

Most importantly, don’t let the current meta dictate everything you pick up.

Weapon balance will continue to change. Ammo systems can change. Attachments can change. Care Package rotations can change.

The skill that lasts is knowing why you’re choosing a weapon and what you want it to accomplish.

Once you start thinking that way, looting becomes faster, your loadouts become more deliberate, and your weapon choices start supporting the rest of your game instead of determining it.

Related Apex Legends articles

Apex Legends Movement guide

Apex Legends Octane Guide

Apex Legends Weapons Guide

Apex Legends Beginner Guide

Apex Legends Movement Guide: Sliding, Strafing & Advanced Tips

Apex Legends Movement Guide: Sliding, Strafing & Advanced Tips

In Apex Legends, winning a gunfight isn’t always about who lands the first shot. Sometimes it’s about who reaches cover first, who takes the better angle, or who can make the other player miss while keeping their own crosshair on target.

That is why movement matters so much.

You don’t need to master every flashy movement technique to become a better Apex player. In fact, most players will see bigger improvements by learning a few fundamentals—sprinting efficiently, sliding at the right time, strafing while shooting, and using terrain intelligently—before worrying about advanced mechanics.

This Apex Legends movement guide covers those fundamentals first, then moves into more advanced techniques and practical drills you can use in the Firing Range.

Why Movement Matters in Apex Legends

Apex Legends is built around momentum, positioning, and fast engagements. Movement helps you do much more than travel around the map.

Good movement can help you:

  • Reach cover before an enemy finishes their reload.
  • Make yourself harder to track during a close-range fight.
  • Change angles without giving an opponent an easy target.
  • Escape a bad engagement.
  • Take high ground or stronger defensive positions.
  • Stay with your squad during rotations.
  • Create better opportunities for your own shots.

EA’s beginner guidance specifically recommends sprinting rather than walking, holstering your weapon while travelling, sliding down declines, and using movement options such as launch pads and ziplines to travel efficiently.

The important distinction is that fast movement isn’t automatically good movement.

If you sprint into an open area with no cover, slide past your teammates, or chase an enemy into a bad position, moving quickly won’t save you. The best movement supports your positioning rather than replacing it.


Apex Legends Movement Basics

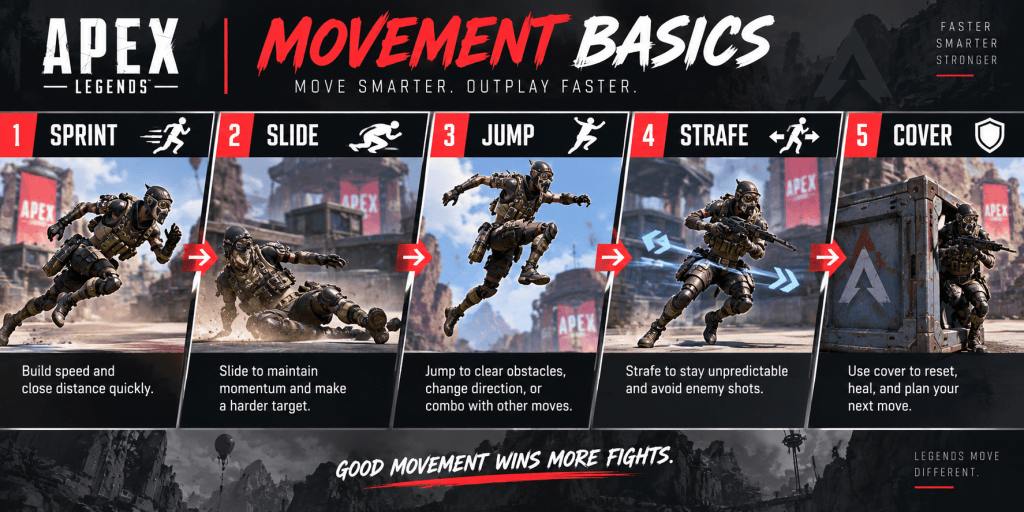
Before learning advanced techniques, make sure the basic movement loop feels natural.

Apex Legends basic movement diagram showing sprint, slide, jump, strafe, and cover

Sprinting

Sprinting is your default way of moving around the map.

Use it when rotating between locations, repositioning during a fight, or closing distance when you aren’t actively aiming.

One simple habit is worth developing early: don’t walk when you could safely sprint.

There is little benefit to moving slowly through open areas when you’re not trying to maintain a specific firing position.

Holstering Your Weapon

Holstering your weapon lets you move faster while travelling.

It is particularly useful when:

  • Rotating toward the next Ring.
  • Catching up with your squad.
  • Crossing a relatively safe area.
  • Retreating from a fight.
  • Moving between buildings.

You don’t want to spend the entire match with your weapon holstered, though. If you expect an enemy around the next corner, having your weapon ready is more important than squeezing out a little extra movement speed.

That small decision—weapon out or weapon holstered—becomes increasingly important as you improve.

Sliding

Sliding is one of the most useful movement mechanics for beginners.

A basic slide lets you maintain momentum while lowering your character’s profile and moving quickly across suitable terrain.

The easiest way to understand sliding is to think about momentum, rather than treating it as a button you press constantly.

Use slides when terrain and positioning make them useful. Sliding down a slope, for example, can help you cover ground quickly. Sliding across flat terrain can also help you change your position during a fight, but doing it repeatedly without a purpose can make your movement predictable.

Slide Jumping

Slide jumping combines a slide with a jump to preserve momentum and cover ground efficiently.

A simple practice routine is:

  1. Sprint forward.
  2. Start a slide.
  3. Jump near the end of the slide.
  4. Continue sprinting once you land.
  5. Repeat the sequence.

Don’t worry about performing it perfectly at first. The goal is to make the transition feel automatic.

Once you stop thinking about every individual input, you can concentrate more on where you’re actually going.


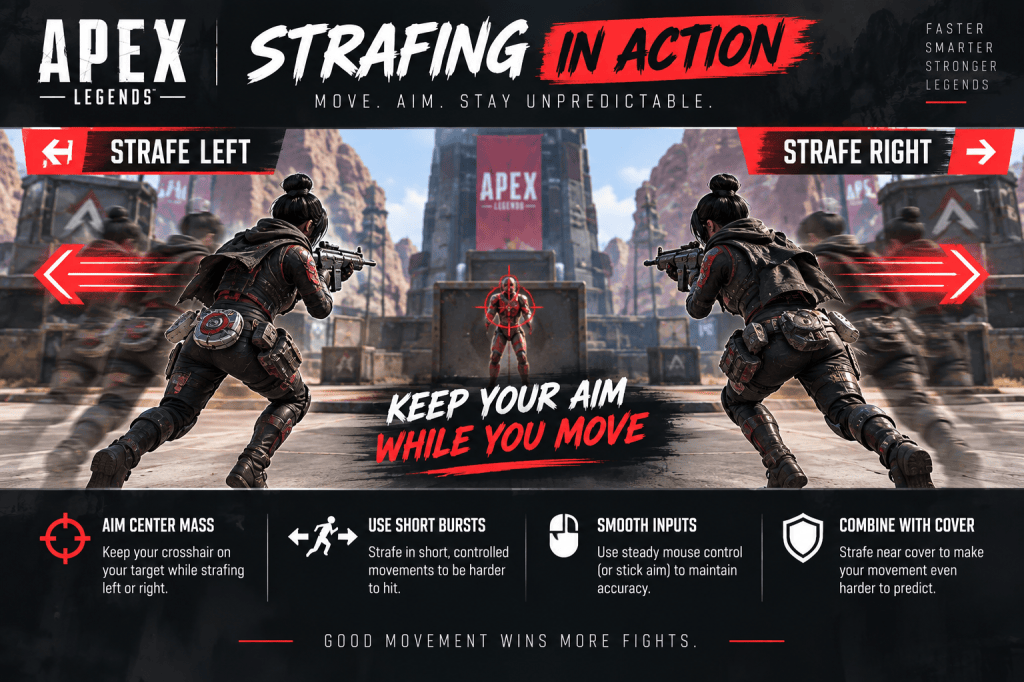
Strafing: The Movement Skill You Should Learn First

Strafing is moving sideways while keeping your aim on an opponent.

It sounds simple, but effective strafing is one of the most important skills in Apex.

Apex Legends strafing example showing a character moving left and right while maintaining aim on a target

When you’re standing still and shooting, your opponent has a much easier target. When you’re moving unpredictably while maintaining your aim, they have to constantly adjust.

How to Practice Strafing

Start in the Firing Range.

Pick a target and move left and right while keeping your crosshair around the target’s upper body.

Don’t immediately try to move as quickly as possible.

Instead, focus on three things:

  • Keep your crosshair on the target.
  • Change direction without losing control.
  • Avoid falling into an obvious left-right rhythm.

Once you can track a stationary target comfortably, increase the difficulty by shooting while moving and then practicing against moving targets.

EA also recommends using the Firing Range to practice aim, tracking, recoil control, and other mechanical skills.

Don’t Strafe Like a Metronome

One common beginner habit is moving left, then right, then left, then right at exactly the same pace.

That looks like movement, but it isn’t particularly difficult to predict.

Instead, vary your timing.

Move one direction for a moment, change direction, briefly adjust your movement, and occasionally use the environment to break the opponent’s line of sight.

Your objective isn’t to look flashy.

Your objective is to make your opponent’s next shot harder.


Crouching and Changing Your Height

Crouching can be useful during fights, particularly when combined with strafing.

Changing your character’s height can disrupt an opponent’s tracking and create awkward situations in close-range fights.

However, constantly crouch-spamming isn’t a substitute for good positioning.

If you are fighting beside a piece of cover, for example, changing your height while moving around that cover can be much more useful than repeatedly crouching in the open.

Think about where your opponent expects you to be.

Good movement often comes from making small changes that force them to adjust their aim.


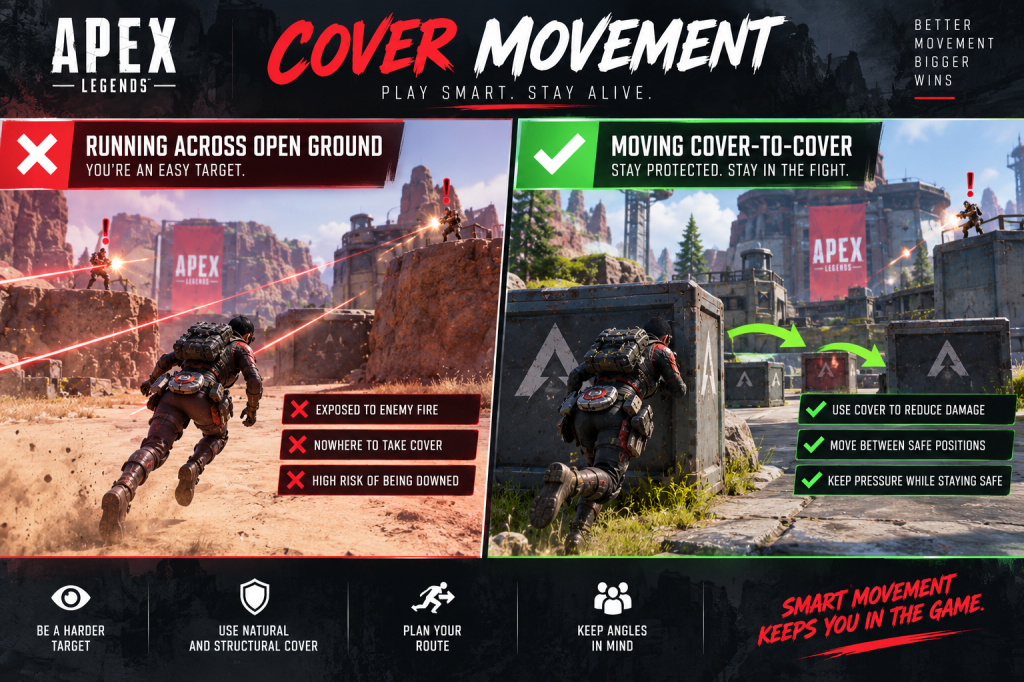
Use Cover as Part of Your Movement

One of the biggest mistakes newer players make is treating movement and positioning as separate skills.

They aren’t.

Apex Legends cover movement comparison showing a character running across open ground versus moving safely from cover to cover

Imagine you’re fighting an enemy outside a building.

You could strafe around in the open and hope your movement is enough to keep you alive.

Or you could move between the doorway, wall, box, rock, or other available cover while taking shots.

The second option gives your movement a purpose.

Try to build the habit of asking:

“Where am I moving next if I get shot?”

If you don’t have an answer, your current position may already be too exposed.


Movement During a Gunfight

Movement becomes much more valuable when combined with shooting.

Close-Range Fights

At close range, standing still is usually a bad idea.

Use strafing, crouching, short slides, and nearby cover to make yourself harder to track.

But don’t sacrifice your aim just to move constantly.

There is a point where excessive movement makes your own shots worse.

A useful rule is:

Move enough to make yourself difficult to hit, but not so much that you can’t control your weapon.

That balance is more valuable than performing complicated movement techniques.

Reloading

Reloading creates a vulnerable moment.

Rather than standing in the open while your weapon reloads, use the time to:

  • Move behind cover.
  • Change your angle.
  • Strafe toward safety.
  • Break the enemy’s line of sight.
  • Create enough distance to reset the fight.

The same principle applies when healing.

Don’t automatically heal in the exact location where you took damage. If the enemy knows where you are, reposition first whenever the situation allows it.

Moving While Healing

Healing is another opportunity to think about movement.

If you’re behind solid cover, stay protected.

If your cover is weak or the enemy has an angle on it, consider repositioning before committing to a longer heal.

The goal isn’t to constantly run around while healing. It’s to avoid giving an opponent an easy prediction.


Advanced Apex Legends Movement Techniques

Once the basics become comfortable, you can start experimenting with more advanced movement.

However, there is an important warning here: Apex movement mechanics have changed over the game’s lifespan.

Old movement tutorials can remain popular long after the underlying mechanics have been adjusted. Respawn has previously made changes to tap-strafing and specifically described its intention to alter rapid directional inputs associated with the technique.

For that reason, treat older movement tutorials with caution and verify advanced techniques against current patch notes or in-game behavior before building your playstyle around them.

Bunny Hopping

Bunny hopping refers to maintaining momentum through repeated jumps and movement inputs.

It has historically been used to make certain movement situations more fluid, particularly when repositioning or combining movement with healing.

The exact usefulness and execution of movement techniques can change as Apex evolves, so don’t make bunny hopping your first priority.

If your basic slide jumps and strafing aren’t consistent yet, you’ll get more value from practicing those skills.

Tap-Strafing

Tap-strafing is one of the most well-known advanced Apex movement techniques, particularly among mouse-and-keyboard players.

The term has also been used to describe slightly different movement behaviors, which is one reason older guides can become confusing.

Respawn has previously discussed changes targeting rapid directional commands after jumping, including the movement behavior commonly associated with scroll-wheel tap-strafing.

Because Apex is continuously updated, don’t assume that an old tap-strafing tutorial still describes the current implementation.

If you’re interested in learning it, check the latest game behavior and patch notes first.

Wall Bouncing

Wall bouncing involves using a wall and jump input to redirect your movement.

It can be useful for changing direction quickly or creating an unexpected angle during a fight.

But again, mechanics should come after fundamentals.

A player who can consistently strafe, use cover, slide, and maintain accurate aim will generally benefit more from those skills than a player who knows several flashy techniques but can’t win a basic close-range duel.


Movement and Aim Have to Work Together

Movement is only half of the equation.

If you’re moving perfectly but your crosshair is nowhere near the enemy, you’re not accomplishing much.

When practicing movement, deliberately combine it with aim.

Try this:

  1. Pick a target in the Firing Range.
  2. Strafe left and right.
  3. Keep your crosshair around the target’s upper body.
  4. Fire short bursts.
  5. Change direction.
  6. Repeat without stopping your tracking.

Once that feels comfortable, add slides and jumps.

This gradually teaches your hands to coordinate movement and aiming rather than treating them as two separate skills.

EA’s current PC guidance also emphasizes tracking, crosshair placement, recoil control, and regular Firing Range practice.


Movement for Rotations and Team Play

Movement isn’t only for winning 1v1 fights.

It also affects how effectively your squad rotates around the map.

Apex rewards teams that move together and avoid unnecessary exposure. EA recommends staying close to your squad and using movement options to avoid falling behind.

If your teammates are rotating, don’t take an unnecessary detour just because you spotted some loot.

If you’re crossing an open area, think about the safest route rather than simply taking the shortest one.

If the Ring is closing, holster your weapon when appropriate and focus on getting your squad into a good position.

Movement becomes much more powerful when your entire team arrives at the next fight together.


The Biggest Movement Mistakes Beginners Make

Learning what not to do can save you a lot of time.

1. Moving Constantly Without a Purpose

Movement isn’t automatically useful just because you’re moving.

If you’re already behind cover, there may be no reason to sprint around.

Sometimes the strongest position is simply the one that gives you the best angle and protection.

2. Prioritizing Speed Over Cover

Running quickly into an open area can put you in a worse position than moving slowly between pieces of cover.

Don’t confuse mobility with safety.

3. Practicing Advanced Mechanics Too Early

It’s tempting to spend hours learning complicated movement because it looks impressive.

But if your strafing, slide jumping, aim, and positioning are inconsistent, advanced techniques shouldn’t be your main focus yet.

Build the foundation first.

4. Repeating the Same Movement Pattern

Predictable movement is easy to punish.

If you always strafe in the same direction, always slide at the same distance, or always take the same route around cover, experienced opponents can anticipate you.

5. Forgetting Your Squad

Apex is a team game.

Being mechanically fast doesn’t help much if you leave your teammates behind and start a fight alone.

Stay close enough that your squad can support you when an engagement begins.


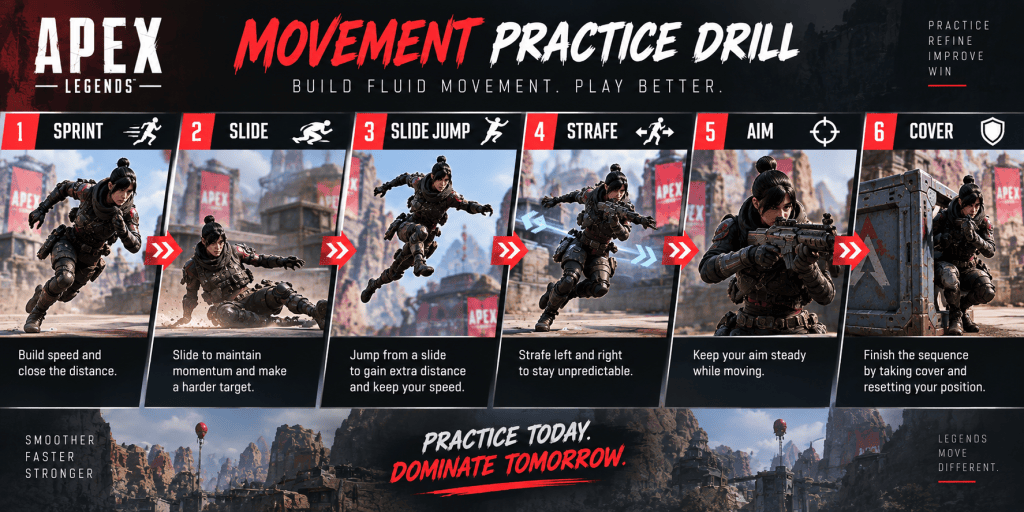
A Simple Apex Legends Movement Practice Routine

You don’t need a complicated training schedule.

Spend 10–15 minutes in the Firing Range before playing if you want to work specifically on movement.

Apex Legends movement practice drill showing sprint, slide, slide jump, strafe, aim, and cover in sequence

Drill 1: Slide Jumps

Spend a few minutes moving around the range using sprint → slide → jump.

Focus on consistency rather than speed.

Drill 2: Strafing

Choose a target and strafe from side to side while keeping your crosshair on it.

Change your timing occasionally.

Drill 3: Movement + Shooting

Shoot while strafing.

Concentrate on keeping your aim stable while changing direction.

Drill 4: Cover

Move between pieces of cover and practice exposing yourself only long enough to take shots.

This teaches an important habit: movement should create safer opportunities, not simply make you harder to hit.

Drill 5: Apply It in Real Matches

Finally, stop practicing and play.

Movement needs to become useful under pressure.

A mechanic that works perfectly against a stationary target can feel completely different when you’re low on health, being pushed by a squad, and trying to reach cover.

That is why actual matches are part of the practice process.


Which Apex Legends Are Best for Learning Movement?

Some Legends naturally encourage players to think more about mobility.

Octane

Octane is an obvious choice for movement-focused players because his kit is built around speed and mobility.

His Stim and Launch Pad make it easier to experiment with aggressive repositioning and fast rotations.

If you’re learning how to use movement to create openings, Octane is a natural Legend to explore.

Related article: Apex Legends Octane Guide: Abilities, Tips & Beginner Strategies

Pathfinder

Pathfinder rewards players who pay attention to terrain and positioning.

His mobility encourages you to think vertically and look for creative routes around the map.

Wraith

Wraith’s kit can complement players who enjoy taking aggressive angles and quickly disengaging from dangerous situations.

However, you don’t need a mobility-focused Legend to learn good movement.

The fundamentals apply to every Legend.

Apex currently divides Legends into five classes—Assault, Controller, Recon, Skirmisher, and Support—with Skirmishers specifically focused on fast-paced combat and mobility.


Apex Legends Movement Settings

Your settings can affect how comfortable movement feels.

Rather than copying a professional player’s configuration exactly, start with controls that feel natural and make it easy to access the inputs you use most.

Controller players can also explore Advanced Look Controls if they want more control over aiming and movement. EA describes ALC as settings that provide greater control over these areas.

The most important thing is consistency.

If you constantly change sensitivity, button layouts, or movement settings, it becomes harder to develop reliable muscle memory.

Find a setup that feels comfortable and give yourself time to learn it.


The Movement Rule Most Beginners Get Wrong

Here’s the biggest lesson to take away from this guide:

The best movement isn’t necessarily the fastest movement.

Good movement helps you accomplish something.

Maybe you’re moving toward cover.

Maybe you’re breaking an enemy’s line of sight.

Maybe you’re creating a better angle.

Maybe you’re dodging shots while maintaining your aim.

Maybe you’re rotating with your squad before another team can take the position you want.

If you can’t explain why you’re moving, there’s a good chance you’re moving too much.

That mindset will take you further than memorizing a list of advanced techniques.


Final Thoughts

Apex Legends movement can look intimidating when you watch highly skilled players chaining together advanced mechanics, but you don’t need to master everything at once.

Start with the fundamentals:

  • Sprint efficiently.
  • Holster your weapon when travelling safely.
  • Learn consistent slide jumps.
  • Practice strafing while aiming.
  • Use cover instead of relying purely on speed.
  • Change your movement patterns so you’re harder to predict.
  • Move with your squad.
  • Practice advanced techniques only after the basics feel natural.

Once those habits become automatic, you can start experimenting with more advanced movement mechanics.

And remember that Apex is a live-service game. Movement mechanics can be adjusted over time, so older tutorials aren’t always reliable sources for current techniques. Keep an eye on current updates when learning mechanics such as tap-strafing or other advanced movement techniques.

The goal isn’t to become the flashiest player in the lobby.

It’s to become the player who is consistently in the right place, at the right time, with enough control to win the fight.

Related Apex Legends Articles

Apex Legends Beginner Guide

Apex Legends Movement Guide

Apex Legends Weapons Guide