Apex Legends Solo Queue Guide: How to Win With Randoms

Apex Legends Solo Queue Guide: How to Win With Randoms

Apex Legends feels different when you queue without a premade squad.

You don’t know how your teammates like to fight. You don’t know who will make rotation calls. One player might charge toward the first gunshot they hear, while another would rather loot until the Ring starts closing.

That uncertainty is what makes solo queue difficult.

It is also what makes it useful.

Without a familiar squad handling communication and decision-making for you, solo queue forces you to read situations faster, communicate more clearly, manage your own positioning, and adapt to players you have never met.

This Apex Legends Solo Queue Guide explains how to make that work.

You’ll learn how to choose Legends with useful self-sufficient tools, communicate with random teammates, recognize different playstyles, handle bad pushes, manage fights and rotations, recover from early mistakes, and play Ranked without allowing someone else’s decision to dictate your entire match.

The goal isn’t to control your teammates.

It’s to become a player who can adapt to them.


What Does Solo Queue Mean in Apex Legends?

Solo queuing generally means entering a squad-based Apex mode without a premade team and allowing matchmaking to fill the other squad positions.

That is different from playing a dedicated solo mode.

In standard squad-based Apex, you’re still part of a team. Your teammates simply happen to be players you didn’t choose beforehand.

Apex matchmaking considers factors such as skill, queue time, and latency when building matches, and different modes use different matchmaking systems. EA also continues to test changes to matchmaking as it works on issues such as skill disparity and the advantage coordinated premade squads can have over solo players.

That means solo queue isn’t a special version of Apex where you are expected to play alone.

You’re still playing as a squad.

You’re just learning to build that squad on the fly.


Is Apex Legends Solo Queue Harder?

For most players, the biggest challenge isn’t weaker teammates.

It’s uncertainty.

With friends, you already know:

  • Who makes the calls
  • Who likes taking early fights
  • Who scouts
  • Who plays support
  • Who overextends
  • Who tends to clutch difficult situations

Solo queue removes that familiarity.

You have to figure it out as you play.

That starts almost immediately.


Read Your Teammates Early
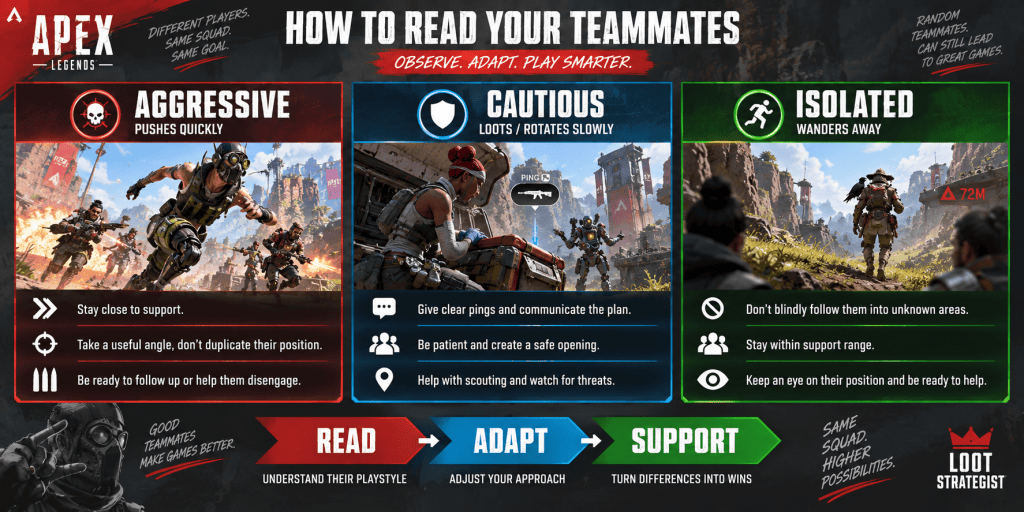
Apex Legends solo queue guide showing how to adapt to aggressive, cautious, and isolated teammates.

Your first few minutes can tell you a surprising amount.

Watch:

Where they land.

How quickly they loot.

Whether they stay together.

Whether they communicate.

Whether they rotate early.

Whether they chase every enemy they see.

This isn’t about deciding whether your teammates are “good” or “bad.”

You’re learning their habits so you can play around them.

If both teammates are aggressive, you can stay closer and prepare to support their pushes.

If they’re cautious, you may need to create more momentum yourself.

If one player constantly wanders away from the squad, don’t automatically follow them into a bad position.

Adapt to the team you actually have.


Choose a Legend That Gives You Options

Solo queue rewards versatility.

A Legend with mobility, information, recovery, survivability, or a reliable escape can remain useful even when your teammates don’t make the play you expected.

That doesn’t mean you should always choose the most “selfish” Legend.

It means your kit should help you solve problems without requiring perfect coordination.

A mobility ability can help you:

Rotate.

Take an angle.

Support a push.

Reach a teammate.

Escape a failed engagement.

That kind of flexibility is valuable when the rest of the squad is unpredictable.


Best Legends for Solo Queue

There isn’t one permanent list of “best solo-queue Legends.”

Balance changes, maps, player skill, and personal playstyle all affect the answer.

A better way to approach this is to look for Legends with tools that remain useful when coordination is limited.

LegendWhy They Work Well in Solo Queue
PathfinderStrong mobility for rotations, angles, and escapes
WraithReliable repositioning and disengagement options
BangaloreCan create cover and break sightlines without depending heavily on teammates
LobaHelps secure useful resources and supports longer matches
LifelineProvides healing and recovery utility for the squad
NewcastleOffers strong revive and defensive options when teammates get into trouble

These are strong solo-queue options, not a permanent tier list.

The best pick is still the Legend whose abilities you understand well enough to use under pressure.

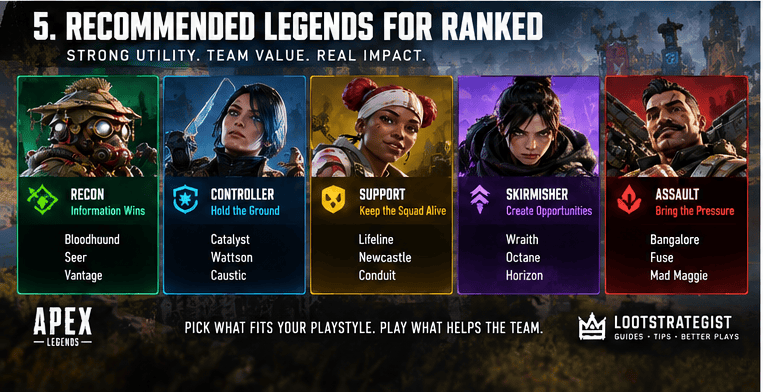
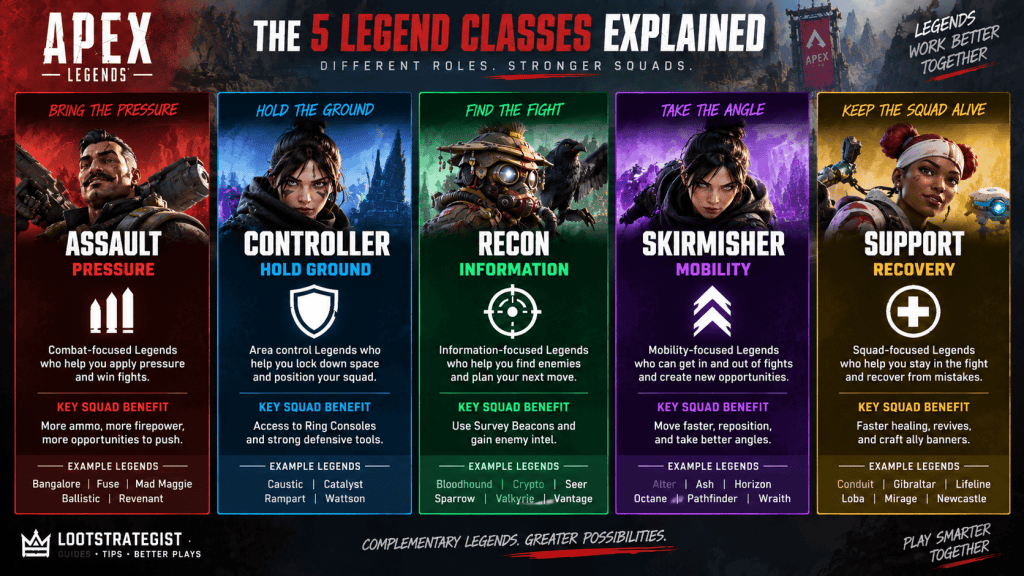
EA currently classifies Legends across five classes—Assault, Controller, Recon, Skirmisher, and Support—and the class system is intended to communicate broad team functions rather than lock every Legend into one rigid job.


Don’t Choose Your Legend Only Because It’s Meta

A popular Legend isn’t automatically your best Legend.

There are really two questions:

How strong is the Legend?

and:

How reliably can I use that Legend’s strengths when my teammates don’t know what I’m doing?

The second question matters enormously in solo queue.

A player who understands one Legend deeply can often contribute more than someone repeatedly switching between supposedly optimal picks.

Learn your abilities.

Know your escape.

Know your strongest engagement range.

Know how your kit helps the squad.

Then worry about the tier list.


Communication Is Your Biggest Solo-Queue Tool

You have less information about random teammates, so communication becomes more valuable.

Fortunately, you don’t need to explain everything.

Apex already gives you a powerful communication system through pings. EA specifically highlights pinging enemies, loot, locations, and other useful information as part of squad communication.

Use pings to:

Mark enemies.

Identify useful loot.

Show where you’re rotating.

Warn about danger.

Mark where you want the team to move.

The earlier your teammates understand your intention, the easier it is for them to cooperate.


Talk About What Happens Next

One of the biggest differences between useful communication and useless communication is timing.

Compare:

“Why did you push?”

with:

“Hold for two seconds. I’m coming.”

The first analyzes a mistake after it happened.

The second changes what happens next.

In a chaotic fight, short information is usually better than long explanations.

Call:

Enemy location.

Your target.

Your intended route.

When you’re backing up.

When you’re ready to push.

That is enough.


Don’t Turn Voice Chat Into a Second Battle

Voice chat can improve coordination.

It can also make a bad match much worse.

When you’re frustrated, keep your communication focused on useful information.

Don’t spend the match proving that your teammate made a bad decision.

They already know they died.

Tell the surviving team where the enemy is.

Then make the next play.


Follow the Squad—Without Copying Every Mistake
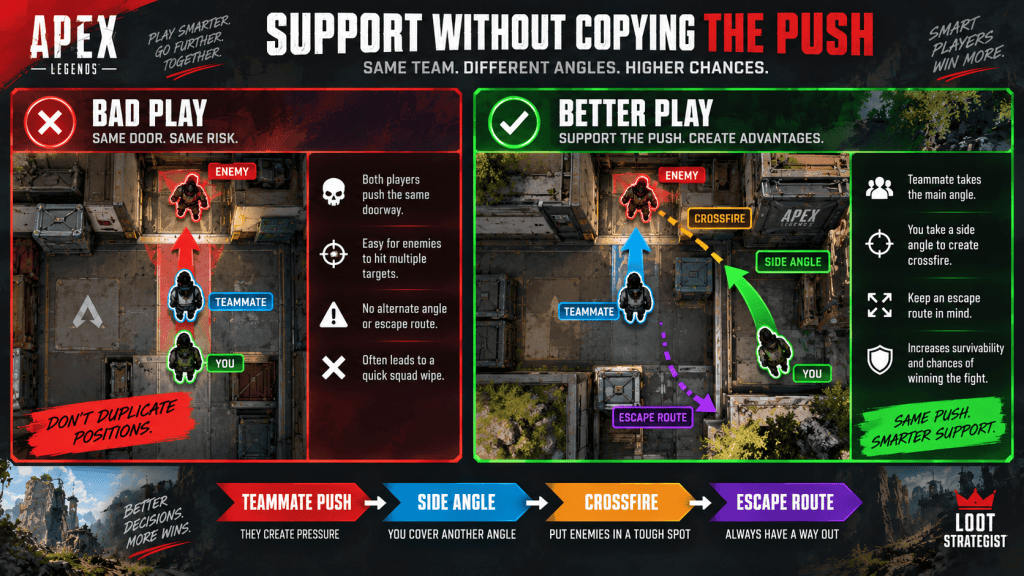
Apex Legends solo queue guide comparing a bad doorway push with a better side angle and crossfire.

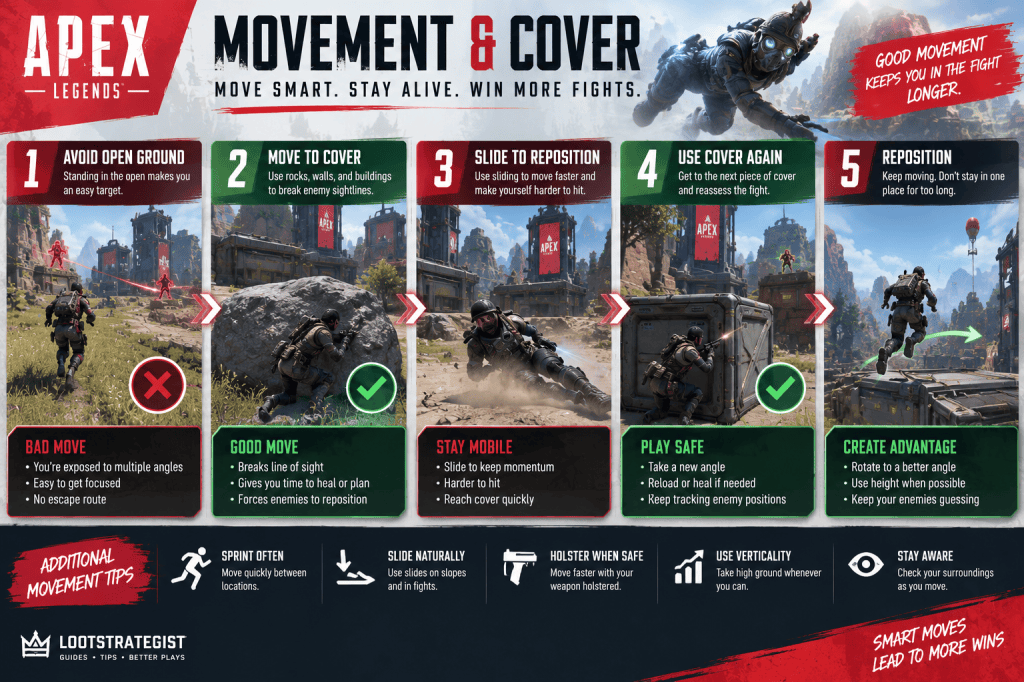
This is one of the most important solo-queue skills.

Your teammate pushes.

You should generally try to support them.

That does not mean running directly through the same doorway.

Take another angle.

Watch the flank.

Hold the retreat.

Create crossfire.

Now you’re helping their push without duplicating their position.

This also gives you a chance to survive if the engagement goes wrong.


Identify the Natural Shot-Caller

Not every squad needs a formal leader.

Still, somebody usually ends up making the next decision.

Watch for the player who naturally:

  • Pings rotations
  • Spots enemies
  • Chooses strong positions
  • Calls disengagements
  • Keeps the team moving

When that player consistently makes good calls, working with them can create more cohesion than having three people independently choose where to go.

You don’t have to follow every decision blindly.

You should recognize a useful decision-maker when you see one.


Build Around the Teammate You Can Support

Here’s a better solo-queue rule:

Stay close enough to support at least one teammate without putting yourself in the same danger.

That is more useful than trying to keep all three players perfectly synchronized.

Maybe one teammate pushes a building.

You take the outside angle.

Maybe another teammate is watching a flank.

You cover the rotation.

The goal is to create supporting positions, not identical ones.


What to Do With an Aggressive Teammate

The aggressive teammate isn’t automatically a problem.

Sometimes they’re the reason your squad wins the fight.

The difference is whether their aggression is being supported.

If the push is reasonable:

Close the distance.

Take an angle.

Watch the escape route.

Be ready to collapse on a weak enemy.

If the push is obviously terrible, don’t turn it into a 2v3 just because you feel obligated to follow.

A good solo-queue teammate doesn’t suppress aggression.

They make good aggression more effective.


What to Do With a Passive Teammate

A passive teammate can be frustrating.

But don’t assume they’re useless.

Maybe they’re waiting for:

  • Better equipment
  • Better positioning
  • More information
  • A safer rotation

Try a clear ping.

Mark your destination.

Give the squad a direction.

If the teammate still wants to play slowly, adjust.

You don’t have to force every player into your preferred pace.


When a Teammate’s Push Is No Longer Salvageable

Sometimes a teammate runs into trouble.

You have a choice.

If you can support the fight safely, do it.

If the enemy has already isolated them, your shields are low, and you have no useful angle, charging into the same situation may simply create another knock.

This is the hard part:

Supporting your squad and preserving the squad are both team play.

Know which one the situation requires.


What to Do When a Teammate Splits Off

Not every split is bad.

Sometimes a teammate is simply moving to a better loot area or taking a scouting angle.

The problem is distance.

If they’re close enough that you can help them, stay nearby.

If they’re running directly into another squad because they saw one enemy, don’t automatically follow.

Before moving, ask:

Can I realistically support this player?

If the answer is no, the better play may be to hold your own position and wait for a safer opportunity.


What to Do When a Teammate Dies Early

One early death doesn’t necessarily end the match.

If the situation is safe, recover the banner.

If the area is dangerous, create distance first.

Apex gives surviving teammates ways to recover eliminated players, so preserving the remaining squad can be more valuable than rushing into the same fight that already claimed one teammate.

Think in terms of recoverable positions.

A teammate who dies can sometimes return.

A squad that all dies cannot.


When You Should Stop Trying to Save a Teammate

This is uncomfortable, but necessary.

If a teammate charges into a full squad while you’re completely out of position, following them may accomplish nothing except adding another death.

Your responsibility is to the surviving squad.

Stay alive.

Take the fight when you have a realistic opportunity.

Recover later if the game gives you one.

Walking into an impossible situation because you feel guilty about leaving is not good teamwork.


Solo Queue Looting Rules

Solo queue changes how you should think about looting.

You don’t want to rush into another fight carrying one weapon and twelve rounds.

You also don’t want to spend five minutes in a building while your teammates have already crossed half the map.

A practical priority is:

Weapons → ammo → shields → healing → useful attachments → rotate.

Once you can fight, move.

You can find more loot later.


Share Resources

Random teammates become easier to play with when you make sensible resource decisions.

Your teammate needs a Shield Battery and you have several?

Share one.

You find ammunition that matches their weapon?

Ping it.

You discover a useful attachment they can actually use?

Mark it.

These are tiny actions.

Together, they make a squad feel much more coordinated.


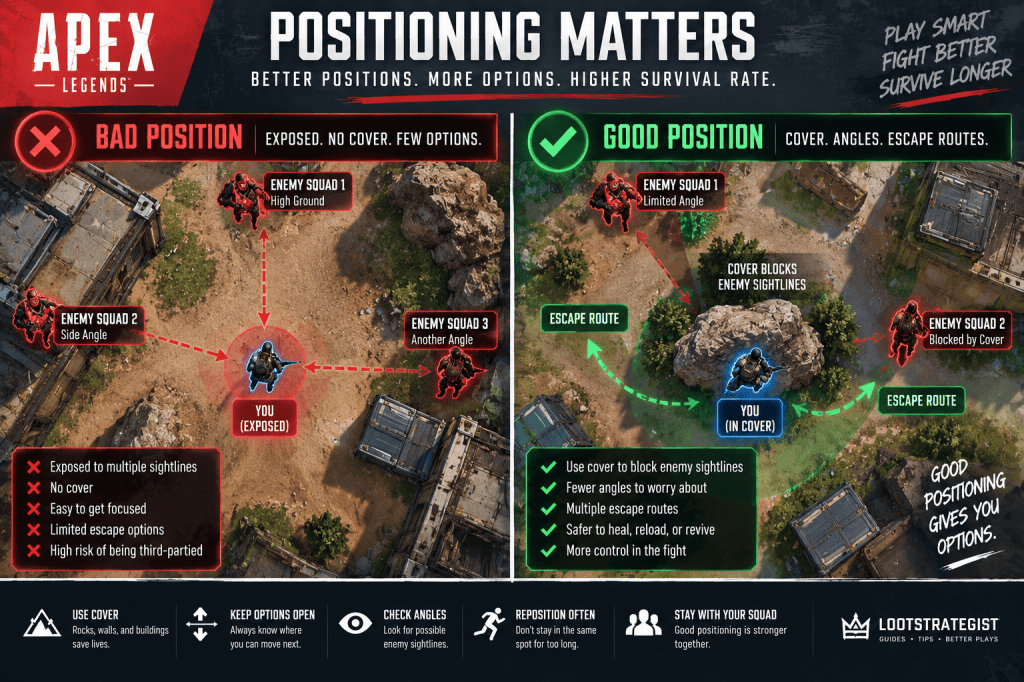
Position Yourself So Teammates Can Reach You
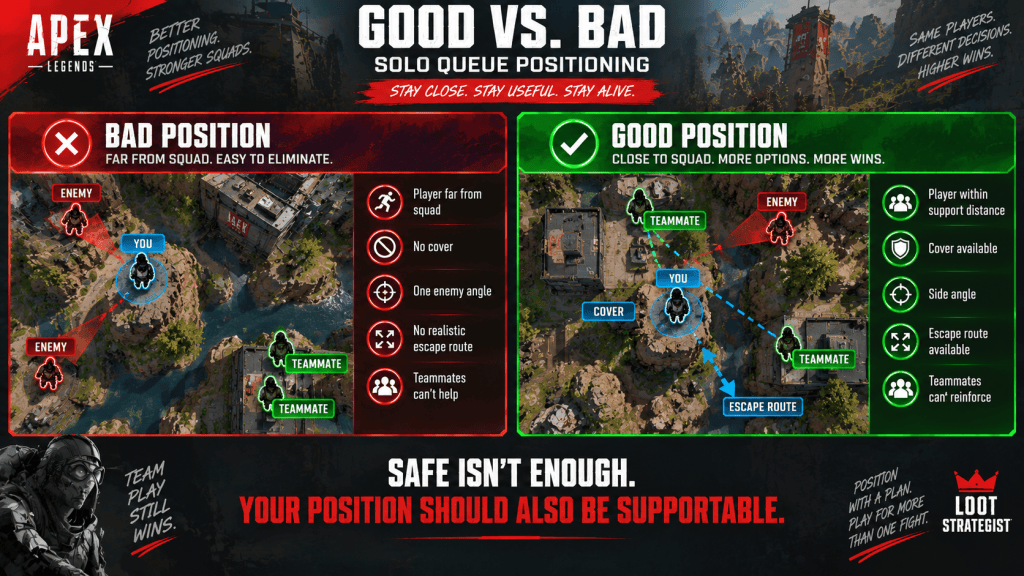
Apex Legends solo queue positioning guide comparing a bad isolated position with a good position within teammate support range

This is where solo queue often separates strong players from merely mechanical ones.

You might find a fantastic head-glitch position.

But if your teammates cannot reach you, the position has a serious flaw.

Look for:

Cover.

Escape routes.

Useful sightlines.

Nearby terrain.

Positions your teammates can reinforce.

A strong solo-queue position isn’t simply safe.

It is supportable.


Pick Fights That Help the Whole Squad
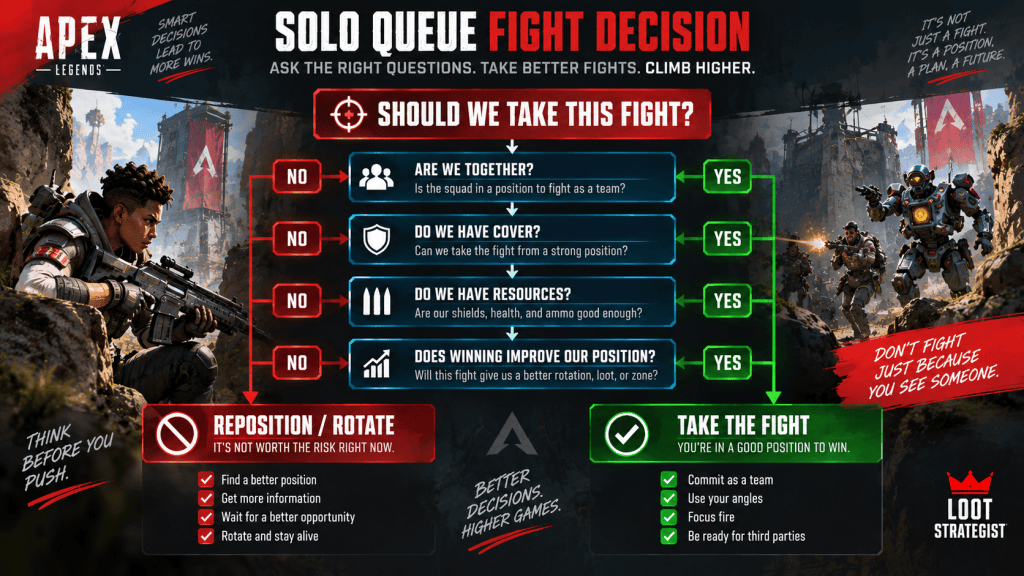
Apex Legends solo queue fight decision guide showing when to take a fight or reposition based on squad, cover, resources, and position.

A useful fight should improve something.

Maybe you gain:

Better positioning.

A numbers advantage.

Useful information.

A cleaner rotation.

Better resources.

That’s much stronger than chasing an enemy because they happened to crack your shield.

Before committing, ask:

What do we gain if this works?

If the answer is “one kill,” the fight may not be worth the risk.


Third Parties Are Even More Dangerous in Solo Queue
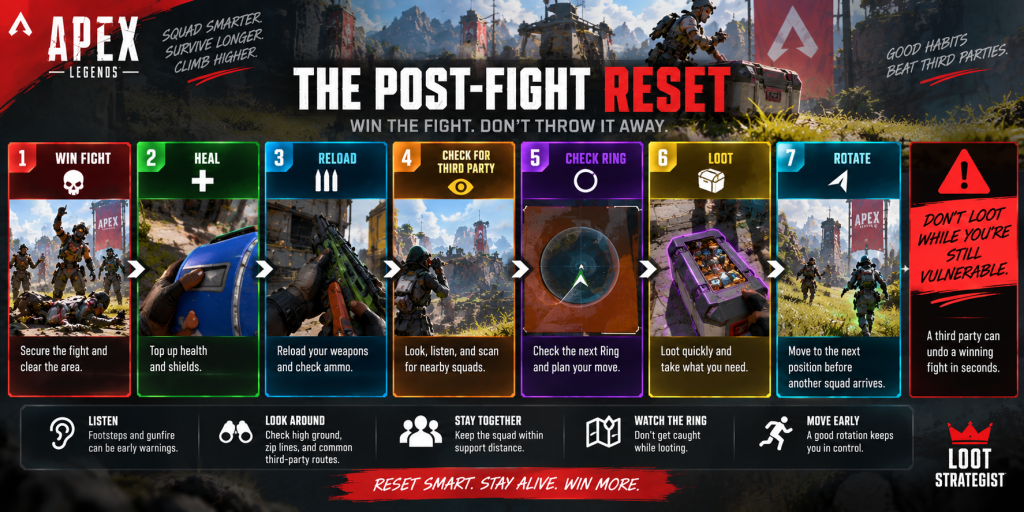
Apex Legends solo queue post-fight reset showing how to heal, reload, check for third parties, loot, and rotate

A squad that just won a fight is often vulnerable.

You may be:

  • Low on shields
  • Low on healing
  • Reloading
  • Separated
  • Distracted by death boxes

Random teammates don’t always have the same reset habits.

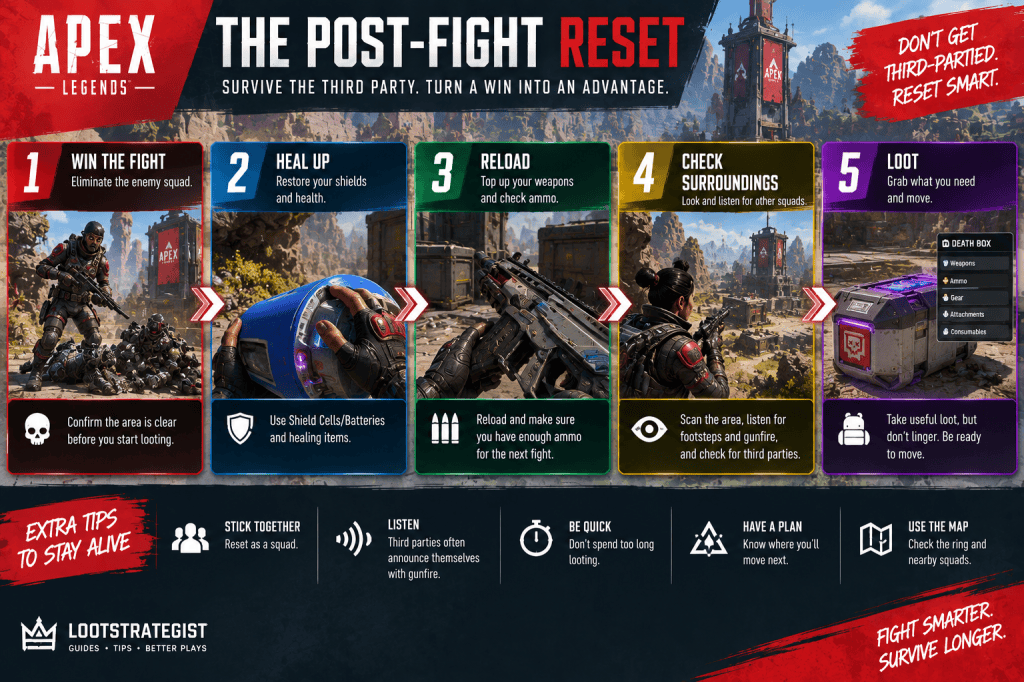
Make yours predictable:

Heal.

Reload.

Check ammunition.

Scan the surroundings.

Listen for footsteps and gunfire.

Check the Ring.

Then loot.

This is one of the simplest ways to turn a winning engagement into an actual advantage.


Learn to Disengage Even When a Teammate Won’t

This is one of the hardest solo-queue decisions.

A teammate refuses to leave.

The enemy has better position.

Your squad is low on resources.

Another squad is approaching.

At some point, staying is no longer bravery.

It’s simply another knock waiting to happen.

If the fight is unsalvageable, move.

You may still be able to recover the squad later.


Watch the Ring Yourself

Don’t assume someone else is watching the map.

This becomes particularly important when your teammates are moving independently.

Know:

Where the next Ring is.

Where your squad wants to rotate.

Which routes are dangerous.

Where you can stop and reset.

Even if your teammates don’t follow perfectly, a clear ping gives them a destination.

Someone has to make the next plan.

In solo queue, that person may need to be you.


How to Solo Queue in Ranked

Ranked makes every unnecessary mistake more expensive because your performance affects RP.

EA’s current Ranked system ties progression to placement, eliminations, and bonuses, with entry costs increasing at higher ranks.

That makes the following habits especially important:

Avoid unnecessary early deaths.

Take favorable fights.

Rotate early.

Protect your position.

Stay within support distance of your squad.

Don’t turn one teammate’s mistake into three deaths.

You don’t need to win every match.

You need to stop giving away matches you could have salvaged.


Solo Queue Doesn’t Mean Playing Passively

There is a difference between smart play and fearful play.

If your squad has:

  • Good equipment
  • Strong positioning
  • Healthy shields
  • Numbers
  • A favorable Ring

take the opportunity.

Playing cautiously should never become an excuse to avoid every fight.

The purpose of caution is to improve the quality of your fights—not eliminate combat entirely.


What to Do During a Terrible Match

Sometimes the game is simply ugly.

You land badly.

Your teammate disconnects.

You can’t find a useful weapon.

Another squad appears immediately.

Don’t let the original plan control the rest of the match.

Rebuild.

Maybe survival becomes the priority.

Maybe the surviving squad can rotate early.

Maybe you can recover a banner.

Maybe you can take one good fight and reset.

The match changed.

Your plan should change with it.


Solo Queue Matchmaking and the 2026 Test

Apex matchmaking continues to evolve.

In June 2026, EA announced a Diamond+ solo-queue-only Ranked experiment intended to address the competitive imbalance between solo players and premade squads. EA later announced that the test would run from June 30 through July 13, 2026, or until enough data had been gathered. During that test, Diamond and higher players could not queue into Ranked as premade squads.

That was a limited experiment, not a permanent rule that should be assumed for every Ranked season.

EA has said it continues to run matchmaking tests and use the results to refine the system. A separate change that increased the maximum matchmaking search period from 30 to 60 seconds was later implemented globally in Ranked and Unranked Trios after producing positive results for match quality.

For players, the practical lesson is simple:

Check current Ranked and matchmaking announcements whenever Respawn introduces a new test.

Don’t assume a matchmaking rule from one season will remain unchanged forever.


How to Improve at Solo Queue

Don’t measure your progress entirely by wins.

Measure your decisions.

After each match, ask:

Did I stay close enough to support my squad?

Did I communicate clearly?

Did I take a fight without a good reason?

Did I rotate early enough?

Did I give up a strong position unnecessarily?

Could I have escaped?

Those questions give you something you can actually improve.


Focus on One Skill at a Time

Solo queue exposes many weaknesses at once.

Don’t try to fix all of them in one evening.

Spend several matches working on positioning.

Then focus on movement.

Then fight selection.

Then communication.

Once each skill becomes more natural, combine them.

Improvement is easier when you know what you’re trying to improve.


Don’t Tilt Queue

This deserves more attention than it gets.

You lose RP.

You get annoyed.

You decide the next game needs to make up the difference.

You force a fight.

You lose more RP.

Then you queue again because now you’re even more determined to recover it.

That cycle rarely ends well.

Take a break when your decisions stop being rational.

There is no bonus RP for emotional damage.


Can Solo Queue Make You a Better Apex Player?

Absolutely.

Solo queue forces you to develop skills that can become hidden when you’re always playing with the same friends.

You learn to:

Read unfamiliar players.

Communicate efficiently.

Adapt to different tempos.

Position independently.

Make decisions without waiting for reassurance.

Recognize when an engagement is already lost.

Those skills carry over into premade squads and Ranked.

A player who can perform only when their regular teammates make all the calls may be less adaptable than they realize.


Three Solo Queue Rules I Would Keep

Stay close enough to help.

You don’t have to copy your teammate’s position, but you should usually be close enough to influence the fight.

Don’t turn someone else’s bad decision into your own death.

Support the squad when the situation is recoverable. Preserve the squad when it isn’t.

Communicate before the fight, not after it.

A useful ping or quick call can change the engagement. Complaining afterward cannot.


A Simple Solo Queue Game Plan

Early Game

Watch your teammates.

Land together.

Loot efficiently.

Notice who naturally takes initiative.

Identify nearby enemy squads.

Mid Game

Stay within support distance.

Use pings.

Rotate before the Ring forces you to.

Take favorable fights.

Reset after each engagement.

Late Game

Protect strong positions.

Keep the squad together.

Avoid unnecessary fights.

Communicate the next move.

If the team splits, support the teammate you can realistically reach.


Common Solo Queue Mistakes

Playing Like You’re in a Premade

Your teammates don’t know the plan until you communicate it.

Following Every Push

Support reasonable aggression without blindly copying bad positioning.

Treating Random Teammates as Enemies

The squad already has enough opponents.

Refusing to Adapt

The team you have matters more than the team you wanted.

Looting Alone for Too Long

The rest of the squad may already be rotating.

Ignoring the Ring

Someone has to watch the map.

Overextending for a Teammate

One bad push should not automatically become three deaths.

Stopping Communication After a Mistake

Reset and keep giving useful information.

Taking Fights Personally

A fleeing enemy is not insulting you.

Playing Tilted

Frustration changes decision-making.


Loot Strategist’s Solo Queue Rule

Your teammates are variables. Your decisions are the constant.

You cannot decide whether a random teammate will hot drop.

You cannot control whether they push.

You can’t guarantee they’ll listen.

You can decide where you stand.

You can communicate.

You can choose your fights.

You can rotate early.

You can preserve your life.

And you can adapt.

That is the real solo-queue skill.


Final Thoughts

Solo queue Apex Legends isn’t about finding perfect teammates.

They don’t exist consistently enough for that to be a strategy.

You’re learning to make a three-player squad work when those three players have different habits, different instincts, and sometimes completely different ideas about what should happen next.

Some matches will feel effortless.

You’ll get teammates who communicate immediately, share loot, rotate together, and seem to know exactly what you’re thinking.

Other matches will feature the player who sprints over a hill after spotting one enemy and apparently forgets that there are nineteen other squads on the map.

Both types of games are useful.

Watch.

Adapt.

Communicate.

Position yourself so you can help.

Support reasonable aggression.

Don’t copy terrible decisions.

Rotate before the Ring forces you to.

And when a fight is lost, recognize it before you turn one bad decision into a full squad wipe.

The best solo-queue players aren’t the ones who never need their teammates.

They’re the ones who can adapt to almost any teammates without losing their own discipline.

That’s a skill worth carrying into every Apex match.


Related Apex Legends Guides

Apex Legends Beginner Guide — Learn the fundamentals of movement, weapons, positioning, looting, healing, and squad play.

Apex Legends Ranked Guide — Learn how RP, placement, fights, rotations, Ranked splits, Drop Zones, and competitive decision-making work.

Apex Legends Squad Composition Guide — Learn how Legend classes and complementary team roles can make your squad more effective.

Apex Legends Movement Guide — Improve movement, repositioning, and survival skills for both solo queue and coordinated squads.

Apex Legends Best Legends Guide — Compare Legends and find a character that fits your playstyle.


Sources & Updates

Last reviewed: September 6, 2026

Apex Legends matchmaking and Ranked systems are actively tuned and periodically tested by Respawn. This guide focuses on durable solo-queue principles rather than treating temporary matchmaking experiments as permanent features.

EA’s current matchmaking documentation explains that Apex matchmaking balances factors including skill, queue time, and latency, with different matchmaking systems used across game modes.

Current Ranked information was checked against EA’s official How Apex Legends Ranked Works documentation.

EA also documented a 2026 experiment that temporarily made Ranked solo queue only for Diamond and above from June 30 through July 13, 2026. That experiment is treated here as a historical matchmaking test rather than a permanent Ranked rule.

Current Legend classes and their broad functions were checked against EA’s official Legend documentation. Apex currently uses five classes: Assault, Controller, Recon, Skirmisher, and Support.

Editorial note: Gameplay advice in this article—including Legend selection, fight selection, positioning, communication, and solo-queue decision-making—is Loot Strategist editorial guidance rather than official EA instruction.
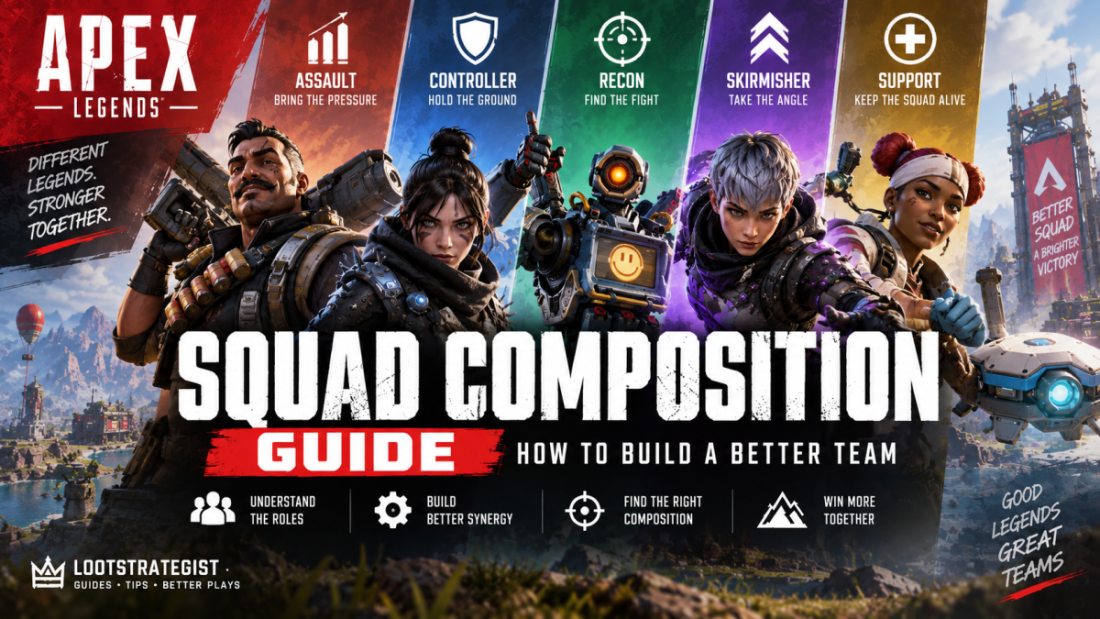
Apex Legends Squad Composition Guide: How to Build a Better Team

Apex Legends Squad Composition Guide: How to Build a Better Team

Apex Legends gives you three Legend slots.

That sounds simple until you’re staring at the character select screen wondering whether your squad needs more firepower, mobility, information, or someone who can keep everybody alive after the inevitable disaster.

The good news is that you don’t need a perfectly optimized professional composition to win games.

You need three Legends whose abilities solve different problems.

A team with strong mobility but no way to gather information can struggle to find fights on its terms. A squad built entirely around defense can become trapped when the Ring moves. Three aggressive Legends can absolutely destroy another team—but they can also run out of options when the first push fails.

The best squad compositions give your team multiple ways to approach, win, and escape a fight.

This Apex Legends Squad Composition Guide explains how the current Legend classes work, which roles a balanced squad should cover, how to build teams for Ranked and casual play, and how to create effective combinations without becoming obsessed with a single “meta” lineup.

What Makes a Good Apex Legends Squad Composition?

A strong composition gives each player a clear purpose.

That doesn’t mean one player is permanently assigned to be “the support” while everyone else gets to have fun.

A good squad can:

Find information.

Create an opening.

Control an area.

Move when the situation changes.

Recover after something goes wrong.

Finish a fight.

The strongest compositions usually create overlap between those responsibilities.

For example, a mobility Legend can help the squad rotate, but the same mobility can also be used aggressively during a push or defensively during a retreat.

That’s better than choosing three Legends whose abilities all solve exactly the same problem.


Understanding Apex Legends Classes

Apex Legends five Legend classes explained with Assault, Controller, Recon, Skirmisher, and Support roles

EA currently divides Legends into five classes:

Assault, Controller, Recon, Skirmisher, and Support.

Each class has its own role and class perk. (help.ea.com)

EA describes the classes broadly as:

ClassPrimary role
AssaultCombat-focused play
ControllerArea control and strategic positioning
ReconEnemy information and tracking
SkirmisherMobility and fast-paced combat
SupportSquad help and recovery

These categories are useful when building a composition, but they shouldn’t be treated as rigid RPG roles.

A Recon Legend can fight.

A Support Legend can entry.

A Controller Legend can push.

An Assault Legend can help create space.

The class tells you what a Legend naturally contributes—not everything that Legend is allowed to do.


Assault Legends: Add Firepower

EA describes Assault Legends as combat-focused characters whose class perk improves access to weapon-related resources, including extra ammunition capacity and secret compartments in Weapon Supply Bins. (help.ea.com)

For squad building, think of Assault as the class that helps your team convert opportunities into damage.

Current Assault Legends include Ballistic, Bangalore, Fuse, Mad Maggie, and Revenant. (help.ea.com)

These Legends can be especially useful when your squad wants to pressure enemies rather than simply wait for them to make mistakes.

What Assault Brings to a Squad

An Assault pick can provide:

  • Stronger combat pressure
  • Additional offensive utility
  • Better access to ammunition
  • Tools for breaking enemy positions
  • More options during a direct engagement

The important question is not:

“Do we need an Assault Legend?”

Ask instead:

“Does our squad have enough ways to turn an opening into a winning fight?”

Sometimes the answer is yes without one.

Sometimes adding an Assault Legend gives the team exactly what it was missing.


Controller Legends: Own the Space

Controller Legends specialize in area control and strategic positioning.

EA’s current class description says Controllers can use Ring Consoles to determine the location of the next Ring, helping their squad secure advantageous positions. (ea.com)

Current Controller Legends include Catalyst, Caustic, Rampart, and Wattson. (ea.com)

Controllers become increasingly valuable when your team wants to establish a defensible position.

They can help answer a simple question:

“Where do we want the enemy to fight us?”

When Controllers Make Sense

Controllers are particularly useful when:

  • Your squad likes holding buildings or defensible areas
  • You expect extended fights
  • You want to control entrances and routes
  • Ring information matters to your strategy
  • Your team prefers a slower, more deliberate pace

The trade-off is mobility.

A composition that invests heavily in area control can become uncomfortable when the squad is forced to leave its position.

That’s why Controller picks generally work best when the rest of the squad can help solve the rotation problem.


Recon Legends: Information Is an Advantage

Recon Legends specialize in enemy intelligence and strategic planning.

EA says their class perk allows them to use Survey Beacons to reveal the next Ring location. (ea.com)

Current Recon Legends include Bloodhound, Crypto, Seer, Sparrow, Valkyrie, and Vantage. (ea.com)

Information is incredibly valuable in Apex because so many fights are decided before either squad fires a shot.

Knowing where another squad is positioned changes your options.

Knowing whether a route is occupied changes your rotation.

Knowing that a team is weak can turn a cautious approach into an aggressive one.

Why Recon Works So Well in Squads

A Recon Legend can help your team:

Find enemies.

Track enemy movement.

Plan rotations.

Avoid walking into bad fights.

Choose when to engage.

This is why Recon pairs naturally with almost every other class.

Information makes damage more useful.

Information makes mobility safer.

Information makes defensive positioning easier.


Skirmisher Legends: Control the Pace

Skirmishers specialize in mobility and evasive play.

EA’s current class information describes them as Legends that can get in and out of fights quickly and provides tools for identifying incoming Care Packages. (help.ea.com)

Current Skirmishers include Alter, Ash, Axle, Horizon, Octane, Pathfinder, and Wraith. (ea.com)

Mobility solves one of Apex’s biggest problems:

What happens when your position stops being good?

You can rotate.

You can chase.

You can disengage.

You can take a different angle.

You can rescue a teammate.

The Danger of Too Much Mobility

Three mobile Legends can be extremely fun.

That doesn’t necessarily make them a good composition.

If everyone can move quickly but nobody provides reliable information, control, or recovery, the team can end up making fast mistakes instead of slow ones.

Speed is most valuable when it gives the squad more choices.


Support Legends: Keep the Squad Alive

Support Legends focus on squad sustain and recovery.

EA’s current Support class includes Conduit, Gibraltar, Lifeline, Loba, Mirage, and Newcastle, with class benefits that include access to secret compartments in Blue Supply Bins and the ability to craft ally banners at Replicators. (ea.com)

This makes Support especially valuable when your squad wants more resilience.

A good Support pick can help your team recover from a bad engagement instead of turning one mistake into a complete match-ending disaster.

Why Support Matters

Support can improve:

  • Recovery
  • Healing and sustain
  • Banner recovery
  • Revive situations
  • Resource management
  • Endurance during long matches

That doesn’t make Support mandatory.

But for beginners and solo-queue players, having some recovery utility can make a squad considerably more forgiving.


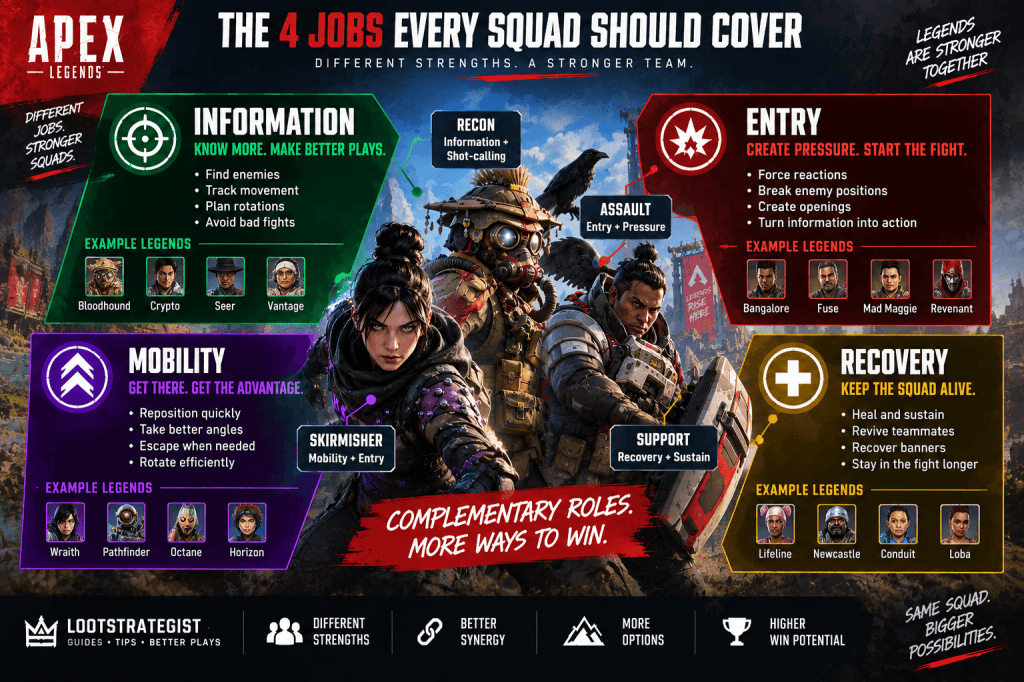
The Four Jobs Every Squad Should Cover

Apex Legends squad composition guide showing four key team jobs: Information, Entry, Mobility, and Recovery

A professional-level composition is unnecessary for most squads.

You do want your three players collectively covering four broad jobs:

Information

Someone should be able to gather information or help the squad understand where enemies and the Ring are.

Entry

Someone should have the tools to create pressure and start a favorable engagement.

Mobility

Your squad needs a way to reposition when the fight or Ring moves.

Recovery

You need a plan for when something goes wrong.

One Legend can cover multiple jobs.

That’s exactly what makes some compositions better than others.

A single mobility tool might help your team enter a fight, escape it, and rotate afterward.

A defensive ability might control an area while also creating cover for a revive.

A scan might tell you where the enemy is and prevent your squad from walking into a third party.

Look for abilities that solve more than one problem.


The Best General-Purpose Squad Composition

For most players, the easiest structure to understand is:

Recon + Skirmisher + Flexible Third

That third slot can be:

Assault for more offensive pressure.

Controller for stronger area control.

Support for greater recovery and sustain.

Why does this structure work?

Recon gives the squad information.

Skirmisher provides mobility.

The third Legend fills whichever weakness remains.

But there are enough versions of this throughout the article that the rhythm starts becoming predictable.


Balanced Composition: Recon + Skirmisher + Support

This is one of the safest structures for players who value consistency.

Recon

Provides information and planning.

Skirmisher

Provides mobility and repositioning.

Support

Provides recovery and sustain.

The result is a squad with:

Information + Mobility + Recovery

The main weakness is direct area control.

If you’re fighting a team entrenched inside a strong building, you may need to rely more heavily on weapons, grenades, and good positioning rather than Legend abilities designed specifically to hold space.

For newer players, however, the forgiving nature of this composition can be more valuable than maximum offensive potential.


Aggressive Composition: Assault + Skirmisher + Recon

This setup is for squads that want to create fights rather than wait for them.

Assault

Applies pressure.

Skirmisher

Creates openings and provides mobility.

Recon

Supplies information.

The basic sequence becomes:

Find the enemy → create an opening → move in → finish the fight.

This composition can be excellent when your squad is confident in gunfights.

The downside is recovery.

If the push fails badly, you may have fewer tools for stabilizing afterward.

That makes discipline particularly important.


Defensive Composition: Controller + Recon + Support

This is a more deliberate approach.

Controller

Controls the area.

Recon

Provides information.

Support

Improves recovery and sustain.

The idea is to establish a good location, understand the Ring and nearby threats, and make the enemy come to you when possible.

This works especially well for teams that enjoy positional play.

The obvious weakness is mobility.

If the Ring pulls away from your position, you’ll need to rotate efficiently instead of assuming your defensive setup will solve everything.


Balanced Fighting Composition: Assault + Recon + Support

This composition trades some mobility for more direct combat pressure and recovery.

Assault

Helps convert openings into damage.

Recon

Finds information.

Support

Makes mistakes easier to recover from.

It suits players who are comfortable moving between aggressive and defensive phases.

The weakness is obvious:

You may struggle to escape a bad engagement without a dedicated mobility Legend.

That means your positioning needs to be better.


The “Three Aggressive Legends” Composition

Yes, you can run three aggressive Legends.

And sometimes it is hilarious.

The problem is that your squad can become one-dimensional.

Suppose all three players have excellent combat tools.

What happens when:

  • The Ring moves away?
  • Another squad holds high ground?
  • Your push fails?
  • One teammate gets knocked?
  • You need information?
  • The team needs to reset?

Aggression is valuable.

Having no answer when aggression fails is not.

Three aggressive Legends can work extremely well in coordinated hands.

For beginners, it’s usually more forgiving to have at least one source of information, mobility, control, or recovery that complements the aggression.


The “Three Defensive Legends” Problem

The opposite problem exists too.

A heavily defensive squad can survive difficult situations.

But surviving isn’t enough.

Eventually, the Ring moves.

Eventually, your squad must rotate.

Eventually, someone has to leave the building.

If your composition excels at holding a position but struggles to create movement or pressure, you may find yourselves trapped between another squad and the Ring.

Defense is strongest when you can choose where to defend.


Does Every Team Need a Recon Legend?

No.

Recon is useful, but it isn’t mandatory.

A coordinated squad can get information through:

  • Audio
  • Visual observation
  • Map awareness
  • Pings
  • Enemy abilities
  • Positioning
  • Experience

The value of Recon becomes greater when your team struggles to locate enemies or plan rotations.

So don’t pick Recon because a guide says every team must have one.

Pick it because the information solves a problem your squad actually has.


Does Every Team Need a Support Legend?

Again, no.

Support becomes particularly useful when:

  • Your squad plays longer games
  • You regularly need to recover teammates
  • You want greater sustain
  • You’re still learning and make mistakes
  • You are playing with less coordinated teammates

Highly aggressive coordinated teams may prefer a more combat-oriented third slot.

That’s why composition should follow the team’s playstyle.


Does Every Team Need a Skirmisher?

Not necessarily.

But mobility solves enough problems that it is easy to understand why Skirmishers appear in many team-building approaches.

Mobility helps with:

Rotations.

Angles.

Escapes.

Pushes.

Rescues.

High-ground access.

Just remember that mobility isn’t valuable simply because it looks flashy.

Its real value is giving your squad options.


How to Build a Squad Around Your Playstyle

Instead of asking:

“What is the current best team composition?”

Ask:

“How does our squad actually play?”

Aggressive Players

Consider:

Assault + Skirmisher + Recon

The composition supports finding fights and taking them quickly.

Defensive Players

Consider:

Controller + Recon + Support

This gives you information, area control, and recovery.

New Players

Consider:

Recon + Support + Skirmisher

This gives a beginner-friendly mix of information, recovery, and mobility.

Highly Coordinated Friends

You can experiment more.

A coordinated squad can make unconventional compositions work because players understand exactly what each Legend is supposed to contribute.

That coordination is often more important than the theoretical quality of the composition.


Squad Composition for Ranked

Ranked changes the equation slightly.

In Core modes such as Ranked, Legend picks are staggered, and the same Legend cannot be selected more than once on a squad. Ranked also uses class perks and Legend Amps. (help.ea.com)

That means you should think about your team’s overall toolkit, not simply individual comfort picks.

A Ranked composition should ideally answer:

How do we find the next fight?

How do we start the fight?

How do we rotate?

How do we recover?

How do we hold a strong final position?

You don’t have to answer all five questions with five different Legends.

You have three players.

You need overlap.


Squad Composition for Solo Queue

Solo queue changes the priorities again. Build around the teammate who is easiest to support, not necessarily the one making the boldest play.

You may not be able to convince two random teammates to run a particular composition.

That’s fine.

Instead, choose a Legend that can provide value independently.

A self-sufficient pick can be useful when teammates make unpredictable decisions.

At the same time, don’t treat every solo-queue teammate as a liability.

A teammate who appears passive during the first minute may simply be learning the situation.

Watch how they play.

Then build around their strengths.


Don’t Obsess Over the Tier List

Tier lists have a place.

They are useful for understanding which Legends are currently popular or powerful.

They’re less useful when they convince players that a composition is automatically good because three names happen to be high on a ranking chart.

Balance changes.

Maps change.

Legend kits change.

Player skill changes.

Even Respawn’s long-term development plans include further changes to Legend classes and squad-building systems, with a planned team-composition/class overhaul for Season 32. (forums.ea.com)

A composition that looks unbeatable today can become mediocre after one major patch.

The fundamentals are more durable:

Cover.

Information.

Mobility.

Damage.

Recovery.

Build around those.


How Abilities Should Work Together

The best compositions aren’t simply three good Legends.

They are three kits that create opportunities for one another.

Imagine:

A Recon Legend finds an enemy position.

A Controller limits the routes the enemy can use.

An Assault Legend pushes the opening.

That’s synergy.

Or:

A Skirmisher creates a mobility route.

A Support Legend keeps the squad healthy.

The Recon player identifies the safest destination.

That’s synergy too.

The individual abilities don’t need to be spectacular.

They need to make each other more useful.


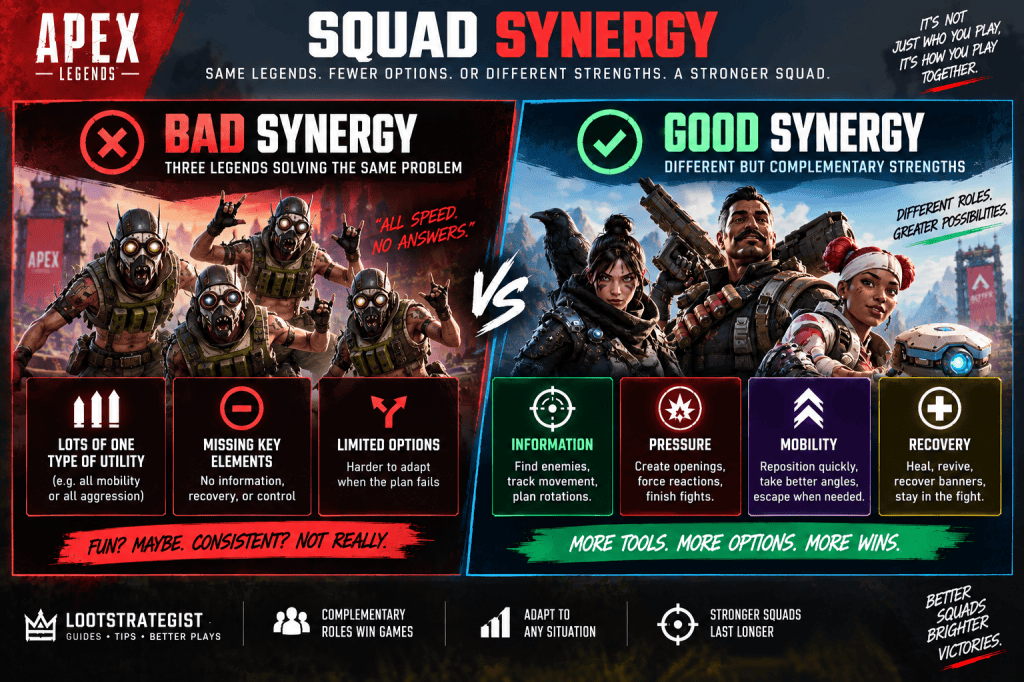
Don’t Stack the Same Job

Apex Legends squad synergy guide comparing bad team synergy with three similar roles against complementary roles for information, pressure, mobility, and recovery.

This is one of the easiest mistakes in squad building.

Suppose all three Legends are excellent at entering fights.

That sounds powerful.

Until you realize nobody is helping the squad recover, gather information, or hold the ground afterward.

When selecting a third Legend, ask:

“What does our team already have two of?”

Then ask:

“What are we missing?”

That simple question can produce better compositions than following a tier list blindly.


Composition Matters Less Than Coordination

There is a point where team communication becomes more important than the exact Legend combination.

Three players using a slightly imperfect composition together can beat three stronger Legends whose players don’t coordinate.

Good teams:

Share information.

Focus targets.

Move together.

Use abilities with purpose.

Know when to disengage.

Reset after fights.

A perfect composition won’t rescue three players who are fighting three separate battles.


How to Assign Roles Without Overcomplicating It

You don’t need formal roles like a traditional MMO.

But a lightweight division can help.

One player can naturally become the shot-caller.

Another can focus more heavily on scouting and information.

Another can watch for flanks and recovery opportunities.

Those responsibilities can move around during the match.

The important part is that everyone understands the plan.


A Simple Team-Building Checklist

Before entering a match, ask:

Who gathers information?

Who creates pressure?

Who helps us reposition?

Who helps us recover?

How do we handle a defensive team?

What happens if the Ring forces us to move?

If your squad has reasonable answers to those questions, the exact classes matter less.


Common Squad Composition Mistakes

Picking Three Legends You Individually Like

A squad isn’t three solo loadouts.

Think about what the team needs.

Copying a Professional Composition Blindly

A composition designed for coordinated competition may not make sense for three friends playing casually.

Ignoring Mobility

You can hold the strongest building in the world.

The Ring can still make you leave.

Ignoring Information

Good gunplay becomes much easier when you know where the enemy is.

Overloading on Defense

Holding ground is useful.

Being unable to leave it isn’t.

Choosing a Legend Solely Because It’s “Meta”

The strongest Legend is not automatically the strongest pick for you.

Never Adjusting Your Composition

Your preferred team may work beautifully on one map and feel awkward on another.

Adapt.


Our Recommended Composition Framework

Rather than giving you one permanent “best” squad, use this framework:

Slot 1 — Information

Recon or another Legend capable of gathering useful information.

Slot 2 — Mobility / Entry

Skirmisher or a flexible combat Legend that can create or exploit openings.

Slot 3 — Adaptation

Choose based on the first two:

Assault for more pressure.

Controller for area control.

Support for recovery and sustain.

This approach is much more useful than memorizing one lineup.

It gives you a way to build a team even after the roster changes.


Final Thoughts

Apex Legends squad composition is less about discovering the three “correct” Legends and more about making sure your team has answers.

Someone needs information.

Someone needs to create pressure.

Your squad needs a way to move.

And when the plan falls apart—as it inevitably will—you need a way to recover.

The five current classes make those strengths easier to understand, but they aren’t rigid roles. A good Legend can contribute outside the description attached to their class, and a good squad uses abilities together rather than waiting for three separate moments to shine.

So before your next match, don’t ask:

“Which Legends are the strongest?”

Ask:

“What does our team need?”

That question will stay useful long after the next balance patch changes the tier list.

And when your squad eventually finds a composition that just clicks?

Keep it.

There’s nothing more satisfying than three players who know exactly what the other two are about to do.


Related Apex Legends Guides

Apex Legends Beginner Guide — Learn the fundamentals of movement, weapons, positioning, looting, healing, and squad play before diving deeper into team strategy.

Apex Legends Ranked Guide — Learn how RP, placement, fights, rotations, Ranked splits, Drop Zones, and competitive decision-making work.

Apex Legends Octane Guide — Learn how to use Octane’s mobility without sacrificing your squad’s positioning.

Apex Legends Movement Guide — Master the movement fundamentals that make mobility-focused squad compositions more effective.

Apex Legends Best Legends Guide — Compare individual Legend strengths and decide which characters fit your playstyle.


Sources & Updates

Last reviewed: September 6, 2026

Apex Legends receives frequent balance updates and Legend reworks, so this guide emphasizes squad-building fundamentals rather than presenting one permanent “best” composition.

Current Legend class information was checked against EA’s official Apex Legends documentation. EA currently divides Legends into five classes: Assault, Controller, Recon, Skirmisher, and Support, with each class providing different strategic benefits.

Current class-specific roles and rosters were cross-checked against EA’s official character hubs for Assault, Recon, Controller, Skirmisher, and Support Legends.

Current Ranked composition rules—including staggered Legend selection, no duplicate Legends within a squad, and class perks in Ranked—were checked against EA’s Ranked documentation.

Respawn has also outlined future plans to continue evolving squad composition and the Legend Class system, including a planned overhaul in Season 32.

Editorial note: The recommended squad structures in this guide are Loot Strategist’s editorial frameworks, not official EA recommendations. They are intentionally designed around durable team functions—information, mobility, pressure, control, and recovery—rather than a fixed seasonal meta.

Apex Legends Ranked Guide: How to Climb Faster and Smarter

Apex Legends Ranked Guide: How to Climb Faster and Smarter

Apex Legends Ranked changes the way you think about a match.

In Unranked, a reckless push can be a funny story five minutes later. In Ranked, that same push can erase a chunk of progress you spent the last few games earning.

That’s why climbing is not simply a matter of getting more kills.

Ranked rewards a combination of placement, eliminations, and skill-based bonuses, while the cost of entering a match rises as you move up the ladder. The higher you climb, the more valuable consistency becomes.

This Apex Legends Ranked Guide explains how the current system works, how RP is earned and spent, what the ranks require, how Ranked splits and Ladders work, and—most importantly—how to make better decisions when you actually want to climb.

The aim isn’t to promise a secret trick that will carry you to Master.

It is to help you build a Ranked game plan that works.

What Is Apex Legends Ranked?

Ranked is Apex Legends’ competitive mode, where players progress through a ladder by earning Ranked Points (RP) through their match performance. Matchmaking is based on current RP, and matches become more challenging as your RP rises.

The current ranked progression is:

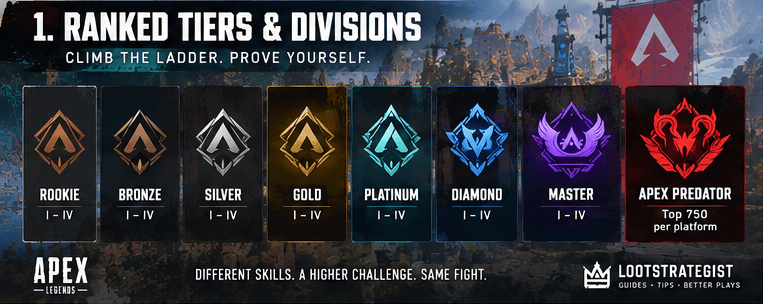
Rookie → Bronze → Silver → Gold → Platinum → Diamond → Master → Apex Predator

Rookie through Diamond use four divisions, such as Bronze IV through Bronze I. Once you reach Master, you can compete for the Apex Predator title; Apex Predators are the top 750 players per platform within Master.

That means Ranked has two very different experiences.

At the lower tiers, you’re learning how the system works.

At the top end, you’re competing for position against players who are already highly skilled.


How to Unlock Ranked

New players below Level 20 must complete Road to Ranked, which consists of three sets of challenges. Completing all three unlocks Ranked access. Players who already had Ranked access before the system was introduced keep that access.

That requirement is actually useful.

Use your early matches to become comfortable with movement, looting, positioning, healing, weapons, and your preferred Legends.

Ranked should be where you refine those skills—not where you first discover what your Tactical ability does.


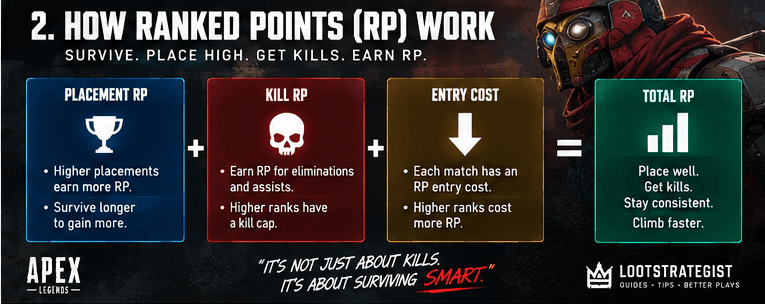
How Ranked RP Works

Apex Legends Ranked Points guide showing how placement, eliminations, and entry costs affect RP

Ranked Points are the currency of progression.

You gain RP from:

  • Placement
  • Eliminations
  • Skill-based bonuses

Higher placement increases the value of your eliminations, so kills and survival are tied together rather than functioning as completely separate goals.

This is why a five-kill game that ends early isn’t automatically better than a three-kill game that reaches the late game.

The useful question is not:

“How many kills did I get?”

It’s:

“How much RP did my decisions create?”


Ranked Entry Costs

Every Ranked match has an entry cost, and that cost increases as you climb.

RankRP Entry Cost
Rookie0 RP
Bronze10 RP
Silver20 RP
Gold38 RP
Platinum48 RP
Diamond65 RP
Master / Predator90 RP

EA’s current Ranked documentation confirms these costs and notes that you can finish a match with less RP than you started with.

That distinction matters.

At higher ranks, a bad game doesn’t merely mean “I didn’t gain anything.”

It can mean you lost progress.

This is why climbing becomes increasingly dependent on avoiding low-value deaths.


How Much RP Do You Need to Rank Up?

Each division requires a set amount of RP to move forward.

EA currently lists the following progression requirements:

PromotionRP Required
Rookie250 RP
Bronze divisions500 RP
Silver IV → III500 RP
Silver III → II500 RP
Silver II → I500 RP
Silver I → Gold IV750 RP
Gold divisions750 RP
Platinum IV → III750 RP
Platinum III → II750 RP
Platinum II → I1,000 RP
Platinum I → Diamond IV1,000 RP
Diamond divisions1,000 RP

The amount needed within a division increases as you reach higher ranks.

For example, moving from Bronze II to Bronze I requires 500 RP, while moving from Platinum II to Platinum I requires 1,000 RP.

That is one reason a strategy that works comfortably in Bronze can feel much less effective in Platinum.

Every mistake becomes more expensive.


How Ranked Scoring Works

EA currently divides Ranked scoring into three main components:

Placement

Eliminations

Bonuses

Placement determines a base part of your score, while kills and assists contribute additional RP. The value of eliminations rises as your team places higher.

Kills and Assists

Your personal kills and assists count toward your score.

A kill or assist counts as one kill for scoring purposes.

If your squad eliminates an enemy without you dealing damage to that player, you can receive half a kill through the participation system.

There is also an important limit:

Once you have more than eight kills, the value of subsequent kills, assists, and participations is halved.

That doesn’t mean getting nine kills is suddenly bad.

It means that once you’ve built a strong elimination total, throwing away a good position purely to chase another kill makes less sense.


Higher-Ranked Enemies Give Bonus RP

EA currently gives a bonus when you eliminate an opponent ranked above you.

The bonus scales according to the rank difference:

Rank differenceBonus
1 tier higher+15%
2 tiers higher+25%
3 tiers higher+35%
4+ tiers higher+50%

Your placement still determines the underlying value of the elimination.

Think of this as a reward for beating stronger opponents, not a reason to hunt them down recklessly.

An enemy being higher ranked does not make your fight automatically favorable.


Top-Five Streaks Can Earn Bonus RP

Ranked also rewards consecutive top-five finishes.

EA’s current system gives:

Second consecutive top-five: +10 RP

Third: +20 RP

Fourth: +30 RP

Fifth and subsequent: +40 RP

The streak resets whenever you finish outside the top five.

This is another reason not to treat every match as an all-or-nothing kill race.

Consistent top-five finishes can build momentum over several games.


Understanding the Apex Legends Ranked Ladder

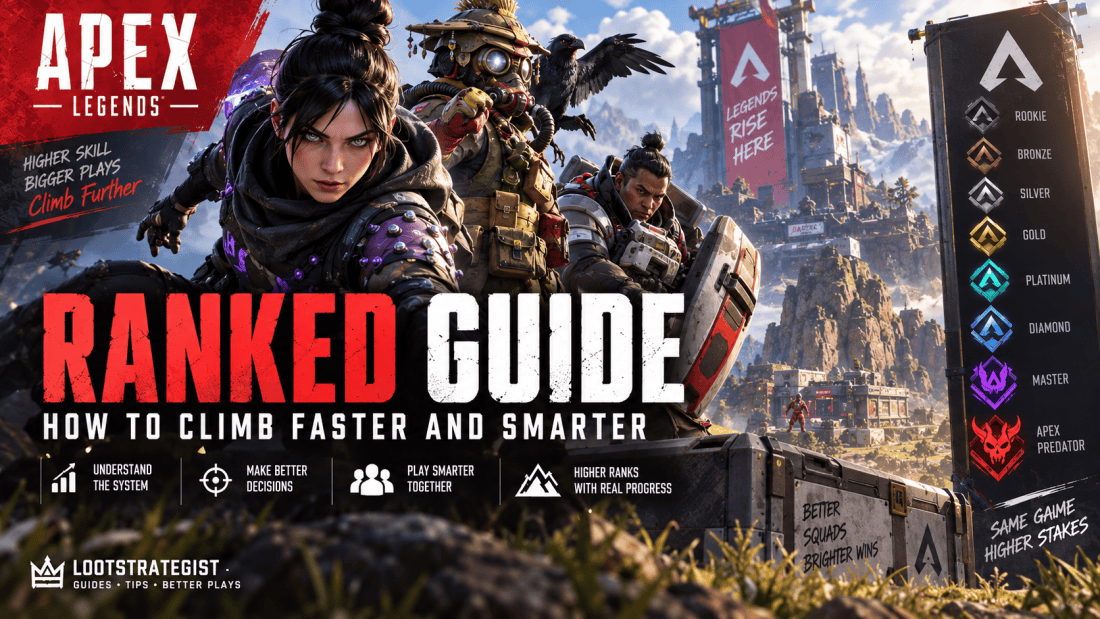
Apex Legends Ranked tiers showing progression from Rookie through Apex Predator

The current rank structure is:

RankDivisions
RookieRookie
BronzeIV–I
SilverIV–I
GoldIV–I
PlatinumIV–I
DiamondIV–I
MasterMaster
Apex PredatorTop 750 per platform

Rookie is designed as an introductory tier, while Apex Predator is reserved for the top 750 players per platform within Master.

Rookie

Rookie is where newer Ranked players begin learning the competitive system.

Once you’ve progressed out of Rookie, you cannot be placed back into it.

Bronze and Silver

These ranks are where you should concentrate on clean fundamentals.

Learn rotations.

Improve your aim.

Stop taking fights from terrible positions.

Gold

Gold is where inconsistent decision-making becomes much more noticeable.

A few unnecessary deaths can erase the gains from a strong match.

Platinum

Platinum is a meaningful step up.

Players are generally more disciplined about positioning, rotations, and taking favorable fights, so careless decisions tend to get punished quickly.

Diamond

Diamond demands consistency.

You need to be much more deliberate about when you fight, where you rotate, and how you spend your resources.

Master

Master is a different level of competition.

Mechanical skill matters, but decision-making and consistency are increasingly important.

Apex Predator

Predator is the top end of the ladder: the top 750 players per platform within Master.

Reaching the threshold isn’t the same as securing the title.

You are competing against other players for those positions.


How Ranked Matchmaking Works

Ranked matchmaking is based on your current RP.

For your first Ranked experience, your hidden skill value from Unranked Trios helps determine your starting rank and RP.

For players who have played Ranked before, the system uses their hidden Ranked skill value. Matches become more difficult as RP increases.

EA also recommends checking the distribution of player ranks in the lobby before the match begins so you can adapt your strategy to the competition.

Don’t overthink it.

You don’t need to memorize the lobby.

Just recognize that a stronger-looking lobby may reward a more conservative opening, while a lower-pressure lobby can give you more room to take fights.


How Drop Zones Work in Ranked

This is one of the current Ranked mechanics worth knowing.

EA says Ranked matches can currently begin in two different ways:

Dropship

or

Drop Zone.

With the normal Dropship format, a Jumpmaster chooses where the squad lands.

In a Drop Zone match, which is used when the lobby meets a certain threshold of Diamond, Master, or Predator players, your squad is assigned a POI before Legend selection. Your team then independently jumps toward that area, although you can adjust your landing to contest nearby zones.

This can change how you approach the opening.

Pay attention to the loading screen.

Know where your assigned area is.

Watch whether nearby squads are likely to contest.

Then make a decision before you are already falling out of the sky.


Ranked Legend Selection Is Different

Apex Legends Ranked guide showing recommended Legend roles for different squad strategies

Legend selection in Ranked is staggered, meaning players choose one at a time.

You also cannot stack the same Legend on one team.

Ranked includes Legend class perks, and you can collect Legend Amps that provide additional passive abilities during the match.

That makes team composition more relevant than simply picking three characters you individually enjoy.

You don’t need a professional-level composition.

You do need a squad whose abilities make sense together.


Ranked EVO and Shield Cores

Ranked currently uses an upgrade system in which EVO progresses your armor and Legend level during the match.

EA lists three Legend levels for the armor progression:

Level 1 — White

Level 2 — Blue

Level 3 — Purple

EVO can be earned through dealing damage, finding EVO Harvesters, and collecting EVO Caches.

Ranked armor is fueled by a Shield Core rather than the older system of simply swapping armor.

Enemy death boxes contain Shield Cores tied to the defeated player’s Legend Level, while the displayed color of a dropped Core represents the charge remaining in that Core.

For beginners, you don’t need to memorize every Shield Core edge case.

The important lesson is to understand that your armor progression and remaining shield charge are separate considerations.


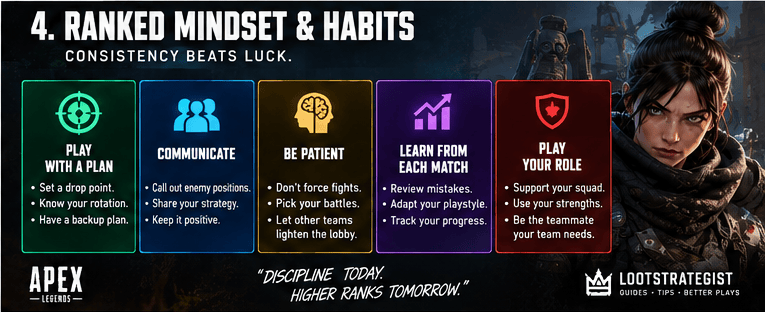
The Best Ranked Strategy Is Consistency

There is no single strategy that works perfectly every match.

Sometimes you’ll land uncontested and have excellent loot.

Sometimes another squad will be in your building before you’ve even found a weapon.

Sometimes your rotation will give you strong ground.

Other times the Ring will make your preferred route impossible.

Good Ranked players adapt to those situations.

Your job is not to force the match to behave the way you wanted.

It’s to make the best decision from the position you’re actually in.


How to Choose Fights in Ranked

Before committing to a fight, consider four things:

Position

Do you have cover?

Do you have a useful angle?

Do you have an escape route?

Numbers

Are your teammates nearby?

Is everyone healthy enough to fight?

Resources

Do you have ammunition, shields, and healing?

Exit

What happens if the enemy pushes back?

If those four factors look favorable, the fight may be worthwhile.

When several of them are missing, you’re taking a much larger gamble.

A fight doesn’t have to be guaranteed to be worth taking.

It simply needs to make sense.


Don’t Hot Drop Every Ranked Match

Hot dropping can be useful for practicing mechanics.

That doesn’t make it the best strategy for climbing.

A chaotic opening can end before your squad has a chance to stabilize, particularly when another team lands on the same loot.

Unless your squad has a reason to contest a POI, a controlled opening usually gives you more time to acquire weapons, shields, and information.

You can find a fight after you’re prepared.

You cannot always recover from one you started unprepared.


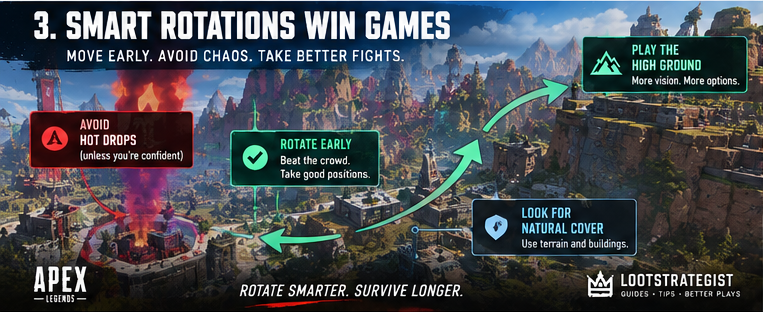
Rotate Early

Apex Legends Ranked rotation guide showing smart early rotations and strong positioning

Late rotations create problems that did not need to exist.

You wait.

You loot.

The Ring moves.

You finally rotate.

The only available route now goes directly through a team holding high ground.

The better approach is to think one rotation ahead.

Ask:

Where does the squad want to be next?

Then move while you still have options.

Early rotation isn’t about running away from combat.

It’s about giving yourself the ability to decide which combat you actually want.


Play for Position Before the Endgame

You shouldn’t start thinking about your final position only when there are three squads left.

Your mid-game choices determine where you can play later.

Prioritize:

  • Cover
  • High ground
  • Defensible terrain
  • Escape routes
  • Useful sightlines
  • Rotations that don’t funnel you through predictable choke points

A strong position can make the enemy move first.

That is often more valuable than one additional elimination.


Learn to Recognize a Bad Fight

A bad fight often has warning signs before the first shot.

Your squad is split.

You’re low on shields.

You are fighting uphill.

The enemy has cover.

You have no escape route.

The Ring is closing.

Another team is shooting nearby.

Any one of these may be manageable.

Several at once should make you reconsider.

The best Ranked decision sometimes happens before the fight starts.


Don’t Chase a Losing Fight

One of the most expensive habits in Ranked is refusing to disengage.

You crack an enemy.

They retreat.

You follow.

They reach cover.

Another squad arrives.

Now you’re fighting two teams.

The original damage doesn’t matter anymore.

Once the conditions change, change with them.

Backing out of a bad engagement isn’t wasted time.

It preserves your squad and your next opportunity to earn RP.


Reset After Every Fight

Make this routine automatic:

Heal.

Reload.

Check ammunition.

Check your surroundings.

Recover teammates when safe.

Check the Ring.

Then loot.

The order can change slightly depending on the situation, but the principle stays the same.

A squad that immediately opens death boxes after every fight is vulnerable to the squad that heard the gunfire from two buildings away.

The loot will still be there.

Your shields may not be.


Solo Queue Ranked Tips

Solo queue requires a different mindset because your teammates won’t always want the same things you do.

You don’t control their decisions.

You do control your own.

Adapt to Your Team

Watch how your teammates play during the first few minutes.

Are they aggressive?

Do they rotate early?

Do they split during loot?

Do they prefer holding positions?

Use that information.

A flexible player can get much more value from an imperfect squad than someone who insists every teammate follow the same plan.

Don’t Follow Every Bad Push

Supporting your squad doesn’t mean copying a terrible decision.

If a teammate runs into a hopeless 1v3, don’t automatically turn it into a 2v3.

Look for an angle.

Provide cover.

Be ready for a retreat.

Preserve your position if the push is clearly lost.

Communicate

Use pings for enemies, loot, rotations, and danger.

A concise ping at the right moment is worth more than frantic communication after the fight has already started.


Ranked With a Premade Squad

A full squad has something a solo player doesn’t:

predictability.

You can create routines.

One player can make rotation calls.

Another can focus on scouting.

Another can manage support and recovery.

The exact division doesn’t matter as much as having a shared plan.

Decide before the match how your squad generally wants to play.

That prevents three players from making three different decisions when the first enemy appears.


Learn When to Play for Placement

There are moments when the correct play is to fight.

There are also moments when another team doing the fighting is exactly what you want.

Suppose your squad has:

  • Good Ring position
  • Strong cover
  • Healthy resources
  • Multiple escape routes
  • Two enemy squads already fighting

You don’t necessarily gain anything by rushing into the middle of that fight.

Let them weaken each other.

Then decide whether the resulting position is favorable.

Patience isn’t passivity.

It’s choosing when the fight is cheapest to take.


Ranked Splits and Resets

Ranked splits happen twice each Season: once at the start and once at the announced second split.

Your RP is reset when the split occurs.

For Split Two, EA’s current reset structure is:

Previous RankSplit-Two Reset
Bronze IV–IBronze IV — 1,000 RP
Silver IV–ISilver IV — 3,250 RP (+250 demotion protection)
Gold IV–IGold IV — 5,750 RP (+250 demotion protection)
Platinum IV–IPlatinum IV — 8,750 RP (+250 demotion protection)
Diamond IV–IIIPlatinum III — 9,250 RP
Diamond II–IPlatinum II — 10,000 RP
Master and abovePlatinum I — 11,000 RP

These are the current values in EA’s Ranked documentation.

Because Ranked systems can be changed between seasons, this is one section worth rechecking whenever Respawn publishes new Ranked patch notes.


Ranked Rewards

At the start of the next Season, you receive rewards based on the highest rank you achieved during the previous Season.

That highest rank can come from either split. EA also distinguishes the badge presentation depending on whether you match or surpass your first-split rank in the second split.

Ranked also has Auras, cosmetic effects that display your current rank in matches.

They range from gray for Rookie to red for Predator.

The rewards are nice.

The more useful reward, though, is knowing that your level of play has actually improved.


Can You Play Ranked With Friends?

Ranked parties have matchmaking restrictions.

EA’s current rules require players in a premade Ranked squad to be within two ranks of each other.

For example, a Bronze player can party with Rookie, Bronze, Silver, and Gold players, but not Platinum or higher. Premade squads are matched using the highest RP value in the squad.

Temporary matchmaking tests can alter those rules, so check the latest patch notes when Respawn announces an experiment or change.


Ranked Ladders Explained

Ranked Ladders are a separate leaderboard system.

EA currently describes each Ladder as a skill-based leaderboard with a maximum of 100 players.

You need at least five Ranked matches to establish a Ladder result, and your Ladder score is based on your five best Ranked RP scores during that period. Cross-play must be enabled, and you can compete with or without a squad.

The current Ladder tiers are:

TierLeaderboard Position
Tier 1Top 10%
Tier 2Top 10–30%
Tier 3Top 30–50%
Tier 4Bottom 50%

EA’s current Ranked page says Ladders run weekly from Tuesday through Sunday, while the Season 30 Marked update specifically extended Ranked Ladders to five days.

Because the exact Ladder schedule can be seasonal, use the in-game Compete tab as the final reference for active dates.


How to Improve Your Ranked Climb

Apex Legends Ranked guide showing recommended Legend roles for different squad strategies

You don’t need to review every game like a professional player.

Start with your deaths.

After a bad match, ask:

Was my position good?

Was my squad together?

Did I have enough resources?

Did we choose the fight?

Did I rotate too late?

Could I have escaped?

If you keep giving the same answer, you’ve found the skill you need to work on.

That is much more useful than simply saying, “I need better aim.”


Stop Trying to Fix Everything at Once

Improvement becomes easier when you give yourself one target.

For a few matches, focus on positioning.

Then work on close-range gunfights.

Then practice movement.

Then work on rotations.

Then communication.

Once each habit becomes more automatic, combine them.

Trying to overhaul your entire gameplay at once usually creates another problem:

You start thinking about everything except the fight in front of you.


Don’t Tilt Queue

A bad Ranked session can turn into a disaster surprisingly quickly.

You lose RP.

You get frustrated.

You take a reckless fight to win it back.

You lose more RP.

Then you queue again because now you really need the points.

That cycle is rarely productive.

Take a break when you’re no longer making calm decisions.

There is no bonus RP for emotional damage.


The Biggest Ranked Mistakes to Avoid

Apex Legends Ranked mistakes guide showing common errors such as bad rotations, unnecessary fights, poor positioning, and weak communication

Chasing Every Fight

Not every enemy is worth fighting.

Rotating Too Late

Late rotations leave you with fewer options.

Splitting From Your Squad

An isolated player is easier to eliminate and harder to support.

Refusing to Disengage

A good fight can become a terrible one in seconds.

Looting Without Checking for Third Parties

Gunfire attracts attention.

Chasing Kills Instead of Position

Kills contribute to RP, but dying in a terrible position contributes to someone else’s match.

Ignoring the Ring

A late rotation can force a fight you could have avoided.

Changing Legends Constantly

You learn much more from a Legend when you actually understand the kit.

Playing Tilted

Bad decisions compound.

Ignoring Your Deaths

Your mistakes are information.

Use them.


A Simple Ranked Game Plan

Early Game

Land with your squad.

Get a practical weapon combination.

Secure ammunition, shields, and healing.

Identify nearby squads.

Take a fight only when the opening makes sense.

Mid Game

Rotate before you’re forced to.

Prioritize strong positions.

Take favorable engagements.

Reset after fights.

Watch for third parties.

Late Game

Value position over unnecessary kills.

Keep the squad together.

Preserve resources.

Hold useful terrain.

Make the next rotation before you desperately need it.

That’s the basic loop.

The details change from match to match.

The principles don’t.


Loot Strategist’s Ranked Rule

Don’t ask how many kills you can get this match.

Ask:

“What decision gives my squad the best chance of finishing higher?”

Sometimes the answer is a fight.

Sometimes it’s a rotation.

Sometimes it’s holding your position.

Sometimes it’s letting another squad leave.

And sometimes it’s walking away from a fight that looks tempting but offers almost no upside.

Ranked is built from hundreds of small decisions.

The flashy moments are simply the easiest ones to remember.


Final Thoughts

Apex Legends Ranked gets easier to understand once you stop thinking of RP as something you have to chase every minute.

Think about creating good outcomes consistently.

Take favorable fights.

Rotate early.

Use cover.

Stay close to your squad.

Reset after engagements.

Pay attention to the Ring.

Don’t chase an enemy simply because they are running away.

And when you lose, figure out why.

You won’t win every match.

You won’t gain RP every session.

Some games will end because the squad made one terrible call.

Others will end because another team simply played the situation better.

That’s part of competitive Apex.

What matters is whether you are making better decisions than you were ten matches ago.

That is what makes the climb sustainable.


Related Apex Legends Guides

Apex Legends Beginner Guide — Start here if you’re still learning Apex fundamentals such as weapons, movement, positioning, looting, healing, and squad play.

Apex Legends Octane Guide — Learn how to use Octane’s mobility without sacrificing your squad’s positioning.

Apex Legends Movement Guide — Learn the movement fundamentals that become increasingly important as your skill level rises.

Apex Legends Best Weapons Guide — Build a reliable loadout around weapons you can use consistently.

Apex Legends Solo Queue Guide — Learn how to adapt when you’re climbing without a premade squad.


Sources & Updates

Last reviewed: September 6, 2026

Apex Legends Ranked systems can change during a Season, so this guide separates current game mechanics from Loot Strategist’s editorial recommendations.

Current Ranked mechanics—including RP progression, entry costs, scoring, rank divisions, matchmaking, Drop Zones, Ranked splits, rewards, party restrictions, Shield Cores, and Ranked Ladders—were checked against EA’s official How Apex Legends Ranked Works documentation.

Season-specific Ranked information was also checked against the official Apex Legends: Marked Patch Notes released for Season 30. Those notes state that Ranked Ladders were extended to five days.

Editorial note: Gameplay recommendations in this guide—including fight selection, rotations, positioning, solo queue habits, and climbing strategy—are Loot Strategist’s editorial advice. They are not presented as official EA rules.

Apex Legends Beginner Guide: Tips for New Players

Apex Legends Beginner Guide: Tips for New Players

Apex Legends has a reputation for being difficult to learn, and that reputation isn’t entirely undeserved.

The gunfights are fast. Movement is surprisingly deep. Every Legend brings a different kit, and a bad rotation can put your squad in a fight you never wanted. Then there is the small matter of getting third-partied immediately after surviving the first one.

But Apex becomes much easier once you understand what the game is actually asking you to do.

This Apex Legends beginner guide focuses on the fundamentals that matter most: choosing a Legend, surviving the drop, finding a practical loadout, using movement and cover properly, working with your squad, managing the Ring, and knowing when a fight is worth taking.

You do not need perfect aim to start improving. You need better decisions.

What Is Apex Legends?

Apex Legends is a free-to-play Battle Royale shooter from Respawn Entertainment and Electronic Arts. You choose a Legend with unique abilities, drop into a match, collect weapons and equipment, fight enemy squads, and try to survive until the end. EA currently separates the game into Core modes, including Unranked and Ranked, and Freestyle modes, including Wildcard, Bot Royale Evolved, and Mixtape.

The traditional Battle Royale experience revolves around a simple loop:

Drop → loot → rotate → fight → survive.

The difficulty comes from everything happening inside that loop.

You are managing ammunition, shields, healing, abilities, positioning, movement, teammates, enemy squads, and the shrinking Ring at the same time. That is why Apex can feel overwhelming during your first few matches.

The trick is to learn those pieces one at a time.


Start With Unranked and Practice Modes

Ranked can wait.

EA recommends Unranked for players who aren’t ready for competitive play, and Apex also offers practice and more relaxed game modes that are useful for learning.

Before you worry about winning matches, get comfortable with the basic controls and weapons.

Spend a Little Time in the Firing Range

You don’t need to turn practice into a second job.

Spend a few minutes learning how your preferred weapons feel, especially their recoil and effective range. Practice changing weapons, reloading, aiming, sliding, and moving between pieces of cover.

The goal isn’t to become a mechanical monster.

It is simply to make basic actions feel automatic so that you have more attention available for the actual fight.

Try Bot Royale

Bot Royale can be useful when the normal player population feels overwhelming. It gives new players a less punishing environment in which to practice looting, rotating, fighting, and using abilities. EA includes Bot Royale among the game’s more relaxed Freestyle options.

Use it to learn the rhythm of a match, not as a substitute for eventually playing against real opponents.


Pick a Legend You Can Understand

Apex has a large roster of Legends, and learning all of them at once is unnecessary.

EA’s current beginner documentation says new players start with Bangalore, Lifeline, and Wraith, while additional Legends can be unlocked through the Welcome Pass.

For your first matches, choose one Legend and stick with them long enough to understand the kit.

You want to know:

  • What your Tactical ability does
  • What your Ultimate is useful for
  • When your abilities are better saved
  • How your abilities help your squad
  • How your Legend escapes a bad fight

Bangalore

Bangalore is a strong learning choice because her abilities can help you break enemy sightlines and create opportunities to reposition.

She teaches an important Apex lesson early: sometimes the best play is to make the enemy’s information worse rather than trying to outshoot them.

Lifeline

Lifeline is a natural option for players who enjoy supporting their squad.

She also reinforces one of the game’s most important habits: staying alive and keeping teammates in the fight can matter more than chasing another elimination.

Wraith

Wraith can appeal to players who like a more aggressive or mobile playstyle.

Her kit can help you learn when to disengage, reposition, and create safer routes for your squad.

The important thing is less about finding the mythical “best” beginner Legend and more about learning one kit properly.


Survive the Drop First

Apex Legends landing guide showing squad members landing near each other, nearby enemy squads, and a suggested safe landing pattern

The match begins before you ever fire a weapon.

EA’s current beginner guidance recommends landing close to your teammates without dropping directly into the exact same loot spots, watching nearby enemy squads, and learning the maps over time.

For a new player, that translates into a simple rule:

Stay close enough to help your teammates, but give everyone room to loot.

If three squad members land on the same building and find one weapon between them, your squad has created its own problem.

Instead, spread across nearby rooms or buildings.

As you are dropping, look around.

Are enemy players landing nearby?

Do you have enough time to reach a quieter building?

Can your squad share the same general area without fighting over the same loot?

These decisions matter because the first 30 seconds often determine how prepared your squad will be for the first real fight.


Loot Quickly, Then Move

Your first objective is not a perfect loadout.

It is a functional loadout.

Try to secure:

  • Two usable weapons
  • Matching ammunition
  • Shield-healing items
  • Health-healing items
  • A knockdown shield
  • Useful attachments
  • A grenade or two when space allows

EA’s current beginner guidance similarly recommends weapons and matching ammo, healing items, and useful equipment while encouraging players to keep updating their inventory as they find better loot.

Once you’re equipped well enough to fight, stop searching every corner for an upgrade.

Apex rewards movement.

If you spend too long looting the first area, another squad may already have taken the strong position you needed.


Choose Weapons by Role

Apex Legends beginner weapon loadout showing an assault rifle and SMG for close- and mid-range combat

Don’t worry about memorizing the entire weapon pool.

For a beginner, a simple combination is easier to manage:

One weapon for medium range + one weapon for close range.

That could mean an assault rifle paired with an SMG, for example.

EA’s current weapons guidance recommends that newer players become comfortable with assault rifles and SMGs, highlighting weapons such as the R-301 and Volt as approachable options.

Assault Rifles

Assault rifles are flexible and useful in a wide range of engagements.

That versatility makes them excellent learning weapons.

SMGs

SMGs shine at closer ranges, especially when a fight becomes aggressive.

They pair naturally with a more versatile primary weapon.

Shotguns

Shotguns can end close-range fights very quickly, but they are less forgiving when your positioning or aim is off.

Learn them once you’re comfortable taking close fights.

Snipers and Long-Range Weapons

Long-range weapons have their place, but they shouldn’t become an excuse to avoid learning close and medium-range combat.

A beginner who spends an entire match sitting on a hill and firing occasionally is not necessarily learning the skills that make Apex players dangerous.

You eventually want to become comfortable fighting at different distances.


Learn Ammo Management

Your inventory has limited space.

That means every stack of ammunition should have a reason to be there.

Carry ammo that supports the weapons you’re actually using. If you switch weapons, update your inventory too.

EA’s current beginner guidance also recommends picking up ammunition that matches your weapons and changing your inventory as your loadout changes.

A surprisingly common beginner mistake is spending half the match carrying ammunition for a weapon they abandoned ten minutes ago.

Your backpack has better things to do.


Understand Shields, Health, and EVO

This is one of the first Apex systems worth learning properly.

Your shield absorbs damage before your health, so a player with low shields is not truly ready for another engagement simply because their health bar is full.

After a fight, check both.

Shield Cells and Shield Batteries restore shields, while Syringes and Med Kits restore health.

A good beginner habit is to reset after every engagement:

Heal → reload → check ammunition → check surroundings → move.

Apex also uses EVO progression, so your equipment and combat progression can develop as a match continues.

You don’t need to understand every detail immediately.

For your first few matches, simply recognize that surviving fights and managing your resources are part of getting stronger during the match.


Movement Matters, but Don’t Chase Fancy Tricks

Apex Legends movement guide showing how to move from open ground to cover, slide, and reposition safely

Apex is famous for movement.

You will eventually see players using advanced techniques that make them look as though they have forgotten gravity exists.

Ignore that for now.

Learn the basics.

Sprint

Move decisively when you’re rotating through areas that aren’t currently under attack.

Slide

Sliding helps maintain momentum and makes your movement less predictable.

Practice sliding naturally rather than forcing it into every situation.

Holster When It Helps

Putting your weapon away can improve movement speed, but you should not remain unarmed when you are approaching an area where enemies could appear.

Speed is useful.

Being ready to shoot is also useful.

Use Cover

This is the movement habit that matters most.

Move from cover to cover.

Avoid unnecessary open ground.

Don’t confuse constant motion with good movement.

A player who smoothly moves between cover is often much harder to kill than someone who simply jumps and slides everywhere.


Positioning Wins Fights Before the Shooting Starts

Apex Legends positioning guide comparing a bad exposed position with a good position behind cover and multiple escape routes

Apex is not purely an aim game.

Imagine two players with identical weapons.

One is standing in an open field.

The other is behind a rock with a clear line of retreat.

The second player already has an advantage.

Good positioning provides:

Cover.

Useful sightlines.

Escape routes.

Better angles.

More time to react.

Before starting a fight, ask yourself:

Where do I go if this goes badly?

If there is no answer, rethink the position.

That single habit will save you from a remarkable number of unnecessary deaths.


Don’t Fight in the Open

This sounds obvious until a fight starts.

Then people forget.

Heal behind cover.

Reload behind cover.

Revive behind cover.

Peek from cover.

Use buildings, rocks, walls, terrain, and other obstacles to reduce the number of angles an enemy can use against you.

You don’t have to stand still and trade damage until somebody loses.

Take a shot, reposition, and make the enemy work for theirs.


Stay Close to Your Squad

Apex is built around squad play.

You don’t need to walk shoulder-to-shoulder with your teammates, but you should usually remain close enough that they can help you when a fight begins.

EA specifically advises beginners to stay close to their squad because isolated players are easier to overwhelm.

Good squad spacing means:

  • You can reinforce a teammate quickly
  • You can trade damage
  • You can combine abilities
  • You can retreat together
  • You can recover a knocked teammate more safely

The worst place for a new player is often 100 meters away from everyone else when the shooting starts.


Learn the Ping System

Apex’s ping system is one of its best tools for communication.

You don’t need a microphone to give your teammates useful information.

EA specifically recommends pinging enemy positions, loot, and locations.

Use pings to:

Mark enemies.

Highlight useful loot.

Suggest where to move.

Warn teammates about nearby danger.

Show where you intend to go.

A good ping can communicate something immediately that would otherwise take several seconds to explain.

Just remember that communication is information, not noise. One useful ping is better than twelve frantic ones.


Know When to Fight

This is probably the hardest beginner lesson.

Seeing an enemy does not mean you have to shoot them.

Before committing to a fight, look at the situation.

Do you have decent equipment?

Are your teammates nearby?

Do you have cover?

Is the enemy in a better position?

Can you disengage?

Is the Ring about to force everyone into a different area?

There is no shame in refusing a bad fight.

Apex rewards players who can recognize a favorable engagement before they commit to it.

That doesn’t mean you should spend the entire match hiding, either.

Fight when you have a reason.

Leave when you don’t.


Beware the Third Party

You win a fight.

Great.

Now you start looting.

Footsteps.

Another squad.

Death.

This is the classic Apex third-party problem.

After an engagement, your squad may be low on shields, healing, ammunition, and positional advantage. Another team arriving at that exact moment can clean up before you’ve recovered.

So make “reset” a habit.

Heal.

Reload.

Check your surroundings.

Listen for nearby footsteps and gunfire.

Then loot.

The extra few seconds can be the difference between collecting useful gear and becoming somebody else’s useful gear.


Use Grenades With a Purpose

Grenades are most useful when they solve a problem.

Use them to:

  • Force enemies out of cover
  • Punish a team holding a building
  • Deny a route
  • Create space during a retreat
  • Pressure an enemy while your squad pushes

Don’t carry a backpack full of grenades simply because they were available.

Your inventory should support the way you actually play.


Watch the Ring

The Ring is one of the systems that gives Apex its pace.

As the match continues, playable space becomes more restricted, forcing squads closer together.

The beginner mistake is waiting until the last possible moment to rotate.

That often creates a terrible choice:

Run through an open area while the Ring closes behind you, or enter an unfamiliar area where another squad is already waiting.

A better approach is to think ahead.

Ask:

Where does my squad want to be next?

Then move before you absolutely have to.

Being early gives you options.

Being late gives you problems.


Don’t Throw Yourself Into a Revive

Your teammate is down.

Your instinct may be to sprint straight at them.

Sometimes that’s correct.

Sometimes it is the fastest possible way to get two teammates knocked instead of one.

Before reviving, look at:

  • Enemy positions
  • Available cover
  • Your own health and shields
  • Your other teammate’s location
  • Whether the enemy squad is still watching the area

A revive is valuable.

A revive attempt with no cover and three enemies staring directly at you is usually not.

Knocked teammates can also use their knockdown shields, and surviving teammates may have opportunities to recover them or respawn them later, depending on the situation.

Don’t turn one bad position into a complete squad wipe because you felt obligated to revive immediately.


What to Do After You Get Knocked

Getting knocked is not automatically the end of the match.

Stay calm.

Use your knockdown shield when appropriate.

Move toward cover if you can.

Keep giving useful information to your teammates.

Tell them where enemies are rather than simply announcing that everything has gone terribly.

Sometimes your team can recover you.

Sometimes they can’t.

Either way, useful information can still help win the fight.


Don’t Rush Into Ranked

Ranked is designed for competitive play, so there’s no reason to force yourself into it before you’re comfortable with the basics.

EA currently requires new players below Level 20 to complete the Road to Ranked challenges before they can enter Ranked.

Treat those requirements as part of your learning period.

By the time Ranked becomes available, ideally you should already be comfortable with:

  • Your preferred Legend
  • Several weapons
  • Basic movement
  • Healing
  • Ping communication
  • Rotating with the Ring
  • Fighting around cover
  • Staying with your squad

Ranked points are not going to teach those fundamentals for you.

Practice will.


The Biggest Apex Legends Beginner Mistakes

Landing Too Far From Your Squad

You want enough space to loot without separating so far that your teammates can’t help.

Looting for Too Long

Once you can fight, move.

Carrying the Wrong Ammo

Your inventory should support your current weapons, not the guns you used ten minutes ago.

Ignoring Shields

Full health doesn’t mean you’re ready if your shields are empty.

Fighting Alone

Being aggressive is not the same as being isolated.

Chasing Every Knock

An enemy running around a corner may be leading you directly into another squad.

Ignoring the Ring

Late rotations create unnecessary problems.

Using Abilities Without a Plan

An ability being available doesn’t mean it has to be used immediately.

Reviving in the Open

Check the situation first.

Blaming Teammates for Every Death

Sometimes your teammate made a bad play.

Sometimes you did.

The useful question is what you can do differently next time.


A Simple Game Plan for Your First Matches

You don’t need to remember fifty rules while learning.

Use this instead.

Early Game

Land near your squad.

Find two workable weapons.

Collect matching ammunition.

Pick up shields and healing.

Pay attention to nearby enemies.

Then move.

Mid Game

Watch the Ring.

Stay with your squad.

Look for strong positions.

Take sensible fights.

Reset after engagements.

Be ready for third parties.

Late Game

Value positioning more than unnecessary kills.

Hold useful ground.

Stay together.

Keep healing resources available.

Think about where the next fight will happen before it starts.

That is the difference between reacting to the game and actually playing it.


How to Improve at Apex Legends Faster

Playing more matches helps, but simply repeating the same mistake doesn’t make you better at it.

Instead, review your deaths.

Not every death needs a complicated explanation.

Sometimes you simply lost a fair gunfight.

Other times there was a clear mistake:

You were standing in the open.

You pushed before your teammates arrived.

You ignored the Ring.

You had no shields.

You chased a player into a bad position.

You had no escape route.

Pick the biggest mistake and work on that one.

The next time the same situation appears, try a different decision.

That’s meaningful improvement.

Practice One Skill at a Time

Don’t try to master everything simultaneously.

Spend one session paying attention to positioning.

Another can focus on movement.

Another can focus on one or two weapons.

You will improve faster when you actually know what you’re practicing.


Loot Strategist’s Beginner Rule

For your first several matches, forget about chasing huge kill totals.

Build the habits that keep you alive:

Land with your squad.

Get a practical loadout quickly.

Keep your shields and health topped up.

Use cover.

Watch the Ring.

Don’t take fights you cannot explain.

Learn from your deaths.

Kills will come later.

First, become difficult to kill.


Apex Legends Beginner Checklist

Apex Legends post-fight reset guide showing the steps to heal, reload, check surroundings, and loot after winning a fight

Before and during every match, remember:

Choose a Legend you understand.

Stay close to your squad.

Loot quickly.

Carry weapons that cover different ranges.

Keep appropriate ammunition.

Carry shields and health heals.

Use cover whenever possible.

Ping useful information.

Watch the Ring.

Reset after fights.

Expect third parties.

Know when to disengage.

That is enough to get started.

You can worry about advanced movement techniques and hyper-optimized loadouts later.


Final Thoughts

Apex Legends has a steep learning curve because there is a lot happening at once.

The game asks you to shoot accurately, move intelligently, manage resources, understand your Legend, communicate with teammates, read the map, and make quick decisions under pressure.

You don’t have to master all of that immediately.

Start small.

Learn one Legend. Get comfortable with a few weapons. Practice basic movement. Stay near your squad. Use cover. Watch the Ring. Heal before taking another fight.

Most importantly, stop treating every enemy as an invitation to fight.

Good Apex players aren’t simply the ones who can win a gunfight.

They’re the ones who recognize which fights are worth taking in the first place.

And yes, you’ll still occasionally get deleted by somebody who appears to have a personal grudge against your existence.

That’s Apex.


Related Apex Legends Guides

Apex Legends Octane Guide — Learn how Octane’s mobility tools work and how to use his speed without throwing away your team’s position.

Apex Legends Squad Composition Guide — Explore how different Legends can complement each other when building a squad.

Apex Legends Ranked Guide

More Apex Legends Guides — Find additional Legend guides, tips, and strategies from Loot Strategist.


Sources & Updates

Last reviewed: September 6, 2026

Apex Legends changes regularly, so this guide focuses on fundamentals that remain useful across seasons rather than short-lived weapon or Legend rankings.

Current game information was checked against EA/Respawn’s official Apex Legends documentation, including beginner guidance, game modes, the current Ranked system, and the Marked Season 30 update. Marked launched on August 4, 2026.

Our gameplay recommendations are editorial guidance from Loot Strategist rather than claims that there is one objectively correct way to play Apex Legends.

How we verify: Changing factual details—such as game modes, Ranked access, seasonal systems, and beginner onboarding—are checked against official EA sources. Practical advice is presented as strategy and editorial recommendation rather than as an official game rule.

Apex Legends Weapons Guide: Best Guns, Weapon Types & Beginner Tips

Apex Legends Weapons Guide: Best Guns, Weapon Types & Beginner Tips

Choosing a weapon in Apex Legends is about more than picking up the gun with the highest damage.

You need to think about range, recoil, magazine size, ammo availability, attachments, your second weapon, and even the Legend you’re playing. A weapon that feels incredible in a close-range fight can become awkward when you’re trying to pressure another squad from a distance.

That is why there isn’t one weapon that is simply the best gun in Apex Legends for everyone.

EA’s own weapons guide recommends trying different guns and learning which weapons feel comfortable at different ranges. For newer players, Assault Rifles and SMGs are a particularly useful starting point because they cover a wide variety of encounters.

This Apex Legends weapons guide breaks down the major weapon types, explains how to choose a loadout, and covers practical tips for getting more value from the guns you find during a match.

Apex Legends Weapon Types Explained

Apex Legends divides its guns into several weapon categories, each designed around different combat situations.

Understanding those roles is more useful than memorizing a tier list because weapon balance changes regularly.

Apex Legends weapon types infographic showing seven categories—Assault Rifles, SMGs, LMGs, Shotguns, Marksman, Snipers, and Pistols—represented by recognizable weapon silhouettes.

Assault Rifles

Assault Rifles are some of the most versatile weapons in Apex Legends.

They’re generally useful at close-to-mid range and can be effective for players who are still learning how to manage different engagements.

Examples include:

  • HAVOC Rifle
  • VK-47 Flatline
  • Hemlok Burst AR
  • R-301 Carbine
  • Nemesis Burst AR

The biggest advantage of an Assault Rifle is flexibility.

You can use one to pressure an enemy across a street, fight around a building, or support a teammate during a medium-range engagement.

For beginners, the R-301 Carbine is an especially approachable starting point because of its relatively manageable handling. EA also specifically recommends it as a beginner-friendly weapon.

Submachine Guns

SMGs are built around faster, closer-range engagements.

They’re particularly useful when fights move inside buildings or when you need to follow up quickly after closing the distance.

SMGs reward:

  • Good tracking.
  • Confident movement.
  • Close-range positioning.
  • Knowing when to reload.
  • Staying close enough for your weapon’s strengths to matter.

A common mistake is carrying an SMG and then taking every fight from too far away.

If your weapon is strongest at close range, your positioning should help you get there safely.

Light Machine Guns

LMGs generally offer larger magazines and sustained fire.

That can make them useful when suppressing an enemy position or maintaining pressure while your teammates reposition.

The trade-off is that they can feel less agile than some lighter weapons.

They’re particularly useful when you want to keep firing rather than constantly resetting your weapon.

Shotguns

Shotguns specialize in close-range burst damage.

They can be extremely effective when you’re fighting around doors, corners, buildings, and other tight spaces.

The catch is obvious: you need to be close enough for the weapon to do its job.

Shotguns also punish missed shots more severely than many automatic weapons. If you fire and miss during a close-range fight, the opponent may have enough time to punish you before you can fire again.

That makes shotguns excellent weapons for players who are comfortable with movement and positioning.

Marksman Weapons

Marksman weapons occupy an interesting middle ground.

They’re generally suited to players who want more range than an SMG or Assault Rifle can comfortably provide without committing fully to a traditional sniper.

They can be useful for:

  • Mid-to-long-range pressure.
  • Opening damage before a rotation.
  • Holding an angle.
  • Punishing enemies who stay exposed.

However, weapon balance between Marksman weapons and other categories changes over time.

Respawn has specifically discussed moving away from a Marksman-dominated meta during 2026, so it’s better to think of this category in terms of its role rather than assuming Marksman weapons will always dominate long-range encounters.

Sniper Rifles

Sniper Rifles are designed for long-range engagements.

They allow you to pressure enemies who are too far away for most close-range weapons to use effectively.

The downside is that they can be awkward when another squad suddenly pushes into close range.

If you choose a sniper, your second weapon becomes especially important.

You don’t want to discover halfway through a fight that both weapons are designed for long-range engagements.


What Is the Best Gun in Apex Legends?

There isn’t a universal answer.

The strongest weapon for you depends on how you play and what the match gives you.

A weapon that has excellent statistics on paper isn’t automatically the best choice if you can’t control its recoil or consistently land shots with it.

Instead, ask three questions:

What range am I fighting at?

If most of your fights happen inside buildings, a shotgun or SMG may make more sense than a sniper.

Can I control the weapon?

A weapon with theoretically excellent damage won’t help much if your shots consistently miss.

Does it complement my second weapon?

Your two weapons should ideally cover different situations.

That third question is particularly important for beginners.


Best Weapons for Beginners

If you’re still learning Apex Legends, don’t worry about mastering every gun immediately.

Start with weapons that help you understand the fundamentals.

R-301 Carbine

The R-301 is a strong beginner choice because it is versatile and relatively easy to understand.

It can handle a range of encounters and gives new players an opportunity to practice tracking, recoil control, and positioning without requiring an extremely specialized playstyle.

If you find one early in a match and feel comfortable with it, there is little reason to abandon it simply because another weapon has a higher reputation.

Flatline

The VK-47 Flatline offers a different feel from the R-301.

It rewards players who are comfortable with its recoil and damage profile.

If you’re transitioning from easier-to-control weapons, spend some time in the Firing Range before deciding whether you like it.

Alternator

The Alternator can be approachable for players who prefer a straightforward automatic weapon.

It can work well in close-to-mid-range encounters and is useful while you’re learning how to track moving targets.

Volt

The Volt is another useful option for players who enjoy close-range automatic fire.

Its current energy-weapon ammunition system is different from the traditional ammo system many longtime players remember, so newer guides that describe it as simply consuming conventional Energy Ammo are outdated.

Peacekeeper

The Peacekeeper is a good weapon to practice if you want to improve your close-range accuracy.

It can be rewarding when your timing and aim are good, but it is less forgiving when you repeatedly miss.


The Best Weapon Depends on Your Range

Apex Legends combat range infographic showing recommended weapons by distance: Shotguns and SMGs for close range, Assault Rifles and Marksman weapons for mid range, and Marksman and Sniper weapons for long range.

One of the easiest ways to improve your weapon choices is to think about engagement range.

Close Range

Good options include:

  • SMGs
  • Shotguns
  • Certain Pistols

Close-range weapons work best when you’re fighting around buildings, corners, doors, and tight cover.

Movement also becomes extremely important here.

Your recent movement practice should complement your weapon choice. If you’re carrying an SMG or shotgun, being able to strafe, slide, change direction, and use cover can make a huge difference.

Mid Range

This is where Assault Rifles and many Marksman weapons become useful.

Mid-range fights give you enough distance to avoid some of the chaos of a point-blank fight while still allowing consistent pressure.

For beginners, this is often the easiest range to learn because you have more time to react than you would in a shotgun duel.

Long Range

Snipers and certain Marksman weapons are designed for this role.

Long-range fights can be useful for:

  • Gathering information.
  • Cracking shields.
  • Forcing enemies out of cover.
  • Creating opportunities for your squad to rotate.
  • Punishing teams that remain exposed.

But don’t fall into the trap of shooting from far away simply because you can.

If you’re dealing 20 or 30 damage repeatedly without creating an opportunity for your team, you may be better off rotating into a stronger position.


How to Build a Good Two-Gun Loadout

Apex Legends two-gun loadout infographic showing a mid-range primary weapon paired with a close-range secondary, with example Assault Rifle + SMG and alternative Marksman + SMG combinations.

Your two weapons should generally complement each other.

A simple beginner setup is:

Mid-range weapon + close-range weapon

For example:

Assault Rifle + SMG

This gives you a weapon for sustained mid-range fights and another for aggressive close-range engagements.

Another option is:

Marksman + SMG

This gives you more range while keeping a strong close-range option.

You could also use:

Sniper + Shotgun

This setup gives you a very strong range split, but it requires more confidence because both weapons are specialized.

The important thing is to avoid creating unnecessary overlap.

If both weapons are strongest at exactly the same range, you may find yourself poorly equipped when the fight changes distance.


Don’t Choose a Weapon Before Considering Your Second Gun

This is an easy mistake to make when looting.

You find a weapon you like, grab it immediately, and then spend the next several minutes looking for another gun that uses the same type of ammo or fills the same role.

Instead, think in pairs.

For example:

“I have a strong mid-range weapon. Now I need something for close range.”

That simple thought process makes looting more efficient.

It also helps prevent awkward loadouts.


Ammo Management in Apex Legends

Ammo management is part of weapon selection.

EA currently lists several ammunition systems, including Light, Heavy, Energy, Shotgun Shells, Sniper Ammo, Mythic Ammo, and Arrows. Some special ammunition systems behave differently from traditional floor-loot ammo.

One particularly important current change is the Energy weapon rework introduced with the Marked update.

Energy Ammo was removed as a conventional lootable item. Energy weapons instead have their own ammunition stockpile, which regenerates over time. Different weapons have different stockpile sizes, and the regeneration pauses while firing or reloading.

That means old guides explaining energy weapons as if they work exactly like Light or Heavy Ammo are no longer accurate.

For newer players, the bigger lesson is simple:

Don’t fill your inventory with ammo just because you have space.

Carry what your weapons actually need, pay attention to how much ammunition you are using, and make sure you have enough supplies for the fights you’re likely to take.


Weapon Attachments Matter

Finding the right attachment can change how comfortable a weapon feels.

Depending on the weapon, attachments can improve areas such as:

  • Magazine capacity.
  • Reloading.
  • Handling.
  • Recoil control.
  • Optics.
  • Hip-fire performance.
  • Other weapon-specific characteristics.

But don’t spend half a match searching for a perfect attachment.

A weapon you can use confidently with a basic setup is usually more valuable than a weapon sitting in your inventory while you search for one missing attachment.

Prioritize Attachments That Solve a Problem

Instead of thinking:

“I need the best attachment.”

Think:

“What is currently making this weapon difficult to use?”

If you’re constantly running out of bullets during a fight, a better magazine can matter.

If you struggle to control recoil, an attachment that improves handling or recoil can be more valuable.

If you’re fighting primarily at longer distances, the right optic can make target acquisition easier.

This is a much more useful way to think about attachments.


Don’t Chase Every Hop-Up

Hop-Ups can modify or enhance certain weapons, but their availability and implementation can change between seasons.

A common beginner mistake is seeing a Hop-Up and immediately deciding that they need the corresponding weapon.

Instead, start with the weapon.

If you already like the gun and find the relevant attachment, great.

Don’t build your entire loadout around finding one particular Hop-Up unless you already understand why you want it.

Apex has also moved toward locked Hop-Up systems in previous updates, so older loot guides can describe systems that no longer work the same way.


Weapon Choice Should Match Your Playstyle

Your Legend and weapons don’t have to match perfectly, but they can complement each other.

Aggressive Players

If you enjoy pushing enemies and taking close-range fights, consider weapons that reward:

  • Fast tracking.
  • Quick movement.
  • Close-range accuracy.
  • Rapid follow-up damage.

SMGs and shotguns are natural options to experiment with.

Defensive Players

If you prefer holding buildings, controlling angles, and forcing enemies to approach you, weapons that provide sustained pressure or reliable mid-range damage can be more comfortable.

Long-Range Players

If you prefer watching an enemy squad from a distance and looking for opportunities to punish exposure, Marksman weapons and Sniper Rifles may suit you better.

Just remember that eventually the fight may come to you.

Having a second weapon capable of handling close-range pressure is important.


Match Your Weapon to Your Legend

Some Legend abilities can make certain weapon styles more comfortable.

For example, a mobility-focused Legend can make it easier to close distance with an SMG or shotgun.

That doesn’t mean you need to force a particular weapon onto a particular Legend.

Instead, think about what your Legend allows you to do.

If your Legend can quickly reposition, you may be able to take angles that make a close-range weapon more effective.

If your Legend specializes in holding an area, you may get more value from weapons that let you control an approach.

This is where weapon choice becomes part of your overall game plan rather than an isolated decision.


The Biggest Weapon Mistakes Beginners Make

1. Chasing the “Meta” Gun

A weapon can be strong without being the right weapon for you.

If you can’t control it, your personal results may be worse than with a supposedly weaker weapon that you understand.

2. Carrying Two Weapons for the Same Range

Running two close-range weapons can leave you struggling to pressure enemies across open terrain.

Likewise, carrying two long-range weapons can become painful when another squad pushes your building.

Think about coverage.

3. Ignoring Recoil

Damage numbers don’t matter if your shots aren’t connecting.

Spend time in the Firing Range learning how your weapon behaves.

4. Reloading in the Open

A magazine running dry doesn’t mean you should stand still and reload.

Use cover, reposition, or break line of sight when possible.

This connects directly to the movement fundamentals covered in an Apex Legends movement guide.

5. Staying in a Bad Fight Because You Have the “Right” Weapon

A good gun doesn’t fix bad positioning.

If you’re exposed, outnumbered, or being pushed from multiple angles, repositioning may be more important than continuing to fire.

6. Spending Too Long Looting

The perfect loadout doesn’t matter if another squad reaches the next position before you do.

Get weapons that work, grab useful attachments, secure enough ammunition, and keep moving.


How to Practice Your Weapons

Apex Legends weapon practice infographic showing five steps: recoil control, tracking moving targets, strafing while shooting, quick weapon swaps, and using cover effectively.

The Firing Range is one of the best places to become comfortable with a weapon before relying on it in a real match.

Don’t just shoot at a stationary target.

Practice situations that resemble actual fights.

Drill 1: Recoil Control

Choose one automatic weapon.

Fire at a target while controlling the recoil.

Start at a comfortable range, then move farther away.

Drill 2: Tracking

Move around while keeping your crosshair on a target.

This is particularly useful for SMGs and other weapons that require sustained tracking.

Drill 3: Strafe + Shoot

Combine your weapon practice with movement.

Strafe left and right while firing and maintain your crosshair placement.

This connects your aim training with the movement skills you’ve already been practicing.

Drill 4: Weapon Swap

Practice switching between your two weapons.

You don’t want to spend several seconds fumbling through your inventory during a fight.

Learn which weapon you reach for at each range.

Drill 5: Cover

Practice firing from behind cover, retreating, reloading, and re-peeking from a slightly different angle.

This teaches an important lesson:

Good shooting is not just about aim. It’s also about giving yourself safe opportunities to shoot.


How to Choose a Weapon After Landing

The first weapon you find doesn’t need to be your final weapon.

Early in a match, prioritize functionality.

If you find an SMG and a shotgun, you can fight.

If you find an Assault Rifle and a pistol, you can fight.

You don’t need to spend the next five minutes searching for your dream loadout.

As you rotate, you can gradually improve your weapons and attachments.

This is especially important during contested drops when another squad is already nearby.

A usable weapon now is more valuable than a theoretically better weapon that you might find later.


What If You Find a Weapon You Don’t Like?

Use it long enough to understand why you dislike it.

Is the recoil difficult?

Is the fire rate uncomfortable?

Are you fighting at the wrong range?

Does the weapon require more precise aim than you’re currently comfortable with?

Sometimes the problem isn’t the weapon.

Sometimes you’re asking it to do something it wasn’t designed to do.

If you consistently dislike a weapon after giving it a fair test, move on.

Apex gives you enough weapon variety that you can build a loadout around your strengths.


How to Improve Your Weapon Choice Over Time

Apex Legends weapon decision-making flowchart showing how to choose weapons based on combat range, select a complementary second weapon, and use a loadout that the player can control confidently.

You don’t need to memorize every weapon statistic.

Instead, start paying attention to what happens in your matches.

After a fight, ask:

Did I lose because my weapon was weak, or because I used it badly?

Was I fighting at the wrong range?

Did my second weapon give me another option?

Did I run out of ammunition?

Did I miss because I couldn’t control the recoil?

These questions are much more useful than simply checking which weapon currently has the highest pick rate.

Apex is constantly changing.

Respawn’s 2026 updates have already adjusted weapon damage, recoil, magazine sizes, ammo systems, weapon rotations, and other mechanics.

Learning how to evaluate a weapon will therefore remain useful even when the meta changes.


A Simple Beginner Weapon Checklist

Before committing to a loadout, ask yourself:

  • Do I have a weapon for my preferred fighting range?
  • Does my second weapon cover a different range?
  • Can I control both weapons?
  • Do I have enough ammunition?
  • Do I have useful attachments without spending too much time looting?
  • Can I fight effectively indoors?
  • Can I pressure enemies at medium range?
  • Do my weapons work with the way I like to play?

If the answer is mostly yes, your loadout is probably good enough.

You don’t need a perfect setup.

You need a setup you understand.


Final Thoughts

The best weapons in Apex Legends aren’t necessarily the ones at the top of a tier list.

The best weapon for you is the one you can control, understand, and use at the range where your fights actually happen.

For beginners, start with versatile weapons such as Assault Rifles and SMGs. Learn how each weapon behaves, practice recoil and tracking in the Firing Range, and build two-gun loadouts that cover different situations.

From there, experiment.

Try shotguns if you want to improve your close-range fighting. Try Marksman weapons if you enjoy controlling longer angles. Test Snipers if you prefer patient, long-range engagements.

Most importantly, don’t let the current meta dictate everything you pick up.

Weapon balance will continue to change. Ammo systems can change. Attachments can change. Care Package rotations can change.

The skill that lasts is knowing why you’re choosing a weapon and what you want it to accomplish.

Once you start thinking that way, looting becomes faster, your loadouts become more deliberate, and your weapon choices start supporting the rest of your game instead of determining it.

Related Apex Legends articles

Apex Legends Movement guide

Apex Legends Octane Guide

Apex Legends Weapons Guide

Apex Legends Beginner Guide

Apex Legends Movement Guide: Sliding, Strafing & Advanced Tips

Apex Legends Movement Guide: Sliding, Strafing & Advanced Tips

In Apex Legends, winning a gunfight isn’t always about who lands the first shot. Sometimes it’s about who reaches cover first, who takes the better angle, or who can make the other player miss while keeping their own crosshair on target.

That is why movement matters so much.

You don’t need to master every flashy movement technique to become a better Apex player. In fact, most players will see bigger improvements by learning a few fundamentals—sprinting efficiently, sliding at the right time, strafing while shooting, and using terrain intelligently—before worrying about advanced mechanics.

This Apex Legends movement guide covers those fundamentals first, then moves into more advanced techniques and practical drills you can use in the Firing Range.

Why Movement Matters in Apex Legends

Apex Legends is built around momentum, positioning, and fast engagements. Movement helps you do much more than travel around the map.

Good movement can help you:

  • Reach cover before an enemy finishes their reload.
  • Make yourself harder to track during a close-range fight.
  • Change angles without giving an opponent an easy target.
  • Escape a bad engagement.
  • Take high ground or stronger defensive positions.
  • Stay with your squad during rotations.
  • Create better opportunities for your own shots.

EA’s beginner guidance specifically recommends sprinting rather than walking, holstering your weapon while travelling, sliding down declines, and using movement options such as launch pads and ziplines to travel efficiently.

The important distinction is that fast movement isn’t automatically good movement.

If you sprint into an open area with no cover, slide past your teammates, or chase an enemy into a bad position, moving quickly won’t save you. The best movement supports your positioning rather than replacing it.


Apex Legends Movement Basics

Before learning advanced techniques, make sure the basic movement loop feels natural.

Apex Legends basic movement diagram showing sprint, slide, jump, strafe, and cover

Sprinting

Sprinting is your default way of moving around the map.

Use it when rotating between locations, repositioning during a fight, or closing distance when you aren’t actively aiming.

One simple habit is worth developing early: don’t walk when you could safely sprint.

There is little benefit to moving slowly through open areas when you’re not trying to maintain a specific firing position.

Holstering Your Weapon

Holstering your weapon lets you move faster while travelling.

It is particularly useful when:

  • Rotating toward the next Ring.
  • Catching up with your squad.
  • Crossing a relatively safe area.
  • Retreating from a fight.
  • Moving between buildings.

You don’t want to spend the entire match with your weapon holstered, though. If you expect an enemy around the next corner, having your weapon ready is more important than squeezing out a little extra movement speed.

That small decision—weapon out or weapon holstered—becomes increasingly important as you improve.

Sliding

Sliding is one of the most useful movement mechanics for beginners.

A basic slide lets you maintain momentum while lowering your character’s profile and moving quickly across suitable terrain.

The easiest way to understand sliding is to think about momentum, rather than treating it as a button you press constantly.

Use slides when terrain and positioning make them useful. Sliding down a slope, for example, can help you cover ground quickly. Sliding across flat terrain can also help you change your position during a fight, but doing it repeatedly without a purpose can make your movement predictable.

Slide Jumping

Slide jumping combines a slide with a jump to preserve momentum and cover ground efficiently.

A simple practice routine is:

  1. Sprint forward.
  2. Start a slide.
  3. Jump near the end of the slide.
  4. Continue sprinting once you land.
  5. Repeat the sequence.

Don’t worry about performing it perfectly at first. The goal is to make the transition feel automatic.

Once you stop thinking about every individual input, you can concentrate more on where you’re actually going.


Strafing: The Movement Skill You Should Learn First

Strafing is moving sideways while keeping your aim on an opponent.

It sounds simple, but effective strafing is one of the most important skills in Apex.

Apex Legends strafing example showing a character moving left and right while maintaining aim on a target

When you’re standing still and shooting, your opponent has a much easier target. When you’re moving unpredictably while maintaining your aim, they have to constantly adjust.

How to Practice Strafing

Start in the Firing Range.

Pick a target and move left and right while keeping your crosshair around the target’s upper body.

Don’t immediately try to move as quickly as possible.

Instead, focus on three things:

  • Keep your crosshair on the target.
  • Change direction without losing control.
  • Avoid falling into an obvious left-right rhythm.

Once you can track a stationary target comfortably, increase the difficulty by shooting while moving and then practicing against moving targets.

EA also recommends using the Firing Range to practice aim, tracking, recoil control, and other mechanical skills.

Don’t Strafe Like a Metronome

One common beginner habit is moving left, then right, then left, then right at exactly the same pace.

That looks like movement, but it isn’t particularly difficult to predict.

Instead, vary your timing.

Move one direction for a moment, change direction, briefly adjust your movement, and occasionally use the environment to break the opponent’s line of sight.

Your objective isn’t to look flashy.

Your objective is to make your opponent’s next shot harder.


Crouching and Changing Your Height

Crouching can be useful during fights, particularly when combined with strafing.

Changing your character’s height can disrupt an opponent’s tracking and create awkward situations in close-range fights.

However, constantly crouch-spamming isn’t a substitute for good positioning.

If you are fighting beside a piece of cover, for example, changing your height while moving around that cover can be much more useful than repeatedly crouching in the open.

Think about where your opponent expects you to be.

Good movement often comes from making small changes that force them to adjust their aim.


Use Cover as Part of Your Movement

One of the biggest mistakes newer players make is treating movement and positioning as separate skills.

They aren’t.

Apex Legends cover movement comparison showing a character running across open ground versus moving safely from cover to cover

Imagine you’re fighting an enemy outside a building.

You could strafe around in the open and hope your movement is enough to keep you alive.

Or you could move between the doorway, wall, box, rock, or other available cover while taking shots.

The second option gives your movement a purpose.

Try to build the habit of asking:

“Where am I moving next if I get shot?”

If you don’t have an answer, your current position may already be too exposed.


Movement During a Gunfight

Movement becomes much more valuable when combined with shooting.

Close-Range Fights

At close range, standing still is usually a bad idea.

Use strafing, crouching, short slides, and nearby cover to make yourself harder to track.

But don’t sacrifice your aim just to move constantly.

There is a point where excessive movement makes your own shots worse.

A useful rule is:

Move enough to make yourself difficult to hit, but not so much that you can’t control your weapon.

That balance is more valuable than performing complicated movement techniques.

Reloading

Reloading creates a vulnerable moment.

Rather than standing in the open while your weapon reloads, use the time to:

  • Move behind cover.
  • Change your angle.
  • Strafe toward safety.
  • Break the enemy’s line of sight.
  • Create enough distance to reset the fight.

The same principle applies when healing.

Don’t automatically heal in the exact location where you took damage. If the enemy knows where you are, reposition first whenever the situation allows it.

Moving While Healing

Healing is another opportunity to think about movement.

If you’re behind solid cover, stay protected.

If your cover is weak or the enemy has an angle on it, consider repositioning before committing to a longer heal.

The goal isn’t to constantly run around while healing. It’s to avoid giving an opponent an easy prediction.


Advanced Apex Legends Movement Techniques

Once the basics become comfortable, you can start experimenting with more advanced movement.

However, there is an important warning here: Apex movement mechanics have changed over the game’s lifespan.

Old movement tutorials can remain popular long after the underlying mechanics have been adjusted. Respawn has previously made changes to tap-strafing and specifically described its intention to alter rapid directional inputs associated with the technique.

For that reason, treat older movement tutorials with caution and verify advanced techniques against current patch notes or in-game behavior before building your playstyle around them.

Bunny Hopping

Bunny hopping refers to maintaining momentum through repeated jumps and movement inputs.

It has historically been used to make certain movement situations more fluid, particularly when repositioning or combining movement with healing.

The exact usefulness and execution of movement techniques can change as Apex evolves, so don’t make bunny hopping your first priority.

If your basic slide jumps and strafing aren’t consistent yet, you’ll get more value from practicing those skills.

Tap-Strafing

Tap-strafing is one of the most well-known advanced Apex movement techniques, particularly among mouse-and-keyboard players.

The term has also been used to describe slightly different movement behaviors, which is one reason older guides can become confusing.

Respawn has previously discussed changes targeting rapid directional commands after jumping, including the movement behavior commonly associated with scroll-wheel tap-strafing.

Because Apex is continuously updated, don’t assume that an old tap-strafing tutorial still describes the current implementation.

If you’re interested in learning it, check the latest game behavior and patch notes first.

Wall Bouncing

Wall bouncing involves using a wall and jump input to redirect your movement.

It can be useful for changing direction quickly or creating an unexpected angle during a fight.

But again, mechanics should come after fundamentals.

A player who can consistently strafe, use cover, slide, and maintain accurate aim will generally benefit more from those skills than a player who knows several flashy techniques but can’t win a basic close-range duel.


Movement and Aim Have to Work Together

Movement is only half of the equation.

If you’re moving perfectly but your crosshair is nowhere near the enemy, you’re not accomplishing much.

When practicing movement, deliberately combine it with aim.

Try this:

  1. Pick a target in the Firing Range.
  2. Strafe left and right.
  3. Keep your crosshair around the target’s upper body.
  4. Fire short bursts.
  5. Change direction.
  6. Repeat without stopping your tracking.

Once that feels comfortable, add slides and jumps.

This gradually teaches your hands to coordinate movement and aiming rather than treating them as two separate skills.

EA’s current PC guidance also emphasizes tracking, crosshair placement, recoil control, and regular Firing Range practice.


Movement for Rotations and Team Play

Movement isn’t only for winning 1v1 fights.

It also affects how effectively your squad rotates around the map.

Apex rewards teams that move together and avoid unnecessary exposure. EA recommends staying close to your squad and using movement options to avoid falling behind.

If your teammates are rotating, don’t take an unnecessary detour just because you spotted some loot.

If you’re crossing an open area, think about the safest route rather than simply taking the shortest one.

If the Ring is closing, holster your weapon when appropriate and focus on getting your squad into a good position.

Movement becomes much more powerful when your entire team arrives at the next fight together.


The Biggest Movement Mistakes Beginners Make

Learning what not to do can save you a lot of time.

1. Moving Constantly Without a Purpose

Movement isn’t automatically useful just because you’re moving.

If you’re already behind cover, there may be no reason to sprint around.

Sometimes the strongest position is simply the one that gives you the best angle and protection.

2. Prioritizing Speed Over Cover

Running quickly into an open area can put you in a worse position than moving slowly between pieces of cover.

Don’t confuse mobility with safety.

3. Practicing Advanced Mechanics Too Early

It’s tempting to spend hours learning complicated movement because it looks impressive.

But if your strafing, slide jumping, aim, and positioning are inconsistent, advanced techniques shouldn’t be your main focus yet.

Build the foundation first.

4. Repeating the Same Movement Pattern

Predictable movement is easy to punish.

If you always strafe in the same direction, always slide at the same distance, or always take the same route around cover, experienced opponents can anticipate you.

5. Forgetting Your Squad

Apex is a team game.

Being mechanically fast doesn’t help much if you leave your teammates behind and start a fight alone.

Stay close enough that your squad can support you when an engagement begins.


A Simple Apex Legends Movement Practice Routine

You don’t need a complicated training schedule.

Spend 10–15 minutes in the Firing Range before playing if you want to work specifically on movement.

Apex Legends movement practice drill showing sprint, slide, slide jump, strafe, aim, and cover in sequence

Drill 1: Slide Jumps

Spend a few minutes moving around the range using sprint → slide → jump.

Focus on consistency rather than speed.

Drill 2: Strafing

Choose a target and strafe from side to side while keeping your crosshair on it.

Change your timing occasionally.

Drill 3: Movement + Shooting

Shoot while strafing.

Concentrate on keeping your aim stable while changing direction.

Drill 4: Cover

Move between pieces of cover and practice exposing yourself only long enough to take shots.

This teaches an important habit: movement should create safer opportunities, not simply make you harder to hit.

Drill 5: Apply It in Real Matches

Finally, stop practicing and play.

Movement needs to become useful under pressure.

A mechanic that works perfectly against a stationary target can feel completely different when you’re low on health, being pushed by a squad, and trying to reach cover.

That is why actual matches are part of the practice process.


Which Apex Legends Are Best for Learning Movement?

Some Legends naturally encourage players to think more about mobility.

Octane

Octane is an obvious choice for movement-focused players because his kit is built around speed and mobility.

His Stim and Launch Pad make it easier to experiment with aggressive repositioning and fast rotations.

If you’re learning how to use movement to create openings, Octane is a natural Legend to explore.

Related article: Apex Legends Octane Guide: Abilities, Tips & Beginner Strategies

Pathfinder

Pathfinder rewards players who pay attention to terrain and positioning.

His mobility encourages you to think vertically and look for creative routes around the map.

Wraith

Wraith’s kit can complement players who enjoy taking aggressive angles and quickly disengaging from dangerous situations.

However, you don’t need a mobility-focused Legend to learn good movement.

The fundamentals apply to every Legend.

Apex currently divides Legends into five classes—Assault, Controller, Recon, Skirmisher, and Support—with Skirmishers specifically focused on fast-paced combat and mobility.


Apex Legends Movement Settings

Your settings can affect how comfortable movement feels.

Rather than copying a professional player’s configuration exactly, start with controls that feel natural and make it easy to access the inputs you use most.

Controller players can also explore Advanced Look Controls if they want more control over aiming and movement. EA describes ALC as settings that provide greater control over these areas.

The most important thing is consistency.

If you constantly change sensitivity, button layouts, or movement settings, it becomes harder to develop reliable muscle memory.

Find a setup that feels comfortable and give yourself time to learn it.


The Movement Rule Most Beginners Get Wrong

Here’s the biggest lesson to take away from this guide:

The best movement isn’t necessarily the fastest movement.

Good movement helps you accomplish something.

Maybe you’re moving toward cover.

Maybe you’re breaking an enemy’s line of sight.

Maybe you’re creating a better angle.

Maybe you’re dodging shots while maintaining your aim.

Maybe you’re rotating with your squad before another team can take the position you want.

If you can’t explain why you’re moving, there’s a good chance you’re moving too much.

That mindset will take you further than memorizing a list of advanced techniques.


Final Thoughts

Apex Legends movement can look intimidating when you watch highly skilled players chaining together advanced mechanics, but you don’t need to master everything at once.

Start with the fundamentals:

  • Sprint efficiently.
  • Holster your weapon when travelling safely.
  • Learn consistent slide jumps.
  • Practice strafing while aiming.
  • Use cover instead of relying purely on speed.
  • Change your movement patterns so you’re harder to predict.
  • Move with your squad.
  • Practice advanced techniques only after the basics feel natural.

Once those habits become automatic, you can start experimenting with more advanced movement mechanics.

And remember that Apex is a live-service game. Movement mechanics can be adjusted over time, so older tutorials aren’t always reliable sources for current techniques. Keep an eye on current updates when learning mechanics such as tap-strafing or other advanced movement techniques.

The goal isn’t to become the flashiest player in the lobby.

It’s to become the player who is consistently in the right place, at the right time, with enough control to win the fight.

Related Apex Legends Articles

Apex Legends Beginner Guide

Apex Legends Movement Guide

Apex Legends Weapons Guide

Resident Evil Requiem: Best Weapons & Upgrades

Resident Evil Requiem: Best Weapons & Upgrades

Resident Evil Requiem gives Leon plenty of guns to play with, but that doesn’t mean you should buy every weapon you come across.

Credits are limited, inventory space matters, and some weapons are far more useful than others during a normal playthrough. The right upgrades can make a bigger difference than simply carrying a larger arsenal.

So if you’re wondering which weapons are actually worth buying and upgrading in Resident Evil Requiem, this guide cuts through the clutter.

Our short list: the Silencer 9 is the best all-purpose handgun, the 990-TAC is the shotgun I’d prioritize first, and the Classic 70 is the rifle I’d keep once it becomes available. For players working through New Game+ and bonus content, weapons such as the Clatter Carbine, Ghost Grudge, Mortal Edge, and RPG-7 become much more attractive.

If you want the complete weapon list and acquisition locations first, check our [Resident Evil Requiem: All Weapons & How to Unlock Them] guide.

How We Rank the Best Weapons

There isn’t one objectively “best” weapon in Resident Evil Requiem.

Our recommendations are based on damage, ammunition economy, upgrade potential, availability, inventory space, versatility, and how useful a weapon is during a normal playthrough.

First-run weapons are also judged differently from bonus weapons. A gun that is fantastic after you’ve finished the campaign isn’t necessarily the smartest purchase when you’re still scraping together Credits in East Raccoon City.

That’s the distinction that matters when you’re deciding what to spend your money on.

Quick rule: Don’t spend Credits trying to build a collection. Build a loadout you can actually afford to feed.


Best Weapons in Resident Evil Requiem at a Glance

WeaponBest ForRecommendation
Silencer 9Best all-purpose handgun★★★★★
990-TACBest early shotgun★★★★★
Classic 70Best rifle★★★★★
Stiri REVO3 A1Best general-purpose SMG★★★★☆
RequiemHeavy targets and specific enemies★★★★☆
Clatter CarbineBest post-game automatic weapon★★★★★
Ghost GrudgeHeavy single-target damage★★★★☆
Mortal EdgeBest bonus melee weapon★★★★☆
RPG-7Maximum firepower★★★★★

The important distinction is that not every weapon needs an upgrade path. Leon’s weapons can be upgraded at Supply Boxes, while Grace’s normal firearms do not have conventional weapon upgrades.


Best Handgun: Silencer 9

If you’re buying one handgun for Leon and want something that will remain useful for most of the game, make it the Silencer 9.

It costs 5,500 Credits at the Supply Box in East Raccoon City. Its built-in suppressor is useful, but the real appeal is the combination of precision, stability, rate of fire, and magazine capacity. It starts with a 17-round capacity and has a strong selection of upgrades.

Silencer 9 upgrades

The first upgrade tier includes:

  • Add-on Suppressor — increases Power
  • Aluminum Trigger — improves Rate of Fire
  • High-Capacity Mag. — increases ammunition capacity

The second tier improves those same components, while the third tier becomes available through Advanced Tuning.

What should you upgrade first?

For a normal playthrough, I’d prioritize:

  1. Add-on Suppressor
  2. High-Capacity Mag.
  3. Aluminum Trigger

The suppressor upgrade gives you more damage, while the larger magazine gives you more breathing room when several enemies are pushing you at once.

Don’t rush to buy every upgrade immediately. Credits are better spent on the weapons and defensive upgrades that actually change how you play.


Best Shotgun: 990-TAC

The 990-TAC is one of the easiest recommendations in the entire game.

It costs 7,000 Credits and is worth replacing the earlier MSBG 500 with once the Supply Box becomes available. The 990-TAC’s semi-automatic action gives it a much higher rate of fire than the pump-action alternatives, and its tight spread makes it useful beyond point-blank range.

990-TAC upgrades

Its upgrade tree includes:

  • Ceramic Coated Barrel — Power
  • Stock — Stability
  • Carbon Tube Extension — Reload Speed and capacity
  • Dot Sight — Precision

The first upgrade I’d buy is the Ceramic Coated Barrel. Damage matters most when you’re using the shotgun to stop an enemy before it reaches you.

After that, the Carbon Tube Extension is a sensible investment because the additional capacity and reload improvement make the weapon easier to use under pressure.

If you’re short on Credits, don’t feel obligated to max every stat. A couple of well-chosen upgrades will do more for a first playthrough than emptying your wallet into a single gun.


Best Rifle: Classic 70

This is one place where weapon rankings can get misleading.

The Marksman 1A looks tempting because you can find it in an East Raccoon City BSAA container, but the Classic 70 is the rifle I’d recommend keeping for a normal playthrough.

The Classic 70 has the highest damage per shot among the rifle options highlighted by current weapon comparisons. Its trade-off is obvious: the bolt-action operation and slower reload make follow-up shots considerably slower.

That isn’t necessarily a bad thing.

The Classic 70 is at its best when you’re using it deliberately—putting a powerful round into a dangerous target rather than trying to use it like an assault rifle.

Should you keep the Marksman 1A?

You can, but there’s little reason to build your entire loadout around it if you’re happy with the Classic 70.

The Marksman 1A can also be bought later if you don’t have room for it when you first discover it.


Best SMG: Stiri REVO3 A1

The Stiri REVO3 A1 is the practical choice when you want sustained automatic fire.

It costs 6,000 Credits and starts with a 30-round magazine. Its upgrade path can push that capacity to 40, 45, and eventually 50 rounds, giving it plenty of ammunition for encounters where precision shooting isn’t enough.

Its most useful upgrades are:

  • Long Flash Guard — Power
  • Folding Stock — Stability
  • High-Capacity Mag. — Magazine capacity
  • Dot Sight — Precision

I’d start with the Long Flash Guard, then take the High-Capacity Mag. if you’re regularly burning through ammunition.

The Stiri is not the weapon I’d tell a first-time player to dump every Credit into. The Silencer 9 and 990-TAC are more important early purchases.

But once your core loadout is established, the Stiri gives Leon a useful automatic option.


Requiem: Save It for the Targets That Deserve It

The Requiem is a powerful revolver that uses 12.7x55mm ammunition. It isn’t a weapon you want to treat like a conventional handgun.

Its base Power is already high, while its rate of fire, reload speed, and stability are deliberately poor.

That makes ammunition conservation important.

The Requiem is particularly useful against tougher enemies and certain special encounters. Current guides specifically recommend it for targets including the basement girl, East Wing Chunk, Zombie Chef, and Blister Heads.

If you upgrade it, the Ported Barrel is the straightforward damage choice. The Barrel Jacket is more useful if you want better handling and faster follow-up shots.

Don’t burn through Requiem ammunition just because you have the gun equipped.


Best Post-Game Weapon: Clatter Carbine

Once you’ve finished the story and start spending CP on bonus weapons, the Clatter Carbine becomes one of the most appealing purchases.

It’s an assault rifle available through the Special Content menu after your first playthrough. It costs 6,000 CP.

This is where the weapon economy changes.

During your first run, you’re balancing every Credit against ammunition, armor, inventory upgrades, and essential weapons. In post-game content, you have considerably more freedom to build a specialized loadout.

The Clatter Carbine is therefore an excellent candidate if you want an automatic weapon that can handle a wide range of encounters.


Best Heavy-Hitting Bonus Firearm: Ghost Grudge

The Ghost Grudge is a 12.7x55mm revolver available through Special Content for 1,000 CP after completing the game.

It’s a much more specialized purchase than the Silencer 9 or 990-TAC, but that’s exactly why it works well as a bonus weapon.

Use it when you want to put serious damage into a single target rather than conserve every round for routine enemies.

It’s particularly attractive once you’re doing repeat runs and have already established your normal loadout.


Best Bonus Melee Weapon: Mortal Edge

The Mortal Edge is worth keeping in mind for players who like to use melee aggressively.

You can obtain it during the story after the hatchet-wielding boss, and the weapon has higher damage and better durability than the standard Hatchet. It is also available as a 3,000 CP bonus weapon.

The biggest reason to use it isn’t simply damage.

Mortal Edge gives you a more forgiving melee option, making it particularly attractive for players who are comfortable parrying and using melee to conserve ammunition.

If you’re trying to play efficiently, that’s a meaningful advantage.


Best Bonus Weapon for Grace

Grace’s weapons work differently from Leon’s.

Her standard firearms cannot be upgraded at Supply Boxes, so you shouldn’t approach her equipment the same way you approach Leon’s guns.

For bonus content, however, Grace gets two notable options:

  • Freya’s Needle — 4,000 CP
  • Kotetsu — 5,000 CP

Both are unlocked through Special Content after completing a first playthrough.

Freya’s Needle gives Grace a full-auto pistol, while Kotetsu is an unbreakable knife.

If you prefer conserving ammunition and already enjoy Grace’s melee-heavy approach, Kotetsu is the more interesting utility purchase. If you’d rather have a firearm that changes her combat options, Freya’s Needle is the obvious choice.


R.I.P. Knife: An Insanity-Difficulty Exception

The R.I.P. Knife deserves its own category because it isn’t simply another damage upgrade.

On Insanity difficulty, it can be purchased in the Care Center’s Parlor for Antique Coins and replaces one of the standard Parlor rewards. Its special purpose is producing more Blood when used, making it particularly useful for players learning how to manage Grace’s resources on the harder difficulty.

The Parlor’s normal upgrade selection also changes on Insanity, so don’t follow a Casual/Standard shopping list blindly.

If you’re preparing specifically for Insanity, our [Resident Evil Requiem: Complete Puzzle Solutions] guide can also help with the Blood Analyzer and related progression.


What Should You Buy First?

This is where weapon guides usually become less useful than they should be.

Knowing that the 990-TAC is good doesn’t help much if you’re sitting on 8,000 Credits and wondering whether to buy the shotgun, upgrade your case, or purchase armor.

For a first Leon playthrough, I’d use this order:

1. Case Upgrade

The Case Upgrade costs 4,000 Credits and increases Leon’s inventory from 8×12 to 8×13. It’s a one-time purchase and makes every subsequent section easier to manage.

2. 990-TAC

At 7,000 Credits, this is the first weapon purchase I’d prioritize.

3. Silencer 9

At 5,500 Credits, the Silencer 9 gives you a dependable handgun for the bulk of Leon’s encounters.

4. Body Armor

Body Armor Level 1 costs 8,000 Credits, while Level 2 costs another 15,000 Credits on the normal difficulties.

Don’t underestimate this purchase. Surviving a hit is sometimes worth more than squeezing another fraction of damage out of a weapon.

5. Weapon Upgrades

Once your basic equipment is covered, start putting Credits into the weapons you actually use.

This priority broadly matches current Supply Box recommendations, which put the Case Upgrade, 990-TAC, Silencer 9, Body Armor, and then weapon upgrades near the top of the shopping list.


Credits vs. CP: Don’t Mix Them Up

Resident Evil Requiem uses two currencies for different purposes.

Credits are your normal gameplay currency. You earn them during Leon’s sections and spend them at Supply Boxes on weapons, ammunition, armor, inventory upgrades, and weapon upgrades.

CP (Challenge Points) are used for bonus content.

That means you shouldn’t look at a 6,000-CP bonus weapon and think it’s competing directly with your 6,000-Credit Stiri purchase.

They’re two separate progression economies.

Save Credits for surviving the current run. Spend CP on the toys you want for subsequent runs.


Advanced Tuning and the 25 Mr. Raccoons

If you’re serious about maximizing Leon’s weapons, there’s another reason to hunt down the game’s collectibles.

Destroying all 25 Mr. Raccoon Memoriams unlocks the Advanced Tuning reward, allowing compatible Leon weapons to access their third upgrade tier.

That’s a substantial late-game investment, particularly if you’re planning multiple runs.

If you haven’t collected them all yet, our [Resident Evil Requiem: All Mr. Raccoon Locations] guide has the complete list.

And because Requiem has no traditional chapter select, it’s worth paying attention to collectible opportunities during your normal exploration rather than assuming you can clean everything up later.


Best First-Playthrough Loadout

If you want a straightforward Leon loadout without wasting Credits, I’d build around:

Handgun: Silencer 9
Shotgun: 990-TAC
Rifle: Classic 70
Heavy weapon: Requiem
Automatic weapon: Stiri REVO3 A1
Melee: Mortal Edge when available
Defense: Body Armor

You don’t need to carry every weapon.

Inventory space is valuable, and carrying guns you rarely use simply because you found them isn’t automatically an advantage. Leon can sell weapons at Supply Boxes and buy them again later if necessary, so don’t be afraid to clean up your inventory.

The better approach is to carry weapons that cover different jobs.

The Silencer 9 handles routine enemies. The 990-TAC handles close-range emergencies. The Classic 70 gives you a powerful precision option. The Requiem is there when something needs to stop being your problem immediately.

That’s enough firepower for most situations.


Best New Game+ Spending Order

New Game+ is where the bonus weapons start making much more sense.

If you’ve already finished the campaign and have CP available, I’d prioritize:

  1. Clatter Carbine
  2. Ghost Grudge
  3. Mortal Edge
  4. Kotetsu
  5. Freya’s Needle
  6. Matilda IMP
  7. Redemption
  8. RPG-7

The RPG-7 is the obvious choice if you simply want maximum destructive power, but its high CP cost makes it more of a luxury purchase than a first bonus weapon. The RPG-7 costs 15,000 CP, with its infinite-ammo option requiring another major CP investment.

Likewise, Redemption is powerful but highly specialized. It fires a single rifle round and must be reloaded after every shot, so its damage comes with a very obvious handling cost.


Which Upgrades Are Actually Worth Buying?

You don’t need to max every weapon.

For most players, upgrade priority should look something like this:

Handgun

Prioritize Power and Magazine Capacity.

The Silencer 9 already has strong handling, so increasing its damage and giving yourself more shots before reloading are the most noticeable improvements.

Shotgun

Prioritize Power, followed by Reload Speed/Capacity.

The 990-TAC is already fast-firing. Making each shell hit harder is usually more valuable than obsessing over every handling stat.

SMG

Prioritize Power and Magazine Capacity.

Automatic weapons chew through ammunition quickly. A larger magazine reduces the number of interruptions during hectic fights.

Requiem

Prioritize Power if you use it as a specialist weapon.

If you find the recoil and slow handling frustrating, the Barrel Jacket or Weighted Grip can make it easier to control.

Bonus Weapons

Don’t automatically spend CP and then immediately dump Credits into every upgrade available.

Try the weapon first.

If it changes how you play and solves a problem your normal loadout has, invest in it. If it simply duplicates a weapon you already like, save the money.


Final Verdict: Which Weapons Should You Actually Use?

For a standard first playthrough, you don’t need the fanciest arsenal in the game.

The Silencer 9, 990-TAC, and Classic 70 form the core of the Leon loadout I’d recommend. Add the Stiri REVO3 A1 if you want sustained automatic fire, and keep the Requiem for enemies that justify its ammunition.

Once you’ve finished the campaign, the equation changes. Clatter Carbine becomes a strong all-round bonus choice, Ghost Grudge gives you serious single-target firepower, and Mortal Edge is an excellent melee upgrade.

The RPG-7 is there when subtlety has officially left the building.

For Grace, don’t waste time looking for conventional weapon upgrades—her standard firearms don’t use Leon’s Supply Box upgrade system. Focus instead on her unique tools, Parlor upgrades, and the bonus weapons unlocked through Special Content.

Most importantly, spend your Credits with a purpose.

A fully upgraded collection looks impressive. A small loadout that you can keep supplied, protect with armor, and use confidently is what actually gets you through Requiem.


Frequently Asked Questions

What is the best handgun in Resident Evil Requiem?

The Silencer 9 is our pick for the best all-purpose handgun. It combines good damage, precision, rate of fire, and a large magazine, and it has a useful upgrade tree.

What is the best shotgun in Resident Evil Requiem?

The 990-TAC is our recommended shotgun. Its semi-automatic action gives it an excellent rate of fire, while its upgrade path can make its spread and damage even more effective.

What is the best rifle?

For a normal playthrough, we’d choose the Classic 70. It has excellent damage per shot but sacrifices firing and reload speed.

Can Grace upgrade her weapons?

No. Grace’s standard weapons don’t have Leon-style weapon upgrades at Supply Boxes.

Is the Stiri REVO3 A1 worth buying?

Yes, particularly if you want an automatic weapon. Its 30-round base magazine can be expanded through upgrades, making it useful when sustained fire matters.

Is the RPG-7 worth buying?

It’s worth it for players who want maximum firepower in subsequent runs, but at 15,000 CP, it isn’t the first bonus weapon I’d recommend buying. Infinite RPG ammunition is a separate CP purchase.

What should I buy first in Leon’s campaign?

Our priority is Case Upgrade → 990-TAC → Silencer 9 → Body Armor → weapon upgrades. This keeps inventory and survivability ahead of unnecessary weapon spending.


Sources & Updates

Last reviewed: September 2026

This guide was fact-checked against current Resident Evil Requiem weapon, upgrade, collectible, and Supply Box information. Particular attention was given to weapon costs, upgrade availability, bonus weapons, the 25 Mr. Raccoon Advanced Tuning unlock, and Insanity-specific equipment changes.

Because weapon rankings are partly subjective, this guide offers editorial recommendations rather than claims of an objectively superior weapon in every situation.

For related Requiem resources, see our All Weapons & How to Unlock Them, All Mr. Raccoon Locations, Complete Puzzle Solutions, All Safe Codes & Combinations, and Complete Walkthrough guides.

Resident Evil Requiem: All Endings & How to Unlock Them

Resident Evil Requiem: All Endings & How to Unlock Them

Resident Evil Requiem has two endings, and the difference between them comes down to one decision near the end of the game: whether Grace chooses to Release Elpis or Destroy Elpis.

You don’t need to make a series of hidden choices or complete a secret set of objectives to unlock either ending. The game gives you the decision directly at the end of the ARK sequence, and your choice determines how the story concludes.

If you’re here because you’re staring at the final choice and don’t want to make the wrong call, here’s the short version:

Choose Release Elpis if you want the full ending, the final boss, and the conclusion generally treated as the game’s true or intended route.

Choose Destroy Elpis if you want to see the alternate, much darker ending.

The good news is that you don’t have to replay the entire campaign to experience both.

Spoiler warning: This guide contains major spoilers for the ending of Resident Evil Requiem, including the fate of Leon, Grace, Elpis, Zeno, and the final boss.


How Many Endings Does Resident Evil Requiem Have?

Resident Evil Requiem has two main endings:

  1. Release Elpis — Hope Ending
  2. Destroy Elpis — Destruction Ending

The endings are determined by a single choice at the ARK’s central terminal. Your previous choices, collectibles, exploration, and general playstyle don’t determine which ending you receive.

That makes this one of those rare Resident Evil decisions where you don’t need to worry about secretly ruining your ending hours earlier.

Once you reach the final choice, the game puts the decision in your hands.


How to Unlock Both Endings

The easiest way to see both endings is to use the system-generated save at the final decision.

When you reach the Elpis terminal, make your choice and finish the resulting ending.

Afterward, the game gives you the opportunity to return to the point immediately before the decision so you can experience the other outcome. Multiple current guides confirm that you can see both endings without replaying the entire campaign.

Best way to see both endings

If you want to experience everything with minimal repetition:

1. Reach the final Elpis decision.

2. Choose Destroy Elpis first.

3. Watch the alternate ending.

4. Use the reload option to return to the decision.

5. Choose Release Elpis.

6. Continue through the final boss and complete the full ending.

There’s a practical reason to do it in this order: the Destroy route ends much sooner, while Release Elpis takes you into the game’s actual final boss sequence.

If you’ve already chosen Release first, don’t panic. You can still experience the alternate ending by loading a suitable save from before the decision.


Ending 1: Release Elpis

How to Unlock the Release Elpis Ending

At the final terminal, choose:

Release Elpis

This is the ending most commonly regarded as the true, good, or intended ending of Resident Evil Requiem.

I would describe it as the game’s true/complete ending rather than claim that Capcom has formally labeled it canon. The distinction matters: the route clearly provides the fuller conclusion, but “officially confirmed canon” is a stronger claim than the available evidence supports.


What Happens When You Release Elpis?

The choice initially appears to be exactly what Grace fears.

Throughout the game, Elpis is treated as an extremely dangerous biological weapon. Grace therefore has every reason to hesitate before releasing it.

But the final revelation changes everything.

Elpis is an antiviral cure.

Rather than being the weapon that many characters believed it to be, Elpis can be used to cure viral infections.

That discovery completely changes the stakes of Grace’s decision.

Leon has been suffering from his infection throughout the story, and releasing Elpis gives Grace a chance to save him.

It also changes the fate of other infected characters and resolves several of the major questions surrounding the ARK and its research.


Leon’s Fate in the Release Ending

Leon survives.

Grace is able to use Elpis to cure Leon’s infection, allowing him to continue the fight instead of dying from the condition that has been consuming him.

But the story isn’t finished.

Releasing Elpis leads directly into the game’s true final boss encounter.

And that’s where things get considerably uglier.


Victor Gideon Becomes the Final Boss

After Elpis is released, the story leads into the final confrontation with Victor Gideon.

This fight is exclusive to the Release Elpis route.

Gideon undergoes a final mutation, turning the end of the campaign into a full boss battle rather than simply ending after the Elpis decision. Current guides describe his later form as a major, Nemesis-like transformation.

This is one of the biggest reasons the Release route feels like the game’s intended conclusion.

Choosing Destroy skips this entire confrontation.


What Happens After the Final Boss?

After Leon defeats Gideon, the story receives the fuller resolution that the Destroy route lacks.

Grace and Leon survive, the immediate threat is dealt with, and the campaign continues into additional ending material.

The Release route also provides post-credits scenes that expand on Grace’s future and the wider Resident Evil story.

You’ll also receive the Hope and Requiem trophy/achievement for completing this route, and current guides report that it unlocks Grace’s Report, which provides additional story and series-lore information.

So if you’re only planning to finish Resident Evil Requiem once, this is the route I’d recommend.


Release Elpis Ending: Quick Summary

Choice: Release Elpis

Result:

  • Elpis is revealed to be an antiviral cure.
  • Leon can be cured.
  • The story continues into the true final boss.
  • Victor Gideon becomes the final major threat.
  • Leon and Grace survive the main conclusion.
  • Additional ending material plays after the credits.
  • The Hope and Requiem trophy/achievement is awarded.
  • Grace’s Report becomes available.

Recommended for a first playthrough: Yes.


Ending 2: Destroy Elpis

How to Unlock the Destroy Elpis Ending

At the final terminal, choose:

Destroy Elpis

This triggers the alternate ending.

It’s the considerably darker outcome, and the consequences arrive almost immediately.


What Happens When You Destroy Elpis?

Grace chooses to destroy Elpis rather than risk releasing what she believes could be a catastrophic biological weapon.

The ARK facility begins its self-destruct sequence.

Leon and Grace are caught in the collapsing facility, and Leon makes the decision to help Grace escape.

That comes at a terrible cost.

Zeno confronts Leon.

Despite Leon’s attempt to protect Grace, Zeno ultimately kills him. Grace escapes while the ARK collapses around them.

And that’s essentially where the ending closes.


Leon Dies in the Destroy Ending

This is the major difference between the two routes.

Release Elpis: Leon survives.

Destroy Elpis: Leon dies.

The scene is deliberately brutal because Leon’s final act is to make sure Grace gets away.

It’s also the point where the player’s decision earlier in the sequence becomes painfully clear: Grace has destroyed the one thing that could have cured Leon.

The alternate ending therefore isn’t simply a different cutscene. It changes the outcome of the characters’ stories in a major way.


What Happens to Elpis?

Elpis is destroyed along with the ARK facility.

That means the antiviral cure is lost.

The larger mysteries surrounding Elpis also remain unresolved in this ending, which is another reason the Destroy route feels deliberately incomplete compared with the Release route.

Rather than giving you another boss battle and extended resolution, the game ends shortly after Leon’s death.


Is the Destroy Elpis Ending the Bad Ending?

Functionally, yes.

It’s the game’s alternate/bad ending.

The game itself doesn’t simply punish you with a small variation in the final cutscene. Choosing Destroy removes the entire final boss sequence and leaves several major story threads unresolved.

There is also no equivalent trophy/achievement for the Destroy route.

That doesn’t mean the choice is meaningless.

Actually, it’s worth seeing once.

The Destroy ending gives you a much harsher look at what happens when Grace chooses caution over hope, and it makes the consequences of the final decision considerably clearer.


Destroy Elpis Ending: Quick Summary

Choice: Destroy Elpis

Result:

  • The ARK begins to self-destruct.
  • Elpis is destroyed.
  • Leon stays behind to protect Grace.
  • Zeno kills Leon.
  • Grace escapes the collapsing facility.
  • The story ends without the Victor Gideon final boss.
  • Several major story threads remain unresolved.
  • You don’t receive the Hope and Requiem trophy/achievement.

Recommended for a first playthrough: No, unless you specifically want to see the alternate ending.


Release vs. Destroy Elpis

Here’s the quick comparison if you’re standing at the terminal right now:

ChoiceEndingLeonFinal BossPost-CreditsRecommendation
Release ElpisHope / true endingSurvivesVictor GideonYesBest first choice
Destroy ElpisDestruction / alternate endingDiesNoneNo full equivalentSee it afterward

The Release route is substantially longer and provides the fuller resolution. Destroy is essentially the tragic alternate timeline.


Which Ending Should You Choose?

Choose Release Elpis

If you only intend to play through Resident Evil Requiem once, choose:

Release Elpis.

It’s the route that gives you:

  • The full ending
  • The final boss
  • Leon’s survival
  • The more complete resolution
  • Post-credits material
  • The Hope and Requiem trophy/achievement
  • Grace’s Report

It’s also the ending most sources treat as the game’s intended or canonical path. Again, I’d use “commonly treated as the true/canonical ending” rather than claiming Capcom has formally confirmed that designation.


Can You Get Both Endings in One Playthrough?

Yes.

This is one of the nicest things about Requiem’s ending system.

You don’t need to play through the entire campaign twice.

The game allows you to return to the final decision after completing an ending, letting you choose the other option.

The most efficient order

I’d recommend:

Destroy Elpis → Reload → Release Elpis

Why?

Because Destroy ends quickly.

Release sends you into the final boss and the longer ending sequence, so finishing with Release means you end your run on the game’s complete conclusion.

If you want extra insurance, keep a manual save before the final choice as well.


Does Anything Earlier in the Game Affect the Ending?

No major hidden morality system determines the ending.

The ending comes down to the final Release Elpis / Destroy Elpis decision.

You don’t need a particular number of Mr. Raccoons, a specific weapon, a certain difficulty, or a particular set of dialogue choices to unlock the Release route.

That also means you don’t need to restart your playthrough because you missed a collectible.

If you’re interested in 100% completion, however, you should still keep an eye on the game’s missable content because the ending choice and collectible completion are separate concerns.

For that, see our Resident Evil Requiem: All Mr. Raccoon Locations guide and Resident Evil Requiem: Complete Walkthrough.


Resident Evil Requiem Ending FAQs

Is Release Elpis the true ending?

Yes, in practical terms. Release Elpis is widely treated as the game’s true, good, or intended ending because it contains the full final boss, additional resolution, and post-credits material.

However, I would avoid saying that Capcom has officially confirmed it as canon unless an explicit developer statement establishes that.


Does Leon die in Resident Evil Requiem?

Only in the Destroy Elpis ending.

If you Release Elpis, Leon survives and continues into the final confrontation with Victor Gideon. If you Destroy Elpis, Zeno kills Leon during the collapsing ARK sequence.


What is Elpis in Resident Evil Requiem?

Elpis is ultimately revealed to be an antiviral cure, rather than the biological weapon Grace initially believes it to be.

That revelation is the central reason the final choice matters.


Can you fight the final boss if you destroy Elpis?

No.

The Victor Gideon final boss sequence follows the Release Elpis choice. Destroying Elpis triggers the alternate ending instead.


Can you see both endings without replaying the whole game?

Yes.

After completing one ending, the game provides a way to return to the final decision and experience the other outcome.


Is there a trophy for both endings?

The Hope and Requiem trophy/achievement is associated with the Release Elpis ending. Current guides do not list an equivalent trophy for the Destroy ending.


Resident Evil Requiem: Which Ending Is Better?

If you’re asking purely from a story perspective, Release Elpis is the clear choice.

Destroying Elpis gives you an interesting alternate outcome, but it’s intentionally bleak. Leon dies, the cure is lost, the ARK is destroyed, and the story stops before the full final confrontation.

Release Elpis, meanwhile, gives the campaign room to actually finish.

You get the Victor Gideon boss fight, Leon’s survival, additional character resolution, and post-credits material.

More importantly, the choice creates a satisfying reversal of what Grace believes Elpis represents. What looks like another Umbrella-era nightmare turns out to be the thing capable of saving the people caught in it.

That’s a much stronger ending for a first playthrough.


Final Verdict

There are two Resident Evil Requiem endings: Release Elpis and Destroy Elpis.

If you’re playing through the game for the first time, Release Elpis is the route I’d recommend.

It gives you the complete conclusion, the final boss, the additional ending material, and the outcome most commonly treated as the game’s true or intended path.

But don’t skip Destroy Elpis entirely.

It’s worth seeing once—especially because the game makes it unusually easy to return to the final decision and experience both outcomes without replaying the entire campaign.

So, if you’re standing at that terminal right now:

Destroy first if you want to see everything efficiently.

Reload.

Then Release Elpis and finish the story properly.


Sources & Updates

Last reviewed: September 2026

This guide was fact-checked against multiple current Resident Evil Requiem ending references, including Game8, PC Gamer, GameSpot, GamesRadar+, Prima Games, Kotaku, and Gamer Guides. The core ending structure is consistent across these sources: Release Elpis leads to the longer final route and Victor Gideon encounter, while Destroy Elpis produces the alternate ending in which Leon dies.

Editorial note: Loot Strategist describes Release Elpis as the true/intended ending based on the game’s structure and available evidence. We avoid claiming that Capcom has formally declared it canon unless an official source explicitly confirms that designation.

Related Loot Strategist guides:

Resident Evil Requiem: Complete Walkthrough

Resident Evil Requiem: Complete Walkthrough

Resident Evil Requiem takes Grace Ashcroft and Leon S. Kennedy through Wrenwood, the Rhodes Hill Care Center, Raccoon City, and the ARK. The campaign is largely linear, but several areas contain optional rooms, collectibles, weapons, puzzles, and side objectives that become unavailable after you move too far forward. There is no traditional Chapter Select or free-roam cleanup after the story, so keeping manual saves at major transitions is worthwhile.

This walkthrough follows the story in progression order. It focuses on the things that can actually stop your run: key items, routes, puzzles, major fights, character switches, optional opportunities worth taking, and points of no return.

For the detailed item-level guides, use the dedicated Loot Strategist articles linked throughout the walkthrough.

Spoiler warning: This is a complete story walkthrough. It includes major locations, bosses, story decisions, weapons, puzzles, and the endings.

Resident Evil Requiem Walkthrough: Story Order

AreaMain Character(s)Major Objectives
1. WrenwoodGrace → LeonInvestigate the hotel and escape
2. Rhodes Hill – Care CenterGrace → Leon → GraceEscape, obtain wristbands, solve Quartz puzzles
3. Care Center BasementGraceReach Emily and progress through the basement
4. Care Center CourtyardGrace → LeonVIP Suite, underground facility, Blister Borne
5. Water Treatment PlantGraceRestore power and escape
6. East Raccoon CityLeonReach Central Camp and progress toward the city center
7. Raccoon City CenterLeonReach the R.P.D. and solve its optional puzzles
8. OrphanageLeonSurvive the stealth section and reach the lab
9. Side StreetLeonEscape the R.P.D., fight the Tyrant, reach the ARK
10. ARKLeon → Grace → LeonReach Elpis, choose its fate, defeat the final boss

This is the practical area structure used by current full walkthroughs. The broader game is divided into four major regions—Wrenwood, Rhodes Hill, Raccoon City, and ARK—with these ten playable sections nested inside them.


Before You Start

Keep Manual Saves

Resident Evil Requiem has no traditional Chapter Select and no post-game free roam. Some areas close permanently once the story advances. Current 100% walkthroughs recommend using the game’s manual-save slots to preserve access to earlier sections.

For a first playthrough, make a manual save:

  • Before leaving a major region
  • Before entering an obvious boss sequence
  • Before a major character switch
  • Before progressing past a section with collectibles or optional rooms

This is particularly useful for the Care Center and R.P.D.

Don’t Treat This as a Collectible List

This article is your story progression guide.

The complete Loot Strategist guides for Mr. Raccoons, safe combinations, weapons, and puzzles should be used alongside it rather than repeating every individual item here.

That keeps this page useful to someone who is actually trying to finish the story while giving the specialist pages room to cover their own search intent.


1. Wrenwood

Playable characters: Grace, then Leon

Wrenwood is the game’s opening area and introduces Grace’s investigation before handing control to Leon. Current walkthroughs divide the section into Grace’s hotel investigation and Leon’s pursuit sequence.

Investigate the Crime Scene

After the opening scenes, Grace begins on the streets of Wrenwood.

Before moving on, inspect the City Map nearby and check the Investigation Report already in your inventory. The Investigation Report needs to be examined from the Files/Items menu to register it properly.

Continue down the street and follow the route into the alley.

The story will lead you toward the Wrenwood Hotel.


Enter the Wrenwood Hotel

The main entrance isn’t available, so take the route around the building and enter through the rear entrance.

Continue through the hotel until you reach the Lounge & Bar.

In the dark area, inspect the photograph to obtain the Old Key.

Use the Old Key to continue deeper into the hotel.


Find the Wire Cutters

Continue through the hotel and reach the upper floors.

You’ll eventually enter the Recreation Room.

The Wire Cutters are on the pool table.

Take them and use them to cut through the blocked route.

Continue toward Room 204 and inspect the photographs there to trigger the next story sequence.


Escape the Hotel

After the investigation sequence, Grace returns to the present.

Continue through the hotel and follow the story to the painting and journal interaction.

This eventually gives you the Emergency Exit Key.

Take it upstairs and use it on the emergency exit.

After the escape sequence, control switches to Leon.


Leon: Pursue Victor

Leon takes over in Wrenwood.

Follow the main route through the streets and continue pursuing Victor.

There is little reason to wander here. The path is deliberately linear, so concentrate on keeping the chase moving until the game transitions you toward Rhodes Hill.


2. Rhodes Hill — Care Center

Playable characters: Grace → Leon → Grace

The Rhodes Hill Care Center is where Requiem’s exploration systems become much more demanding. You’ll return to the building with different characters and different access levels, so don’t assume that a room you couldn’t enter earlier is permanently inaccessible.

Current walkthroughs treat the Care Center as a major multi-stage section involving the West Wing, East Wing, Parlor, attic, and numerous optional areas.


Grace: Escape Room 203

Grace begins in Room 203.

Read the Progress Notes on the small table, then leave the room.

Follow the corridor until you reach the red light.

Turn on the light at the end of the hallway.

This establishes one of the basic rules of Grace’s Care Center sections: the darkness is not simply an atmosphere problem. Certain areas are inaccessible while they are unlit, and the Girl’s movement is influenced by the lighting system.


Get the Cherub Key

Continue to the end of the illuminated hallway.

The Cherub Key is in a drawer beside the locked gate and fuse box.

Take it back to the earlier door and use it to enter Room 201, your first save-room area.

Take the Lighter inside.

You’ll use it to access the next section.


Find the Screwdriver and Second Fuse

Use the Lighter to continue through the Care Center and reach Room 202.

Follow the clues toward the Nurses’ Station.

Use the cart to reach the Screwdriver.

Return to Room 201 and use the Screwdriver on the fuse box.

The entrance gate requires two fuses. One is already installed; the second is obtained here.

Take the second Fuse and return to the gate.

Once both fuses are in place, the route opens.


Leon: Return to the Care Center

The story shifts to Leon.

Follow the main route until you reach the Care Center interior and encounter the chainsaw-wielding enemy.

Defeat the enemy and use the chainsaw to cut through the blocked doorway.

Missable Mr. Raccoon

Immediately after cutting through the door, check the fireplace in the next room.

This is Mr. Raccoon #1.

For the full 25-statue route, use our Resident Evil Requiem: All Mr. Raccoon Locations guide.


Grace: West Wing

Control returns to Grace.

Your next objective is to obtain access to the rest of the Care Center and eventually reach the East Wing.

Move through the West Wing, checking the optional rooms when you have the appropriate access item.

Dining Room

You’ll find the B934 handgun here.

The Dining Room also connects to the Filing Room, where additional Grace equipment can be found.

Filing Room

Check the room thoroughly for the Makeshift Knife and other resources.

The Hunting Knife can also be obtained from the relevant enemy encounter near this section.


Chairman’s Office — Moon Quartz

Continue upstairs to the Chairman’s Office.

This is the first major Quartz puzzle.

Find the Pencil and use it on the notebook to reveal the celestial clue.

Solution

Moon → Sun → Star → Moon

You receive the Moon Quartz.

For the complete puzzle explanation, including how the clue works, see our Resident Evil Requiem: Complete Puzzle Solutions guide.


Parlor and East Wing Access

Continue toward the Parlor and use the available progression item to enter.

The Parlor contains upgrades and important access progression.

This is also one of your last convenient opportunities to spend the Antique Coins you’ve collected before the story moves deeper into the Care Center. Current walkthroughs note that additional upgrades are available here before the Courtyard section.

Once you obtain the East Wing Keycard, return to Central Hall.

Use the Moon Quartz in the central door and enter the East Wing.


3. Rhodes Hill — Care Center East Wing and Basement

Character: Grace

The East Wing is where Grace’s crafting, Blood Analyzer, wristband, and organ puzzles start overlapping.


Blood Lab

Enter the Blood Lab and collect the Blood Collector.

You’ll also gain access to the first Blood Analyzer sample.

Denatured Blood

Use the Denatured specimen in the Blood Analyzer.

Solution:
Left-middle node

The analysis unlocks additional crafting options. The exact analyzer solutions for every specimen are covered in the dedicated Complete Puzzle Solutions article.


Examination Room

Continue toward the Examination Room.

This room is important because it becomes the location of the Organless Corpse later in the sequence.

Collect the necessary supplies and continue toward the East Wing progression route.


Lead Researcher’s Office — Sun Quartz

Reach the Lead Researcher’s Office.

The second Quartz box is padlocked.

Obtain the Corrosive from the Conference Room and use it on the lock.

Inspect the photographs in the office for the celestial clue.

Solution

Star → Sun → Moon → Sun

This gives you the Sun Quartz.


Organ Transport Box

Continue through the West Wing/garage route until you reach the Organ Transport Box.

Inspect it from your inventory and rotate it to expose the control panel.

Solution

HAND → Middle → 5 → 2 → AUTO

The box gives you the Artificial Lungs.

For the full explanation, see our Resident Evil Requiem: Complete Puzzle Solutions guide.


Find the Artificial Heart

The other organ is obtained through the Cold Storage route.

You’ll need the Wrench to open the relevant mechanism and reach the Artificial Heart. Current walkthrough references place the Wrench and Cold Storage route between the wristband progression and the Organless Corpse sequence.

Once you have both organs, return to the Examination Room.


Organless Corpse

Insert:

Artificial Lungs → Artificial Heart

The corpse wakes up.

Defeat the resulting enemy encounter.

The reward is the Level 2 ID Wristband, which opens the next section of the East Wing.


Isolation Ward and Emily

Use the Level 2 Wristband to open the next restricted area.

Continue through the Isolation Ward and collect the necessary progression items.

Eventually you’ll obtain the Level 3 ID Wristband.

Use it to reach Emily.

Optional Mr. Raccoon

The Medication Room contains one of the Care Center’s easy-to-miss statues.

Check the correct empty cell rather than Emily’s occupied cell.

For the exact location, use the All Mr. Raccoon Locations guide.


Security Manager’s Office

Once you have access to Emily, take her to the Security Manager’s Office.

The puzzle box here doesn’t use a symbol code.

Solution

Bring Emily to the box.

She opens it automatically.

The apparent Braille puzzle is therefore a story interaction rather than a conventional combination puzzle.


4. Rhodes Hill — Care Center Courtyard

Playable characters: Grace → Leon

The Courtyard begins after you’ve completed the major Care Center progression.

Follow the path toward the houses and VIP Suite.

Current walkthroughs treat this as a separate Care Center section because it contains the final upper-area exploration before the Water Treatment Plant.


VIP Suite

The VIP Suite contains two objects that are easy to confuse.

Double Helix Puzzle

Inspect the wine bottle near the entrance.

Rotate it until you find the hidden Double Helix Model.

Take the Helix to the lectern and insert it.

That’s the actual progression puzzle.

Hourglass

The hourglass is a separate clue.

It isn’t needed to solve the Double Helix mechanism, but it matters to the Final Puzzle later in the game.

Inspect it and manipulate it to reveal the hidden clue.

For the full puzzle chain, see the Complete Puzzle Solutions guide.


Underground Facility

Continue into the underground research area.

Search the Private Lab and surrounding rooms before committing to the next major progression sequence.

This is a good place to check your inventory because you’ll soon move into another forced transition.


Blister Borne

Leon takes over for the next major combat sequence.

The Blister Borne has visible vulnerable growths that should be prioritized rather than simply firing at its entire body.

Keep moving around the arena and use the available terrain to maintain distance.

Once the encounter ends, the story moves to the Water Treatment Plant.


5. Water Treatment Plant

Character: Grace

The Water Treatment Plant is one of the most stressful Grace sections because the Girl becomes an active threat while you’re restoring power.

Current walkthroughs identify the Roof Hatch Manual and three separate power objectives as the key progression points.


Get to the Surface

Start in the Storage Bay.

Read the Roof Hatch Manual beside the typewriter.

Before moving deeper, make sure the Requiem revolver is available in Grace’s inventory if you want to use it for the upcoming encounter. Current walkthroughs specifically flag this weapon opportunity during the Water Treatment Plant sequence.


Restore the Three Power Systems

The objective is to restore the plant’s power so you can reach the roof hatch.

You will move through the plant’s storage, treatment, and control areas while the Girl attempts to intercept you.

First Power System

Reach the first control and activate it.

Use nearby lighting to temporarily create safer space when necessary.

Second Power System

Continue toward the Chemical Treatment area.

The interaction takes time, so be ready to retreat if the Girl closes the distance.

Third Power System

The final control requires a Crank Lever.

Search the Filing Room for it, then return to the Control Room and install it.

Once all three systems are active, return to the roof-hatch route.


Escape the Water Treatment Plant

Reach the roof controls and activate the hatch.

This triggers the final confrontation in the section.

Once Grace survives the encounter, the Rhodes Hill portion of the story ends and Leon returns for the transition to Raccoon City.


6. Raccoon City — East Raccoon City

Character: Leon

East Raccoon City is the game’s biggest exploration-heavy urban area.

Unlike the Care Center, you have several connected routes and optional locations here, so this is where keeping track of your key items matters most. Current walkthroughs route Leon through Café Oasis, the Applegate Hotel, Central Camp, the Underground Parking Garage, Cedarbrook Apartments, the Gas Station, Ridgewood Station, and Willis Tower.


Café Oasis

From Leon’s starting position, continue to the first major intersection.

Turn right and enter Café Oasis.

The Mr. Raccoon is behind the counter.

This is a quick optional pickup, so grab it before moving into the Applegate Hotel.


Applegate Hotel

Follow the story route through the hotel.

Progress through the building until you reach the sequence involving the Giant Spider/Titan Spinner.

During the encounter, keep moving around the arena and look for the vulnerable rear section.

After defeating it, continue into the underground route.


Central Camp

Proceed through the underground section toward Central Camp.

You’ll encounter the incomplete bomb objective and begin working with the area’s generators and fuel systems.

From this point, several optional routes become available.


Underground Parking Garage

Explore the Garage before committing to the next major story transition.

This area contains useful supplies and at least one optional weapon opportunity.

For weapon locations, see our Resident Evil Requiem: All Weapons & How to Unlock Them guide.

You can also collect the Garage’s Mr. Raccoon here.


Cedarbrook Apartments

Continue to the Apartments using the appropriate key.

Progress until you obtain the Crank.

Use it to open the balcony route and reach the upper section.

Check the refrigerator for another Mr. Raccoon.

The Apartments route then connects back into the wider East Raccoon City map.


Gas Station

Use the available ladder route to reach the Gas Station.

Search the building for supplies and the hidden Mr. Raccoon before leaving.


Ridgewood Station

Power the relevant generator and follow the newly opened underground route.

Continue until you reach the train section.

Check the train cars for the Mr. Raccoon before moving forward.


Willis Tower

Return toward Central Camp and use the restored power route to reach the Logistics Warehouse.

From the roof, use the zipline to reach Willis Tower.

Search the upper rooms before continuing.

This area contains another Mr. Raccoon and important story progression.


7. Raccoon City Center

Character: Leon

The story now moves into Raccoon City Center and the R.P.D.

After the motorcycle sequence, you’re back on foot.

Before entering the main route, look around the ruined street.

Mr. Raccoon

The next statue is in the rubble beside the destroyed tanker.

Grab it before entering the police station.


Enter the R.P.D.

Follow the main route into the police station.

The R.P.D. has several optional puzzles and collectibles, but the progression path is straightforward:

Main Hall → Operations Room → West Office / S.T.A.R.S. Office → Library → Main Hall shutters

Current walkthroughs recommend finishing the optional R.P.D. objectives before using the Mechanic Jack to open the final route to the Orphanage.


Operations Room

Search the room for files and optional interactions.

This is also the beginning of the Barry scavenger-hunt chain.

Follow Barry’s clues and check the elevated TV area when instructed.

Eventually you’ll obtain the Locker Key for JoJo’s locker in the West Office.


S.T.A.R.S. Office

The S.T.A.R.S. Office contains multiple clues.

Read the relevant Barry documents carefully.

You’ll eventually have enough information to solve the optional S.T.A.R.S. briefcase puzzle.

Briefcase solution

RRR

The clue points to Rebecca as the “rising rookie.”

The reward is the Power Shades Charm.

For the complete clue chain, see our Resident Evil Requiem: Complete Puzzle Solutions guide.


Library

Enter the Library and collect the Mechanic Jack.

Before leaving, search the central bookcase carefully for another Mr. Raccoon.

The statue is hidden behind the books and is easy to overlook.

Once you’ve finished your optional R.P.D. content, return to the Main Hall.

Use the Mechanic Jack on the shutters.

The eastern route leads to the Orphanage.


8. Orphanage

Character: Leon

The Orphanage replaces the R.P.D.’s combat focus with a stealth-heavy section.

You are better off hiding and waiting than trying to force your way through the children’s patrols.

Current walkthroughs use the same basic sequence: hide under the bed, use the play area route, hide under the children’s table, then use the hiding spaces in the Director’s Office.


Main Hall

After entering:

  1. Enter the first room on the left.
  2. Return toward the bedroom.
  3. Hide under the bed until the patrol clears.
  4. Move through the play area.
  5. Descend to the lower floor.
  6. Hide under the children’s table.
  7. Wait until the route clears.

If the children block the hallway, let them detect you and retreat to the hiding place again. This can reset their position and create an opening.


Director’s Office

Enter the Director’s Office.

Interact with the light on the right.

Search the wooden drawer to obtain the Hatch Key.

When the children return, hide behind the white boxes.

Once the room is clear, use the Hatch Key on the floor hatch.


Underground Chapel

Follow the underground tunnel to the Chapel.

Go behind the altar to trigger the hidden mechanism.

The ladder initially cannot be used.

Use the nearby lever to restore the lights.

Then move the appropriate coffin and climb over the stacked coffins to reach the Fire Poker.

Use the poker to open the blocked gate.

This leads into the laboratory section.


Laboratory and Meeting Room

Once you reach the white laboratory corridor, check the accessible rooms for the area’s files.

Then enter the Meeting Room.

Use the remote on the desk.

Cycle through all of the presentation slides.

The sequence triggers a story scene and returns control to Leon at the R.P.D.


9. Raccoon City — Side Street

Character: Leon

Leon returns to the R.P.D. and immediately finds himself in another Tyrant sequence.


Escape the Tyrant

This first encounter is an escape sequence, not a boss fight.

Follow the route as the Tyrant breaks through walls and forces you through the side rooms.

When you reach the central area, use the rubble to create enough space to dodge him.

After the next cutscene, the Tyrant disappears from the R.P.D. portion of the story.

Continue toward the side street.


Parking Garage

Before continuing, explore the optional Parking Garage.

The Garage contains:

  • Cute Bear Charm
  • Silver Finish Scope for the Classic 70
  • Additional supplies

PowerPyx specifically places the scope in the open illuminated container in this section.


Gun Shop Kendo

Enter Gun Shop Kendo.

After the cutscene:

Turn around.

The W870 Police shotgun is on the shelf behind the door.

There is also an optional Mr. Raccoon in the alley outside the shop.


Tyrant Battle

Continue until you reach the proper Tyrant encounter.

This time you’re expected to fight.

Leon can parry certain Tyrant attacks with the Hatchet, so watch his movement rather than trying to stand still and trade damage.

Use powerful ammunition when you have clear openings, but keep enough resources for the sections that follow.

Once the Tyrant sequence is completed, continue toward the Plant 43 route.


Plant 43

You’ll encounter Plant 43 Seedlings through this section.

Wait for a seedling to expose its vulnerable interior before firing.

Check the side paths rather than following the main corridor blindly. Current 100% walkthrough references identify nine Plant 43 Seedlings across the game for the associated completion objective.

Continue until the Giant Plant encounter.


Giant Plant

Keep moving around the arena and avoid standing beneath the tentacles.

Target the exposed flower.

When the internal explosive opportunity appears, shoot it to finish the encounter.

Once the route opens, continue toward the ARK.


10. ARK

Playable characters: Leon → Grace → Leon

The ARK is the game’s final major area and contains the last major story progression, final collectibles, Elpis decision, and true final boss. Current walkthroughs divide it into Leon’s opening, the central refining objectives, Grace’s section, and the final choice.


Leon: Enter the ARK

After passing through the decontamination tunnel, look for the nearby Staff Room.

Use the save point and Supply Box before continuing.

Then move toward the Server Room.

Interact with the terminal to trigger the next sequence.

There is a final ARK Mr. Raccoon nearby in the corridor behind the boxes.


Elite Guards and Server Room

Proceed through the server area.

When the lights go out, several Elite Guards enter.

A grenade can be useful if you catch them grouped at the doorway, but don’t burn your entire inventory here.

Continue into the next rooms and search the area for ammunition and files before moving toward the deeper ARK sections.


Stockroom and Exhibition Areas

The Stockroom contains another combat sequence.

Use elevation and distance where possible.

Continue through the exhibition area and into the Guest Lounge.

Check the ARK monitors and side rooms for files before moving deeper.

This is one of the last major opportunities to organize your inventory before the game’s final objectives.


Commander

Continue until you reach the Commander encounter.

Watch for his melee attacks and take advantage of Leon’s parry mechanics.

After defeating him, collect Mortal Edge.

For its exact unlock and upgrade details, see our Resident Evil Requiem: All Weapons & How to Unlock Them guide.


Grace: Return to the ARK

Control shifts to Grace.

Her ARK section is considerably more dangerous because of the high-level Licker encounters and the confined laboratory routes.

Use the save points and storage whenever they’re available.

Current route references recommend using Acid Bottles aggressively against Lickers when necessary rather than trying to fight every enemy with conventional ammunition.


Find the Override Key

Progress through Grace’s ARK route until you obtain the Override Key.

Continue toward the Central Refining System.

You’ll need to gather the required progression items before the large central door can be opened.


Magnetic Key and Orb Progression

Continue through the relevant laboratory areas and collect the Magnetic Key.

Your next objectives revolve around the ARK’s orb system.

The Noblesse Orb and Animus Orb are required for the red-door progression.

Check the Operations Room and the associated laboratory route carefully before leaving.

There is also a final Mr. Raccoon in Grace’s ARK section. For its exact position, see the All Mr. Raccoon Locations guide.


Archives

Once you have the required orbs, enter the Archives.

Search the room thoroughly before interacting with the final console.

Current collectible walkthroughs specifically warn that a final file can be missed if you advance the progression too quickly.

This is a good place to make one final manual save.


The Elpis Choice

Eventually Grace reaches Leon at the Central Refining System.

You now have a major decision:

Release Elpis

or

Destroy Elpis

The choice changes the ending.


Release Elpis

Choosing Release Elpis is the canon/true ending route according to current ending references.

Elpis is revealed to be an antiviral cure, rather than the weapon the characters initially believed it to be.

Leon is cured of his T-virus syndrome, and the story continues into the Victor Gideon final boss battle. The ending also allows Grace to save Emily.

Recommendation

For your first playthrough, I recommend Release Elpis.

It is the route that continues through the true final boss and leads to the game’s canon ending.


Destroy Elpis

Choosing Destroy Elpis triggers the ARK’s self-destruct sequence.

Leon stays behind to confront Zeno while Grace escapes.

The resulting ending is the alternate outcome in which Leon dies.

If you’re aiming to see both endings, make a manual save before this decision.


Final Boss: Victor Gideon

The Release Elpis route leads into the game’s true final boss battle against Victor Gideon.

Current boss references divide the fight into distinct forms.

Phase 1

Victor fights with his mutated arm and uses close-range attacks.

Keep moving and wait for clean openings.

Leon can use the Requiem to deal heavy damage and can parry suitable attacks with the Hatchet.

Phase 2

Victor transforms into his larger, Nemesis-like form.

The priority changes from the humanoid weak point to the glowing vulnerable growths/orbs on his body.

This is the time to spend your stronger ammunition.

Keep moving, wait out his larger attacks, and punish the exposed weak points rather than firing continuously into armored areas.

Once Victor is defeated, the final story sequence begins.


Resident Evil Requiem Walkthrough: Important Missable Moments

These are the moments I’d pay closest attention to during a first run:

Wrenwood

Inspect the early files and collect the Old Key before continuing deeper into the hotel.

Care Center

Don’t leave the first Care Center sequence without completing the two-fuse gate.

Chairman’s Office

Solve the Moon → Sun → Star → Moon Quartz puzzle.

Lead Researcher’s Office

Solve the Star → Sun → Moon → Sun Quartz puzzle.

Organ route

Make sure you obtain both the Artificial Lungs and Artificial Heart before returning to the Examination Room.

Isolation Ward

Bring Emily to the Security Manager’s Office puzzle box.

Courtyard

Don’t leave Leon’s overwatch position before collecting the nearby Mr. Raccoon if you’re going for the full set.

East Raccoon City

Search the optional landmarks before moving permanently toward Raccoon City Center.

R.P.D.

Finish your optional puzzles, files, and collectibles before using the Mechanic Jack to progress to the Orphanage.

Side Street

Check the Parking Garage and Gun Shop Kendo before leaving the area.

ARK

Collect the remaining files and collectibles before using the final progression console in the Archives.


Resident Evil Requiem Completion Checklist

Use this walkthrough as the story framework, then pair it with the dedicated Loot Strategist guides.

Story

  • Wrenwood
  • Care Center
  • Care Center Basement
  • Care Center Courtyard
  • Water Treatment Plant
  • East Raccoon City
  • Raccoon City Center
  • Orphanage
  • Side Street
  • ARK

Optional Completion

  • Mr. Raccoons
  • Files
  • Safe combinations
  • BSAA Containers
  • Plant 43 Seedlings
  • Antique Coins
  • Weapons
  • Charms
  • Blood Analyzer
  • R.P.D. optional puzzles
  • The Final Puzzle
  • Alternate ending

Current collectible references identify 25 Mr. Raccoons, 75 Files, five combination safes, and nine Plant 43 Seedlings among the game’s major completion objectives.


What to Do After Finishing Resident Evil Requiem

Finishing the game unlocks additional options for repeat runs.

Insanity difficulty becomes available after completing the game once on any difficulty.

This is also the point where your Challenge Points become more valuable because Special Content unlocks additional weapons, upgrades, infinite-ammo options, and other bonuses.

For repeat runs, the most useful Loot Strategist pages are:

Resident Evil Requiem: All Weapons & How to Unlock Them
For story weapons, hidden pickups, Supply Box firearms, and Special Content.

Resident Evil Requiem: Complete Puzzle Solutions
For every major story puzzle, Blood Analyzer solution, R.P.D. puzzle, optional puzzle, and the Final Puzzle.

Resident Evil Requiem: All Safe Codes & Combinations
For every combination safe and its Insanity variant.

Resident Evil Requiem: All Mr. Raccoon Locations
For the complete 25-statue checklist and Advanced Tuning reward.


Final Thoughts

Resident Evil Requiem is most manageable when you treat each major area as its own short campaign.

Wrenwood is investigation-heavy.

The Care Center is about exploration, light, access cards, and puzzle progression.

East Raccoon City gives Leon more freedom to explore and collect weapons.

The R.P.D. and Orphanage shift the pacing again, with optional clue chains followed by a stealth section.

Then the ARK pulls everything back together for the final choice and endgame fights.

The biggest mistake on a first run is pushing the story forward without checking what the current area has to offer.

Make your saves.

Check the side rooms.

Listen for the Mr. Raccoon sound.

Use the map.

And before crossing an obvious story threshold, take a minute to decide whether you’ve finished everything you wanted from that section.

That approach makes the difference between a clean first playthrough and a cleanup run that requires replaying half the game.

For detailed help beyond the main story route, use the dedicated Resident Evil Requiem puzzle, safe-code, weapon, and Mr. Raccoon guides on Loot Strategist.


Sources & Updates

Last reviewed: September 2026

This walkthrough was checked against current Resident Evil Requiem progression references from PowerPyx, Game8, VGC, GameFAQs, and current collectible references. The article uses a practical ten-section progression structure while keeping detailed collectibles, weapons, puzzles, and safe combinations in their dedicated Loot Strategist guides.

How we verify: Story progression is cross-checked across multiple current walkthroughs. Where the game has optional or missable content, the walkthrough calls out the relevant transition rather than reproducing every collectible location in the story guide. Specialist topics—such as the 25 Mr. Raccoons, safe combinations, weapons, and puzzle solutions—are maintained in separate guides so their location-level information can be updated independently.

Guide note: The area numbering in this article is the numbering used by Loot Strategist for navigation. It is not an official in-game chapter numbering system.

Author: Daisy Miller
Guide type: Story Walkthrough
Last reviewed: September 2026